
RX-8 AC condenser on FD VMIC

Thread Starter

Joined: Aug 2004
Posts: 4,786
Likes: 145
From: Colorado Springs, CO
RX-8 AC condenser on FD VMIC
I removed my AC in 2008 when I first swapped to VMIC, but soon realized I needed it back. It took me several years to get started putting it back in and it's been several years since I started that process. I've had it working a couple times using a universal condenser that can be found for about $50 (part number CN20001XC
) and had to get the lines modified and swap to a Denso dryer because the MANA dryers were NLA (mine is a 94 Touring and many say it was supposed to come with the Denso system, but that's another topic). It was an alright system and it worked, but it wasn't as clean as I would have liked. I had two compressors fail back to back and eat the belt both times, which was probably my fault since they had been sitting for years and I didn't clean them out, and I hadn't cleaned out any other parts that had been sitting for years, and I also didn't pay attention to how much refrigerant and oil I put into the system. I figured this time I'd take the opportunity to do it cleaner and do it right and hopefully it will stay working this time.
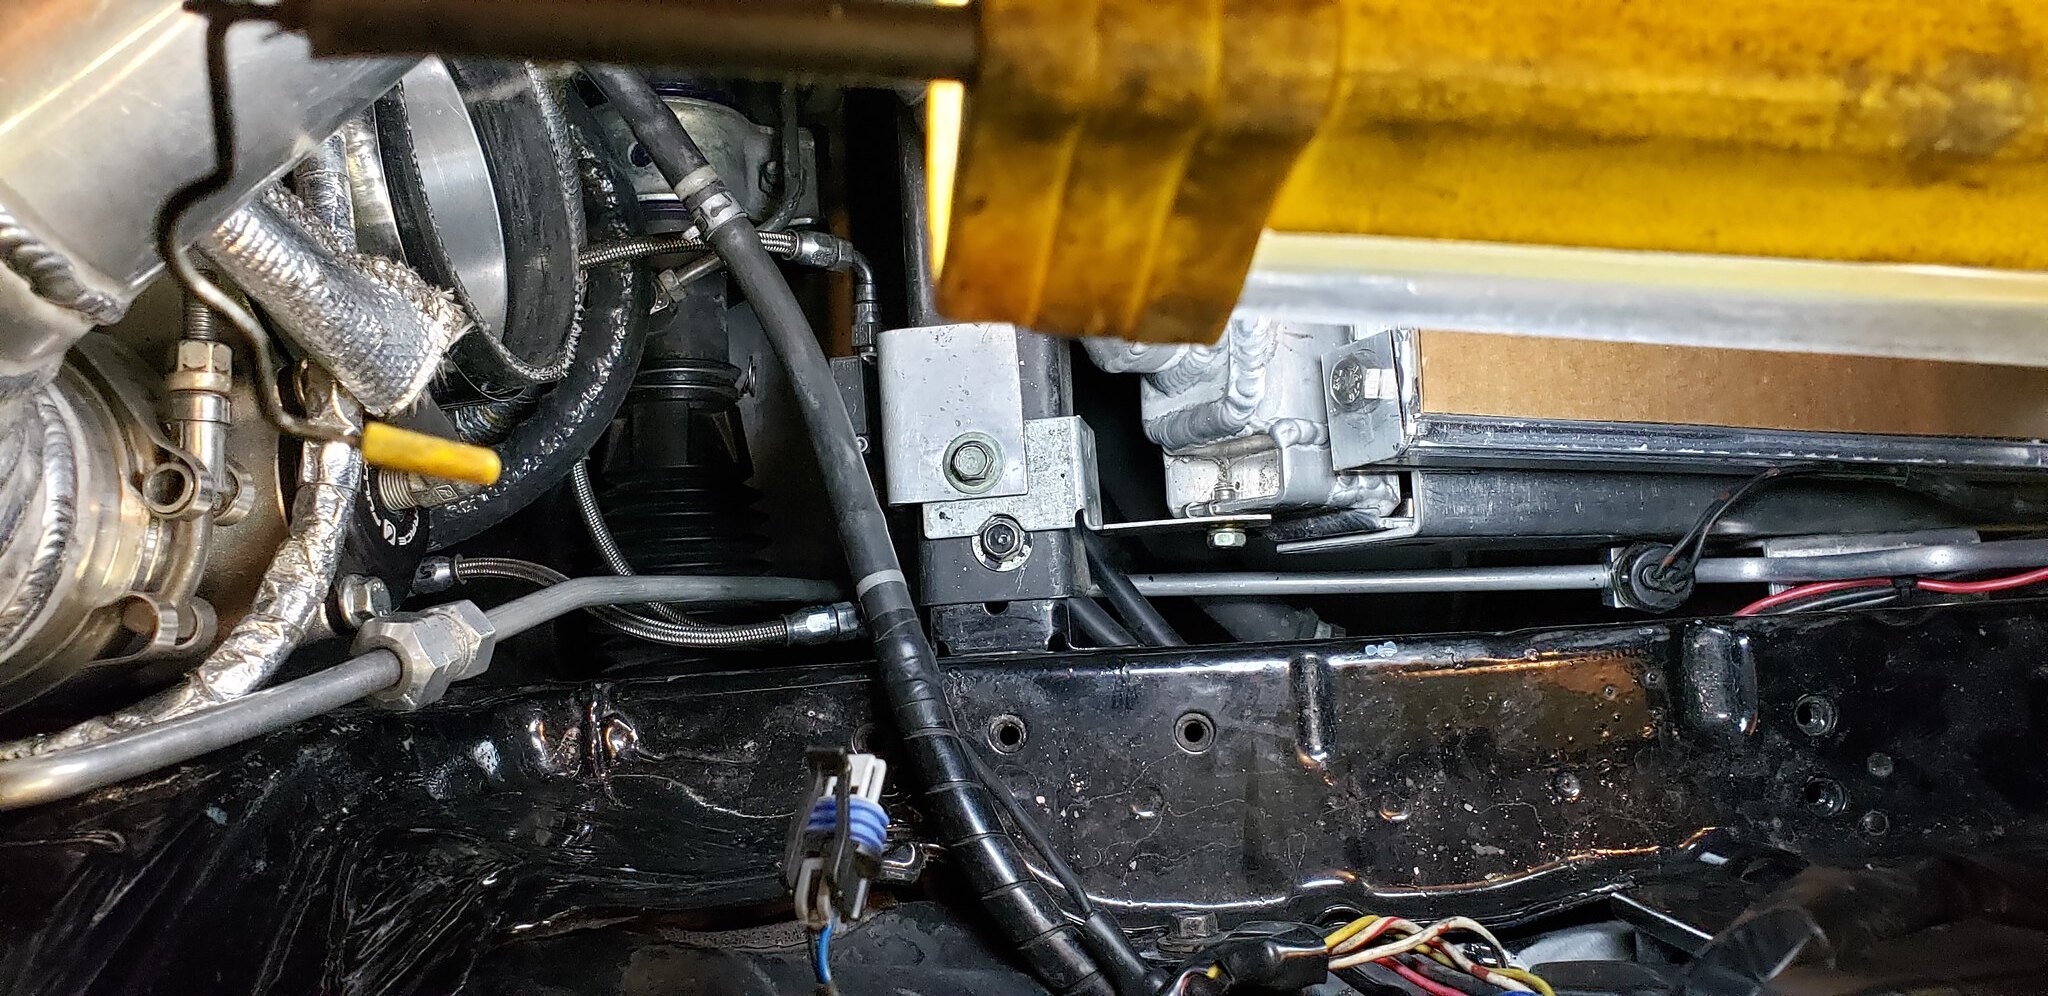
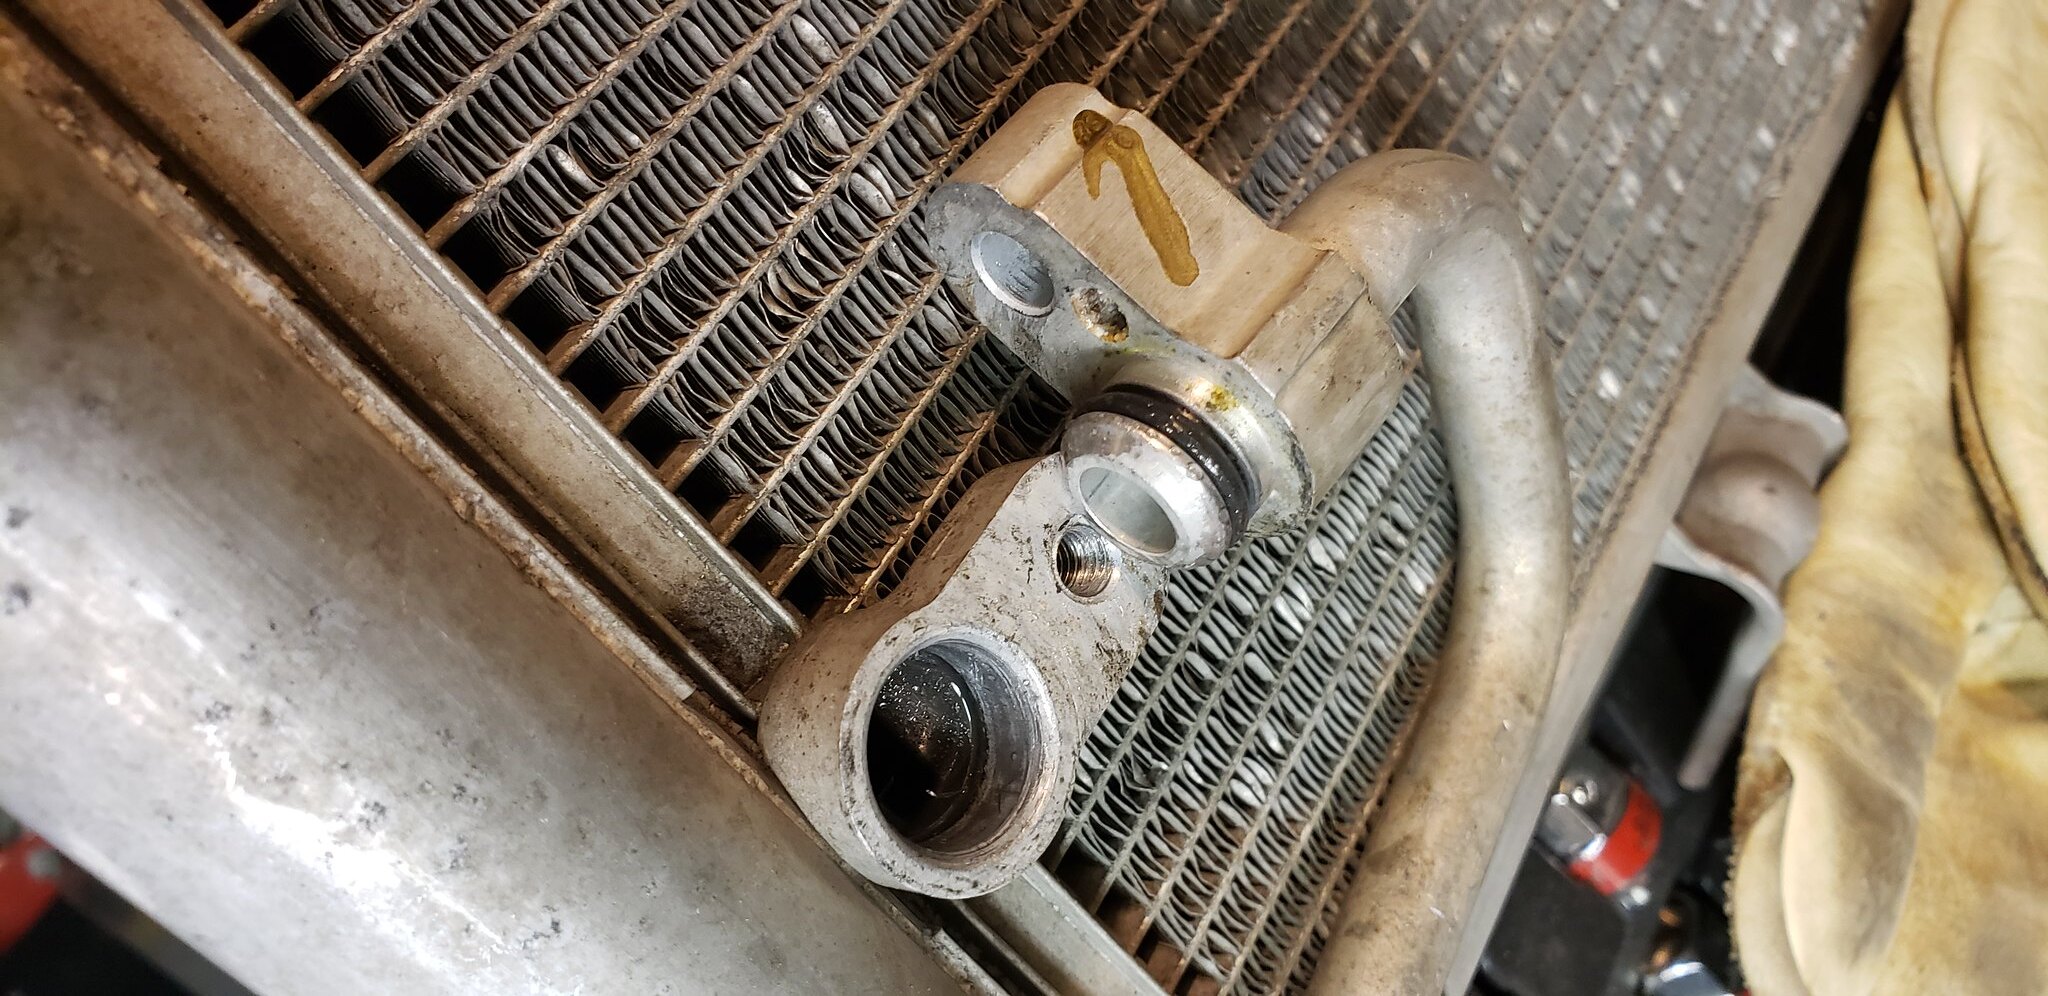
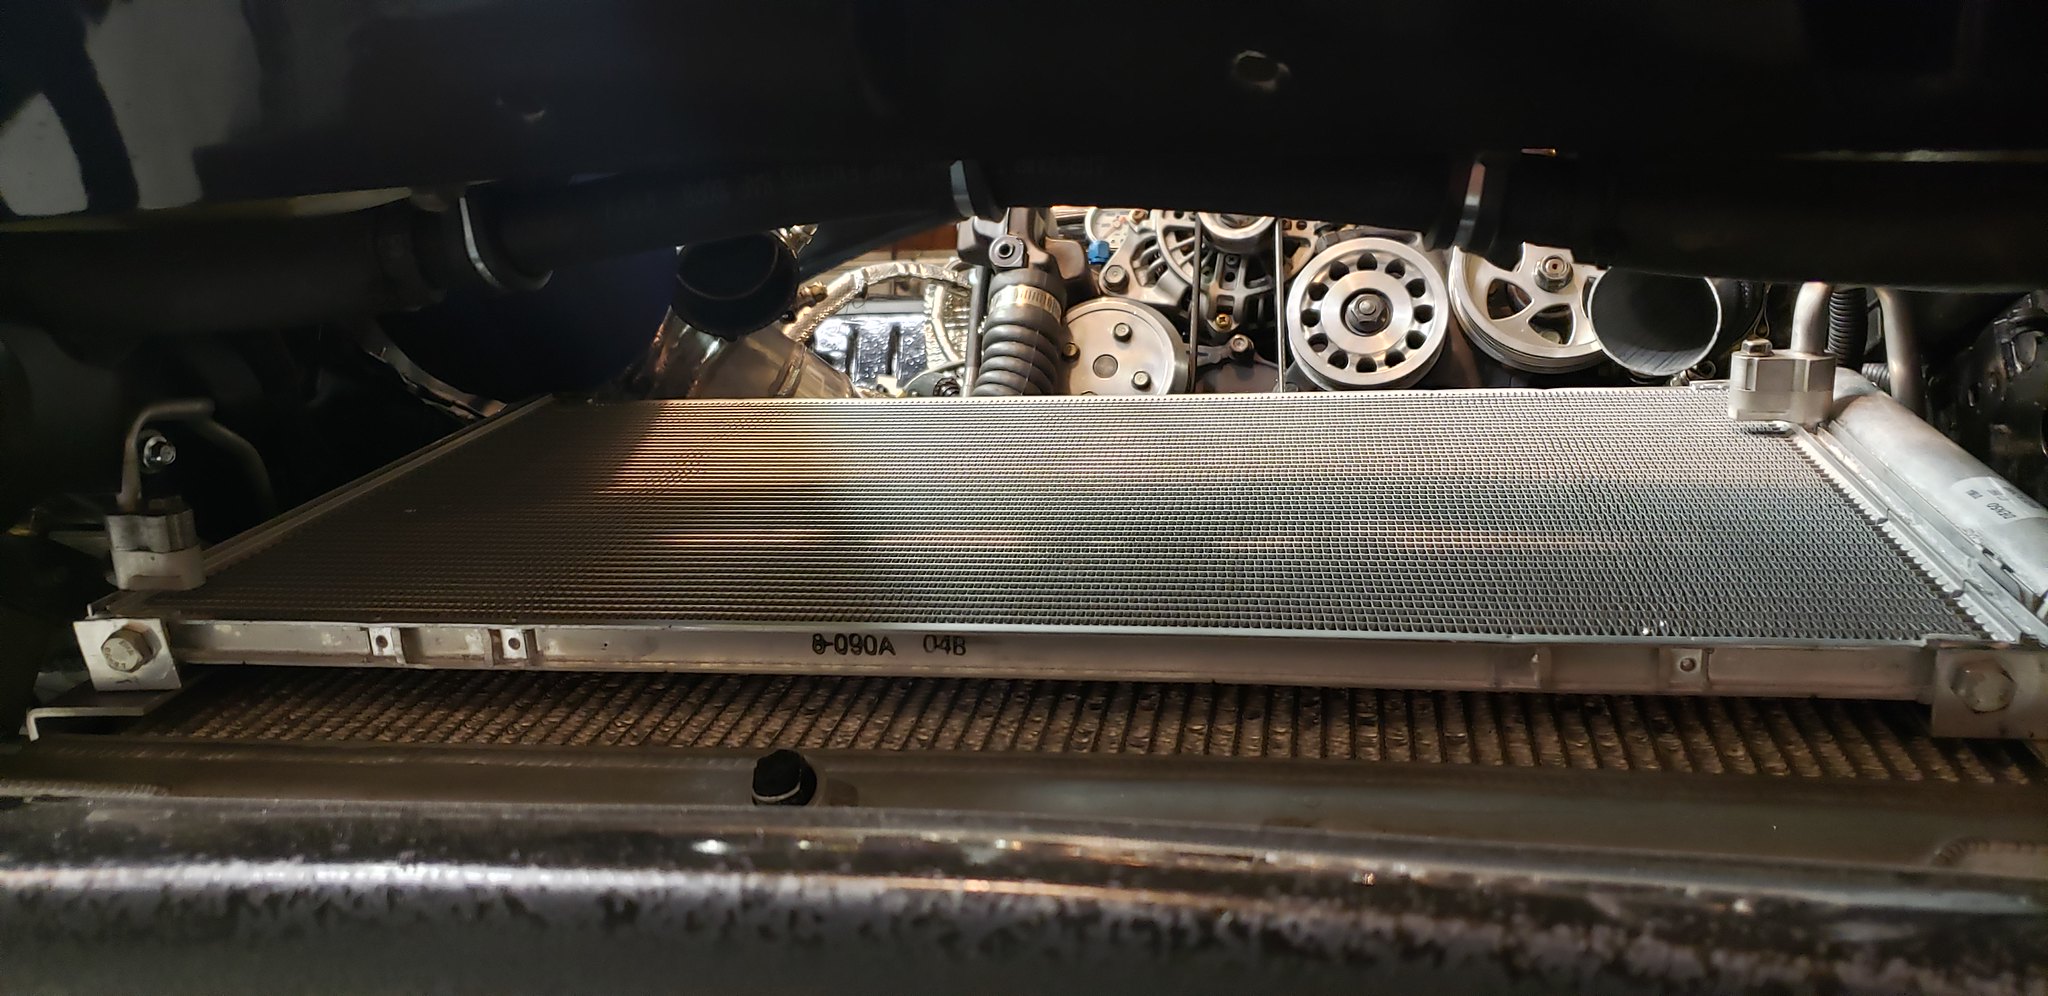
When I started this project about a month ago I couldn't find any pics of others' installs with the RX-8 condenser so I figured I'd post mine and maybe others can post theirs too if they want. I'm not completely done with the install, I still need to get the lines brazed and welded, then I can charge the system and see how it goes. I've always had brackets on the sides of my radiator, I assume so a condenser could be mounted there. When my buddy modified my newest radiator for VMIC he made those side brackets removable, so I'll be able to swap them to a new radiator when the time comes. I didn't want to deal with the hassle of making mounting points for the stock mounts on the RX-8 condenser, so I cut those off and made an L bracket for each corner and used a rubber bushing to try to soften it up some. It seems to work OK but it's probably not the best, and hopefully someone can come up with a better solution. Side note, not all aftermarket RX-8 condensers have the holes I used to mount this, so I bought a genuine Denso part because I knew it did. I used a low profile M8x1.25 jam nut and pressed it into the slot behind the hole. The rest is pretty self explanatory with the pics. I'd rather have used an allen head bolt but I couldn't find one local that was short enough. The bolt really needs to be only about 10mm to mount it this way, or even shorter if you don't want to use the rubber bushing.
by https://www.flickr.com/photos/159205146@N07/, on Flickr
by https://www.flickr.com/photos/159205146@N07/, on Flickr
by https://www.flickr.com/photos/159205146@N07/, on Flickr
I'll go ahead and post links for all the parts I ordered, some of which I didn't end up using but you might want or need to.
https://www.onlinemetals.com/en/buy/...rawn/pid/21946 (5/16" 6061 aluminum tube for the small line, I used some of this)
https://www.onlinemetals.com/en/buy/...drawn/pid/4338 (1/2" 6061 aluminum tube for the larger line, I didn't end up using any of this, so far anyway)
https://www.autoacfittings.com/Weld-...ed-RB-6602.htm (#8 reduced barrier weld on crimp fittings, 2 each)
https://www.autoacfittings.com/Weld-...ed-RB-6603.htm (#10 reduced barrier weld on crimp fittings, 2 each)
https://www.autoacfittings.com/13-32...-Ft-AC-08R.htm (#8 reduced barrier hose, for from the compressor to the condenser)
https://www.autoacfittings.com/1-2-G...-Ft-AC-10R.htm (#10 reduced barrier hose, for coming from the evaporator to the compressor)
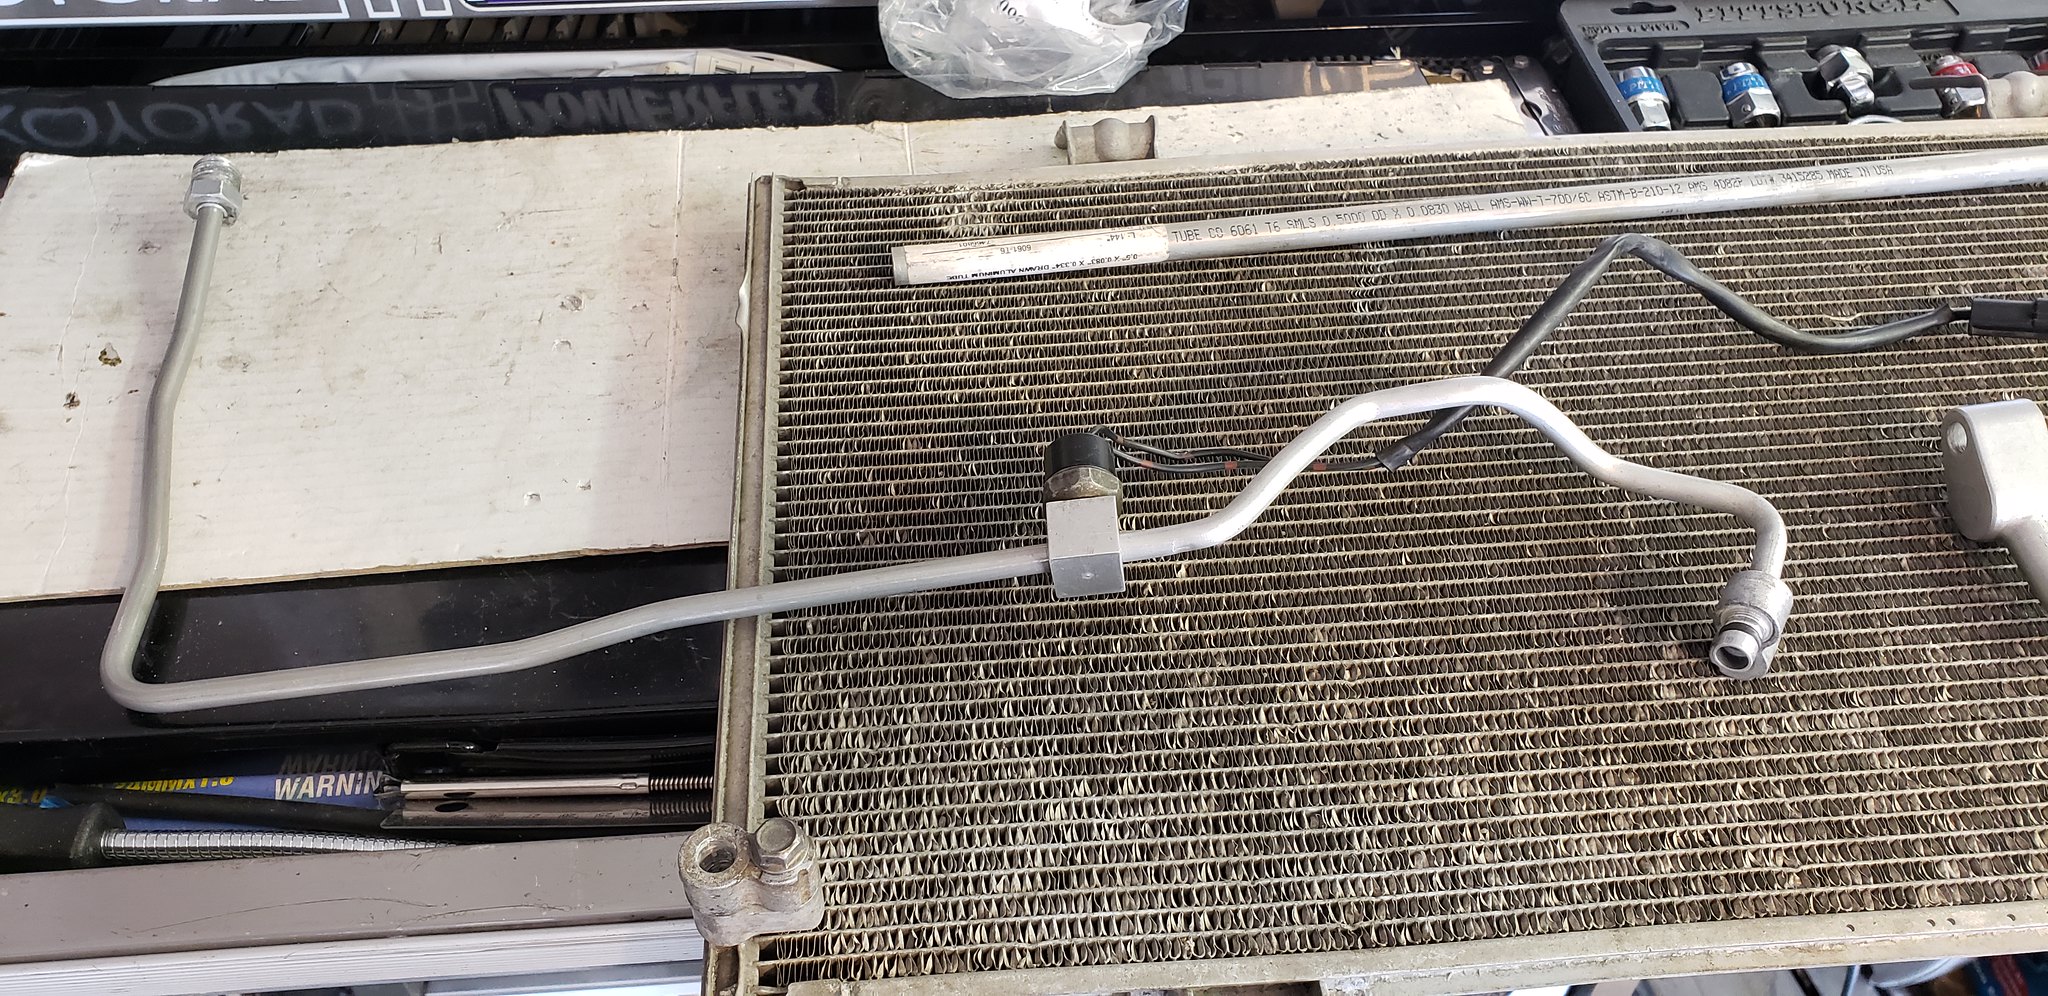
I tried to use the original RX-8 lines for both sides, but I had to get creative. Originally I cut off the fittings from each side and drilled out the center, and I was going to use new aluminum line that I'd bought from OnlineMetals.com, but soon discovered that the center went all the way through and drops into the fitting on the condenser and holds the o-ring to seal it, so that was a no go. I decided it would be better to try to use the line as much as possible to ensure it wouldn't leak, rather than trying to join the center of the fitting and the new aluminum line and then try to fit it into the part of the fitting that bolts on. The smaller line is 5/16" with a wall thickness of 0.049", which is pretty thick. It worked out pretty well in the end.
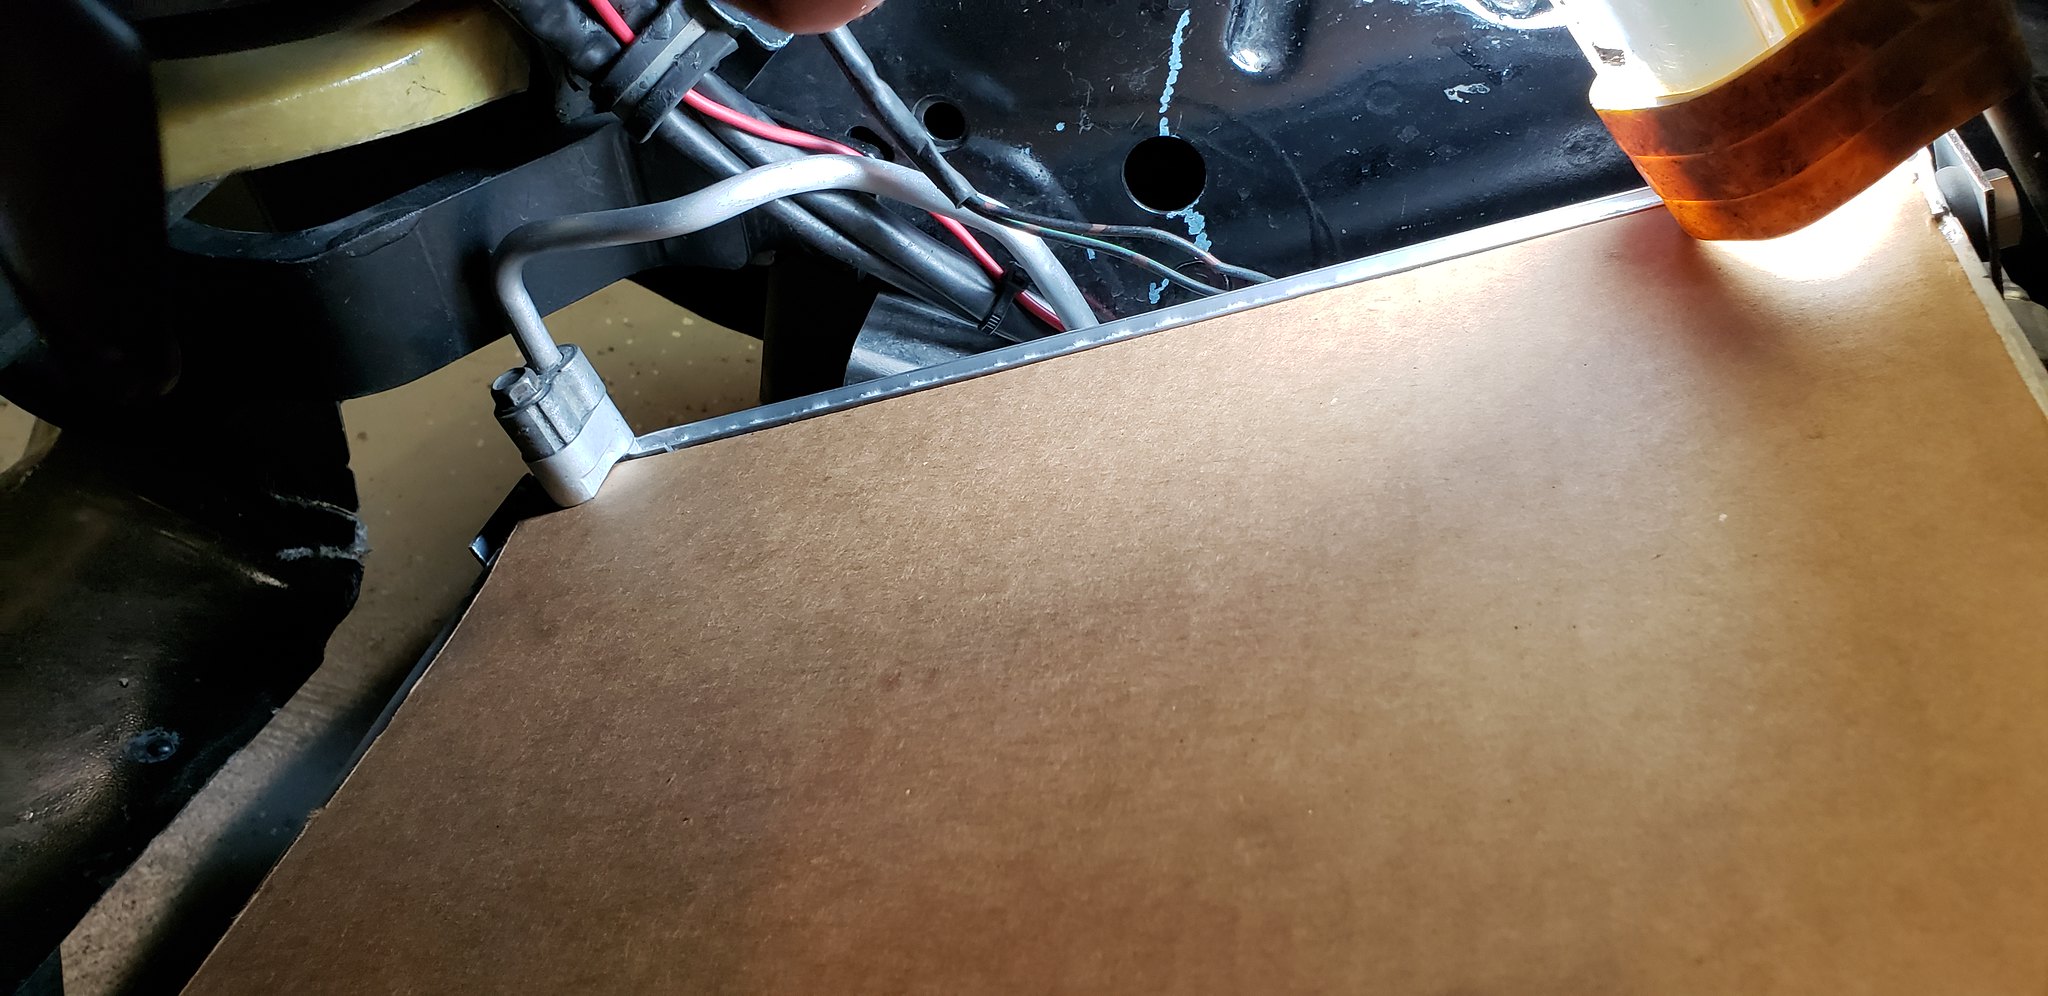
The high pressure side (small line) was actually pretty easy. I used the RX-8 condenser fitting and a few inches of the line to make the first part of it. I cut the pressure switch block out of the original line and drilled out the holes so the 5/16" line could go into it on each side, and that piece goes next. Then I used some of the new 5/16" line for the rest of it to the line going to the evaporator. I also had to cut the fitting off the end of the line (it's a male o-ring fitting sized M16x1.5 and I couldn't find a new one). Be careful when drilling out this fitting, you don't want to drill the hole too big to where the female end won't seat properly inside. I drilled a little too much on the first one and luckily had another one on the other end of the line, so I only drilled about 1/8" or so into the back of it so the line would stop firm and the other side would seat like normal with the female fitting. I had to bend the RX-8 part of the line a couple times, and obviously I had to bend the new part of the line, but I was very happy with how it turned out. I have a front tow hook so I had to shift the condenser back far enough that the line wouldn't contact it, and it barely clears but it works.
by https://www.flickr.com/photos/159205146@N07/, on Flickr
by https://www.flickr.com/photos/159205146@N07/, on Flickr
by https://www.flickr.com/photos/159205146@N07/, on Flickr
by https://www.flickr.com/photos/159205146@N07/, on Flickr
And now this brings me to the difficult side. I tried two different times with the RX-8 fitting to make it work, but it's just bent too wonky already to get it to work where I was happy with it. The first one I bent too much and too many times and it just got out of hand. The second line I broke right away when I was trying to straighten it. I wanted to get the hard line to drop down enough to where the soft line would connect pretty straight from the compressor, instead of having it bend up and around. After breaking the second line, I decided there were probably other cars that used the same style fittings, so I went to the salvage yard today and looked at probably 50 different cars or more, and I found one that I think will work. I say that because it doesn't have exactly the same style connection, but I don't see why it won't work and it took the least amount of bending to make it work and it turned out really close to perfect. This line came off of a 2003 Toyota Avalon, but the other cars that might work are 2009 Acura TSX, 2009 Honda CRV, 2005 Acura RL, 2001 Toyota Camry (I believe this one is almost identical to the Avalon line), and a 2003/2004 Honda Accord. This is how the Avalon line looks in original shape.
by https://www.flickr.com/photos/159205146@N07/, on Flickr
This is how it turned out.
by https://www.flickr.com/photos/159205146@N07/, on Flickr
by https://www.flickr.com/photos/159205146@N07/, on Flickr
This is the crimp fitting that will get welded onto the end of it. I bought a crimp kit so I could do it myself, but it was about $150 for the basic kit and then I needed to buy a #10 die specific for the reduced barrier fitting. The #6 regular die will crimp the #8 reduced barrier fitting.
This is why I say it's not exactly the same fitting. The original RX-8 fitting is squared off at the bottom and the Avalon fitting is chamfered. However, the squared off fitting doesn't even seat all the way down, and two of the fittings I tried from other cars that had the same squared off bottom were longer and still didn't have a problem bolting down all the way. I thought the squared off bottom seated fully down inside, but apparently it doesn't, and therefore it shouldn't matter if I use the chamfered fitting since it has the same diameter and both rely on the o-ring to seal it.
by https://www.flickr.com/photos/159205146@N07/, on Flickr
by https://www.flickr.com/photos/159205146@N07/, on Flickr
I'll post pics of the line once they're finished and ready to install. Please don't judge my garage, it's always a disaster lol. I also can't figure out why it posts two copies of each pic when I only link one. When I go to edit, it only shows the one pic.
A couple other notes. The line from the evaporator to the compressor is #10 or 1/2" ID. The line from the compressor to the condenser is #8 or 13/32" ID, and the line from the condenser to evaporator (and also to and from the dryer if it's separate) is #6 or 5/16" ID. You don't necessarily need to change the soft part of the #10 line, but I'm doing it to ensure it's good for most common refrigerants and to ensure it's not breaking apart and seizing the compressor. I chose to do reduced barrier because the outer diameter of the lines is smaller and will be a bit easier to fit into places.
I've been using Industrial R134a from Envirosafe (https://www.es-refrigerants.com/prod...5a/details.asp) and I've been pretty happy with it, but I've been thinking about swapping to HC12 or ES12 or something, I'm open to suggestions. I just want this to be the last time.
When I started this project about a month ago I couldn't find any pics of others' installs with the RX-8 condenser so I figured I'd post mine and maybe others can post theirs too if they want. I'm not completely done with the install, I still need to get the lines brazed and welded, then I can charge the system and see how it goes. I've always had brackets on the sides of my radiator, I assume so a condenser could be mounted there. When my buddy modified my newest radiator for VMIC he made those side brackets removable, so I'll be able to swap them to a new radiator when the time comes. I didn't want to deal with the hassle of making mounting points for the stock mounts on the RX-8 condenser, so I cut those off and made an L bracket for each corner and used a rubber bushing to try to soften it up some. It seems to work OK but it's probably not the best, and hopefully someone can come up with a better solution. Side note, not all aftermarket RX-8 condensers have the holes I used to mount this, so I bought a genuine Denso part because I knew it did. I used a low profile M8x1.25 jam nut and pressed it into the slot behind the hole. The rest is pretty self explanatory with the pics. I'd rather have used an allen head bolt but I couldn't find one local that was short enough. The bolt really needs to be only about 10mm to mount it this way, or even shorter if you don't want to use the rubber bushing.


I'll go ahead and post links for all the parts I ordered, some of which I didn't end up using but you might want or need to.
https://www.onlinemetals.com/en/buy/...rawn/pid/21946 (5/16" 6061 aluminum tube for the small line, I used some of this)
https://www.onlinemetals.com/en/buy/...drawn/pid/4338 (1/2" 6061 aluminum tube for the larger line, I didn't end up using any of this, so far anyway)
https://www.autoacfittings.com/Weld-...ed-RB-6602.htm (#8 reduced barrier weld on crimp fittings, 2 each)
https://www.autoacfittings.com/Weld-...ed-RB-6603.htm (#10 reduced barrier weld on crimp fittings, 2 each)
https://www.autoacfittings.com/13-32...-Ft-AC-08R.htm (#8 reduced barrier hose, for from the compressor to the condenser)
https://www.autoacfittings.com/1-2-G...-Ft-AC-10R.htm (#10 reduced barrier hose, for coming from the evaporator to the compressor)
I tried to use the original RX-8 lines for both sides, but I had to get creative. Originally I cut off the fittings from each side and drilled out the center, and I was going to use new aluminum line that I'd bought from OnlineMetals.com, but soon discovered that the center went all the way through and drops into the fitting on the condenser and holds the o-ring to seal it, so that was a no go. I decided it would be better to try to use the line as much as possible to ensure it wouldn't leak, rather than trying to join the center of the fitting and the new aluminum line and then try to fit it into the part of the fitting that bolts on. The smaller line is 5/16" with a wall thickness of 0.049", which is pretty thick. It worked out pretty well in the end.
The high pressure side (small line) was actually pretty easy. I used the RX-8 condenser fitting and a few inches of the line to make the first part of it. I cut the pressure switch block out of the original line and drilled out the holes so the 5/16" line could go into it on each side, and that piece goes next. Then I used some of the new 5/16" line for the rest of it to the line going to the evaporator. I also had to cut the fitting off the end of the line (it's a male o-ring fitting sized M16x1.5 and I couldn't find a new one). Be careful when drilling out this fitting, you don't want to drill the hole too big to where the female end won't seat properly inside. I drilled a little too much on the first one and luckily had another one on the other end of the line, so I only drilled about 1/8" or so into the back of it so the line would stop firm and the other side would seat like normal with the female fitting. I had to bend the RX-8 part of the line a couple times, and obviously I had to bend the new part of the line, but I was very happy with how it turned out. I have a front tow hook so I had to shift the condenser back far enough that the line wouldn't contact it, and it barely clears but it works.

And now this brings me to the difficult side. I tried two different times with the RX-8 fitting to make it work, but it's just bent too wonky already to get it to work where I was happy with it. The first one I bent too much and too many times and it just got out of hand. The second line I broke right away when I was trying to straighten it. I wanted to get the hard line to drop down enough to where the soft line would connect pretty straight from the compressor, instead of having it bend up and around. After breaking the second line, I decided there were probably other cars that used the same style fittings, so I went to the salvage yard today and looked at probably 50 different cars or more, and I found one that I think will work. I say that because it doesn't have exactly the same style connection, but I don't see why it won't work and it took the least amount of bending to make it work and it turned out really close to perfect. This line came off of a 2003 Toyota Avalon, but the other cars that might work are 2009 Acura TSX, 2009 Honda CRV, 2005 Acura RL, 2001 Toyota Camry (I believe this one is almost identical to the Avalon line), and a 2003/2004 Honda Accord. This is how the Avalon line looks in original shape.

This is how it turned out.


This is the crimp fitting that will get welded onto the end of it. I bought a crimp kit so I could do it myself, but it was about $150 for the basic kit and then I needed to buy a #10 die specific for the reduced barrier fitting. The #6 regular die will crimp the #8 reduced barrier fitting.
This is why I say it's not exactly the same fitting. The original RX-8 fitting is squared off at the bottom and the Avalon fitting is chamfered. However, the squared off fitting doesn't even seat all the way down, and two of the fittings I tried from other cars that had the same squared off bottom were longer and still didn't have a problem bolting down all the way. I thought the squared off bottom seated fully down inside, but apparently it doesn't, and therefore it shouldn't matter if I use the chamfered fitting since it has the same diameter and both rely on the o-ring to seal it.

I'll post pics of the line once they're finished and ready to install. Please don't judge my garage, it's always a disaster lol. I also can't figure out why it posts two copies of each pic when I only link one. When I go to edit, it only shows the one pic.
A couple other notes. The line from the evaporator to the compressor is #10 or 1/2" ID. The line from the compressor to the condenser is #8 or 13/32" ID, and the line from the condenser to evaporator (and also to and from the dryer if it's separate) is #6 or 5/16" ID. You don't necessarily need to change the soft part of the #10 line, but I'm doing it to ensure it's good for most common refrigerants and to ensure it's not breaking apart and seizing the compressor. I chose to do reduced barrier because the outer diameter of the lines is smaller and will be a bit easier to fit into places.
I've been using Industrial R134a from Envirosafe (https://www.es-refrigerants.com/prod...5a/details.asp) and I've been pretty happy with it, but I've been thinking about swapping to HC12 or ES12 or something, I'm open to suggestions. I just want this to be the last time.


Nice! It would be great if a solid how-to can be figured out to run the RX-8 AC condenser. Having the drier built-in and also it's easily and cheaply replaceable is a great thing.
Keep us posted!
Dale
Keep us posted!
Dale
Thread Starter
Joined: Aug 2004
Posts: 4,786
Likes: 145
From: Colorado Springs, CO
Thanks Dale! Yeah I'd love it if everything could be sourced down to the mounting brackets so they could be bought somewhere instead of fabricated, but with everyone's setup being different, I can only ballpark it haha. And I'm not 100% happy with the mounting solution, but it'll work for now I guess and even if I change the mounts, the condenser will have to stay where it is so the lines won't change.
Yeah the RX-8 condenser is a solid choice. At first I was hesitant to use it with the dryer built in, but once I realized the drier itself can be serviced, I was on board completely. I was thinking you'd have to swap the condenser completely if the drier was bad. The dimensions are practically spot on, the lines don't have to cross the engine bay so they can be run very clean, and I was really wanting something that looked factory as much as possible.
Once I get the lines made and get it serviced, I'll run it for a while and make sure it doesn't fail again before I post up the results lol.
Thread Starter
Joined: Aug 2004
Posts: 4,786
Likes: 145
From: Colorado Springs, CO
I took the lines to Maxair in Denver on Tuesday and picked them up Wednesday, for $200. YIKES. I feel that's a bit steep for welding on four crimp fittings and three points on a hard line, but at least they're done. I finished building the lines Wednesday night using the Mastercool crimp tool I bought and installed everything last night after I got some Ester oil with UV dye. I had to bend a couple lines a little bit more, but no big deal, and it's all installed perfectly I believe. I've decided to use R152a from keyboard cleaner cans. I did a good bit of research and it seems to be the best choice. I still need to put the system on a vacuum and charge it. I also had to build an extension harness for the pressure switch to mount it on the passenger side, and luckily I still had some connectors from Corsa Technic laying around.
by https://www.flickr.com/photos/159205146@N07/, on Flickr
by https://www.flickr.com/photos/159205146@N07/, on Flickr
by https://www.flickr.com/photos/159205146@N07/, on Flickr


Small jobs. Amirite? Looks great, though. Built in dryer ftw.
Nice!
FYI for those looking to do this, I know the RX-8 condenser has an "up" to it - if it's installed upside down you'll have problems. The way Speedjunkie has it mounted is correct, the drier on the US driver's side with the fittings pointing towards the front of the car.
Dale
FYI for those looking to do this, I know the RX-8 condenser has an "up" to it - if it's installed upside down you'll have problems. The way Speedjunkie has it mounted is correct, the drier on the US driver's side with the fittings pointing towards the front of the car.
Dale
Thread Starter
Joined: Aug 2004
Posts: 4,786
Likes: 145
From: Colorado Springs, CO
No small jobs I guess lol. Thanks!
Thanks! And yes indeed. It was easy for me because I pulled one off a salvage 8 to use for mock up and use the lines, so I saw how it was mounted stock.
I bought a set of gauges from HF and rented the pump from Autozone and put a vacuum on it the other night. I can only get it to pull 20" of vacuum and then it wasn't holding pressure when I shut off the pump, and that was so defeating lol. I even used my homemade smoke tester to see if the smoke would suck in where the leak was. However, I realized I was supposed to be closing both valves on the gauges and I was only closing one. After closing both, it holds vacuum for about 30 minutes at least, it's still only pulling 20" though. My buddy said he only pulls 22-24" on cars at this altitude, so I'm close I guess. I tightened all the fittings on the gauges with channel locks just to be sure, and I tightened all the lines on the car too. I'm waiting for the oil injector to get here tomorrow to actually charge it, so hopefully I'll have good results by tomorrow night.
Nice!
FYI for those looking to do this, I know the RX-8 condenser has an "up" to it - if it's installed upside down you'll have problems. The way Speedjunkie has it mounted is correct, the drier on the US driver's side with the fittings pointing towards the front of the car.
Dale
FYI for those looking to do this, I know the RX-8 condenser has an "up" to it - if it's installed upside down you'll have problems. The way Speedjunkie has it mounted is correct, the drier on the US driver's side with the fittings pointing towards the front of the car.
Dale
I bought a set of gauges from HF and rented the pump from Autozone and put a vacuum on it the other night. I can only get it to pull 20" of vacuum and then it wasn't holding pressure when I shut off the pump, and that was so defeating lol. I even used my homemade smoke tester to see if the smoke would suck in where the leak was. However, I realized I was supposed to be closing both valves on the gauges and I was only closing one. After closing both, it holds vacuum for about 30 minutes at least, it's still only pulling 20" though. My buddy said he only pulls 22-24" on cars at this altitude, so I'm close I guess. I tightened all the fittings on the gauges with channel locks just to be sure, and I tightened all the lines on the car too. I'm waiting for the oil injector to get here tomorrow to actually charge it, so hopefully I'll have good results by tomorrow night.
Last edited by speedjunkie; Aug 6, 2019 at 02:23 AM.
Trending Topics

Thread Starter
Joined: Aug 2004
Posts: 4,786
Likes: 145
From: Colorado Springs, CO
I got the oil injector today and pulled another vacuum on the system tonight and started charging with R152a. I followed the instructions in this thread https://www.rx7club.com/2nd-generati...gerant-964688/, starting with post #45. I didn't have the same results as him, not pulling enough vacuum and the pressures he was saying you should see while charging. But I followed the instructions nonetheless. I was seeing pressures of 20psi and it would drop to maybe 15psi. I filled the first can right side up with it tapped at the bottom, so liquid would go in, like he said. About half way through the first can, the low side line frosted and the temps coming out of the center vent were about 30F. I raised the temp selection to the highest temp while still being in the blue section on the dial and over the next few minutes the temp raised to around 40F.
The second can I tapped at the bottom but this time I held it upside down so gasses would go in. Everything was fine, although I was still only seeing about 20psi. Then all of a sudden the pressure shot up, the compressor turned off (I assumed from high pressure cutout) and idle RPM raised. I disconnected the yellow line from the manifold and bled off pressure until the compressor kicked on again. When that happened, it dropped RPM quickly until it stalled. I tried starting the car again and it only clicked. It drained the battery, and it might have killed it completely. Even with a battery charger on it I couldn't start the car. I'm doing a trickle charge on it now and it looks like it's slowly coming back. With the car off, low side pressure is around 70psi. I bled off the low side a bit more, but it still goes right back up to 70 when I close the valve again. High side always hovered around 100psi and never got to 150psi like he said.
The second can I tapped at the bottom but this time I held it upside down so gasses would go in. Everything was fine, although I was still only seeing about 20psi. Then all of a sudden the pressure shot up, the compressor turned off (I assumed from high pressure cutout) and idle RPM raised. I disconnected the yellow line from the manifold and bled off pressure until the compressor kicked on again. When that happened, it dropped RPM quickly until it stalled. I tried starting the car again and it only clicked. It drained the battery, and it might have killed it completely. Even with a battery charger on it I couldn't start the car. I'm doing a trickle charge on it now and it looks like it's slowly coming back. With the car off, low side pressure is around 70psi. I bled off the low side a bit more, but it still goes right back up to 70 when I close the valve again. High side always hovered around 100psi and never got to 150psi like he said.
 Great work on this. I might try this when getting AC back in one of the FDs.
Thread Starter
Joined: Aug 2004
Posts: 4,786
Likes: 145
From: Colorado Springs, CO
I hooked up the gauges again last night to check the pressures while using AC because my buddy that's been helping me with all this told me it shouldn't be seeing any more than 25psi on the low side (I'm guessing that's due to our altitude). I bled off a little pressure but it was pretty good already. I let the car run for a while to see if I had any issues with the compressor locking up again, but even running it for a while probably won't tell me that yet. The temp coming out of the vents while sitting still was just over 40F. I drove the car tonight and going 40mph with the fan speed on the highest setting and the temp all the way down, it got down to 32F, I could see my breath haha. I turned the temp up a bit so it wouldn't freeze. Granted, it was only around 70-75F at that time, but still, should be good. I'm eager to test it on a hotter day to see how it handles. These pics are from when the AC was going. I wanted to watch idle RPM while I was in front of the car so I could watch the AC gauges too, because of my issues with the car trying to die recently while the AC has been on, but it handled it ok. And the low side line frosted again when I first started the AC.


Speed, I've been paying attn to your thread results as I'll soon be converting over to the RX8 condenser myself (but w SMIC setup). Good stuff! Curious to know what changed from a couple of days ago to your latest post? Was the engine/cooling system simply getting acclimated to having refrigerant circulating again after a long time wout?
P.S. Loving your Syvecs display unit!
P.S. Loving your Syvecs display unit!
Last edited by Topolino; Aug 10, 2019 at 08:49 AM.
Thread Starter
Joined: Aug 2004
Posts: 4,786
Likes: 145
From: Colorado Springs, CO
Speed, I've been paying attn to your thread results as I'll soon be converting over to the RX8 condenser myself (but w SMIC setup). Good stuff! Curious to know what changed from a couple of days ago to your latest post? Was the engine/cooling system simply getting acclimated to having refrigerant circulating again after a long time wout?
P.S. Loving your Syvecs display unit!
P.S. Loving your Syvecs display unit!
What are you referring to exactly with regards to the differences between a couple days? Do you mean the line frosting up or the pressures being different or what? In any case, I really don't know haha. It's been working great the past few days though. A little too great actually.
While we in Colorado don't see the temps that many others do throughout the country, we've still seen high temps for us this summer. We've seen close to 100F several days this summer, but most of the time it's around the 80s and little to no humidity, thankfully. So take these results with a grain of salt since it will be different for everyone. However, I've seen temps as low as the low 20s coming out of the vents just today, which is OK for about 20 minutes or so, but it will freeze up your system and you'll get no cold air at all for a while haha. Those temps were while I was moving, btw. When sitting still I usually get about 40F from the vent, but once I start moving it'll get down to the low 30s and even below that, especially if you're going down the interstate. Because of this, I think the condenser is spaced out a little far from the radiator, but it's only about 3/4" and I wouldn't want to get any closer than that anyway. And I still get a good amount of cool air for the radiator too, which was my main concern. I think it also helps that the condenser sits back about and inch and a half from the leading edge of the radiator fins, instead of sitting all the way down and blocking fresh air from the radiator completely.
After the system thawed again, I kept the temp **** in the middle white section and the fan speed on about two and that was plenty cool, probably around the mid 40s. Although that's with ambient temps in the mid 70s. I used AC to and from the track yesterday and sometimes between runs, and it was about 90 out there and it felt good in the car. I had taken the thermometer out of the vents though so I'm not sure what the temp was exactly.
I was thinking about checking into the squirrel cage design to see if we could get some more output from the fan, but with the shape and size of our ducts that may be a lost cause anyway. I have a power converter to bump up the voltage to the motor but it will only work for the highest speed setting unless I could figure out a way to change the resistors for the first three speeds, so I haven't wired that in yet and I might not anymore. With as cold as the air gets, lower fan speed really doesn't make as much difference now either.
I'll be switching to RX-8 fan blades and motors soon, so that might have some effect on all this too but it'll probably be minimal. Bottom line, so far I'm very happy with this setup and especially this refrigerant.
As for the Syvecs, I love this ECU and the ability to view this stuff on the iPad, and change boost and traction control on it too. I had originally planned on mounting this in the DIN slot but I like being able to play CDs and DVDs (the DVDs came in handy for my fiance during the drive to SevenStock last year lol). I still might mount it in there, but I do like having the ability to monitor things while I'm at the engine bay too.
Last edited by speedjunkie; Aug 12, 2019 at 11:39 PM.

Nice to see hear that you ironed out the idling issues after the initial charge of refrigerant. Seems like all is good now from your feedback. And just in time for peak HOT summer temps, too!
My plan is to mount the RX8 condenser to my Koyo radiator using 3 of the four existing mounting tabs that come w the condenser. Note: The fourth one appears at first glance that it would interfere w air ducting already in place (FD w SMIC setup). Maybe I'll see about welding attachment tabs where the existing, stock side-mounts are positioned if that is indeed more practical; not sure yet. Once condenser is mounted, I'll take the car to a local specialty AC shop to tidy up/marry the existing stock AC lines to the new condenser (not near as ambitious as you that I can effectively manage the retrofit lines myself). The same shop will also be refurbishing my MANA condenser. If all is successful at that point, I'll have them charge it up w R12 if available; or R-152 perhaps.
My main issue at this point is getting the car to the shop w the RX8 condenser already in place so they can focus on the AC side of things; their specialty. To compound things, I'll actually be swapping in a new Koyo unit so that is the primary reason I'm dividing the overall process into two separate projects.
Thread Starter
Joined: Aug 2004
Posts: 4,786
Likes: 145
From: Colorado Springs, CO
No. I did buy one a few years ago, but I decided against swapping it out because it wasn't exactly the same as the original one, and also in my warped view of it at the time, I figured "well it was working when I pulled the system out over 10 years ago, why change it?" lol. And now I'm at the point that I'm not sure if I could use the new one since it could possibly have different fittings, but I don't know because I didn't compare them at the time and as long as it's working I don't feel the need to pull the dash to get at it again.
Well the car still stalls occasionally while the AC is on, so I still have some issues, but it's livable at the moment.
If you center the RX-8 condenser on the FD radiator, the tabs on the condenser extend past the radiator on both the top and bottom. I guess it would be possible to tack some mounting blocks onto the radiator end tanks, but I was leery about that and also didn't want to drain and remove the radiator to get it done haha. I wouldn't try bending those mounting tabs either, I did that on one of the used condensers I had and it bent the fin area in the process. The mounting tab is definitely more sturdy than the heat exchange portion. If possible, I'd make mounting tabs for the corners, with the added bonus of not interfering with the ducting. I decided on my mounting solution because I wanted something I could easily swap in a replacement if the original was damaged. The side brackets for my radiator are removable so I can swap them to a new radiator pretty easily when the time comes; if I'd welded on mounting blocks (to use the stock tabs on the condenser) I'd have to do it on the new radiator and make sure I got them in the same locations. Of course, you have to do whatever works for you and is easier for you. What worked for me may not work for you.
Well I didn't completely do the lines myself haha. I would have if I could weld, though. The crimping tool was somewhat expensive considering I'll likely never use it again haha, but I have a real issue with buying tools like that. I was able to find someone local to crimp the lines on my last system, but I couldn't find him or anyone else this time so I figured I'd just buy the crimping tool and do it myself. Watching youtube videos on how to do all this gave me the confidence to tackle the crimping part, but even the videos couldn't help me solder the crimp fittings on the original fittings lol.
Does that shop also rebuild compressors? I've been looking for a place to rebuild the three bad ones I have. I also have three good FD condensers that could probably use refurbishing.
R12 would probably be great if you can find it for cheap enough. I think I remember reading that R152 has similar properties to R134 but cools like R12, if not a little better.
You can mount the condenser and just leave the rubber plugs in the holes. You definitely want to keep it closed up as much as possible so you don't have to swap the packets in the drier. Or do you mean you're going to have a different issue with getting it to the shop after mounting it?
My plan is to mount the RX8 condenser to my Koyo radiator using 3 of the four existing mounting tabs that come w the condenser. Note: The fourth one appears at first glance that it would interfere w air ducting already in place (FD w SMIC setup). Maybe I'll see about welding attachment tabs where the existing, stock side-mounts are positioned if that is indeed more practical; not sure yet.
Once condenser is mounted, I'll take the car to a local specialty AC shop to tidy up/marry the existing stock AC lines to the new condenser (not near as ambitious as you that I can effectively manage the retrofit lines myself). The same shop will also be refurbishing my MANA condenser. If all is successful at that point, I'll have them charge it up w R12 if available; or R-152 perhaps.
Does that shop also rebuild compressors? I've been looking for a place to rebuild the three bad ones I have. I also have three good FD condensers that could probably use refurbishing.
R12 would probably be great if you can find it for cheap enough. I think I remember reading that R152 has similar properties to R134 but cools like R12, if not a little better.
My main issue at this point is getting the car to the shop w the RX8 condenser already in place so they can focus on the AC side of things; their specialty. To compound things, I'll actually be swapping in a new Koyo unit so that is the primary reason I'm dividing the overall process into two separate projects.
Getting the RX8 condenser mounted to the new Koyo is holding me up at the moment (also upgrading w new shroud & RX8 fans/motors while I'm at it). Once that process is fully decided/completed, I'm confident the AC shop can tidy up things w applicable connection fittings in short order.
Thread Starter
Joined: Aug 2004
Posts: 4,786
Likes: 145
From: Colorado Springs, CO
It was warmer today than it has been (around the mid 90s) and we were on a fun drive so it was the perfect time to really try the AC. It still froze up even though the temp coming out of the vents was in the mid 30s, I guess it was still too cold at the evaporator. But most of the day it was fine. I did discover that the blower still needs to be addressed because I've never been happy with the force of the air, even on the highest fan speed setting. I was planning on wiring in the power inverter, but I think I'd rather look into a different squirrel cage if I can find one that's more efficient and fits. I imagine that will be a pretty big task.
I do need to get the tune squared away though. The car will die quite often as soon as I left off the gas and disengage the clutch while I'm using the AC. When that happens I usually just use the clutch/tranny to restart the car, but at one point today that didn't work. I guess the ECU had just cut all fuel while the AC was on that time. I tried to restart the car with the tranny about 5 times and never had fuel pressure to keep it running. As soon as I turned off the AC and used the key to try to restart it, it fired up and ran fine after that. I even used AC after that too. It scared the **** out of me at the moment though lol.
I do need to get the tune squared away though. The car will die quite often as soon as I left off the gas and disengage the clutch while I'm using the AC. When that happens I usually just use the clutch/tranny to restart the car, but at one point today that didn't work. I guess the ECU had just cut all fuel while the AC was on that time. I tried to restart the car with the tranny about 5 times and never had fuel pressure to keep it running. As soon as I turned off the AC and used the key to try to restart it, it fired up and ran fine after that. I even used AC after that too. It scared the **** out of me at the moment though lol.
What do you suspect is causing the freezing up? Will it cause a long term issue with the system? I am really contemplating this setup when bringing AC back to my FD ....
Thread Starter
Joined: Aug 2004
Posts: 4,786
Likes: 145
From: Colorado Springs, CO
Well I don't really know the science behind it lol. HVAC was part of my job in the AF but I didn't actually do much with it so I don't know near as much as others, but I'm guessing the refrigerant just gets it so cold that the evaporator is freezing up and then it stops producing cold air. I've seen temps in the mid 20s coming out of the vents, so it's probably even a bit colder than that at the evaporator. Sometimes I'll turn the temp all the way down if I'm sitting still, since the air coming out is only about 41 or 42 degrees, but when I'm moving I'll put the temp up to between the blue and white part. Although yesterday it was still pretty warm in the car with it turned all the way down and the evaporator still froze up, but the temps coming out were around the mid 30s. I don't foresee any permanent problems, but I could be wrong. It usually thaws within about 15-30 minutes, so I usually just do that.
I mean, I'm still happy with it haha, but some people might not want to deal with the freezing part. I don't really mind though so far. As long as it cranks out super cold temps, I'm happy lol. I'm very happy with the parts I used to finish the system too.
I mean, I'm still happy with it haha, but some people might not want to deal with the freezing part. I don't really mind though so far. As long as it cranks out super cold temps, I'm happy lol. I'm very happy with the parts I used to finish the system too.
Sounds like you might be a tad low in refrigerant (and/or a possible in-leakage of outside air/moisture)...
If Freon is low, it is still being forced to expand the same amount - more expansion equals a cooler temperature. As the evaporator coil drops below freezing, any moisture will freeze as it comes into contact with your coil causing it to ice up.
Does your compressor stop running during these episodes? It should kick off on its on; thereby, allowing the system to properly thaw before cycling cold air again.
If experiencing a small leak, you'll eventually run out of refrigerant altogether.
Thread Starter
Joined: Aug 2004
Posts: 4,786
Likes: 145
From: Colorado Springs, CO
Actually I think the system is acting normally aside from the evaporator getting too cold. As Pete told me in the other thread, I think the thermal switch is opening and turning off the compressor, but I'll have to check that the next time this happens. I completely forgot about the thermal switch haha. But I might check for leaks anyway since it has the UV dye in it, it's easy enough to just verify. Also, I doubt I'm low on refrigerant unless I do in fact have a leak. When I was charging it and overcharged it, I bled off refrigerant until the compressor kicked back on, so it should be topped off.
Originally Posted by Pete_89T2 
So you're saying that condensation on the evaporator is freezing up, but the compressor still continues to run? If so, you've got a bad thermal switch or faulty wiring. I'm not familiar with the FD's AC system, but suspect the basics are the same as an FC. On the FC, there is a normally closed thermal switch mounted on the evaporator, that is set to open when the temp gets below 33*F or so. This is wired in series with the refrigerant pressure switch (another NC switch, that opens when pressure goes below ~15psi, protecting the compressor if the system loses refrigerant) that supplies power to the coil of the AC compressor relay.
When the thermal switch is working properly, it will cut off the compressor before the evaporator starts to ice up, and cycle it back on when the evaporator temp rises back up above freezing.
Thread Starter
Joined: Aug 2004
Posts: 4,786
Likes: 145
From: Colorado Springs, CO
Well I've tried a couple times now to get the AC to "freeze up" again and it won't do it. So, I guess that's...good? lol I'm happy it's working great, but it's a little frustrating because I wanted to see exactly what it was doing, to verify the thermal switch was shutting off the compressor and that there weren't other issues.

So, reading over this thread, just making sure i'm understanding correctly, I have the MANA system, and naturally, my condenser is damaged beyond repair. So I am thinking of having the RX-8 condenser mounted. How would this effect the existing dryer on the car? Would it have to be removed? Or would I just leave it in place and only have to worry about physically mounting and connecting the lines?
Car is running stock rad/intercooler.
Car is running stock rad/intercooler.
Thread Starter
Joined: Aug 2004
Posts: 4,786
Likes: 145
From: Colorado Springs, CO
You can ditch the stock dryer, the RX-8 condenser has it built in. The downside is that you'll need to have lines made (or make them yourself), at least the ones that go to and from the condenser. Is your setup VMIC or SMIC or what? You could always get a universal condenser if you want to keep the stock dryer, but you'd probably still need to make some lines and figure out how to mount it. As far as I'm concerned, this is the cleanest way to install it, and really the simplest system since it has the dryer built in. But it might not be for everyone.