Rats nest for Christmas.. yay!
 12-29-11, 04:52 AM
#26

Thanks so much James! That really helped me. I'm going to remove it tomorrow, I know where the screws you are talking about are now. You know in the 3rd pic where u circled the area of the screws, Are the to left most hoses(if they are called that) fuel lines? I'll will get back to you with the bumper, It's still stuck on my car, But i think it has to do with that last bolt i took a picture of. I can't get that one off at all because it broke off inside or something, keeps spinning.
 12-29-11, 10:19 AM
#27
Welcome ...
The shiny tubes / hoses? Yes, I think so. If they were water they would be corroded.
The fuel lines enter the engine bay under a triangle framed by the MAP sensor, brake booster and throttle elbow. There are three of them. One is fuel into the engine bay, one is return to the tank and the third is vapor from a carbon canister (near the tank). Just follow these to the rat's nest.
Another clue is that the fuel lines have heavy duty clamps on them compared to the water lines and that the hose is stiffer. Squeeze it with your fingers to check the stiffness.
12-30-11, 03:46 AM
#28
Oh okay thanks James. I'll do that to test it. Unfortunately while taking off one of the hoses, I broke off the nipple to one of the solenoids(I think that's what it is) at the bottom. Its the 4th one from the left if you are standing on the drivers side when the nest is installed. Do you know how much that one solenoid would cost and where I could buy one? I'm so mad right now, everything is taking days.
12-30-11, 10:55 AM
#30
Yep, there is so much EGR introduced by our intake and exhaust port overlap (at low RPMs) that Mazda didn't bother to include the EGR valve in the 1995 cars. Rumor is that they put it on the 93-94 cars just to show it for smog regulations. You need to leave the solenoid electricaly attached though or your ECU will complain by turning on the check engine light. Looking at the diagram that I attached earlier, you'll need to plug the hose that feeds vacuum from the UIM as well.
I suggest that you search here for used solenoid. Here's a specific example ... there are others.
You could call Ray at Malloy and buy them new ... about $60 each I think.
You could visit a junk yard and pick them up. I've never done this but I understand that many Mazda cars use the same solenoid.
I have several. I'll ship them for $25 each, just PM me.
All that said, if I were in your shoes I would:
- pick up a used rat's nest
- pick up a pressure / vacuum pump with a gauge on it
- learn how to test the solenoids ... pressure, vacuum and electrically
- test every solenoid that I had on the car or had purchased (even new)
- test every check valve ... new ones from Dale, the PCV and the little aluminum one used for the gas vapor canister purge
Check the attachments for a head start. Here's what's attached:
- a vacuum / pressure diagram. Great for understanding what to test with vacuum and pressure as well as to help understand how this mess works.
- a turbo solenoid only diagram ... helps to understand ... just don't be lazy and ignore the non-turbo solenoids
- a couple of pics of what the rack solenoids do with power and without.
Good luck!
12-30-11, 04:04 PM
#31
So If I leave the solenoid with the broken nipple as is and cap off the nipple on the uim, the check engine light will not go on? Do I need to make a blockoff plate or anything like that? Oh one quick question, How do you guys take off hoses when they are hard as a rock? My exacto knife wont cut it at all, I have to keep sawing at it, but thats how I broke the nipple.
12-30-11, 04:24 PM
#32
Just cap of the UIM nipple and see how you do. The ECU has a sensor on the EGR valve ... I think. I'm not sure if it will pick up on it not opening. Do a bit of searching and see what others have done. You don't need a block off plate.
I've found that a heat gun works well to soften the hoses and make them twist off. I've read a few posts where folks used a cigarette lighter. Before my heat gun I would shave (as opposed to cut / saw it) the rubber down slowly with an exact-o knife and then twist.
I've found that a heat gun works well to soften the hoses and make them twist off. I've read a few posts where folks used a cigarette lighter. Before my heat gun I would shave (as opposed to cut / saw it) the rubber down slowly with an exact-o knife and then twist.
12-31-11, 06:23 AM
#33
It seems kind of hard after some research. I'm just going to buy your solenoid. For the ratsnest screws towards the firewall. Did you have hoses blocking them? The clamps are faced downwards towards the tranny and rotor housings on my fd. Any ideas on how I can remove the clamps to get the hoses out of the way? Hm After I take off the solenoid rack and replace the hoses, Do I just replace all the remaining hoses on the vacuum diagram or is the solenoid rack the only hoses?
12-31-11, 10:08 AM
#34
Too funny ... all of the things that I used to have fun with when I started.  It gets easier and you end up with a bunch of cool tools in your garage after owning one of these cars for a few years.
OK, so get a good pair of small needle nose pliers, maybe a screw driver and some mechanics gloves. Put a couple of drops of penetrating fluid on top of the hose clamp in question and rotate the clips up to where you can get at them to open the clamp up. I do this by pushing / twisting one of the clamp tabs in the direction that loosens the clamp. Does that make sense?
Once you can open the clamp, slip it at least a half an inch from the end of the tube. Look at the pics that I posted. The hoses go fairly far over the end of the tubes.
Now use a pair of the pliers that Dale describes in this thread. See the pics in the first post. You need a pair of the needle nose pliers with the round end. These will make is so much easier to twist the fuel / water hoses, work a bit of penetrating fluid under them and slip them off.
Here's some help from Dale for the vacuum hoses.
I don't remember if I had anything blocking the screws but it wouldn't surprise me. Everything in these cars requires that something else be removed to get to it.
I would replace every vacuum / pressure related hose while I was in there. After 20 years it's not a bad idea to replace the FPD and fuel hose as well as the water hoses. The vacuum hose is cheap. The rest is a bit more $$$. At a minimum inspect it under a bright light and look for cracks, bulging, and other signs that it's ready to blow.
It gets easier and you end up with a bunch of cool tools in your garage after owning one of these cars for a few years.OK, so get a good pair of small needle nose pliers, maybe a screw driver and some mechanics gloves. Put a couple of drops of penetrating fluid on top of the hose clamp in question and rotate the clips up to where you can get at them to open the clamp up. I do this by pushing / twisting one of the clamp tabs in the direction that loosens the clamp. Does that make sense?
Once you can open the clamp, slip it at least a half an inch from the end of the tube. Look at the pics that I posted. The hoses go fairly far over the end of the tubes.
Now use a pair of the pliers that Dale describes in this thread. See the pics in the first post. You need a pair of the needle nose pliers with the round end. These will make is so much easier to twist the fuel / water hoses, work a bit of penetrating fluid under them and slip them off.
Here's some help from Dale for the vacuum hoses.
I don't remember if I had anything blocking the screws but it wouldn't surprise me. Everything in these cars requires that something else be removed to get to it.
I would replace every vacuum / pressure related hose while I was in there. After 20 years it's not a bad idea to replace the FPD and fuel hose as well as the water hoses. The vacuum hose is cheap. The rest is a bit more $$$. At a minimum inspect it under a bright light and look for cracks, bulging, and other signs that it's ready to blow.
01-04-12, 02:01 AM
#35
OKay thanks James, i will get to it soon. Unfortunately my Christmas break is over and it's school again so it's gonna take me a little longer. I'll keep you guys updated. And i'll tell you if i figure out the front bumper thing lol, still wont come off.
01-05-12, 11:57 PM
#36
My downpipe came in and I was wondering if I should install it right now or wait until the vacuum hoses or done, Would it be easier to do when everything is taken apart right now? I pretty much juts have to take off the catback, cat, precat and then put the downpipe on right?
01-06-12, 09:13 AM
#37
I've put a couple down-pipes on by just removing the down-pipe. There should be enough play in the cat and cat-back to allow for the DP's installation.
If you've removed the plumbing that connects to the air box it's definitely helpful in installing the DP. Besides letting light in so that you can see what you're doing a friend can help from above while you work from underneath or you can try a wrench from above rather than underneath.
One bit of advice. Use WD40 (or your favorite penetrating fluid) on the nuts about an hour before removing them and then again 30 minutes before. Do this with the four (five?) that bolt to the turbo and the two that go to the main cat.
01-07-12, 01:05 AM
#38
sigh... I broke another thing. I believe it's the vacuum chamber. how do I remove it? its in the way of the oil filter neck. I still can't get the nest out like yourbpicture James. do you know how much vacuum chambers go for? ill post pictures to make sure in 5 mins

 01-07-12, 10:23 AM
#40

Yup that's your vacuum chamber! If I remember there are 2 probably 10 mm screws that hold it in. One is directly below it if you're facing it from the front bumper. If you reach under you can feel it. The other is where the oil filler neck bolts are. It comes in from the drivers side. Hopefully you didn't break the nipple off that chamber! Make sure you test it for leaks in case you think you did >< Use a lighter and lightly heat up vacuum hoses and then grab them with some needle nose and give it a light twist. I promise you'll break significantly less things :P
01-07-12, 06:11 PM
#41
Oh man.. I knew it haha. When you say reach under do you mean from underneath the car? Will the other 10mm take off the oil filler neck too? I took the 2 bolts from the bottom of the oil filler neck but it's held in place from the side near the vacuum chamber. Is there anything else connected to the vacuum chamber besides that hose? I don't want ot break anything else during the process of taking it off. I think it is broken because I can see the straw looking part of the hose and i can stick it back into the chamber, unless thats normal. How much do rotary shops charge for this vacuum hose job? So far I spent almost 100 on things i've broken lol and I think hoses cosed 100-150 i forget. Am I still under what shops charge?
01-07-12, 08:53 PM
#42
The vacuum chamber is in by 2 bolts and the vacuum hose. One is on the side by the bolt that holds the filler neck to that bracket, and the other you can reach from the top of the car. If you're facing the chamber from the front bumper, just reach underneath the front of it from the top of the car and inbetween your drive belts. You'll feel it
01-09-12, 03:52 AM
#43
Thanks matt i'll try it again when I have no homework. But I do have another question. I took off my fuel hoses and I just noticed some of it leaked into the opening of my oil filler neck... Would an oil change take everything out or am I screwed =(. I don't think a lot dripped in but I know some got in there.
01-09-12, 05:45 AM
#44
Fuel dilution of the oil seems to be a naturally occurring thing in these motors. I would change my oil if I were you but here's some food for thought.
http://www.fd3s.net/oil.html#GAS
http://www.fd3s.net/oil.html#GAS
01-10-12, 11:09 AM
#45
Yep, Gas in the oil is not unusual.
I would change the oil to be on the safe side but like Mrmatt3465 said it's normal operation (tends to happen) while the motor is running. Basically if the gas thins out the oil too much it won't be able to properly lubricate the engine. I think that the consensus is that the rotor side seals are to blame. Personally I noticed that the fuel dilution was greatly reduced after cleaning my fuel injectors. I think that a good spray pattern with no drips really helps. That's another topic though.
What about volume of oil? Pull out the dip stick and check it. If it's gone way up from your last check, that's the gas ... and a sign that you should change the oil. Hmm ... these motors get really dirty. Did the gas wash any dirt into the oil filler neck and thus the engine? That's a big reason to change the oil.
The gas tank is sealed for emissions reasons and tends to build pressure. Leave the filler cap cracked open until all of the gas lines are re-attached. This will greatly (if not stop) the gas that leaks out when you disconnect them from the rat's nest.
One other thing. I was looking at my pictures. It looks like there might be more than three screws on each side of the rat's nest to remove it. If it's not obvious for you, PM me. I'll dissemble the extra one that I have at home to figure it out.
01-13-12, 10:11 AM
#46
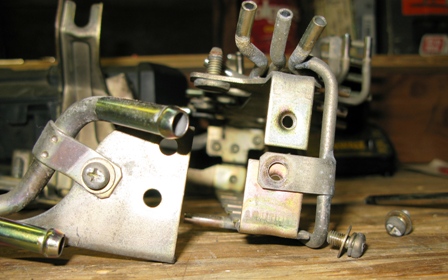
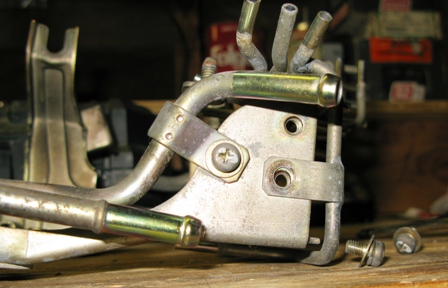
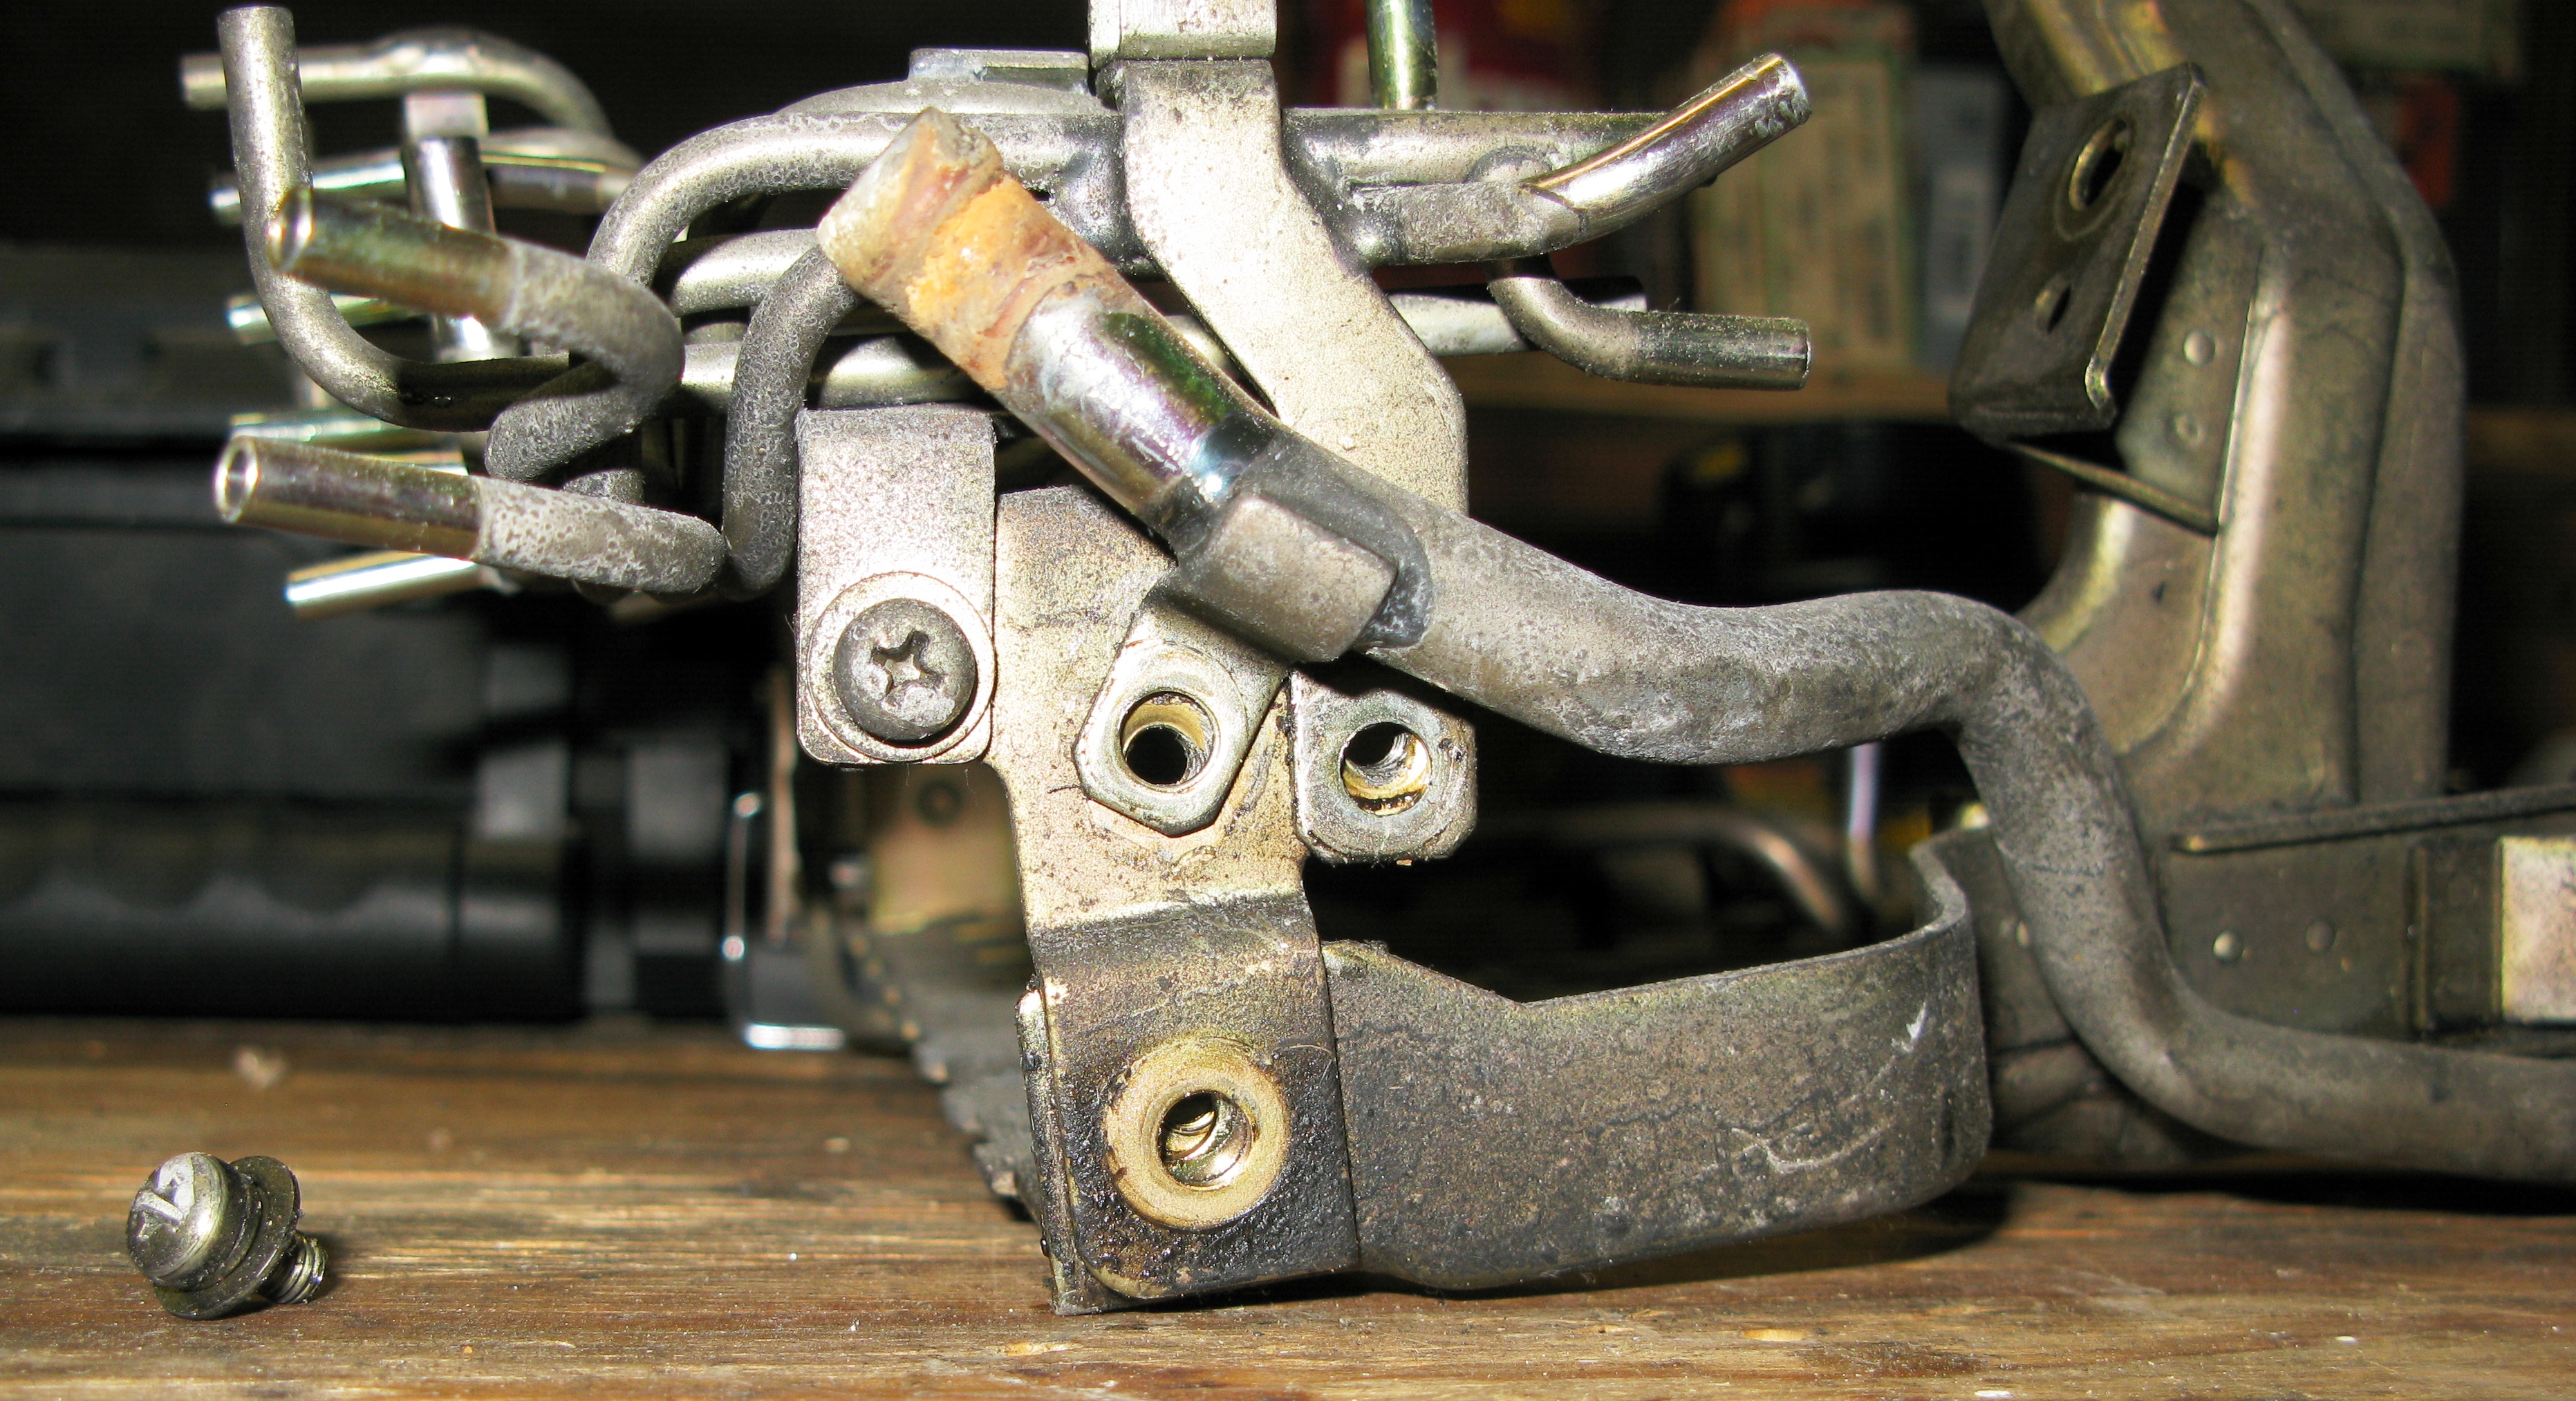
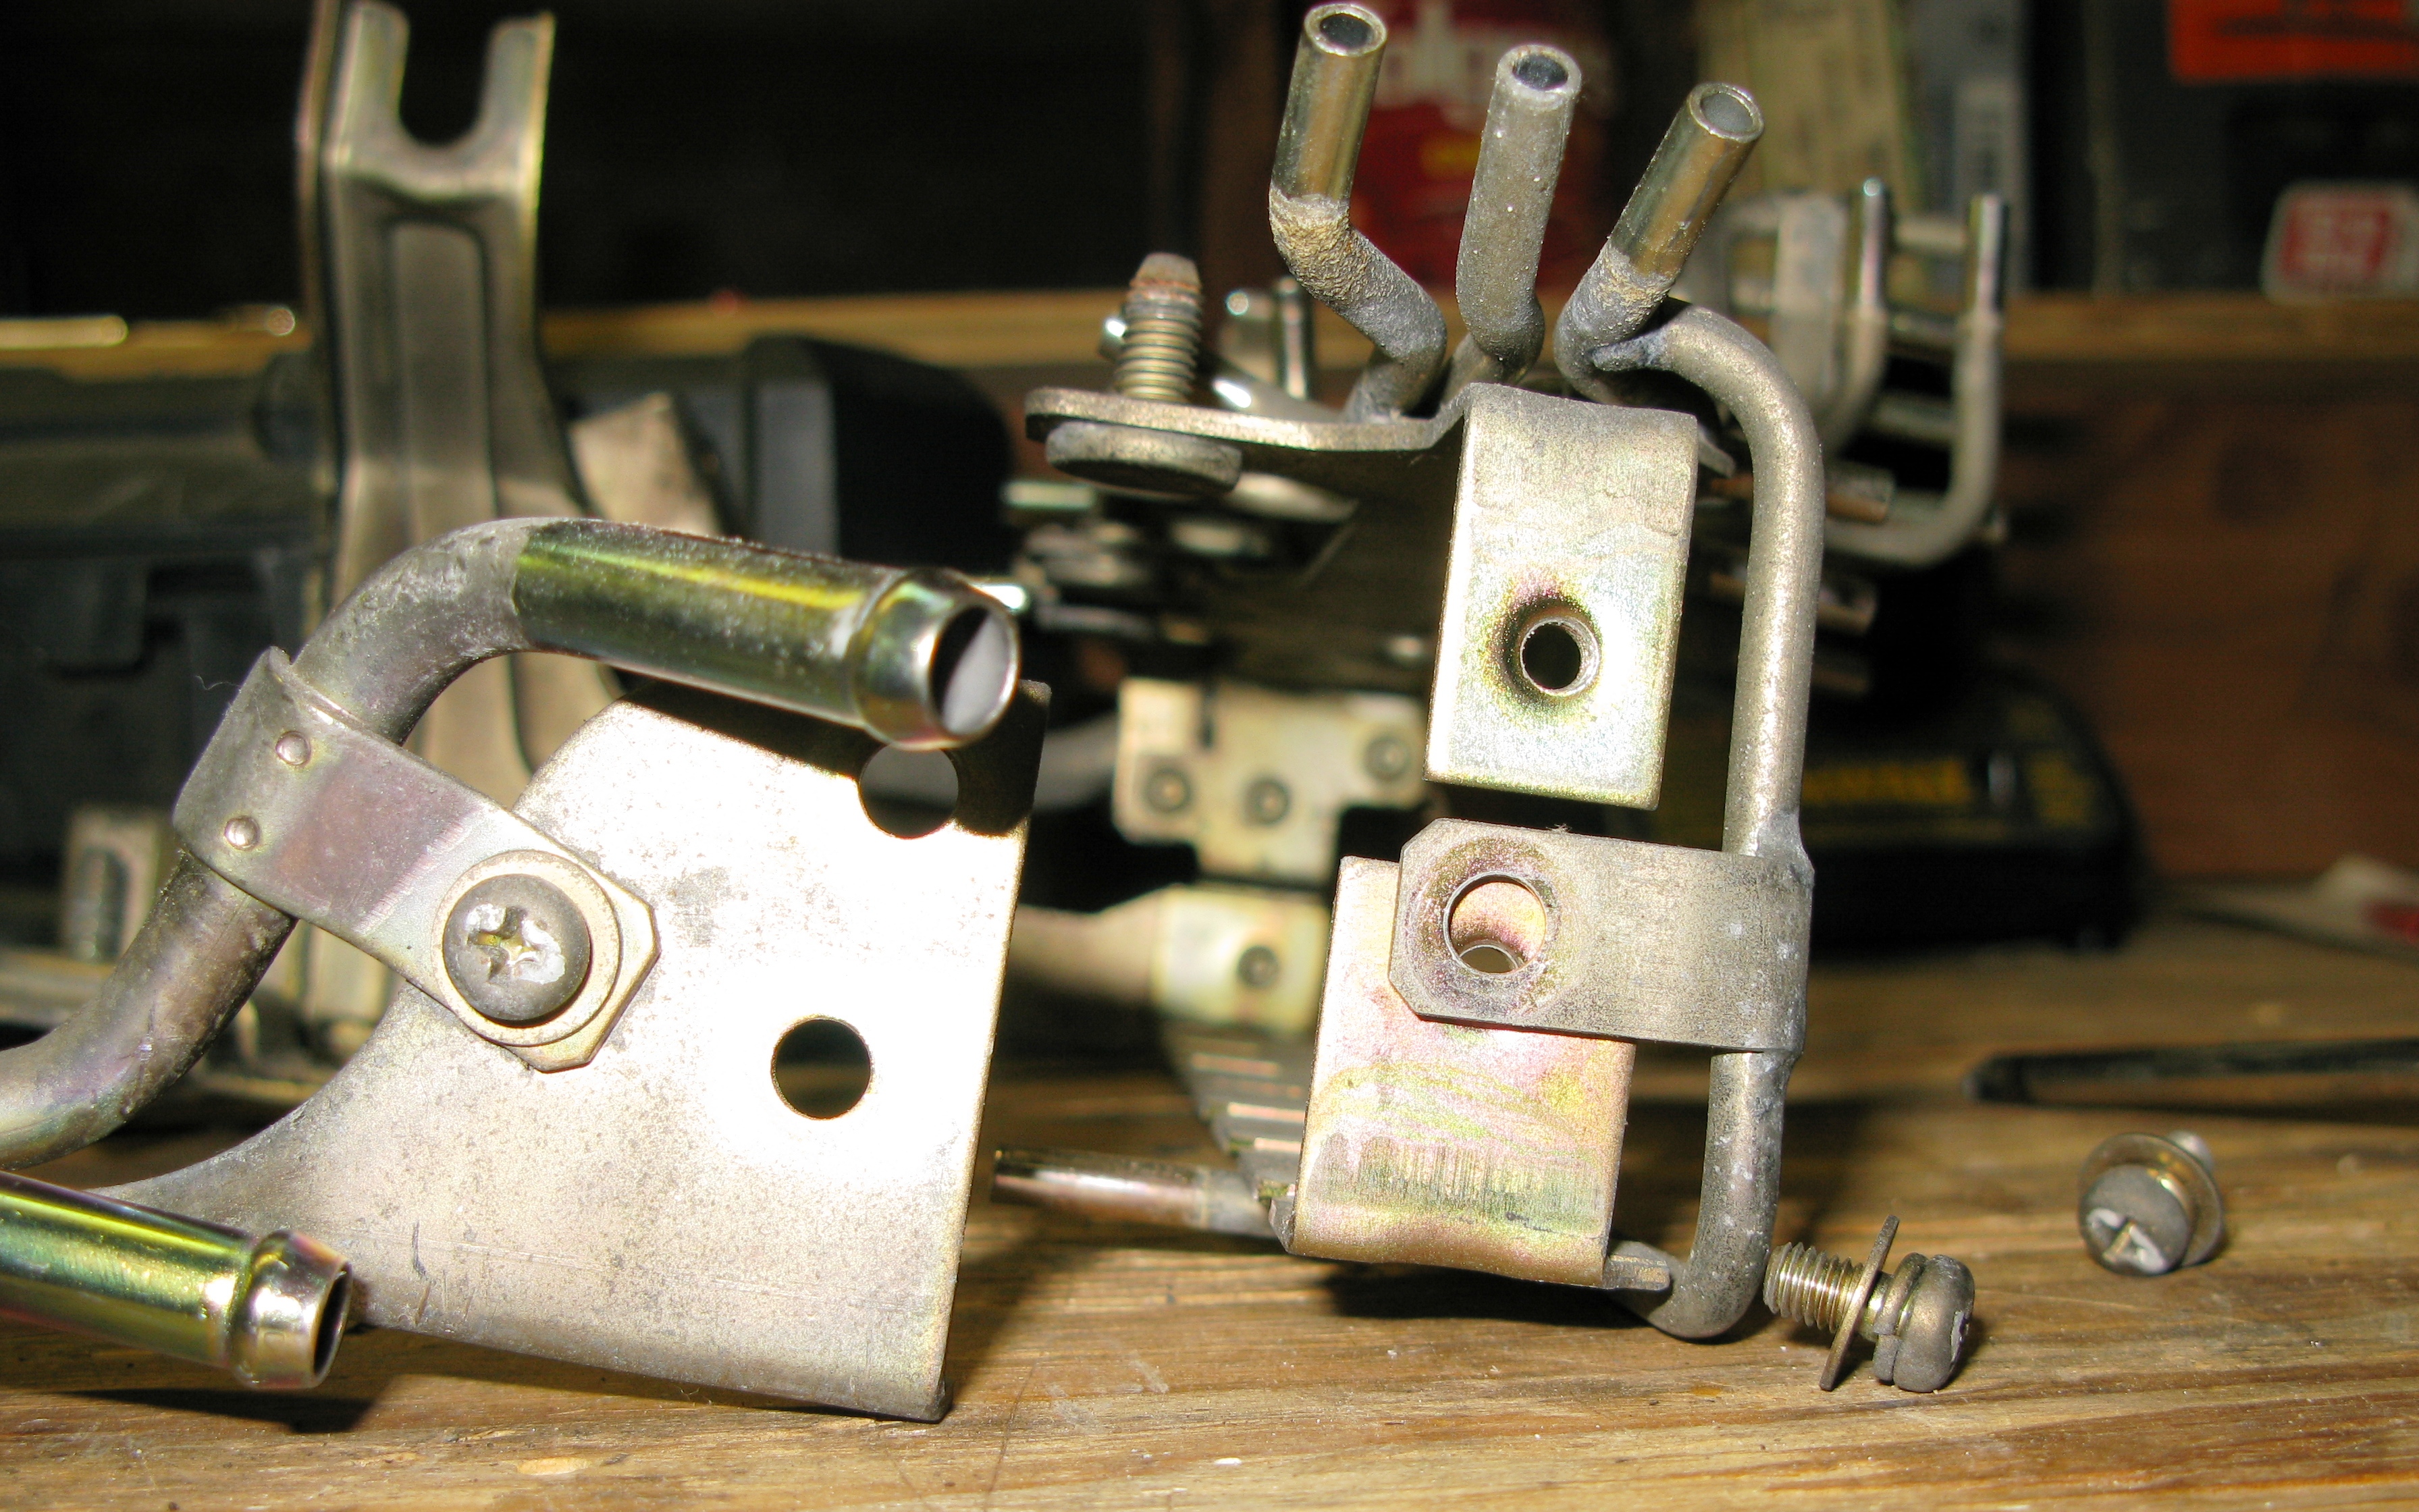
pictures of how to dissemble the rat's nest
Here's the side with water flowing through it ... front of the car I believe. Notice that only two of four screws hold the rat's nest together but a third has to be removed to allow it to slide apart easily. Basically that third screw head bumps into a tab when you're trying to slide the nest apart.
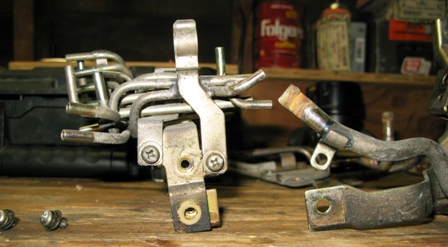
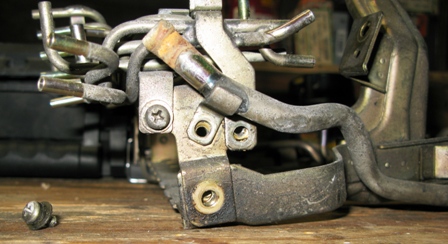
Here's the fuel side ... facing the firewall I think. It's strait forward. Just pull out the two screws shown.

Here's the fuel side ... facing the firewall I think. It's strait forward. Just pull out the two screws shown.
 01-15-12, 02:01 AM
#48
Oh I was reading about some type of fuel pulsation damper replacement or delete while doing the nest. What does that do and is it safe to remove? I found the guide on banzai http://www.banzai-racing.com/pd_elimination_how-to.htm
01-15-12, 09:40 AM
#49
Welcome!
The solenoids should come out with the nest. Just note that the hoses that are attached to the solenoids can hold them in. The hoses that go to the rat's nest metal plumbing don't matter as this comes out with the solenoids but the hoses that go elsewhere do.
You basically need to 1) cut the solenoid noses that I mention above, 2) remove the rat's nest, 3) re-plumb the rat's nest with new vacuum hose and replace your solenoid and then 4) put the rat's nest back in. Well, there's a 3b step in there that involved replacing the vacuum hoses that go to other parts of the engine.
In both of the FDs that I've owned, I paid the piper and replaced the FPD. I'm not sure of the effects that removing it has. Just be sure that you understand what it does. As you modify these cars the further that you go from stock the less street-able they tend to be.
Maybe someone else will chime in about the FPD?
01-15-12, 06:13 PM
#50
Oh I was reading about some type of fuel pulsation damper replacement or delete while doing the nest. What does that do and is it safe to remove? I found the guide on banzai http://www.banzai-racing.com/pd_elimination_how-to.htm
That said, plenty of people run without one and it's functionality is somewhat debatable.
Also, they tend to break and catch FD's on fire and may-or-may-not be compromised by higher-than-stock fuel pressures.
So, at least replace the damn thing while you're in there. For peace of mind, if nothing else.