When you click on links to various merchants on this site and make a purchase, this can result in this site earning a commission. Affiliate programs and affiliations include, but are not limited to, the eBay Partner Network.
Any chance you can repost the photos from under the hood? I just bought a set and was curious where you mounted the pins to. The pics aren't loading for me. Sexy car BTW.
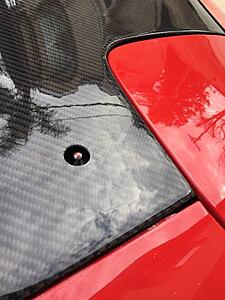
Figured I would revive this thread with some pictures and a review of this product.
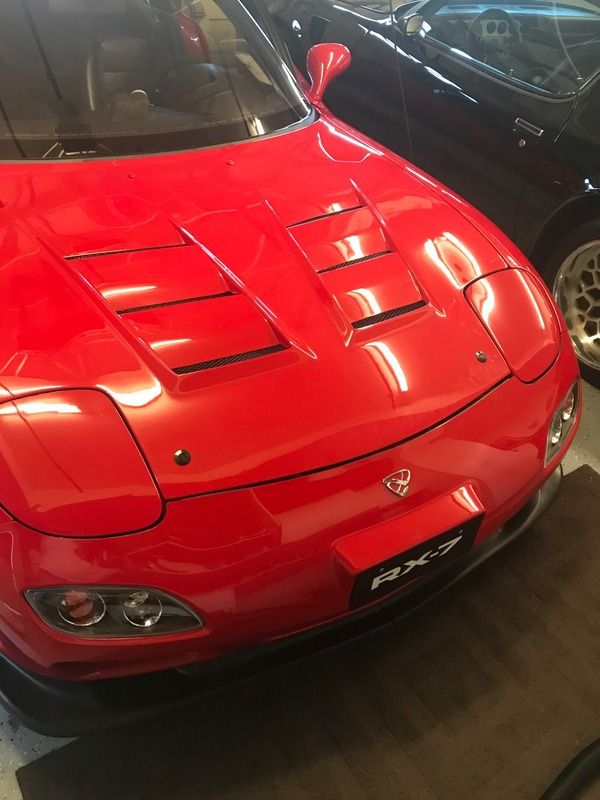
Ive always disliked hood pins, never a fan. Since installing a my aftermarket vented hood I had to bite the bullet. This quick latch style was the most discrete option, in-expensive and once installed I was OK with how it looked. The quality of the product is good and install is easy. The pin is just barely long enough, but could use another 1/2 inch since the bottom bolt is literally 3-4 threads in. I pop both quick latches prior to popping the OEM hood latch.
Hey Armen I am not sure about the mounting location you used but quik latch can provide an extended pin if you call them and ask about it... I needed it for this location behind the headlight
Those QuickLatch's are brilliant!!! I think I'll def get some for the hood, and I'm also thinking they would be a good way to mount an aftermarket under tray and diffuser to some bracing as well...
Those QuickLatch's are brilliant!!! I think I'll def get some for the hood, and I'm also thinking they would be a good way to mount an aftermarket under tray and diffuser to some bracing as well...
I'm in the works of planning a custom front splitter and new under tray. Been looking at these guys. A lot of ppl use these or similar ones for bumpers, etc.
I too installed these a while ago and have loved them. They are not an eye sore like all the other options and really secure the hood (aftermarket carbon fiber hoods).
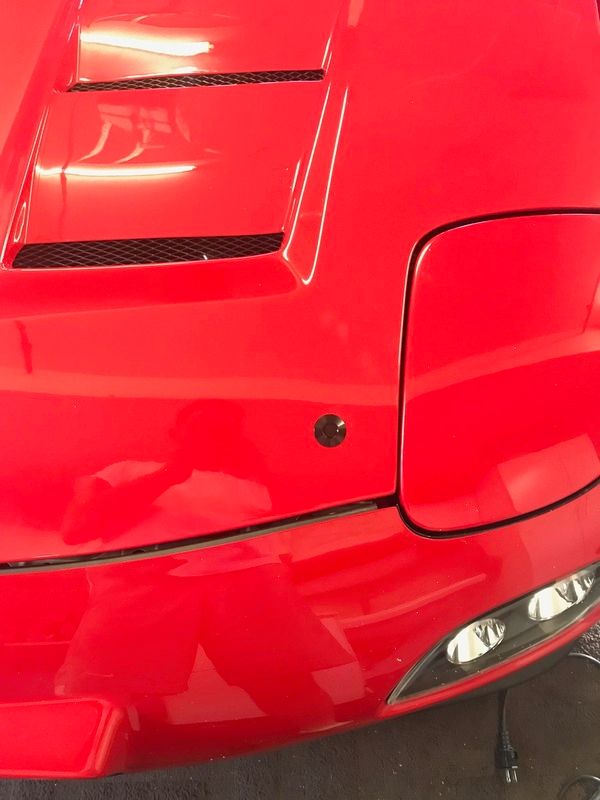
I opted to utilize the factory hood rubber "bump stop" location above the headlights to avoid any drilling in the chassis. I initially used the default length pins that came with the kit but like others mentioned, they are just a tad bit too short and after a while mine were starting to loosen up so I purchased the longer ones. These I had to shorten a little but because I was worried about puncturing a tire because of how much stud length there was protruding down into the wheel well area.
I forgot, most being still have washer/overflow tanks... I used one of the holes from those to mount and kept the rubber bumper... you might could still that with the tanks.
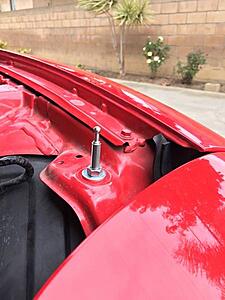
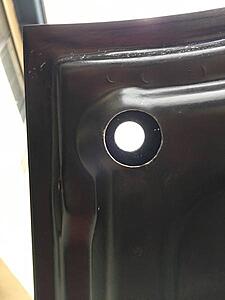
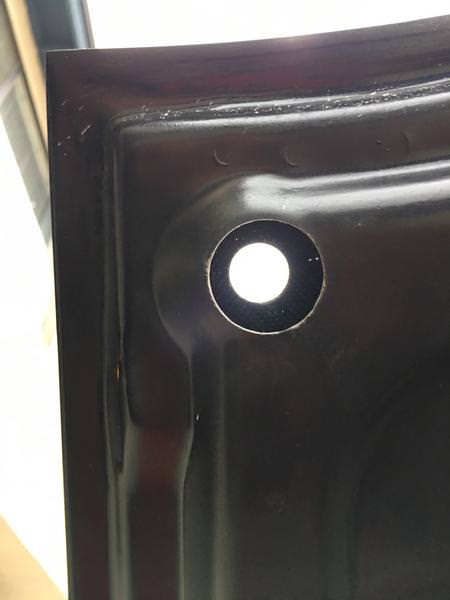
Did you guys drill a ~1 1/2 inch hole on the inside of the hood to fit a 7/8 socket? The inside nut is tightened via needle nose plier for now until I but a big enough drill bit.
1. Drill a VERY accurate pilot hole through thew hood.
2. Use a slightly larger than socket-sized hole saw to cut through the underside layer of the hood (I feel like it was 1" or 1.25").
3. Then use 3/4" hole saw to go through the top of the hood for the latch.
What type of hole saw did you use. Wonder if a ceramic hole saw would provide a cleaner cut in fiberous material (even though it's on the bottom of the hood)
Cutting fiberglass or carbon should always be done with these sanding type hole saw/cutters.
Originally Posted by TomU
What type of hole saw did you use. Wonder if a ceramic hole saw would provide a cleaner cut in fiberous material (even though it's on the bottom of the hood)
I too installed these a while ago and have loved them. They are not an eye sore like all the other options and really secure the hood (aftermarket carbon fiber hoods).
I opted to utilize the factory hood rubber "bump stop" location above the headlights to avoid any drilling in the chassis. I initially used the default length pins that came with the kit but like others mentioned, they are just a tad bit too short and after a while mine were starting to loosen up so I purchased the longer ones. These I had to shorten a little but because I was worried about puncturing a tire because of how much stud length there was protruding down into the wheel well area.
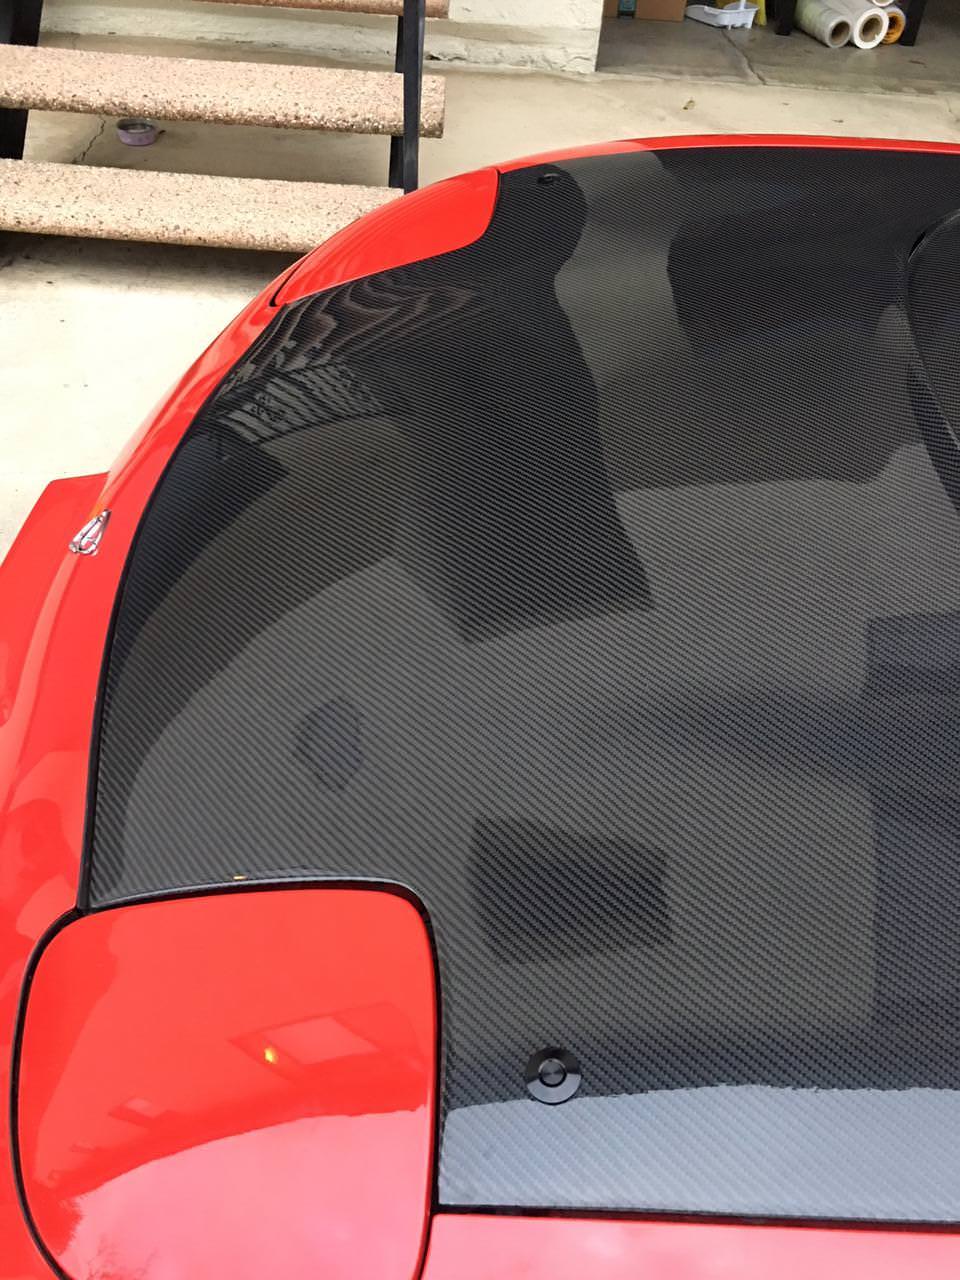
TpCpLaYa thanks for the photos, the pins look really clean and do not interrupt the lines of the car
I may have missed it, but what diameter latch body did you use? I am assuming the QL-25 series 1" version?
I used two different sized step drill bits I got from harbor freight. I heard that drilling into fiberglass/carbon fiber is not good for the tools so I just got these $5 bits that can be disposable if they get damaged. I thought about the hole saw method like Jasonn posted about but then I wanted to start small and enlarge the hole slowly.
get the longer pins from quik latch, the short ones will not quite reach the hood in this position. just pull off the bump stops and put them roughly in the position you want them to be.
I didn't take pics but I laid down a lot of blue painters tape in a criss cross pattern to prevent the material from splitting or causing me any problem while drilling. then I marked the tip of the hood pin with a red sharpie and lightly try to close the hood to mark where to start drilling
double check it again and again as you start drilling. it's nerve racking and you don't want to mess it up.
I used a bigger step drill bit on the bottom. step by step making the hole bigger and bigger to make a perfect circle shape that you can fit both the latch and the locking ring (and the fairly large socket to tighten it) from the bottom. it's best to remove the hood to install the latch part itself, otherwise you can drop the locking ring inside the hood and I don't know how you would get it out if that happens. The hole on the top layer will be smaller, and you'll have to be careful when starting your bigger second hole from the bottom because the drill bit is quite long and will need part of it to go through the first hole on the top layer as you drill.
also use some sandpaper to clean up the edges of where you cut. now you can take your time and adjust the height of the pins to be exactly where you need them. I used a micrometer during the hole process to make it exactly the same height as well as making the holes evenly positioned from the edges.
my stock hood flaps in the wind past 70mph, but after doing this on the CF hood it looks pretty rock solid stable. I drove to laguna seca and back as well as doing the track day and there was no issues. it might be a good idea to use some mild threadlocker on the pins but I didn't and it's still ok.
here's my friend's car with the same hood pins and hood
Thank you! That write up was much appreciated, I will add this to my ever lengthening job list for winter
glad to be of help! it's definitely not fun to do this to a brand new cf hood but also not difficult, just be careful and measure it and double check it 10 times before actually putting the drill to the surface
glad to be of help! it's definitely not fun to do this to a brand new cf hood but also not difficult, just be careful and measure it and double check it 10 times before actually putting the drill to the surface
No doubt! You did a great job - super clean!
The big thing holding me back is where to position these things....on an FD with pop ups they sit nicely behind the lights......but on mine I really am unsure where to put them........
The big thing holding me back is where to position these things....on an FD with pop ups they sit nicely behind the lights......but on mine I really am unsure where to put them........
I preferred that position because they are not too noticeable and there's no need to drill any holes directly into the car since there are already holes there. I think even if you have some flush mount lights it will still look good
I love these Quick Latch fasteners! I switched from Dzus fasteners on my quick release bumper to the minis. So much better and way more flexible mounting options. Definitely going to use these on a hood when I finally get around to it. Photos are way to bright but you get the idea.


 10-08-15, 12:56 PM