
New parts fabrication ideas?


Thread Starter
Joined: Aug 2002
Posts: 610
Likes: 6
From: Erie, Colorado
If welding is something you're capable of (obviously you are, judging by that killer UIM) you should design a fuel cell that bolts up like OEM., removable bulk head, fuel bladder, E85 friendly, tucked up a little higher, so it can't be seen stickibg out inder tge valance from the rear.
Slightly less capacity, but better overall design, with a real internal 1.5 gallon swirl pot/ surge tank.
Slightly less capacity, but better overall design, with a real internal 1.5 gallon swirl pot/ surge tank.


Well, not really. The deal is, if you lower the car past the point where the outer ball joint is level with the inner pivot point (as you do at 25" fender height), you put your roll center down in the ground someplace.
Agreed, I wouldn't want something fabricated in a garage though. There was a Japanese company that made a fabricated steel set you could buy through RHD, but I read that their Miata variety broke. No thanks.
I talked to a fabricator/machinist out in California that DID in fact make a set, but after first contact he said we was going to check on the fixture, and then would never return a call for weeks. I finally just got pissed and called his *** every day for a month just for the hell of it, since he was such a dick.
Anyway, it would be cool if someone would CNC or cast a set, AND return phone calls.
Thread Starter
Joined: Aug 2002
Posts: 610
Likes: 6
From: Erie, Colorado
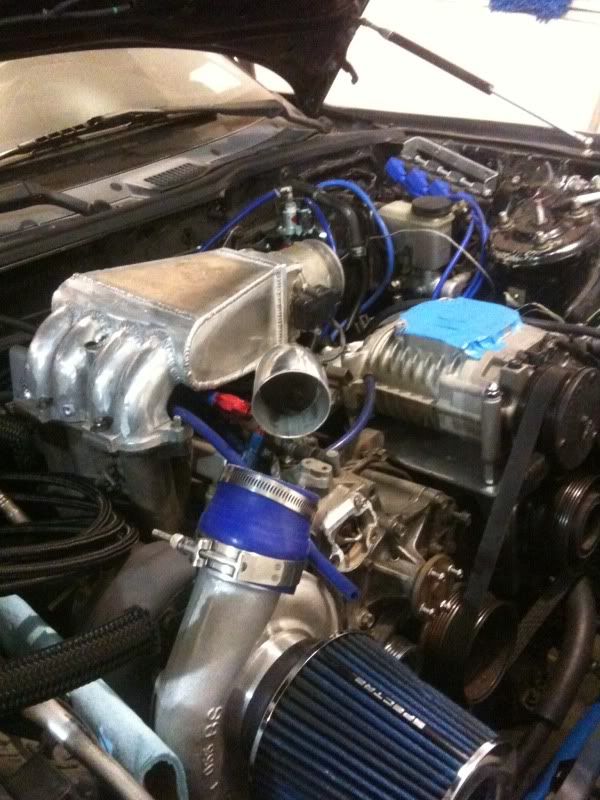
After reading a few posts over the last few days, I have decided that I will definitely be reinforcing my PPF when I get home (Tomorrow, Yay!) and I will be fabricating one of these as well. (See attached image) I can't believe that after all of these years, I never realized how much of a weak point the PPF is, and that it can be responsible for a lot of the wheel hop (which I also have). I must have missed all of those threads I guess.
Joined: Aug 2004
Posts: 4,786
Likes: 146
From: Colorado Springs, CO
I believe it's Tweakit that is building a diff brace that also clamps around the diff itself. Not sure if you'd be interested in anything like that, and since this thread is about you fabbing stuff I now feel like an idiot lol. Just wanted to let you know just in case you'd be interested. I like the one you posted up too. Are you going to make any tranny braces? I might be interested in one of those.
Thread Starter
Joined: Aug 2002
Posts: 610
Likes: 6
From: Erie, Colorado
Yeah, I'll probably do that as well, but I'm going to start on the rear diff and the PPF. I guess I should find a good pic of tranny brace as well and then try to improve upon it.
I built this, running 8 Kinsler nozzles, 4 x 60mm butterflys. 4 nozzles below B/Flys and 4 x 3 1/2 inch nozzles in the middle of the ram tubes. It was a mission but worked out realy nice. Probable wouldent fit in a road car.

Joined: Aug 2004
Posts: 4,786
Likes: 146
From: Colorado Springs, CO
I think that tranny brace might be in the way of the DP if it connected on the other side. Although the stock brace goes over the DP so I'm thinking this one could too, and just replace the stock brace completely, and still have holes for mounting to the tranny. Although I'm wondering with these braces if it might be better to have rubber insulators that the bolts slide through to let it have just a little movement so the bolt holes don't get damaged over time.
Thread Starter
Joined: Aug 2002
Posts: 610
Likes: 6
From: Erie, Colorado
Joined: Aug 2004
Posts: 4,786
Likes: 146
From: Colorado Springs, CO
You know what I mean about insulators? Kinda like bushings. Do you think that would be a good idea? I've heard of the bolts eventually wearing out the holes due to movement from the engine wearing on it. I would think using solid mounts or maybe even Delrin would mitigate that and maybe not need bushings for the brace. I'm also wondering if the brace would even be functional if it had bushings in it, but if they were small enough or strong enough it might still be worth it.
Thread Starter
Joined: Aug 2002
Posts: 610
Likes: 6
From: Erie, Colorado
@ speedjunkie
I think by the time you get the hardware as tight as it should be, the addition of any rubber or delrin insulators would become useless. I intend to run longer hardware all the way through (where possible) to the inside of the car and then install a backing nut to ensure that it cannot come loose. Plain and simple, if the holes are wearing out, the bracket is moving around, which means the hardware is not tight, or is coming loose.
I think by the time you get the hardware as tight as it should be, the addition of any rubber or delrin insulators would become useless. I intend to run longer hardware all the way through (where possible) to the inside of the car and then install a backing nut to ensure that it cannot come loose. Plain and simple, if the holes are wearing out, the bracket is moving around, which means the hardware is not tight, or is coming loose.

Banned. I got OWNED!!!
Joined: Apr 2004
Posts: 478
Likes: 1
From: Menasha, WI
Definitely do the new UIM if you wish. The stock manifold leaves much to be improved upon.
http://www.flickr.com/photos/20669521@N08/5499705091/http://www.flickr.com/photos/20669521@N08/5499705091/ by http://www.flickr.com/people/20669521@N08/, on Flickr
Or ditch both the upper and lower and do a custom single piece manifold... larger runners, better distribution, and tailored to your fuel setup.
http://www.flickr.com/photos/20669521@N08/5879750873/http://www.flickr.com/photos/20669521@N08/5879750873/ by http://www.flickr.com/people/20669521@N08/, on Flickr
This is what I look at when dealing with Methanol. It takes a lot of heat to turn it to a gases form which you need it to do, for it to be able to bond to the atoms of oxygen. So you need a nice straight runner so the fuel can drag some heat from the manifold on its way to the chamber. Also another photo of the end of the ride.
Last edited by rotory26; Dec 9, 2011 at 12:54 AM. Reason: spelling
Thread Starter
Joined: Aug 2002
Posts: 610
Likes: 6
From: Erie, Colorado
Those are some beautiful manifolds there SENZA.
I have been doing some reading and found a few really good posts on calculating the theoretical "ideal" runner and plenum sizes for the manifold. I will try to dedicate some time to designing a new manifold based on my streetport, with a T04z and a 3" exhaust. I will also model it up in SolidWorks and run some flow simulations on it since I can. It will be interesting to see how it turns out. However, I don't think I will get this done before I dyno in the spring, which may be a good thing. This way, I can get some before/after numbers.
I'm not making any promises here, but I do intend to do this at this time. Don't be upset if it doesn't happen quickly.
Thread Starter
Joined: Aug 2002
Posts: 610
Likes: 6
From: Erie, Colorado
I finally got around to making my fire extinguisher quick release bracket this week. It's still a little rough around the edges, and I need to figure out where to mount it, but it holds pretty tight.
Thread Starter
Joined: Aug 2002
Posts: 610
Likes: 6
From: Erie, Colorado
It looks like I may do a run of these quick release clamps. One of my buddies posted my vid up on a forum he visists for his Defender 110 and there was quite a few people wanting them. I would like to start a group buy interest thread, but I can't seem to get a reply to the PM I sent to the moderator over that section of the forum about whether or not you have to pay to beocome an approved vendor just to post in the group buy & product development interest thread. All I can find is that you have to be an approved vendor to post in the group buy section, but it doesn't say anything about the group buy interes and product development section.
Here's a 3d model rendering of it if anyone cares...
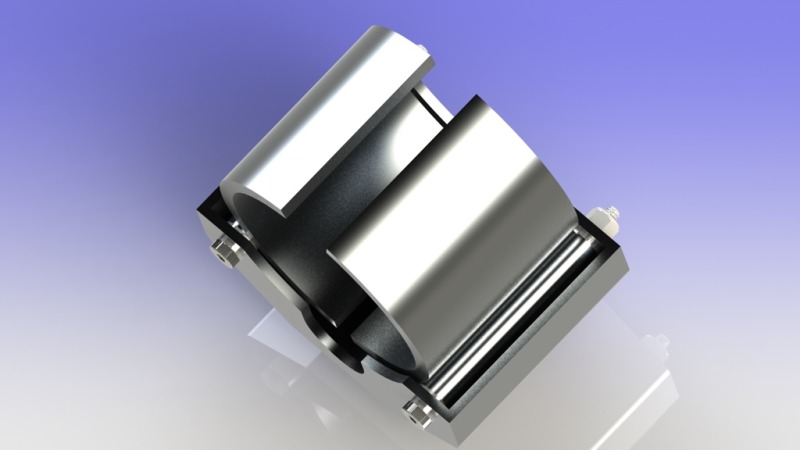
Here's a 3d model rendering of it if anyone cares...