
Mythbusters time - Oil pan and motor mounts

Originally Posted by dubulup
Here's my theory...the motor mounts are torqued to 50+ft-lbs and the pan bolts are torqued to 12in-lbs or something. GENIUS I tell you...what side, front or back leaks again?? go figure 
this is what I did, learned from a guru on another board...did this to the pan and the block and used "The Right Stuff" by permatex...black can orange writing...NO GASKET
The motor in my car is the first that I've built and I have NEVER had a drop of engine oil on my garage floor.
this is what I did, learned from a guru on another board...did this to the pan and the block and used "The Right Stuff" by permatex...black can orange writing...NO GASKET
The motor in my car is the first that I've built and I have NEVER had a drop of engine oil on my garage floor.
Eventualy they all seam to leak in time, but there are several things you can do to prevent this. I recommend an oil pan brace such as the ones sold by several of the vendors. The oil pan is way too thin and flimsy. The torquing of the motor against the motor mounts and the thin oil pan is the main reason they leak. I also recommend upgrading the motor mounts to polyurethane ones at this time. If the motor is in the car, the first thing I do is drop the subframe. It is very easy on a lift with air tools and can even be done on the garage floor. The main thing you need to do is put something like a jackstand or screw jack under the transmision and make sure it is steady. This is what will hold the motor up when the subframe comes down.
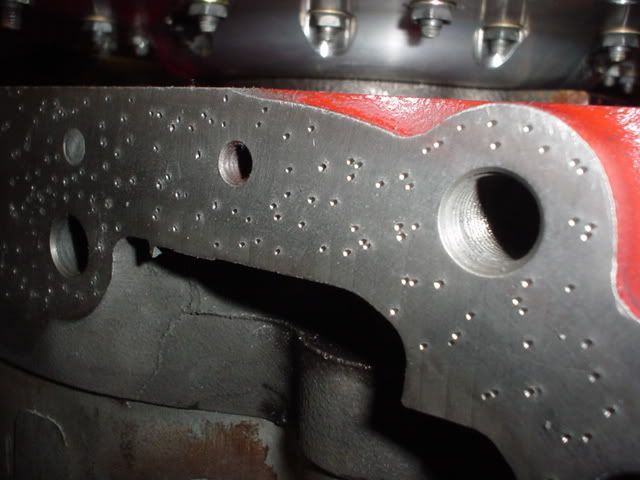
Once the oil pan is off, it is crucial that it is cleaned very vell. I first wipe off all the excess oil and then spray everything down with brake cleaner. Brake cleaner dries and leaves no residue. I then blow it off with compressed air. Next I take an angle grinder with a scrotch brite like sanding pad and clean both the oil pan sealing surface and underside of the motor. Make sure you get all the old silicone and gasket material off including in the grooves in the oil pan.
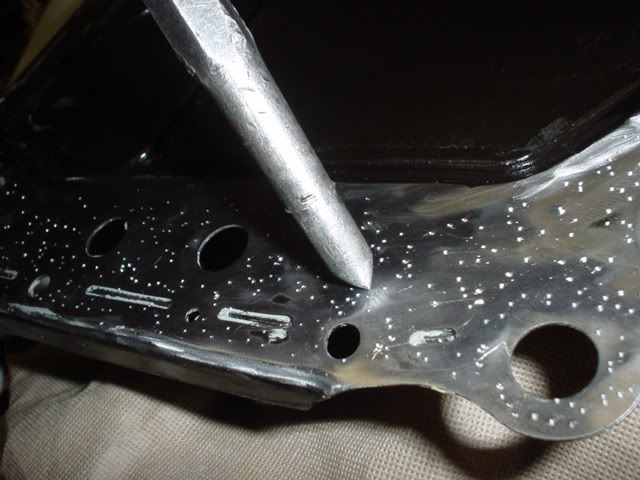
The punch mod shown in the above pic was taught to me by Judge Ito. I do it along the sealing surface of the oil pan as well as the underside of the motor. It helps hold the silicone in place. Judge Ito also like to use the Right Stuff black silicone. I find it to be alot thicker and alot harder when it dries than other silicones. The orange stuff Mazda uses is crap. It doesn't even completely dry. You'll know what I'm talking about if you've ever taken apart a reman. Do not use the Mazda gasket either. It is paper and tends to tear when tightening down the oil pan and leaks like crazy.
Once everything is sanded down and punched, I clean everything off again very well with brake cleaner and blow dry with compressed air. I also take a rag and spray it with brake cleaner and wipe off the underside of the motor to get any oil residue off. Don't forget to clean the motor mounts as well as the harware for the oil pan, or better yet use new bolts. Run a thick bead of silicone all around the oil pan sealing surface. I like to take my finger and gently smear the bead smooth so it covers the entire sealing surface. Don't use too much silicone either. At this point you should get a helper for the next step.
Have one person hold up and line up the oil pan and the other start putting a few of the bolts in. Be very carefull not to get silicone on the oil pickup. Also make sure it lines right up because you don't want to smear the silicone all over the place while trying to line everything up. Do not tighten all of the bolts fully yet. Leave them loose untill every bolt is threaded. If a bolt des not want to thread easily stop and tap the hole. If you force it the bolt will break. I actually recommend taping every hole before putting the oil pan up. Once all the bolts are threaded, go around the oil poan and hand tighten all of them. Do not use air tools. Once they are all hand tight you need to go around again and tighten them more. I like to take my palm and put it over a 3/8 ratchet and use just my wrist to tighten them. If you want you can use a torque wrench and torque to Mazda's specs (I forget the number)
Once all the 10mm bolts are tight the motor mounts must be bolted up right away while the silicone is still wet. Don't mix up the mounts. If you have one aluminum and one steel mount, the aluminum one goes on the driver's side. If you have two steel mounts, it helps to make a spacer like said above. You'll see where you need it where the motor mount covers one of the oil pan bolt holes. I like to put a little silicone on the threads of these too. For these I just use a 1/2" impact gun and blast them on the lowest setting. If you want you can torque them as well. After this you need to go back and make sure all the 10mm bolts are still tight. You won't be able to get to a couple that are under the motor mounts.
Once you are done you can now put the subframe back up. It is very important that you let the motor sit overnight or better yet 24 hours without oil untill the silicone cures. After this you should be good to go.
Last edited by IRPerformance; Dec 7, 2005 at 04:17 PM.
development
Joined: Aug 2002
Posts: 5,714
Likes: 7
From: Lafayette, LA
great write up man! I've got over 10k miles and no leaks...yet, and don't see why this would leak?!?!
||:||:||:||:||:||:||:||:||
DUBULUPAPPROVED
||:||:||:||:||:||:||:||:||
I definitely like this idea...I might try it next time.
||:||:||:||:||:||:||:||:||
DUBULUPAPPROVED
||:||:||:||:||:||:||:||:|| reminds me of the ghia I just took the body off of.
||:||:||:||:||:||:||:||:||
DUBULUPAPPROVED
||:||:||:||:||:||:||:||:||
I definitely like this idea...I might try it next time.
Originally Posted by j9fd3s
the older rotaries (pre rx7's) had studs and these metal support things to spread the load out.
DUBULUPAPPROVED
||:||:||:||:||:||:||:||:||
reminds me of the ghia I just took the body off of.


Originally Posted by dubulup
<SNIP>
this is what I did, learned from a guru on another board...did this to the pan and the block and used "The Right Stuff" by permatex...black can orange writing...NO GASKET
The motor in my car is the first that I've built and I have NEVER had a drop of engine oil on my garage floor.
this is what I did, learned from a guru on another board...did this to the pan and the block and used "The Right Stuff" by permatex...black can orange writing...NO GASKET
The motor in my car is the first that I've built and I have NEVER had a drop of engine oil on my garage floor.
It's expensive, but worth it, and Autozone usually carries it.
What we did, was make sure everything was EXCEPTIONALLY clean and oil-free, then we added a nice thin bead to the oil-pan and torqued it up about finger-tight all around; then torqued it up to 50% all around, and then 100% all around. When we did the motor-mounts we did put some Right Stuff on the threads and the seat of the area that meets the engine.
We let this sit OVERNIGHT for proper curing, and didn't even add oil for another day.
:-) neil
http://www.permatex.com/right_stuff/right_stuff2.asp

We make front and rear differential assemblies as well as 4x4 power trasfer units where I work and each and every oil pan gets sealed with Loctite anaerobic gasket eliminator.
It's a red gel that remains liquid when exposed to air. It's resistant to gas, oil, water, coolant, etc., and temps up to 400degF. Remember that engine oil and gas degrades silicone sealants, this could be a reason for long term leaks...
Anybody tried using something like this? I might try it when I seal my oil pan someday...
Just a quick clarification, that "The Right Stuff" is NOT silicone-based, and once cure is resistant to gas, oil, water , coolant, and even heavy detergent based differential oil. It is actually designed to replace VALVE COVER gaskets.
:-) neil
:-) neil


Joined: Mar 2001
Posts: 30,817
Likes: 656
From: FL-->NJ/NYC again!
Originally Posted by Mahjik
Yep. I always wondered if Mazda (or whoever does the remans) actually bolts up a set of mounts to seal the pan for a day or two, then removes them to ship it out (since mounts don't come with the remans). Or, if they just do a have **** job and seal the pan without the mount bolts.
Last edited by GoodfellaFD3S; Jun 9, 2011 at 11:35 PM.
Racecar - Formula 2000
Joined: Sep 2002
Posts: 4,035
Likes: 371
From: Bath, OH
Originally Posted by GoodfellaFD3S
The remans come with a set of shorter gold colored bolts tightened into the motor mount bolt holes.
Last edited by GoodfellaFD3S; Jun 9, 2011 at 11:35 PM.

getto gasket job
I suppose I should use this thread to fess up what I did. A year or so a go I pulled the pan because it was leaking and replaced it. It still leaked. So pulled it again and went a little crazy. I made sure the pan was flat. I dimpled the block.. Fender washers. Cleaned the threads, etc.etc. Then I did something I think is pretty stupid now. I applied RTV to the pan and went over it with a fine tooth trowel and let it cure.

Before I installed the pan, I filled the grooves with fresh RTV. The idea is that normally almost all the RTV gets squeezed out when things are tightened down. The cured RTV prevented that and left a thick flexible gasket between the block and pan.
Well, It has been leaking for over a year now. And looking back, I think it is not because of my stupid RTV job or anything else I've mentioned so far. I think the important thing is that I spent several hours cleaning all oil and crud off the mating surfaces. Super clean and oil-free lets the sealant stick and when it sticks, it seals.
*sigh*
Originally Posted by DaveW
I assume you meant it HASN'T been leaking for over a year now... 
I only have coolant on the garage floor currently.

Junior Member
Joined: Jan 2006
Posts: 13
Likes: 0
From: Los Angeles
I've been having a bad oil leak from my 7 before and after a rebuild.
From a stand point, could I get this fixed over a weekend?
What are the steps? Do I need to pull out the motor to replace the gaskets?
Arg.... I'm so frustrated with my car, I'm practically scared to drive it and have motor blow again!
And it doesn't help that I don't not know crap on rotories.....
Help me guru's......
You can fix it in a weekend. You'll need some stuff called "The Right Stuff" as a gasket. Don't use the paper style gaskets. They leak after prolonged use, and you'll have to reseal again. It'll take about 4-6 hours to do the job. And that is on a lift. If you don't have access to a lift, then you're better off having a shop do it. That way they can torque the bolts to the right specs also.


Hey, where did my $$$ go?
Joined: Feb 2001
Posts: 4,413
Likes: 0
From: Bimingham, AL
Here is a problem I've seen a BUNCH of times. When you are doing a pan on with the engine in the car it is very hard to get oil residue from the rear of the engine where the mounts are. Its been like 4years since I looked at the bottom of the engine iwth no pan but I'll explain this to the best of my memory. I believe it is the oil drain that is close to the back near to the mounts. No matter how long you let it sit there and drain it seems like oil just keeps coming and coming. Ive let it sit there for days and days and it still kept making a VERY fine trail of oil that ran from the drain, across the bottom of the engine, right across the flat surface where the motor mount bolt holes are and then drips. I would wipe it clean and 5 minutes later it would be there again. It is so fine and thin you can barely see it, you almost have to feel it....especially if you have clean oil. Even if you try to do it fast (which I have tried) and wipe it then put the pan up right away it wont help because the oil will start to get into that area a long time before you have the pan fully in place, torqed down, and the sealent cured.
I think that is the cause of most of these oil pan jobs because they always leak right there in that spot where that oil runs down. If you use a silicone based sealant such as Ultra Grey it will NOT seal over that very fine run of oil residue. "The Right Stuff" will so it works good and I always use that.
Stephen

Originally Posted by mmaluso
My oil pan has no leaks in it and Im changing my motor mounts next week. You guys are making me nervous... am I going to cause a huge oil leak?
About the gasket. Here is a link for the Permatex The Right Stuff For Imports
http://www.autobarn.net/per99071.html
Joined: Mar 2001
Posts: 30,817
Likes: 656
From: FL-->NJ/NYC again!
Originally Posted by TRISPEEDFD3S
I don't think so.
About the gasket. Here is a link for the Permatex The Right Stuff For Imports
http://www.autobarn.net/per99071.html
About the gasket. Here is a link for the Permatex The Right Stuff For Imports
http://www.autobarn.net/per99071.html
Joined: Sep 2003
Posts: 3,067
Likes: 7
From: Home of the Rolex 24
So....I have my motor pulled to do the clutch. In order for the pan to seal properly I need to follow proper steps above, tighten the bolts down, immediately drop the motor in and tighten the motor mounts and then do a final tightening? I am also using Gafinkle's oil pan brace and Noltec motor mounts. I have not seen any new posts on Garfinkle's installation. Anyone have anything to add about the process other than the directions provided? Any tricks about the Noltecs? Thanks Garret
I made a peg out of aluminum stock and slowly took it to the right length using a good caliper. That was after measuring how long it needed to be. Then, I glued it to the pan where the original had obviously made contact.
I don't know if it's completely necessary...
Full Member
Joined: Dec 2005
Posts: 238
Likes: 0
From: clermont, georgia
I've written about this before. if you come across an fd with leaking pan, check and see if the top of the motor is too close to the strut bar- this means, without even looking under the car that whoever put the pan on put a bolt in the pan where the aluminum motor mount nubbin is and this is causing the motor mount to not sit flat on the pan, but on top of that bolt head, causing the leak. best solution is to remove the motor mount (this can be done without dropping the subframe) and mill off the aluminum nubbin and mill a small recess into the mount for the oil pan bolt head. This way you get the advantage of the extra pan bolt AND don't have to remove and reseal the pan. just clean out the rtv from the MM bolts and use some new rtv when you reinstall the mount.
tom
tom