My custom vmount (Pics)

 07-13-07, 12:46 PM
#28
Not if you engineer it to retain the undertray.
Actually, the "flaw" is that the radiator is way out near the lower edge of the nose of the car, so if you sustained a hit from going off track or hitting a hard road transition, it might be more easily damaged relative to the stock config which places the lower part of the radiator further back above the sway mounts for protection.
However, I've not heard ofanyone damaging their V-moun this way yet.
The following users liked this post:
gracer7-rx7 (10-18-21)
07-13-07, 01:06 PM
#29
Rotary Freak
Thread Starter
iTrader: (15)
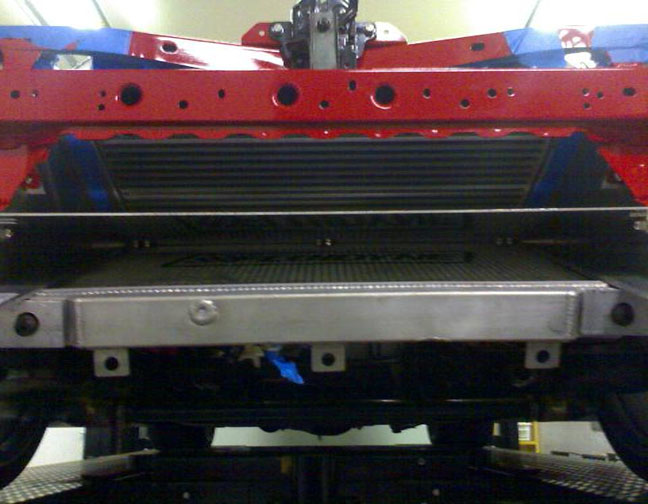
still in the midst of installation/fabrication. ive taken into account the possibility of the radiator getting damaged and had already planned to incorporate some sort of structural protection.
as far as debris flying into both cores, this risk is also present for all stock cars with the AC/radiator exposed. this risk is even greater for those who run front mounts. so with that said, vmounts are at equal risk for this type of damage. ive thought of this already and will be placing a mesh on the front bumper to prevent debris, rocks, roadkill, small animals from finding a home in the confines of the vmount.
updates to follow later tonight.
 07-14-07, 11:02 AM
#32
Rotary Enthusiast

Looks great!
How far below the tow hooks is the radiator edge?
To get mine far enough back and up enough to fit the undertray, I had to have it about 1 inch above the bottom edge of the tow hooks. I've scraped my tow hooks before so I wanted to make sure that it's not the radiator hitting.
How far below the tow hooks is the radiator edge?
To get mine far enough back and up enough to fit the undertray, I had to have it about 1 inch above the bottom edge of the tow hooks. I've scraped my tow hooks before so I wanted to make sure that it's not the radiator hitting.
07-14-07, 03:30 PM
#33
Full Member
Join Date: May 2005
Location: VOLOS-GREECE
Posts: 133
Likes: 0
Received 0 Likes
on
0 Posts
Great work ,but you could fit the a/c too ,its a litle tricky...you have to bend the pipes very carefully but it can be done,also you can protect your fans with a mettalic tray like i did......after done this i understood why they ask 2000$ for a v-mount...you need time and patient but the resault its more than adequate.
Special thanks to Kinetic...it was his project i studied .
Special thanks to Kinetic...it was his project i studied .
Last edited by SAQ; 07-14-07 at 03:40 PM.
07-15-07, 07:34 PM
#36
17 second FD
iTrader: (11)
Join Date: May 2006
Location: Poughkeepsie, New York
Posts: 2,436
Likes: 0
Received 1 Like
on
1 Post
Great work ,but you could fit the a/c too ,its a litle tricky...you have to bend the pipes very carefully but it can be done,also you can protect your fans with a mettalic tray like i did......after done this i understood why they ask 2000$ for a v-mount...you need time and patient but the resault its more than adequate.
Special thanks to Kinetic...it was his project i studied .
Special thanks to Kinetic...it was his project i studied .
While the work that has been done looks amazing, why don't more people do it? How much fabrication is required to make this work? Personally, I'd LOVE to have something like this on mine...
 07-15-07, 11:04 PM
#39
Rotary Freak
Thread Starter
iTrader: (15)
thanks for the pics hugo!
Anyhow, I decided that the mounts I made positioned the rad a little too close to the ground, even though its sitting higher than my GTC front bumper. Too bad though, since I finished everything up tonight (splitter and all!).
I got started on another set of brackets/mounts and will post up tomorrow. These new brackets will allow easier mass production down the road.
 07-16-07, 12:16 AM
#41

Great work ,but you could fit the a/c too ,its a litle tricky...you have to bend the pipes very carefully but it can be done,also you can protect your fans with a mettalic tray like i did......after done this i understood why they ask 2000$ for a v-mount...you need time and patient but the resault its more than adequate.
Special thanks to Kinetic...it was his project i studied .
Special thanks to Kinetic...it was his project i studied .
07-16-07, 08:05 AM
#42
Full Member
Join Date: May 2005
Location: VOLOS-GREECE
Posts: 133
Likes: 0
Received 0 Likes
on
0 Posts
[QUOTE=MADDSLOW;
While the work that has been done looks amazing, why don't more people do it? How much fabrication is required to make this work? Personally, I'd LOVE to have something like this on mine...[/QUOTE]
When you do it second time is very easy,you know what parts to use where they should be placed ,and if you kept sizes and copies from the duct parts it,s no more than 3 hours work.First time is hard cause you have to measure-cut -bolt-try to fit-make changes-and back to the start .What im saying is if someone sends you a design with sizes and how to put it together its very easy.
Quote:RX7LINK
very nice SAQ , is that a greddy front mount you use for ur IC ?
Yeah mate and a koyo radiator.
07-17-07, 11:34 PM
#47
Rotary Freak
Thread Starter
iTrader: (15)
updated pics of redesigned brackets and splitter installed.
i raised the radiator a bit after deciding it was too low/too close to the ground. the space between the rad and the bumper will need a spacer place - this was due to me cutting the bumper when i had a greddy FMIC installed.
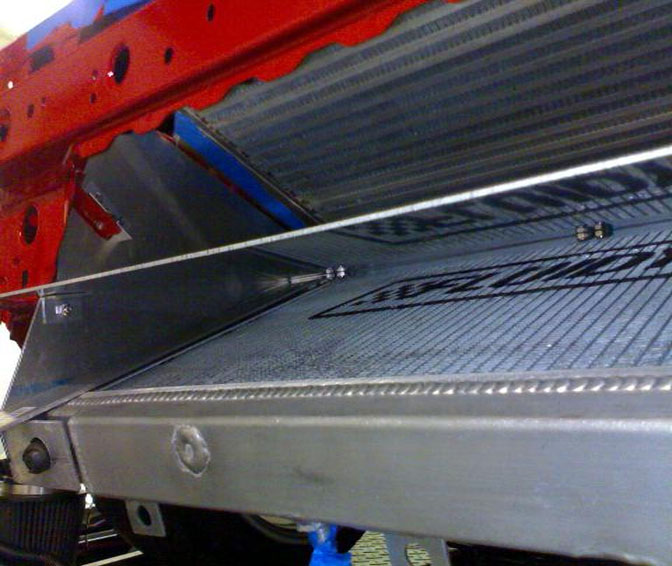

almost done! i plan to install the spacer plate tomorrow and finish up all the loose ends.
i raised the radiator a bit after deciding it was too low/too close to the ground. the space between the rad and the bumper will need a spacer place - this was due to me cutting the bumper when i had a greddy FMIC installed.
almost done! i plan to install the spacer plate tomorrow and finish up all the loose ends.