
Kinda rare part...mazdaspeed rear diffuser


Joined: Feb 2001
Posts: 4,001
Likes: 379
From: Aurora, Ontario, Canada
7racer,
Would it be too much to ask if you can get some step-by-step pics taken while you're mounting that puppy???
The instructions are nice, but they never tell the real story. You get under the car and you start tearing into it and find some surprises the instructions never took into account.
Can't wait to see the pics!!!
Thanks,
Sorry, but my Japanese officemate left for the weekend and won't be back until Monday. I doubt you will be able to wait till then  , but the instructions do seem pretty straightforward. Hope to see some pics soon!
, but the instructions do seem pretty straightforward. Hope to see some pics soon!
Ok, I may be an idiot, but what is the point of this piece? Is it supposed to keep the rear down at speeds in excess of 150 mph of something like that?
Personally, I think it looks ridiculous. Sorry.
Personally, I think it looks ridiculous. Sorry.
Junior Member
Joined: Apr 2007
Posts: 10
Likes: 0
From: Tokyo
Originally Posted by akiratdk
Its seems pretty straight foward to me... just follow the visuals... and the numbers you see on the side is the torque spec for the nuts and bolts~~~
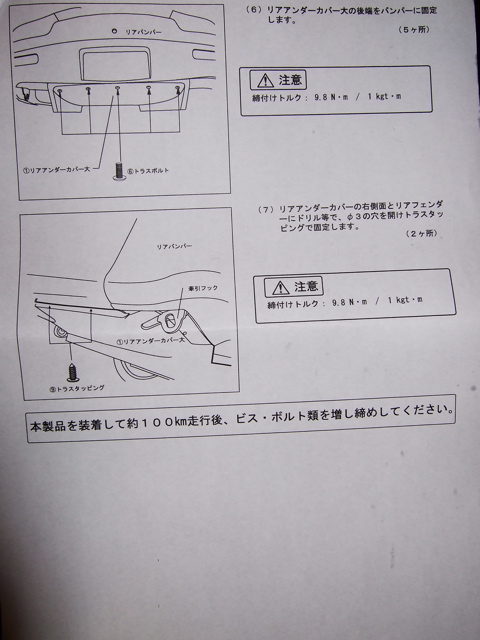
I am trying to read the chinese on the way bottom description and I think it means that this product performs its task when around 100km (about 60 miles) is reached....
my 2 cents~~
but sweet stuff ya got there~~~
I am trying to read the chinese on the way bottom description and I think it means that this product performs its task when around 100km (about 60 miles) is reached....
my 2 cents~~
but sweet stuff ya got there~~~
Please do post pictures (during and) after your install!
Thread Starter
Eats, Sleeps, Dreams Rotary
Joined: Apr 2001
Posts: 3,736
Likes: 10
From: Dallas, Texas
Originally Posted by adam c
Ok, I may be an idiot, but what is the point of this piece? Is it supposed to keep the rear down at speeds in excess of 150 mph of something like that?
Personally, I think it looks ridiculous. Sorry.
Personally, I think it looks ridiculous. Sorry.
Adam,
no worries. I always liked the way it looked in pictures. Thought it would be a nice complement to the car.
It is suppose to reduce rear end lift. But I am not competitive in high speed stuff. Just planning DE's.
Thread Starter
Eats, Sleeps, Dreams Rotary
Joined: Apr 2001
Posts: 3,736
Likes: 10
From: Dallas, Texas
Originally Posted by felix_is_alive
any pics installed yet???
Installation seems pretty straight forward "bolt A to B" kind`a ****
nice piece!!!
Installation seems pretty straight forward "bolt A to B" kind`a ****
nice piece!!!
I'm on call this week and got pounded yesterday. Today warmed up a bit. I need to see some post-ops later this morning.
Hopefully something later this afternoon.
Thread Starter
Eats, Sleeps, Dreams Rotary
Joined: Apr 2001
Posts: 3,736
Likes: 10
From: Dallas, Texas
Originally Posted by hksteve
Don't have time to translate everything from Japanese, but that part warns to check the bolts after installation and having driven 100km (distance, not speed).
Please do post pictures (during and) after your install!
Please do post pictures (during and) after your install!
does that first part say to cut the stock rear piece to get it to fit?
Thread Starter
Eats, Sleeps, Dreams Rotary
Joined: Apr 2001
Posts: 3,736
Likes: 10
From: Dallas, Texas
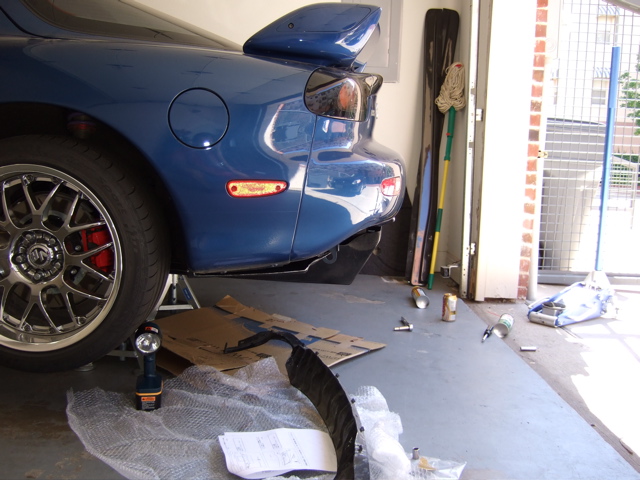
Ok here is the install...I kinda like it 
LOL
anyways.
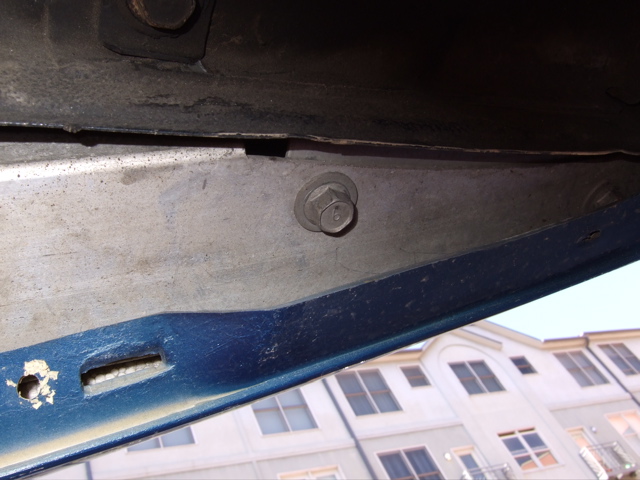
This piece is the front metal support piece that mounts right infront of the gas tank. There are two 10mm nuts to remove.
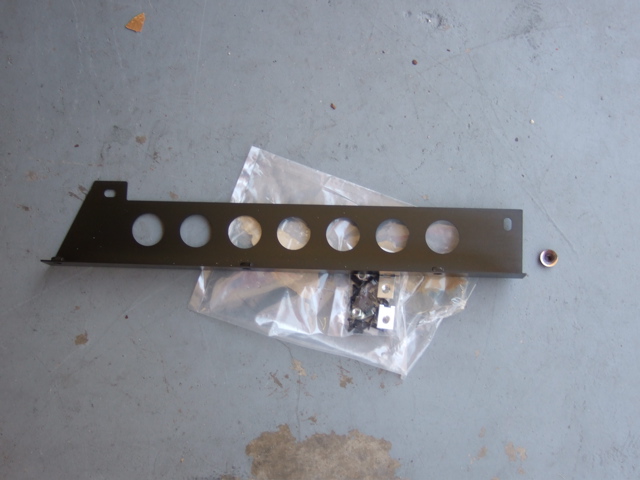
the location of the 10mm nuts
here you can see a plastic piece that I removed to mount the front metal support bar
LOL
anyways.
This piece is the front metal support piece that mounts right infront of the gas tank. There are two 10mm nuts to remove.
the location of the 10mm nuts
here you can see a plastic piece that I removed to mount the front metal support bar
Thread Starter
Eats, Sleeps, Dreams Rotary
Joined: Apr 2001
Posts: 3,736
Likes: 10
From: Dallas, Texas
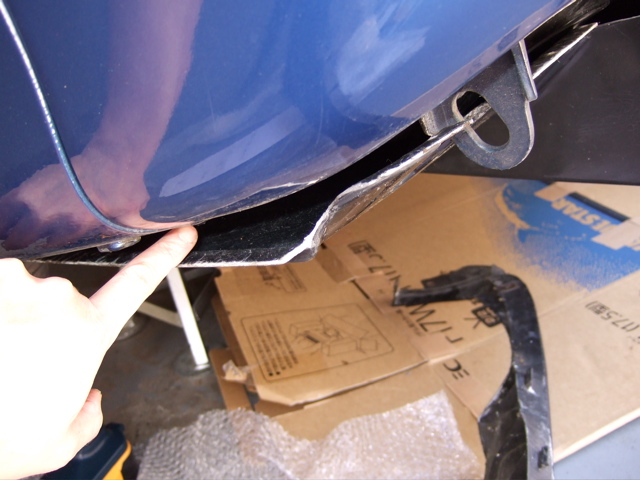
This is the rear support bar. I was kinda upset by this piece. The middle and outer holes line up perfectly with the holes in the fiberglass diffuser. The other two don't!!!! GRRRRR  Not a huge deal but I will have to drill two holes into the support bar that match up.
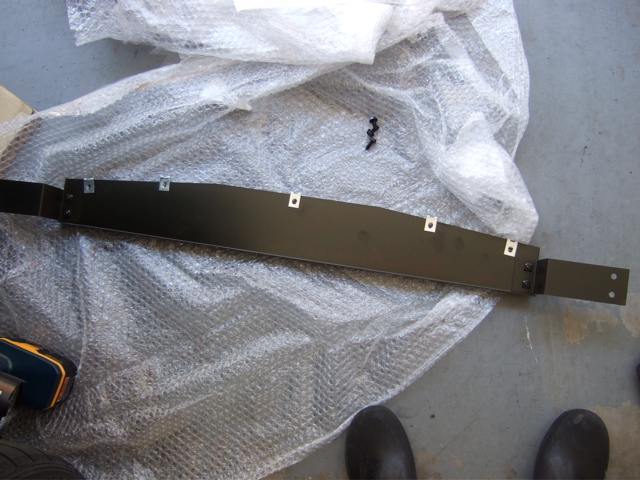
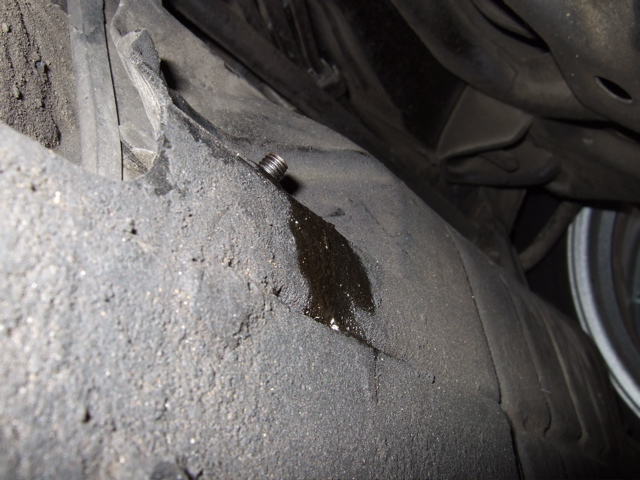
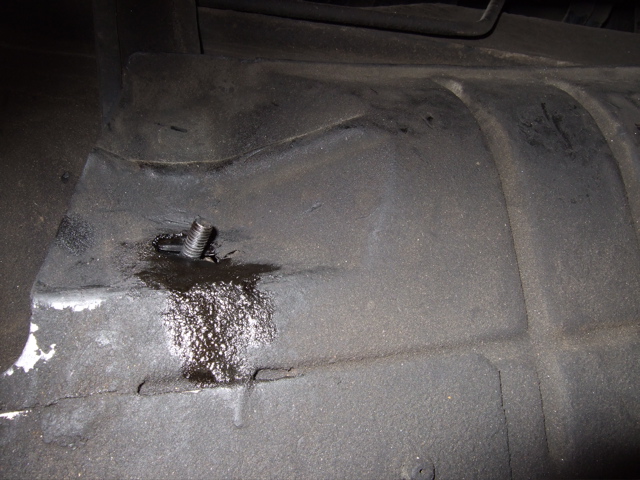
here is the bolt to remove to mount it to the bumper(there is another on the other side...obviously). It's a 12mm.
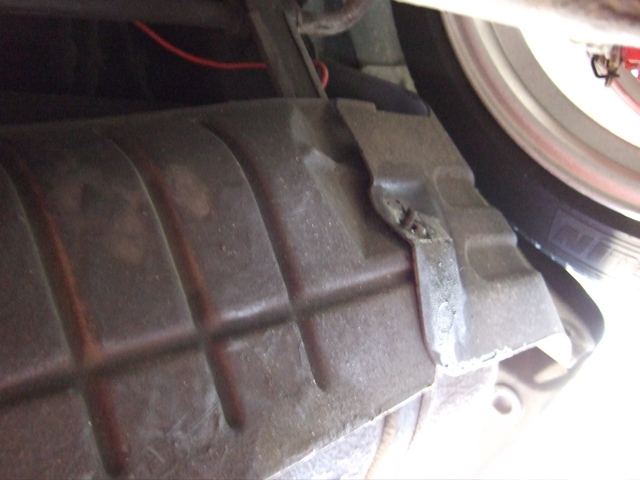
here is the back shot. I have my rear valence off. It kinda squares the back off...and there is a bit of a gap.....so I guess it depends on how I trim the stock valence piece to get it to look....
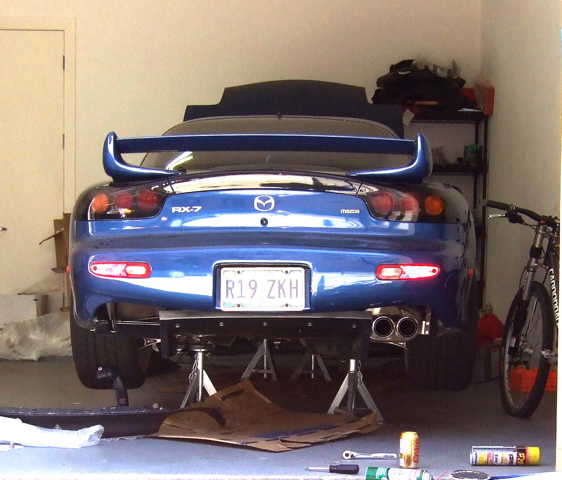

from the left side....kinda neat....
Not a huge deal but I will have to drill two holes into the support bar that match up.here is the bolt to remove to mount it to the bumper(there is another on the other side...obviously). It's a 12mm.
here is the back shot. I have my rear valence off. It kinda squares the back off...and there is a bit of a gap.....so I guess it depends on how I trim the stock valence piece to get it to look....
from the left side....kinda neat....
 BTW, I LOVE the color of your FD! Looks like you got a whole 99spec look goin!
Thread Starter
Eats, Sleeps, Dreams Rotary
Joined: Apr 2001
Posts: 3,736
Likes: 10
From: Dallas, Texas
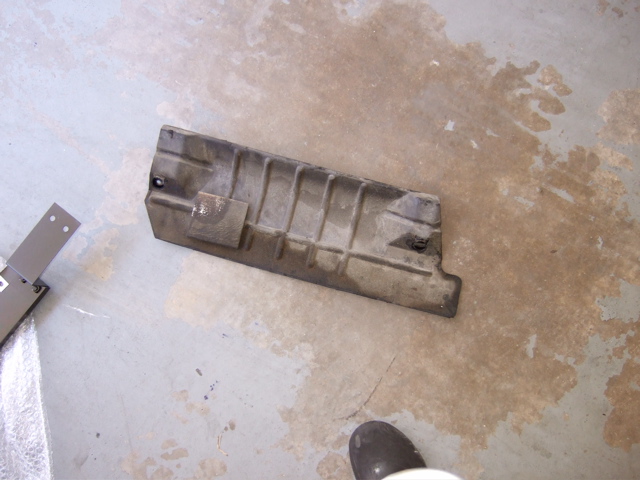
This side of the diffuser looks like it tucks under the body work...but I have an edge where the rear quarter panel meets the rear bumper....the fiberglass will probably need to be "notched" here to get it to fit correctly.
here is the right side....it's wierd how they leave it unfinished, and open. I guess it's because you won't see much of it due to the exhaust...also I guess the purpose is to direct air...not be pretty or not

here is that second little piece...it looks like it is to fill the gap between the diffuser and stock rear valence ....I'm not sure why they just didn't make it one piece? Maybe a fiberglass guy could incorporate it?
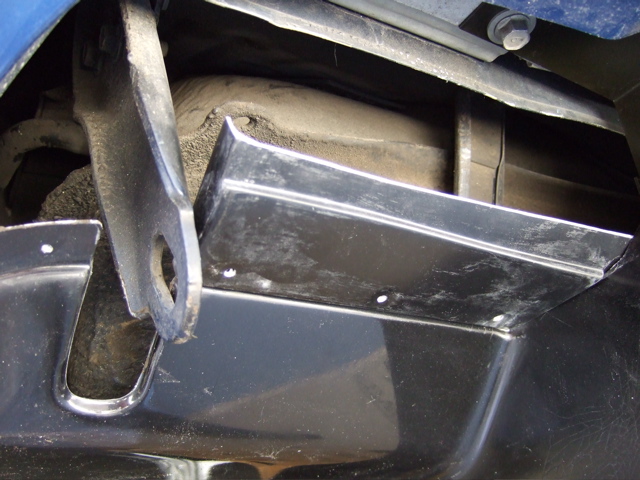
Finally, here is my stock rear piece that is carbon fibered...just debating whether I should hack this one up or not...

here is the right side....it's wierd how they leave it unfinished, and open. I guess it's because you won't see much of it due to the exhaust...also I guess the purpose is to direct air...not be pretty
or not here is that second little piece...it looks like it is to fill the gap between the diffuser and stock rear valence ....I'm not sure why they just didn't make it one piece? Maybe a fiberglass guy could incorporate it?
Finally, here is my stock rear piece that is carbon fibered...just debating whether I should hack this one up or not...
Thread Starter
Eats, Sleeps, Dreams Rotary
Joined: Apr 2001
Posts: 3,736
Likes: 10
From: Dallas, Texas
oops...I take that back...it looks like I use those push pins to hold this side into place...hmmm there aren't any holes, so I guess I drill them? Who knows how to read japanese?
Joined: Feb 2001
Posts: 4,001
Likes: 379
From: Aurora, Ontario, Canada
7racer,
I can't express my gratitude regarding the pics install. It looks like it went through without a hitch. Only real piece you might have to drill extra holes in is the main piece that came with the diffuser.
I have a question. Is it possible to leave the normal rear valiance piece on and still have the diffuser? It's almost like they've intended the rear valiance piece to stay on then add the diffuser?? Or is it impossilbe to keep it on??
Also, that plastic piece you had to remove to mount the rear support bar, what was that for?? I don't recall seeing a piece like that...
Looks good. It'll look better once you figure out what you want to do with the rear valiance piece.
I'm going to assume the front diffuser is a direct bolt on, taking place of the front undertray...
I like the colour of your FD. Also, you've got some massive wheels on that puppy!!
Lates,
P.S. Can't wait to see some finished pics...
Thread Starter
Eats, Sleeps, Dreams Rotary
Joined: Apr 2001
Posts: 3,736
Likes: 10
From: Dallas, Texas
Originally Posted by Neo
7racer,
I can't express my gratitude regarding the pics install.
I can't express my gratitude regarding the pics install.
I have a question. Is it possible to leave the normal rear valiance piece on and still have the diffuser? It's almost like they've intended the rear valiance piece to stay on then add the diffuser?? Or is it impossilbe to keep it on??
Also, that plastic piece you had to remove to mount the rear support bar, what was that for?? I don't recall seeing a piece like that...
I like the colour of your FD. Also, you've got some massive wheels on that puppy!!
 The rears are 18x10
https://www.rx7club.com/forum/showthread.php?t=389749

Thread Starter
Eats, Sleeps, Dreams Rotary
Joined: Apr 2001
Posts: 3,736
Likes: 10
From: Dallas, Texas
Originally Posted by 2in2rborex
How much it cost?
Thanks!
Thanks!
too much...I would ask Ramy for the exact price. I don't have the breakdown as I purchased it with the 99 hatch struts. But I think it was over $700

Joined: Feb 2001
Posts: 4,001
Likes: 379
From: Aurora, Ontario, Canada
Yeah, it's a hefty price to pay for a Mazdaspeed part, but at least you know you've got a factory part. Completely functional.
I wish I could read Japanese, I would have translated it for you...
I'm interested to see what the final pics are going to be like!!
Lates,
I wish I could read Japanese, I would have translated it for you...
I'm interested to see what the final pics are going to be like!!
Lates,
It's probably too late to be of any relevance, but the translation I got for step one is something like:
"Cut from the center 40 cm in each direction for a total of 80 cm. Do not remove the clips"
"Cut from the center 40 cm in each direction for a total of 80 cm. Do not remove the clips"