How To: Rebuild your power steering pump


Thread Starter

Joined: Feb 2010
Posts: 1,105
Likes: 118
From: Sacramento, Ca
How To: Rebuild your power steering pump
To whom it may concern,
As I have researched the factory 3rd generation Rx7 power steering pump is generally a pretty robust pump almost never requiring maintenance. I experienced shaft bearing failure and observed a retained high pitched whine even after replacing my belt. The noise was pinpointed to my shaft bearing on my power steering pump. The technical data provided will describe the process of rebuilding, resealing, and the installation of a new bearing.
Rebuilding the Power Steering Pump
Input Conditions
-Throttle Elbow removed
-SMIC upper coupler removed
-Accessory drive belt removed
-Power Steering pump reservoir drained
-Power Steering pump removed (FSM section N page 28)
Support Equipment
-Strap Wrench
-Torque Wrench 0-50 ft/lbs
-Paint Marker
Consumables
-Power Steering pump seal kit, Autozone P/N 8799 or equivalent
-Shaft bearing, McMaster Carr P/N 6153k77 or equivalent
-Grease, Wheel bearing
-Cleaning Agent, Brakleen or equivalent
-Power Steering Fluid or equivalent
Personnel Recommended
-Two
Note
-Serviceable parts shall be retained for installation.
Disassembly of Power Steering Pump
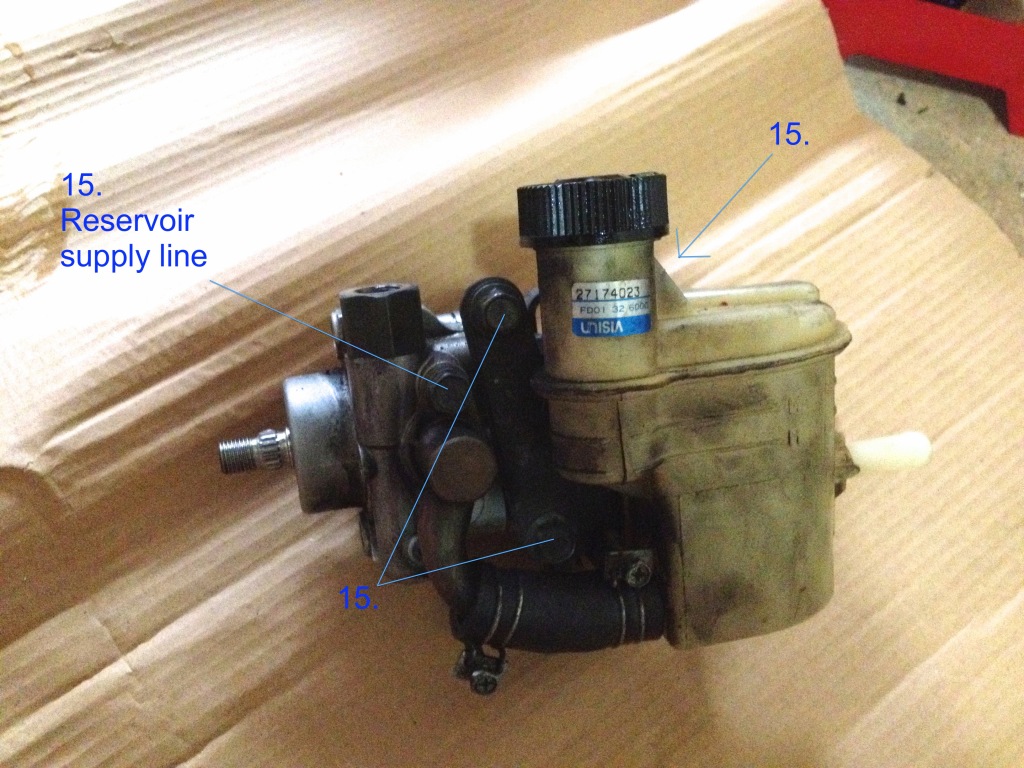
1. Remove 1 bolt and disconnect reservoir supply line. Remove and discard packing.
2. Remove 3 bolts and remove reservoir from power steering pump.
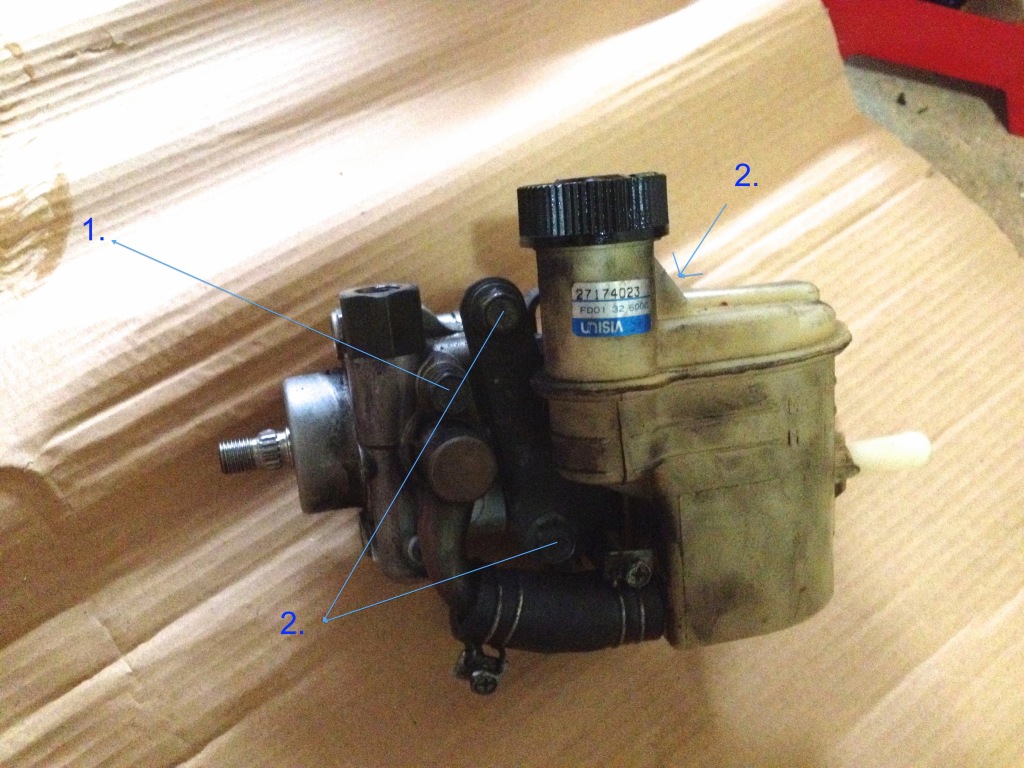
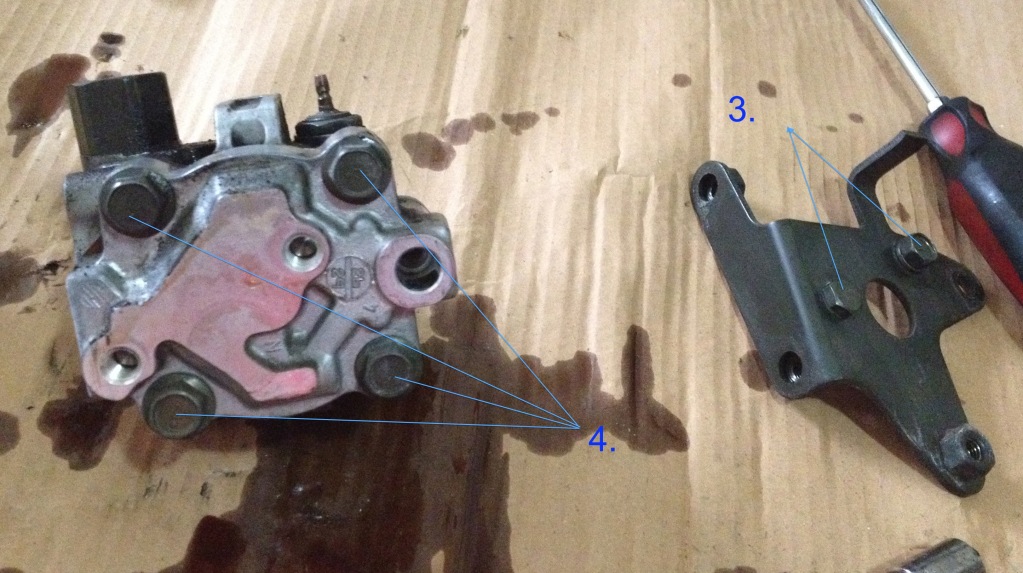
3. Remove 2 bolts and remove reservoir bracket.
4. Remove 4 bolts and remove powersteering pump backplate.
5. Remove internal housing cover.
6. Remove and discard gasket.
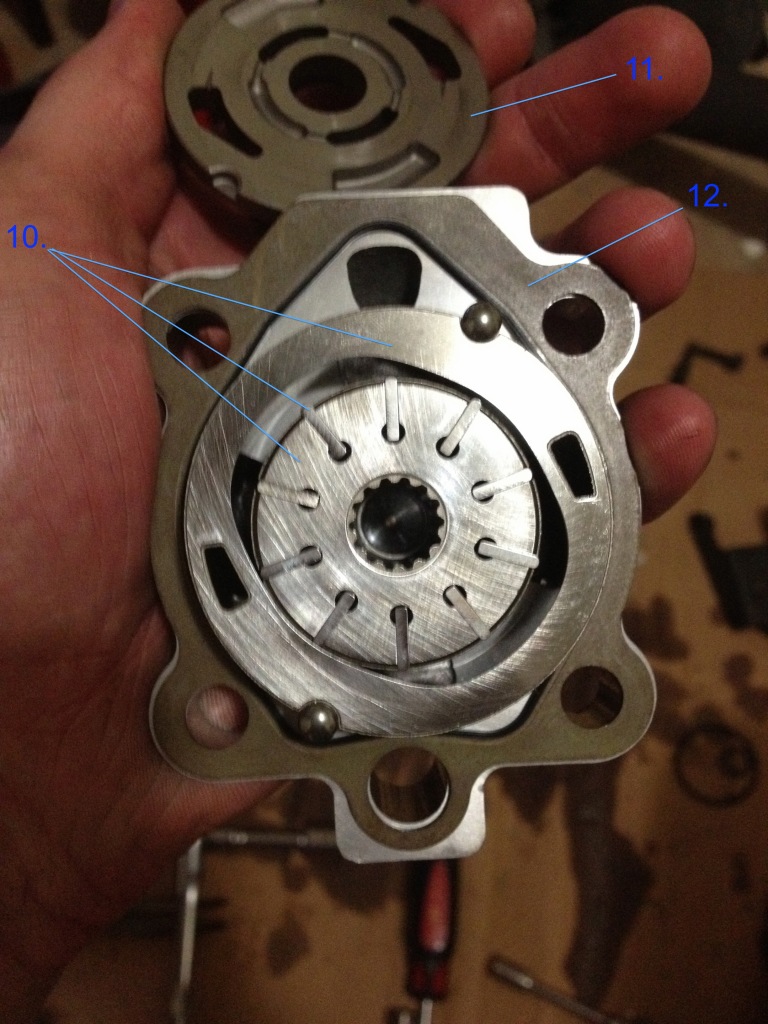
7. Remove rotor, internal housing, and 10 vanes.

8. Remove bearing retaining ring.

Image source: MX6.com/Forums User King6
Note
-If same bearing is to be used, omit step 9.
-Cover shall be installed on shaft end or damage to equipment may result. Bearing and shaft will be removed from the inside out.
9. Lightly tap out shaft and bearing using a hammer on shaft end. Remove bearing from shaft.
10. Remove and discard 2 packings.
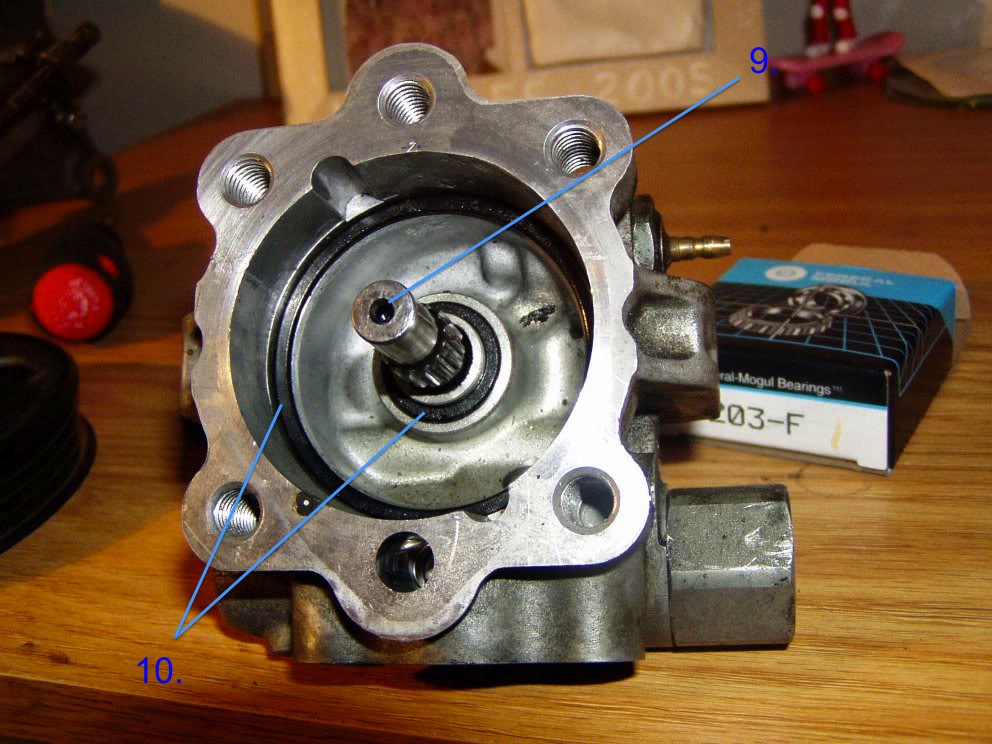
Image source: MX6.com/Forums User King6
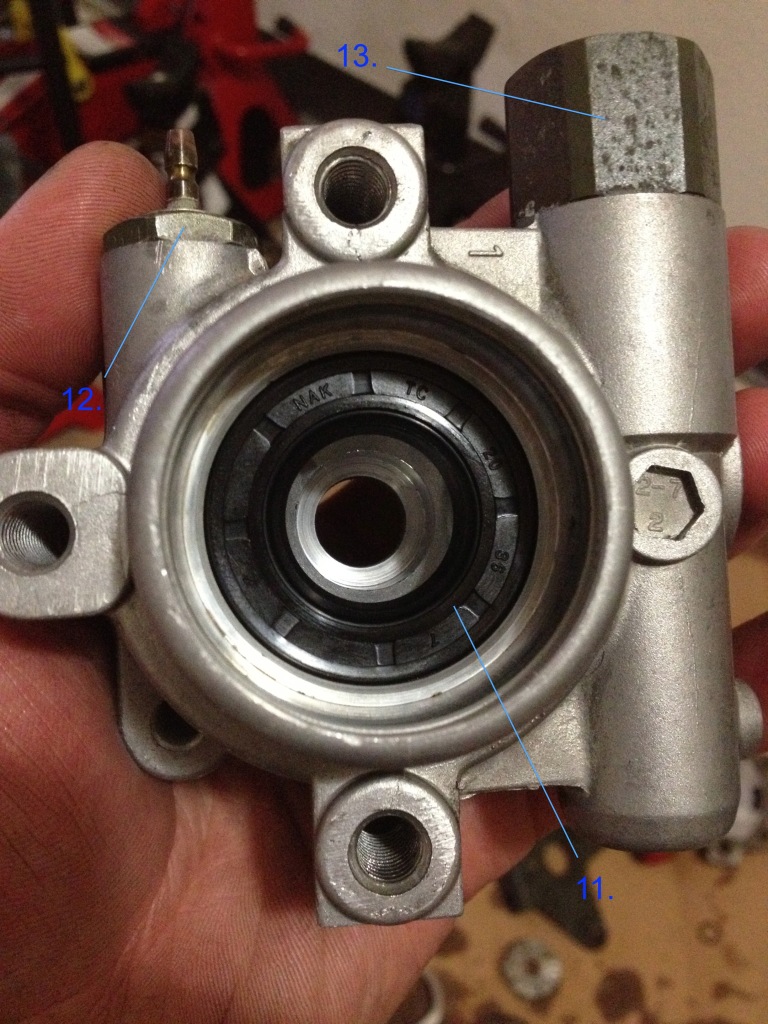
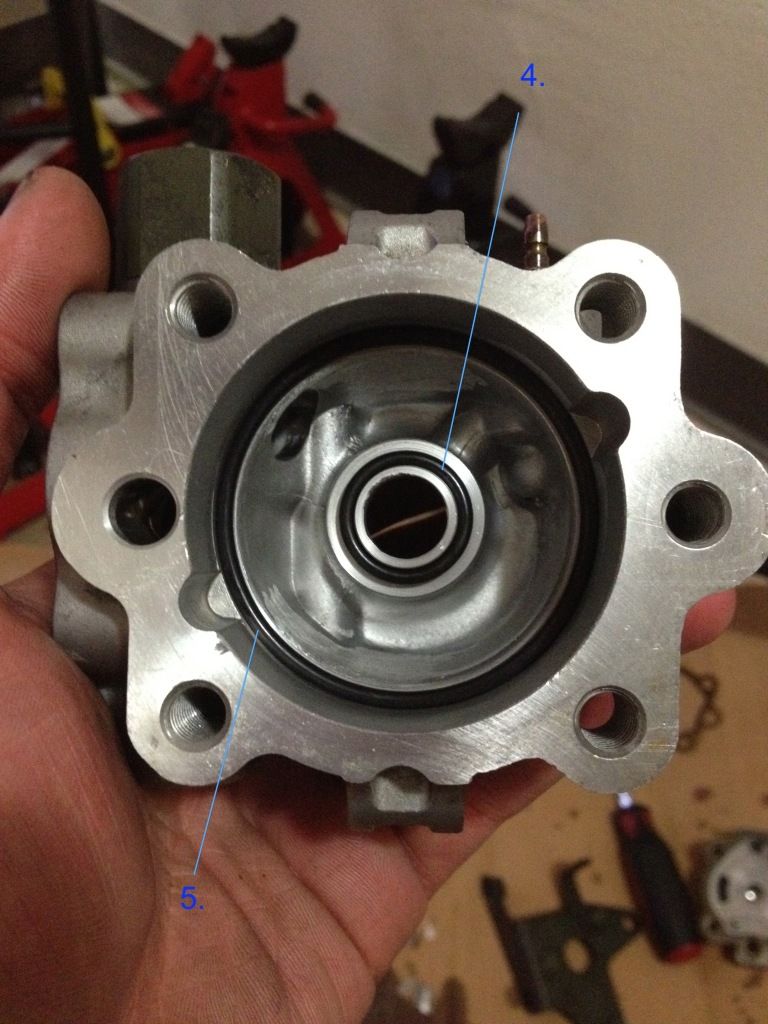
11. Remove oil seal.
12. Remove sensor. Remove and discard packing.
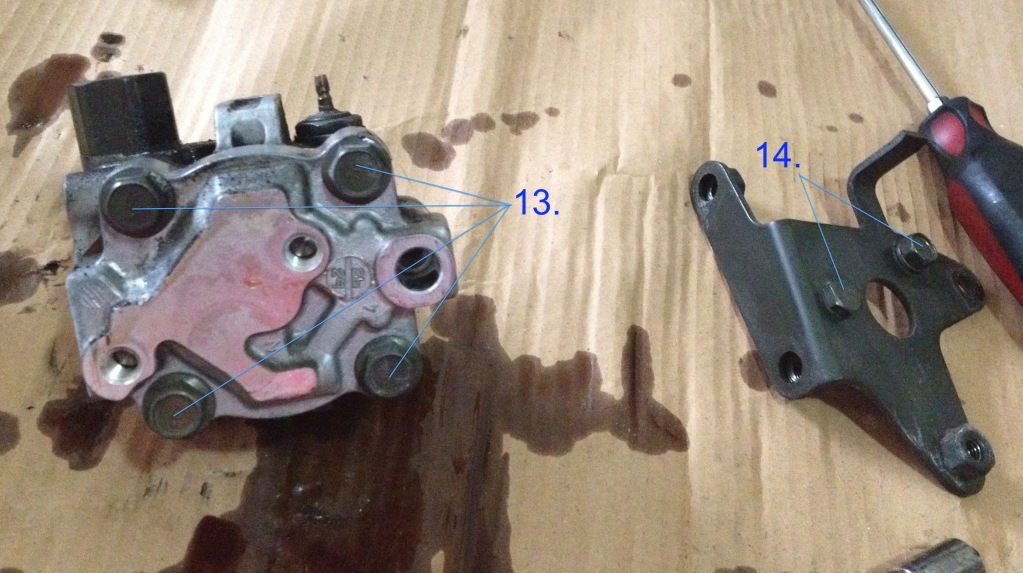
13. Remove supply line union. Discard packing.
Assembly of Power Steering Pump
Coming Soon.
As I have researched the factory 3rd generation Rx7 power steering pump is generally a pretty robust pump almost never requiring maintenance. I experienced shaft bearing failure and observed a retained high pitched whine even after replacing my belt. The noise was pinpointed to my shaft bearing on my power steering pump. The technical data provided will describe the process of rebuilding, resealing, and the installation of a new bearing.
Rebuilding the Power Steering Pump
Input Conditions
-Throttle Elbow removed
-SMIC upper coupler removed
-Accessory drive belt removed
-Power Steering pump reservoir drained
-Power Steering pump removed (FSM section N page 28)
Support Equipment
-Strap Wrench
-Torque Wrench 0-50 ft/lbs
-Paint Marker
Consumables
-Power Steering pump seal kit, Autozone P/N 8799 or equivalent
-Shaft bearing, McMaster Carr P/N 6153k77 or equivalent
-Grease, Wheel bearing
-Cleaning Agent, Brakleen or equivalent
-Power Steering Fluid or equivalent
Personnel Recommended
-Two
Note
-Serviceable parts shall be retained for installation.
Disassembly of Power Steering Pump
1. Remove 1 bolt and disconnect reservoir supply line. Remove and discard packing.
2. Remove 3 bolts and remove reservoir from power steering pump.
3. Remove 2 bolts and remove reservoir bracket.
4. Remove 4 bolts and remove powersteering pump backplate.
5. Remove internal housing cover.
6. Remove and discard gasket.
7. Remove rotor, internal housing, and 10 vanes.
8. Remove bearing retaining ring.
Image source: MX6.com/Forums User King6
Note
-If same bearing is to be used, omit step 9.
-Cover shall be installed on shaft end or damage to equipment may result. Bearing and shaft will be removed from the inside out.
9. Lightly tap out shaft and bearing using a hammer on shaft end. Remove bearing from shaft.
10. Remove and discard 2 packings.
Image source: MX6.com/Forums User King6
11. Remove oil seal.
12. Remove sensor. Remove and discard packing.
13. Remove supply line union. Discard packing.
Assembly of Power Steering Pump
Coming Soon.
Thread Starter
Joined: Feb 2010
Posts: 1,105
Likes: 118
From: Sacramento, Ca
Assembly of Power Steering Pump
1. Lubricate and install packing on Pump Supply union. Install union and torque 51-57 ft/lbs.
2. Lubricate and install packing on Pressure sensor. Install sensor and torque 13-16 ft/lbs.
3. Lubricate and install Oil Seal in Pump Housing.

4. Lubricate and install Shaft Housing packing.
5. Lubricate and install Housing Seal packing.
Note
-If bearing and shaft were not removed, omit step 6-8.
-Protective cover shall be installed on hammering point or damage to equipment may result.
-Shaft shall be installed from bearing/pulley side of the housing.
6. Lubricate Bearing cavity and bearing inner race using grease.

7. Install shaft in housing. Lightly tap bearing into place until bearing is fully seated below retaining ring groove.
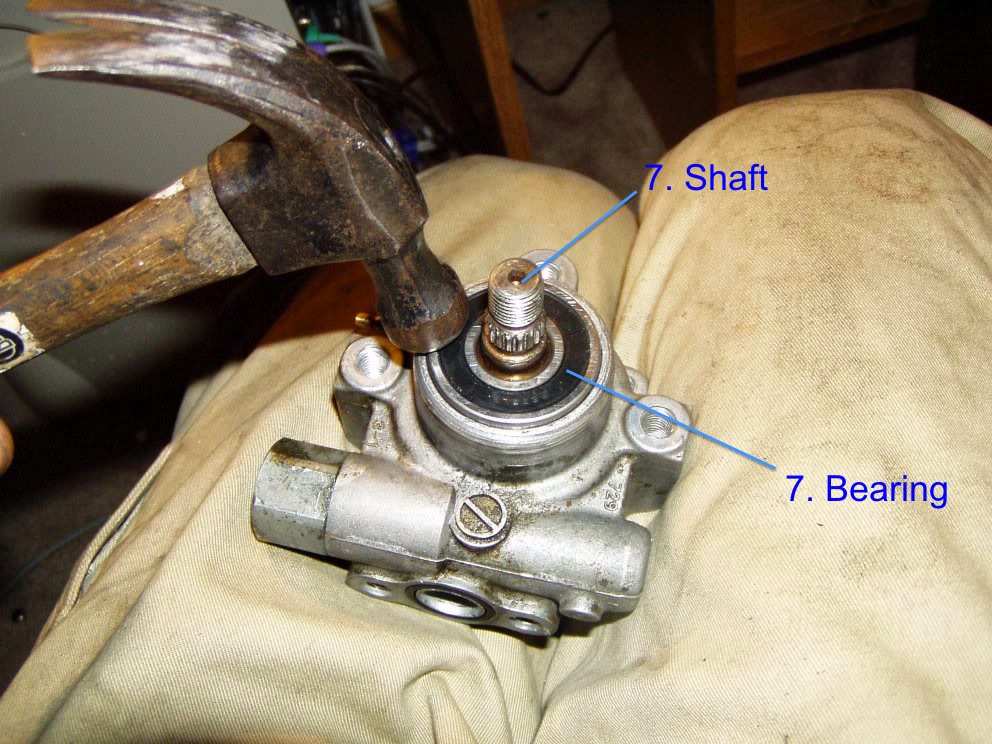
Image Source MX6.com/forums User King6
8. Install Retaining Clip into bearing housing.
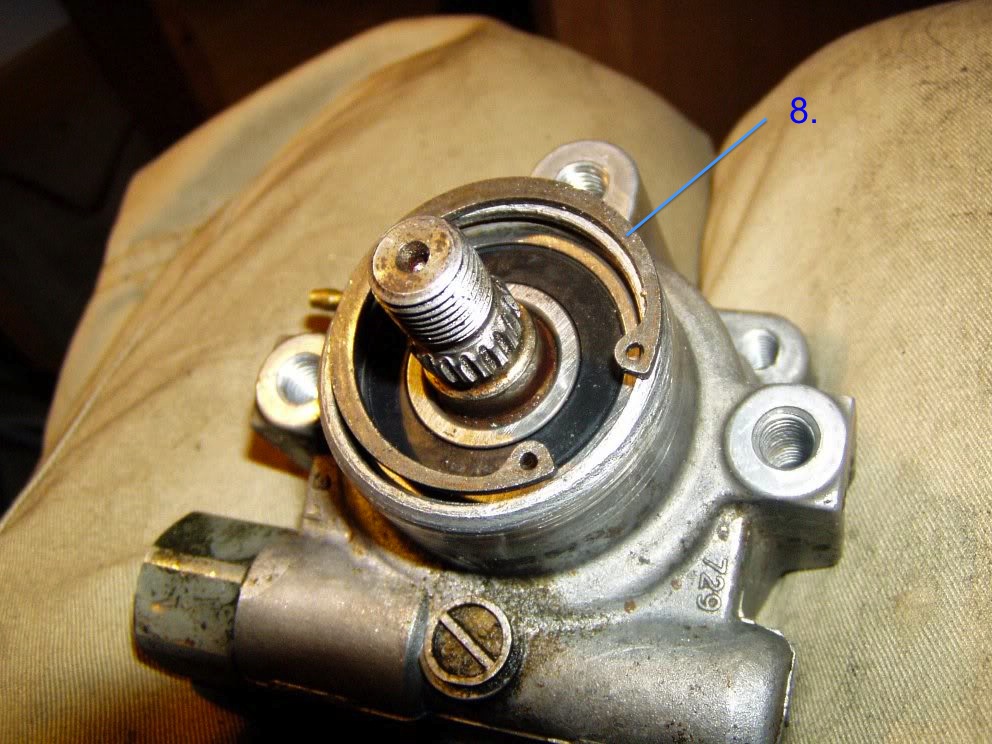
Image Source MX6.com/forums User King6
9. Clean mating surfaces of back plate and front housing using cleaning solution.
Note
-Pump Vanes have a flat side and a rounded side. Rounded side shall face outboard or damage to internal housing and failure of component may result.
-Internal housing contains lettering on one side. Lettering shall face housing back plate.
10. Install internal housing, rotor, and 10 vanes.
11. Install internal housing cover.
12. Install back plate gasket.
13. Install Pump housing onto backing plate and ensure splines of shaft engage rotor. Torque back plate bolts (four places) to 12-14 ft/lbs.
14. Install bracket on pump. Torque 3 bolts 122-156in/lbs.
15. Lubricate and install packing on reservoir supply line. Install reservoir and torque mount bolts 122-156 in/lbs. Torque reservoir supply line bolt 122-156 in/lbs.
Follow-on Maintenance
-Install power steering pump (FSM section N page 28)
-Service power steering pump reservoir.
-Perform power steering pump bleed and leak check (FSM section N page 6)
-Install and tension Accessory drive belt.
-Install Throttle Elbow
-Install upper SMIC coupler
Final Notes
Strap wrench is to be used to remove pulley from power steering pump is SST tool is unavailable. Paint Marker is to torque stripe Idler Pulley lock nut as well as Power Steering Pulley retaining nut. Wheel Bearing grease is also used to lubricate the splines on the power steering pulley prior to installation.
MODS:
Please modify and move the Note prior to step 9 in the disassembly to prior to step 8. Change omitted steps from omitting step 9 to omit step 8 and 9. Please delete my Space Saver post. I thought I would be able to edit it. But it turns out I can't.
Any feedback is accepted. I hope this helps someone out with a leaky power steering pump or a bad bearing in it. Certainly more fun than buying a new pump or tracking down a GOOD used one. I used a stainless steel Abec-1 bearing from McMaster Carr which ended up being ~$40. They had identical bearings with the size needed. I chose this part for its heat withstanding temps (~300*F) and its Max RPM 17,000 I believe. I believe this bearing is OVER engineered for my case but I'd rather be safe than sorry. I'm sure the $11 6203 double sealed bearing will work just as well though. The power steering seal kit was less than $20. So in reality you could rebuild your pump for less than $40. The entire process took approximately 2-3 hours. The format I wrote this How To in is a reflection of the tech data I use everyday on F-16's.
Again, hope this is useful to someone.
Matt
1. Lubricate and install packing on Pump Supply union. Install union and torque 51-57 ft/lbs.
2. Lubricate and install packing on Pressure sensor. Install sensor and torque 13-16 ft/lbs.
3. Lubricate and install Oil Seal in Pump Housing.
4. Lubricate and install Shaft Housing packing.
5. Lubricate and install Housing Seal packing.
Note
-If bearing and shaft were not removed, omit step 6-8.
-Protective cover shall be installed on hammering point or damage to equipment may result.
-Shaft shall be installed from bearing/pulley side of the housing.
6. Lubricate Bearing cavity and bearing inner race using grease.
7. Install shaft in housing. Lightly tap bearing into place until bearing is fully seated below retaining ring groove.
Image Source MX6.com/forums User King6
8. Install Retaining Clip into bearing housing.
Image Source MX6.com/forums User King6
9. Clean mating surfaces of back plate and front housing using cleaning solution.
Note
-Pump Vanes have a flat side and a rounded side. Rounded side shall face outboard or damage to internal housing and failure of component may result.
-Internal housing contains lettering on one side. Lettering shall face housing back plate.
10. Install internal housing, rotor, and 10 vanes.
11. Install internal housing cover.
12. Install back plate gasket.
13. Install Pump housing onto backing plate and ensure splines of shaft engage rotor. Torque back plate bolts (four places) to 12-14 ft/lbs.
14. Install bracket on pump. Torque 3 bolts 122-156in/lbs.
15. Lubricate and install packing on reservoir supply line. Install reservoir and torque mount bolts 122-156 in/lbs. Torque reservoir supply line bolt 122-156 in/lbs.
Follow-on Maintenance
-Install power steering pump (FSM section N page 28)
-Service power steering pump reservoir.
-Perform power steering pump bleed and leak check (FSM section N page 6)
-Install and tension Accessory drive belt.
-Install Throttle Elbow
-Install upper SMIC coupler
Final Notes
Strap wrench is to be used to remove pulley from power steering pump is SST tool is unavailable. Paint Marker is to torque stripe Idler Pulley lock nut as well as Power Steering Pulley retaining nut. Wheel Bearing grease is also used to lubricate the splines on the power steering pulley prior to installation.
MODS:
Please modify and move the Note prior to step 9 in the disassembly to prior to step 8. Change omitted steps from omitting step 9 to omit step 8 and 9. Please delete my Space Saver post. I thought I would be able to edit it. But it turns out I can't.
Any feedback is accepted. I hope this helps someone out with a leaky power steering pump or a bad bearing in it. Certainly more fun than buying a new pump or tracking down a GOOD used one. I used a stainless steel Abec-1 bearing from McMaster Carr which ended up being ~$40. They had identical bearings with the size needed. I chose this part for its heat withstanding temps (~300*F) and its Max RPM 17,000 I believe. I believe this bearing is OVER engineered for my case but I'd rather be safe than sorry. I'm sure the $11 6203 double sealed bearing will work just as well though. The power steering seal kit was less than $20. So in reality you could rebuild your pump for less than $40. The entire process took approximately 2-3 hours. The format I wrote this How To in is a reflection of the tech data I use everyday on F-16's.
Again, hope this is useful to someone.
Matt


Thread Starter
Joined: Feb 2010
Posts: 1,105
Likes: 118
From: Sacramento, Ca
Trending Topics

Thread Starter
Joined: Feb 2010
Posts: 1,105
Likes: 118
From: Sacramento, Ca
I ended up going with a kit from an auto parts store for both cost and ease of access. In the end the o rings I placed are not succumb to ridiculous heat or out of the ordinary conditions like your oil control rings or coolant seals might. None of my oem seals were bad at 43k miles, but my bearing had reached its time. The seal kit was $17 and I picked it up the next day. It was a very complete kit including new crush washers for the banjo bolt and seals for the unions. It was kind of a no brainer. I probably would have been fine with a lighter bearing though. :P


Thread Starter
Joined: Feb 2010
Posts: 1,105
Likes: 118
From: Sacramento, Ca
In the first post, the consumables sections notes McMaster carr part number 6153k77. If you proceed to their website, it will list the dimensions and specs of that bearing. The bearing that I used was "over engineered" for the application it is used in and a 6203 bearing should suffice. Bearings have a standard numbering system. Good luck to you on the rebuild 
Matt
Matt
I am hearing an intermittent griding noise from my engine which I first thought was my alternator,
With a stethoscope though, it is much more pronounced from my power steering pump and im thinking it is the bearing going bad.
Hope this rebuild will do the trick. Thanks for listing part numbers!
With a stethoscope though, it is much more pronounced from my power steering pump and im thinking it is the bearing going bad.
Hope this rebuild will do the trick. Thanks for listing part numbers!
Awesome writeup!
For removing the PS pulley I always use an impact gun. Trying to hold the pulley still while removing the nut with a standard wrench is how most of the PS pullies get broken.
I've removed MANY PS pullies with an impact with zero problem. With the nut off the pulley just slides right off.
If you don't have an impact gun of some kind, this would be a good reason to get one. There's tons of battery operated ones out there if you don't want to get an air compressor. It's REALLY tricky to keep the pulley still while removing the nut with a regular wrench and since the pulley is plastic it doesn't take much to damage or break it.
Dale


I second the impact gun, and getting an electric one if a compressor isn't an option for you. I recently rebuilt my PS Pump with this write-up, and it was super easy! Even easier with my impact gun.
I've always used a synthetic power steering fluid from the parts store. Never had a single problem - no noise, leaks, etc. Used it on many FD's.
Fill the reservoir to the top, start the engine, then turn the wheels lock to lock a few times to work air out of the system. Shut the car off and top up if needed.
Dale
Fill the reservoir to the top, start the engine, then turn the wheels lock to lock a few times to work air out of the system. Shut the car off and top up if needed.
Dale

Full Member
Joined: Mar 2016
Posts: 223
Likes: 7
From: Hong Kong
This is awesome. I don't think I've ever seen a more organized, well-though-out "how to"! Thank you!!
Can anyone tell me if this will also work for a '99 spec FD3S p/s pump? I over-tightened my accessory belt, and now my bearing's just gone... time for a replacement!!
THANKS in advance!!
Can anyone tell me if this will also work for a '99 spec FD3S p/s pump? I over-tightened my accessory belt, and now my bearing's just gone... time for a replacement!!
THANKS in advance!!
Full Member
Joined: Mar 2016
Posts: 223
Likes: 7
From: Hong Kong
Also, how freely should the new bearing (pulley) spin with everything out back together but no oil? Mine still has quite a lot of friction... The pulley is not easily spun by hand, and will certainly not spin freely when let go of.
Thanks!!
Thanks!!
The idler pulley spins pretty well, at least 1 or 2 complete turns after you spin it by hand. The power steering pump had a good amount of resistance, although I didn't try spinning it by hand when it was dry. When there was fluid in the system, it wouldn't spin freely, it would stop moving basically as soon as you quit using your hand to turn it.