When you click on links to various merchants on this site and make a purchase, this can result in this site earning a commission. Affiliate programs and affiliations include, but are not limited to, the eBay Partner Network.
How To: Install aftermarket rear hatch lift supports on a 93-95 RX-7 FD3S
I know this has probably been covered a million times and there are even a few write ups but I could not find a detailed step by step write that included pictures. Pictures, did I mention how much I love pictures? Using OEM lift supports cost significantly more and have limited sources. Aftermarket lift supports can be found at your local parts store and for significantly less money, $25-$35 vs $99+.
Parts needed:
$36 Tuff Support Gas springs 610601 comes in a pair with limited lifetime warranty rated 75lbs and includes accessories
3/8 ratchet
12mm socket
13mm socket
12mm open end wrench
flat nose screw driver
Philips screw driver
pry bar
very fine precision flat head screw driver
vice
drill
7/16 titanium drill bit
possibly 3/8 titanium drill bit
Up to 3/8 titanium step drill bit
dremel with metal cutoff wheel
Pros to aftermarket lift supports:
Can find locally at any automotive parts stuff
multiple options and brands readily available
panel removal no longer necessary
significant financial savings
Cons to aftermarket lift supports:
It is no longer “OEM”
you can no longer use the lower lift support plastic cover however it may be possible with some ingenuity
Procedure:
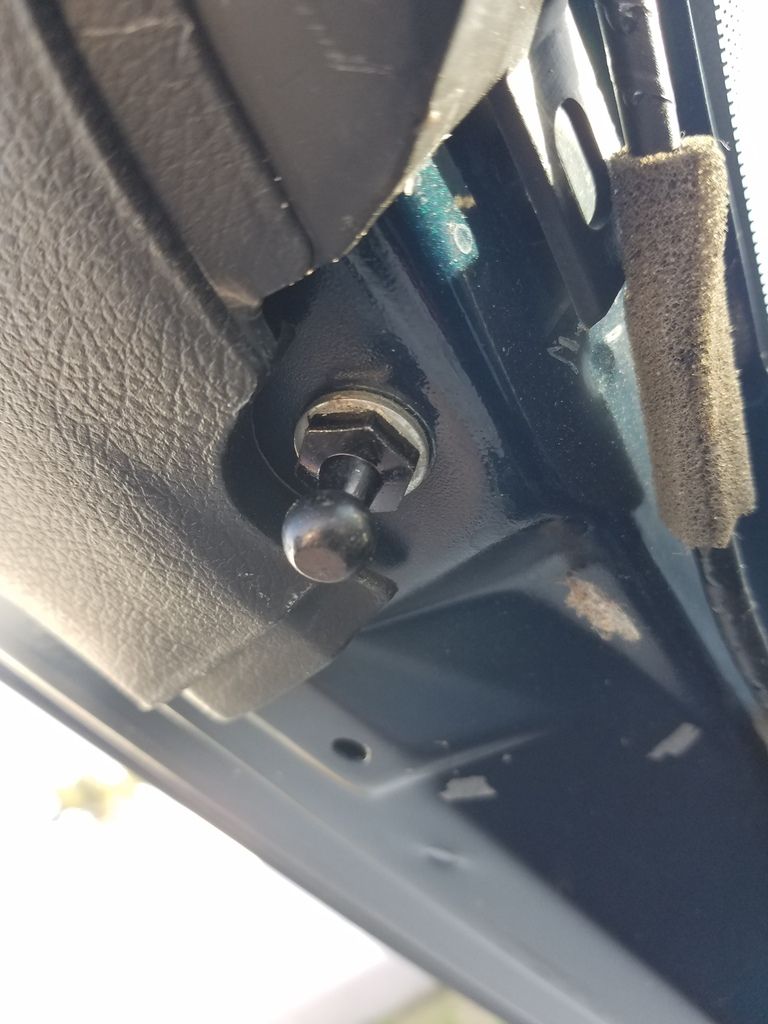
Gain access to the original lift supports. To do this you need to remove a few panels, the rear quarter panels and the rear hatch side panel. The luggage compartment panel hides two push in retaining clips holding the quarter trim in place. The rear quarter panel is held together by a total of (3) push in retaining clips and (1) philips screw. Remove the compartment panel and use the fine precision flat head screw driver to pry open the middle push in retention clip then pull out the entire retaining clip. There is another push in clip located at the bottom of the quarter panel just behind the seat. Remove in the same manner using the precision screw driver. Hidden behind the belt is a Philips screw. Remove this using a Philips screw driver. Now partially remove the rubber door seal to gain access to the internal metal retaining clips. Using a light and/or factory sales manual locate each retaining clip location carefully pry the panel out. Once the panel is out you’ll now have access to the two 12mm bolts holding the bottom end of the oem lift support.[img]
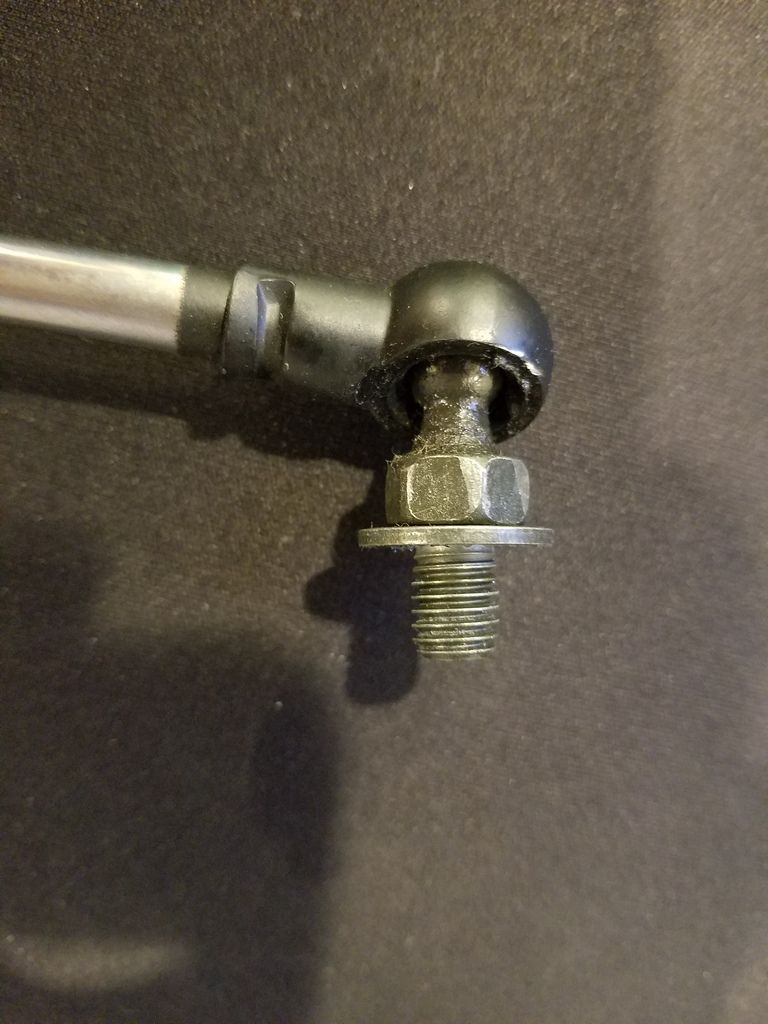
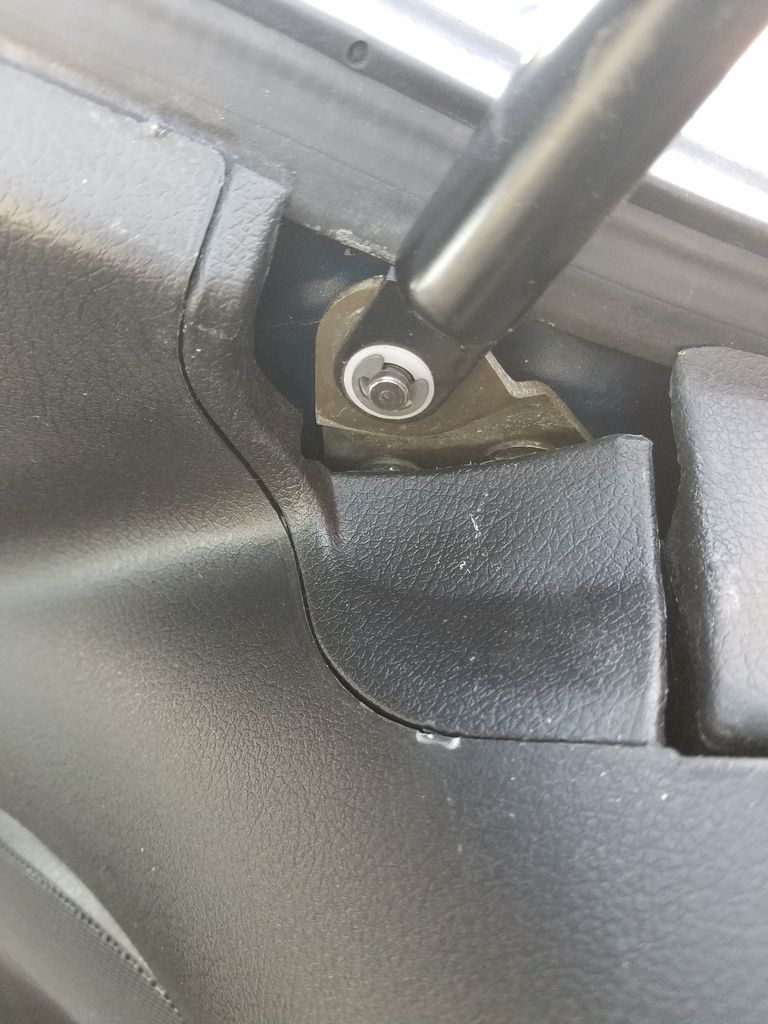
To access the top portion of the OEM lift support you will need to remove the rear hatch side panel. This is held together by (2) push in retaining clips. Once again use the very fine precision flat head screw driver to remove the push in retaining clips. Once out, again, using a pry bar, light, and/or factory sales manual, identify the metal retaining retaining clip locations and carefully pry them out. At the trunk and facing towards the front of the vehicle you may have to push the panel forward and toward the trunk to clear the lift support rod and place it out of the way. Once out of the way you now have access to the other half of the lift support connected to the 10mm ball joint.[img]
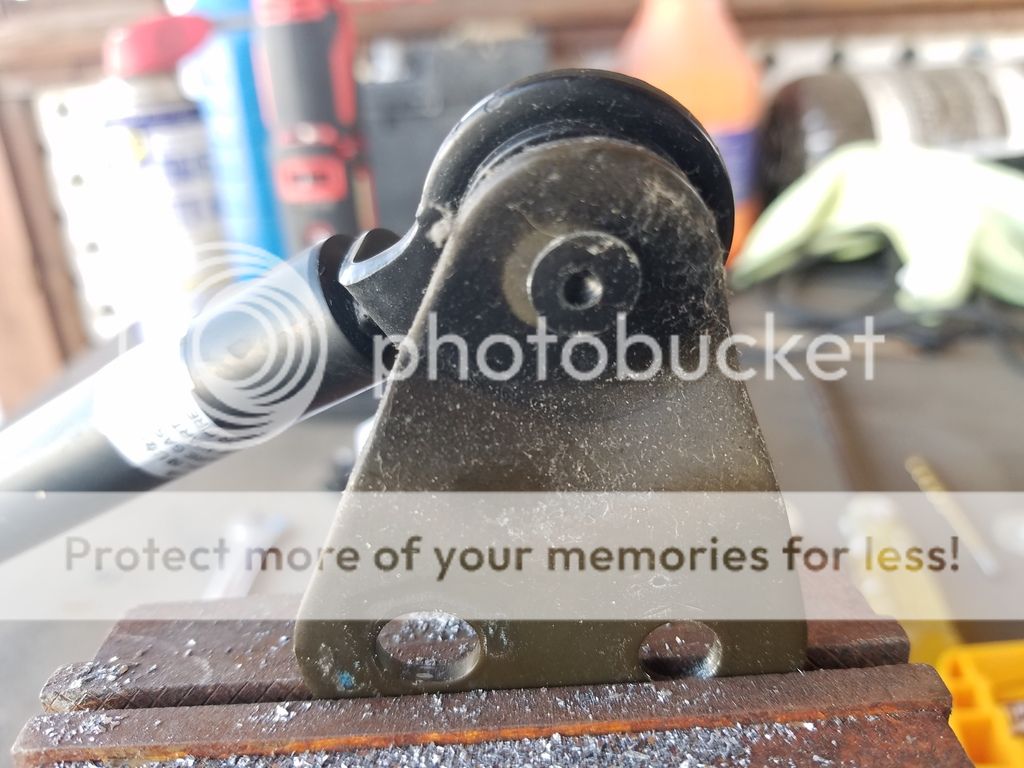
The OEM lift support should be officially uninstalled. Next step is to modify the original lift support to separate the lower bracket from the OEM lift support.
The bracket is needed to install the aftermarket lift support. To remove the bracket from the OEM lift support secure the bracket in a vice. Drill the smaller end of the bracket using a 7/16 drill bit. You use a smaller bit first to make sure the hole depression is centered then step up to the 7/16 bit. You don�t need to drill it completely just enough so cutting with the dremel takes less time. Follow this with the dremel carefully cutting the outer edge of the metal retainer. In hindsight you could probably step up to a 3/8 bit after finishing with the 7/16 bit drilling just far enough where the metal not longer holds the bracket in place. With the bracket still in the vice pull the lift support away as if prying off from the bracket and it should slip out with ease.
Here is a picture of the accessories that came with the tuff lift support kit. The top right corner is the nylon flange bearing that fits inside then nylon spacer which has a inner diameter just greater than 3/8.
Installation instructions provided by tuff lift support
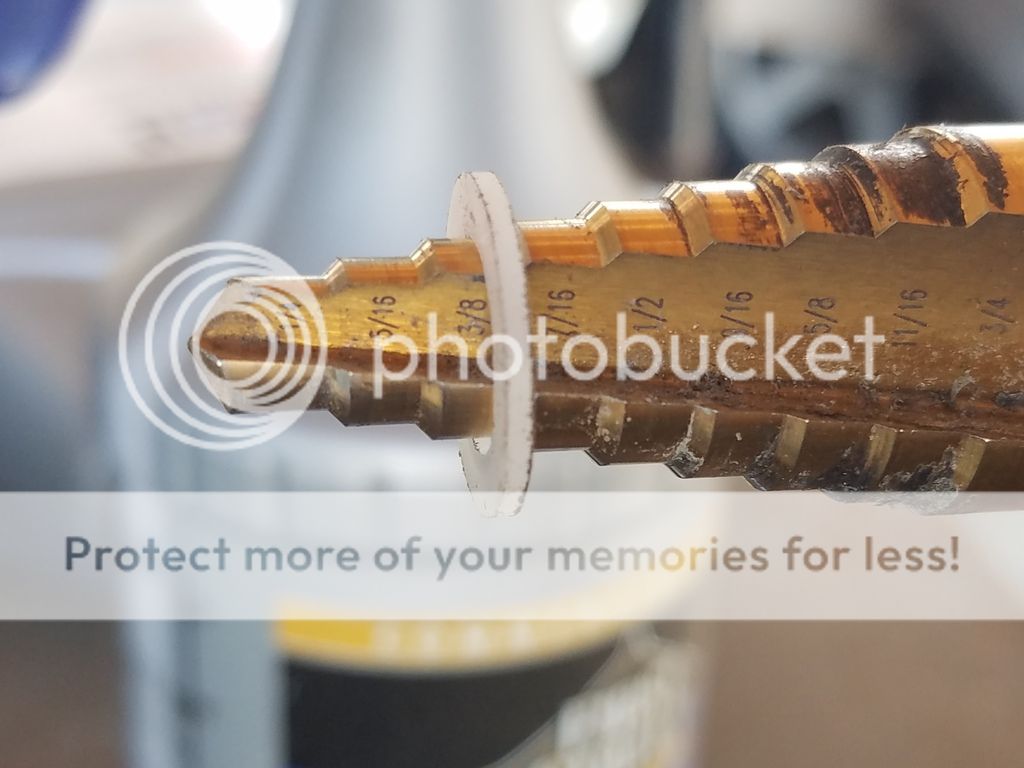
The OEM lift support bracket will have to be modified to fit the nylon flange bearing that comes with the tuff support kit. Using the 3/8 titanium step bit, increase the inner diameter of the OEM bracket to 3/8. The extended hole will no accommodate then nylon flange.
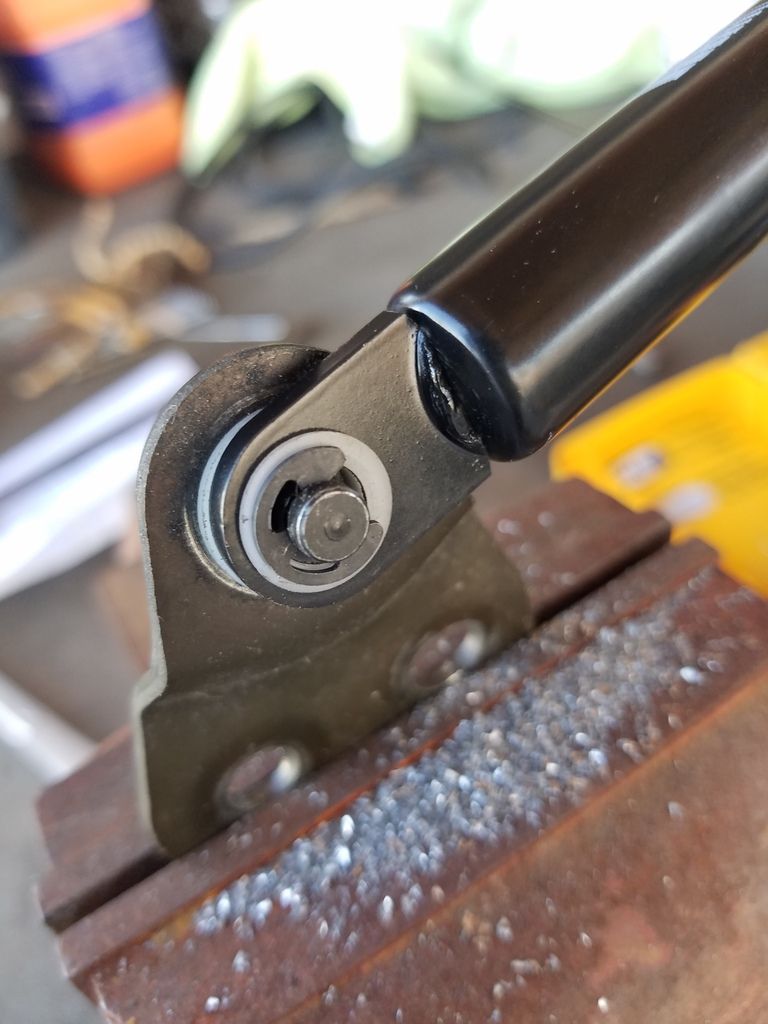
Following the tuff support instructions, install the accessory kit. The order is as follows: Pin, thick nylon spacer, OEM bracket, thin nylon spacer, aftermarket lift support, nylon flange bearing, retaining e-clip.
Because the OEM bracket diameter was increased to 3/8 the nylon flange bearing should fit through the aftermarket lift support hole and the thin nylon spacer behind it. The finish product should look like this.
The tuff support kit did not include any washers for the 10mm ball joint so you will need to source (2) 3/8 washers. Place the washers on the ball joints and using a 13mm socket install them to the hatch where the previous OEM ball joints were located.
Once secure you can now reinstall the OEM bracket with the tuff lift supports preinstalled then pop the opposing end onto the new ball joint on the hatch. The receiving ball end is already greased and has a metal retaining clip. Make sure this clip is in the appropriate position so it can perform its job of retaining that ball joint.
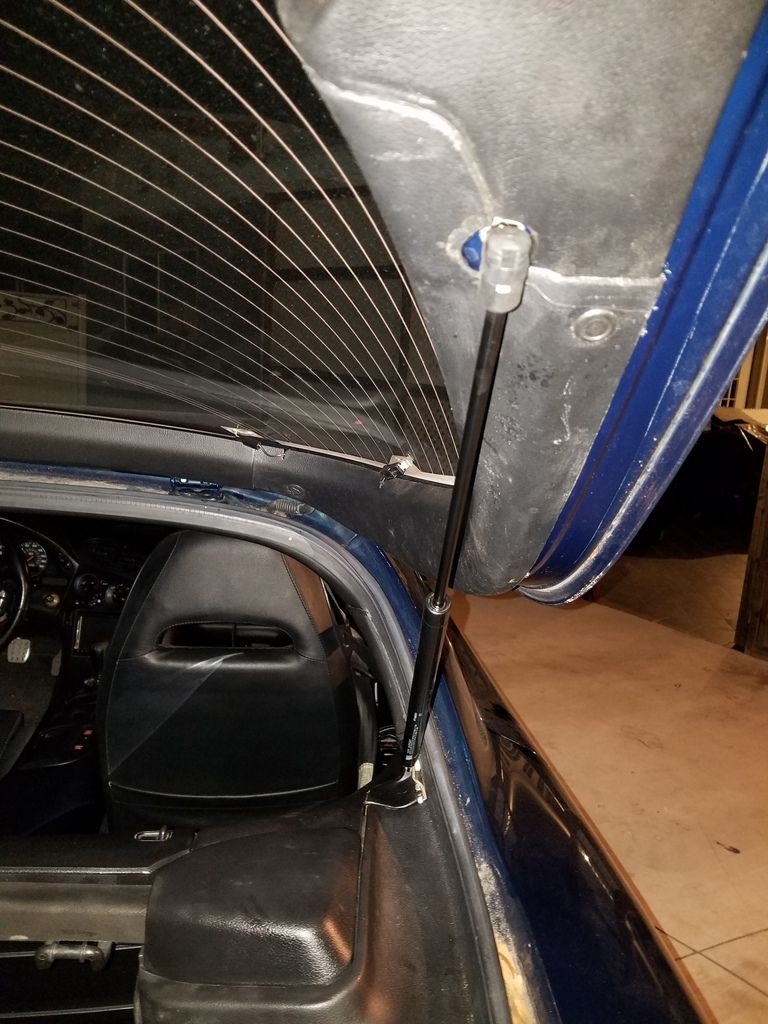
My hatch does not have a rear wiper but it does have a 99 spec wing. When I release the hatch, it pops open a few millimeters. I need only support it a bit before it begins lifting itself to full extension. These are 75lb lift supports. I feel confident with 80lb+ force lift supports the rear hatch will prop itself open to full extension upon hatch release. Autozone sell mighty lifts that support 75lbs-84lbs but are $35 each or $70 for a pair versus the $36 I paid for my pair of tuff lift supports. Changing out lift supports will now be easy and no longer require removal of any panels. The only disadvantage and a small one at that is the plastic cover that hides the lower bracket will no longer fit. I�m sure it can be modified somehow to be reused though.
Final installation lacked cleaning on my end but will be done later as it was late.
Cool to see! I need to replace the struts in my car.. originally wanted OEM ones but the price is steep! Why exactly won't the plastic cover fit? If you end up modifying them so they fit, please post pictures.
Cool to see! I need to replace the struts in my car.. originally wanted OEM ones but the price is steep! Why exactly won't the plastic cover fit? If you end up modifying them so they fit, please post pictures.
Hey Photoresister,
if you click on the first two links on post #2 you'll notice the pin holding the OEM bracket to the OEM lift support is a large circular disk that protrudes out just a bit. The plastic cover goes over the disk and has 3 small extruding areas that snap around the circular disc holding it in place. Installing aftermarket lift supports require removal of the large circular pin. No large circular pin = no mounting point for the original plastic cover.
One crude and raw idea I have for using the original covers is to hot glue a really strong magnet inside the plastic cover and pop it on. Another idea would be using a fender washer with the same outer diameter as the circular disk and then attach the fender washer to the aftermarket pin. Just a few ideas that might work. I'm sure there are cleaner and better ideas. I might do a combination of both a magnet and fender washer.
Thumbs up on the write up , my rear hatch closed by itself for the first time last week 😕
Just wait until you're setting the hatch on top of your head when you need both hands to put something back there.. yeah, my neck needs me to do this haha.
Just wait until you're setting the hatch on top of your head when you need both hands to put something back there.. yeah, my neck needs me to do this haha.
Literally had the hatch propped up via my head while taking out the fuel pump last weekend, I found an old "The Club" (you know the anti theft thing) to keep it open but I was also afraid it might slip and fall onto the quarter panel.
I have a 99-spec wing. Need to switch out the struts for sure.
Not exactly what I was hoping for but its close enough. The cover isn't flush over the lift support. I can cut the cover to accommodate better but I hate destroying factory pieces when possible . Cut a piece off a fender washer, clipped it in and stuck a strong neodymium magnet on the inside. Popped it in place and hoping it stays in place.
deceptively flushed side picture. but in reality the gap is actually large enough where you can see the washer and magnet from outside the car when the hood is open.
innards
If possible, I'd like to modify my original posts so I can attach images directly and bypass the issues with photobucket not displaying the linked images. Would a mod be able to assist with this? Thanks
Had blown lift supports in the white FD so I decided to test the mighty lift supports from autozone and compare them to the tuff supports. The tuff lift supports do not come with brackets instead it required using the factory bracket. The factory bracket had to be cut and modified to work but it was half the costs of the mighty lifts and it worked perfectly. The mighty lifts I got from autozone came with brackets at 2x the costs. Furthermore, the brackets did not line up properly with the support strut so when the hatch is being closed pressure is applied at an awkward angle from strut collapsing. The pressure pops the clips off the pin freeing the bracket from the support creating a hazardous condition. In order to remedy this I had to bend the brackets closer towards the outside of the vehicle. This allowed the pins and clips to line up better. So far they stopped popping off but because the pin and clip popped off several times I'm now paranoid it'll happen again. The fear makes gingerly close the hatch versus the man handling I prefer. If I had to do it over again I would just go with the confident man handle-able tuff lift supports at half the cost and lifetime warranty with minor modifications than the mighty lifts.
Another member posted his experience with aftermarket struts and how he went about solving a common occurring problem which is the eclips failing and the strut detaching from the bracket. This can be very dangerous. A few solutions were mentioned in that thread but the best suggestion at the time was by Billy7. In his video where he replaced the the pin and eclip with a m8x1.25x20mm bolt and nut. I have since replaced mine as well. Previously, drilled holes through the pin and inserted a cotter pin but the bolt and nut is a better idea especially if you can find thinner nylon nuts or locking nuts in black. I wanted to update my thread with the same information for those who may come across it.
As an update for anyone doing this, either mighty lift or tuff struts will support factory hatch with 99 spec wing just toss away the eclip and pin that come with it and pick up a pair of black m8x1.25x20mm bolts and nuts.


 but in reality the gap is actually large enough where you can see the washer and magnet from outside the car when the hood is open.