
Hella 90mm HID capsule mounting in stock popups


^ those are nice. I go for those. but using HID's as a hi beam (unless you have the Bi-Xenon) is kind of hard. You have to wait for the light output to come on fully. Here is the thread on how to get that "sleepy" look
https://www.rx7club.com/interior-exterior-audio-26/how-sleepy-headlights-3rd-gen-351136/
https://www.rx7club.com/interior-exterior-audio-26/how-sleepy-headlights-3rd-gen-351136/


Originally Posted by David Hayes
I would be all over a set of sleepy eye HIDs! Someone make them dammit!
https://www.rx7club.com/showthread.p...59#post2809948
Oh and Philx that was the 50mm ones that I like
Originally Posted by hondasr4kids
I had the idea of using the same hella 90mm bi-xenon. I was going to eliminate the stock headlight housing and find a way to put it in and have the sleepy eye look. Then I was going to use a Fog lamp to put in the out side, kinda like this

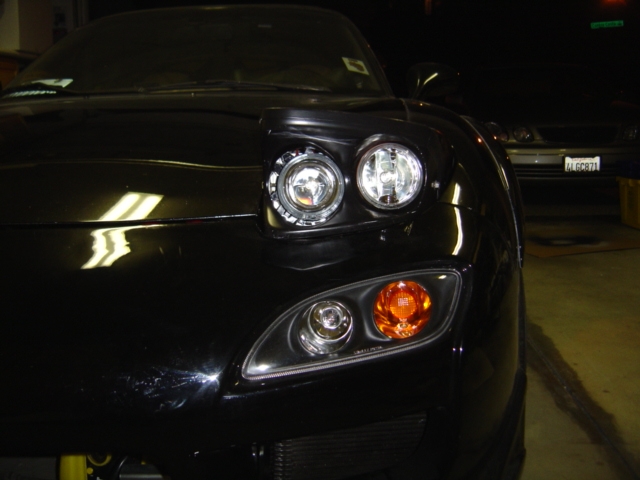
DAMN I LOOK GOOD

THANKS FOR THE PROPS, ^

 on the headlights, you should try sanding down the fluted lense and put em back on
Thread Starter
Senior Member
Joined: Apr 2005
Posts: 524
Likes: 0
From: Rockville MD
Fluted lense is the chrome part?
I'm planning on cutting the front part off of the clear part so it hides the glue. Not sure what I'm going to do about the chrome. I may leave it, or paint it black.
I'm planning on cutting the front part off of the clear part so it hides the glue. Not sure what I'm going to do about the chrome. I may leave it, or paint it black.
Originally Posted by hondasr4kids
Is a lot cheaper if you make it yourself. Is not hard either.
https://www.rx7club.com/showthread.p...59#post2809948
Oh and Philx that was the 50mm ones that I like
https://www.rx7club.com/showthread.p...59#post2809948
Oh and Philx that was the 50mm ones that I like
Thread Starter
Senior Member
Joined: Apr 2005
Posts: 524
Likes: 0
From: Rockville MD
Received my fog lights which I'm going to be using as high beams the other day. As I figured, I have to remount the low beam in order to get the high beam to fit. Pictures gallery is here
Brand new cheapo fog lights:


Testing placement inside the housing to see where I'm going to have to mount the low beam:


Brand new cheapo fog lights:
Testing placement inside the housing to see where I'm going to have to mount the low beam:
Thread Starter
Senior Member
Joined: Apr 2005
Posts: 524
Likes: 0
From: Rockville MD
So, I decided this would probably not be a whole lot of fun. So I decided to fall asleep. Then I came back the next day with May and pulled the cutoff shields from the inside of the fogs so they are actually high beams, not sideways low beams.


And then on sunday I completely destroyed the old mount to install the metal bracket for the low beam, and the bracket for the high beam. The low beam bracket is the square flat one with the hole in the middle.


This is the driver's side headlight. In the last picture, the bracket on the left is for the high beam. I'm waiting for the glue to completely cure before I mount the housings in it though.
And then on sunday I completely destroyed the old mount to install the metal bracket for the low beam, and the bracket for the high beam. The low beam bracket is the square flat one with the hole in the middle.
This is the driver's side headlight. In the last picture, the bracket on the left is for the high beam. I'm waiting for the glue to completely cure before I mount the housings in it though.
Thread Starter
Senior Member
Joined: Apr 2005
Posts: 524
Likes: 0
From: Rockville MD
Worked for a while on the headlight housings. The passenger's side housing now has the bracket for the high beam. I'm also working on reinforcing the driver's side housing.
Pictures.
Passenger housing:


Attached the front face of the driver's side housing. Then used zip ties to make sure the mounts weren't going anywhere. But then I thought that zip ties alone are kind of silly, especially in a headlight. So I covered them in adhesive. I plan to primer and paint the entire assembly before installing the headlights. It should be noted that the red zip ties are there only to hold the assembly together as the adhesive cures.


Not sure about what color to paint them. I'm thinking of just painting the whole thing metallic black, so it kind of blends in with the fiberglass bucket.
Pictures.
Passenger housing:
Attached the front face of the driver's side housing. Then used zip ties to make sure the mounts weren't going anywhere. But then I thought that zip ties alone are kind of silly, especially in a headlight. So I covered them in adhesive. I plan to primer and paint the entire assembly before installing the headlights. It should be noted that the red zip ties are there only to hold the assembly together as the adhesive cures.
Not sure about what color to paint them. I'm thinking of just painting the whole thing metallic black, so it kind of blends in with the fiberglass bucket.


Thread Starter
Senior Member
Joined: Apr 2005
Posts: 524
Likes: 0
From: Rockville MD
Hella makes both 90mm bi-xenon capsules and 90mm low beam capsules. I can't remember the reason exactly, but I believe that the bi-xenons were too deep to fit inside the housings. They're about the same price. Yes, they'll cost around $1000. I got mine from Susquehana motorsports, The guy there is very helpful and I got my HID equipment in the mail within 48 hours of ordering. If I were to order another set of them, I'd definitely go with them.
Also, it should be noted that if you order the replacement parts for the HIDs, instead of ordering the preassmbled new ones, you save $100-$200. If you email them, they'll explain it to you.
Also, if you're going to install them into your stock headlights, I can get more pictures of my mount setup. My high beams are the optilux (sp?) 1000s with the cutoff shields removed. They're simply screwed in, so you can remove them by disassembling the housing and unscrewing them.
Thread Starter
Senior Member
Joined: Apr 2005
Posts: 524
Likes: 0
From: Rockville MD
Test fitted the projector and high beam into the housing and into the car today. I decided to test the housing in the car before I painted it so I don't mess the paint up if it doesn't fit. Good thing I did :P
Pictures here.
First, when I tried to fit the high beam module in, it wouldn't fit. So I trimmed the side of the low beam mount to make space:

For reference, here's what the bracket looked like before:

Got everything in fine after that:


Ended up having to trim a little bit off of the bottom of the fiberglass bucket to make room for the back of the HID capsule. These things are huge.


Pictures here.
First, when I tried to fit the high beam module in, it wouldn't fit. So I trimmed the side of the low beam mount to make space:
For reference, here's what the bracket looked like before:
Got everything in fine after that:
Ended up having to trim a little bit off of the bottom of the fiberglass bucket to make room for the back of the HID capsule. These things are huge.
Thread Starter
Senior Member
Joined: Apr 2005
Posts: 524
Likes: 0
From: Rockville MD
So I happily run over to the car to fit this thing in, and this ******* gets in the way:

Turns out it's scraping the side of the base of the projector. Like I said, they're huge. So I trimmed a bit off the edge of it to try to make it fit.


Well, that didn't work. I'd have to cut the entire side off it for it to fit. So I cut the thing off instead. From what I can tell, it prevents the headlight from going up too much. So I cut off enough to make clearance, but if the arm connecting to the motor fails, it would still intercept the headlight and prevent it from flying back. I need to apply some sort of rust protectant to it though. It kind of worries me having the metal exposed on it like that.

Turns out it's scraping the side of the base of the projector. Like I said, they're huge. So I trimmed a bit off the edge of it to try to make it fit.
Well, that didn't work. I'd have to cut the entire side off it for it to fit. So I cut the thing off instead. From what I can tell, it prevents the headlight from going up too much. So I cut off enough to make clearance, but if the arm connecting to the motor fails, it would still intercept the headlight and prevent it from flying back. I need to apply some sort of rust protectant to it though. It kind of worries me having the metal exposed on it like that.
Thread Starter
Senior Member
Joined: Apr 2005
Posts: 524
Likes: 0
From: Rockville MD
Anyways, so then I had clearance to mount the fg bucket and projector assembly, which I did. It works perfectly.


Pictures with the headlight retracted. The top of the headlight isn't aligned properly. It's a pain in the *** to do, and I'm not going to do it until I install these for the last time. I still have to remove them and paint them.


Pictures with the headlight retracted. The top of the headlight isn't aligned properly. It's a pain in the *** to do, and I'm not going to do it until I install these for the last time. I still have to remove them and paint them.
Thread Starter
Senior Member
Joined: Apr 2005
Posts: 524
Likes: 0
From: Rockville MD
While I was working, the mailman came and delivered my new set of adjusters. Sucks that I had to pay $13 because I lost one of these:


Anyway, I need a good primer that works on both metal and plastic. And I also need a rust prevention thing. Not sure where to get them. And I'm way too lazy to go look now.
Anyway, I need a good primer that works on both metal and plastic. And I also need a rust prevention thing. Not sure where to get them. And I'm way too lazy to go look now.