When you click on links to various merchants on this site and make a purchase, this can result in this site earning a commission. Affiliate programs and affiliations include, but are not limited to, the eBay Partner Network.
To remove the flaps, use a flat head screw driver to pull the little lock tab on the end of the shaft, then slide the flap out. For some reason I didn't realize you could do this when I did the A/C blower. It definitely makes it easier to take the flap out completely.
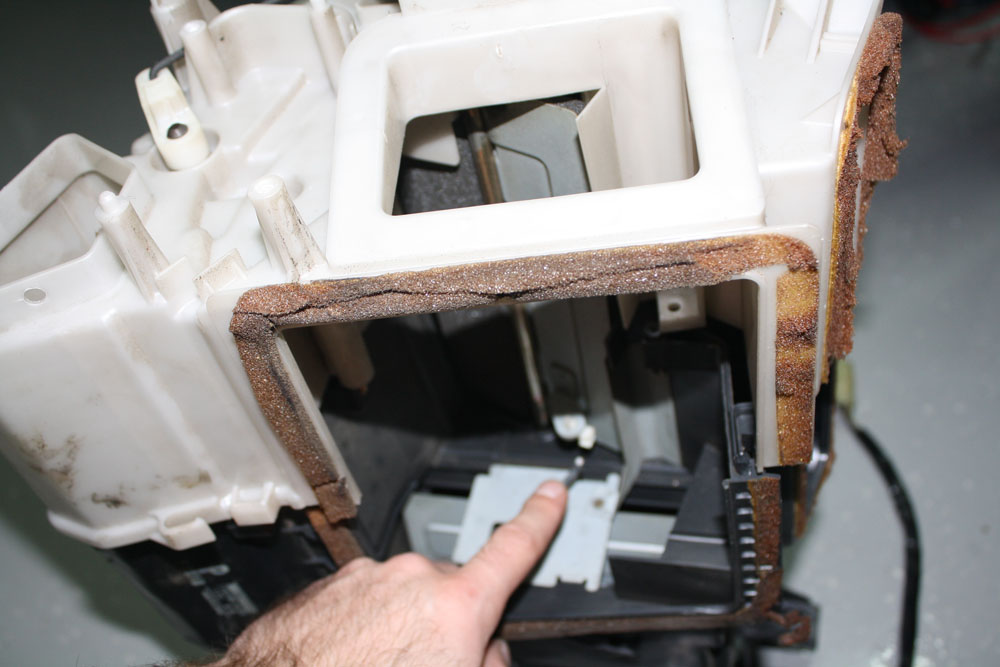
Scrub off all of the old foam. Originally I tried just sticking some adhesive-backed rubber on there, but it didn't stick at all. So I tried a plastic glue, which didn't work at all. I ended up using JB Weld, believe it or not. That stuff held it better than anything else.
Some of the flaps are made from metal, however, and on those the adhesive-backed foam works fine.
The foam I used is Part # 93625K294 from McMaster.com. It's a little harder than I would have liked, so I might have tried something softer if I were to do it again.
Here are the plastic ones after replacing the foam. There are also a couple of metal ones.
I also pulled the little copper radiator and cleaned it up:
Reassembled the whole thing and added new rubber gasket around the outer seals. I used McMaster.com part # 93725K72 which worked perfectly.
On a side note, I also replaced all the foam rubber and anti-rattle foam on my dash.
Also, JB weld works very well for fixing any cracks and broken plastic pieces. In some places I used plastic "weld" glue, and then covered it in JB weld later. JB weld gets very hard so it works great for reinforcing the repair.
You mention cleaning up the heater core, why wouldn't you just replace it considering how much of a PITA it is to replace after everything is assembled?
You mention cleaning up the heater core, why wouldn't you just replace it considering how much of a PITA it is to replace after everything is assembled?
You mean replacing just the copper radiator? It's not available separately, and at least on my car it was in good condition and wasn't leaking or anything. The only thing that can really go wrong with it is a leak. I did replace one of the pipes though, because it was damaged when I pulled the whole assembly.
You can buy a whole new heater core assembly. It's $452.10, if they're still even available. Mazda has been discontinuing a lot of parts lately.
Apologize for being off topic but are you no longer making your Trailing Arms and Toe Links? I have everything you offer suspension wise for the FD but was going to refer someone else to your site and they don't seem to be on there anymore.
Apologize for being off topic but are you no longer making your Trailing Arms and Toe Links? I have everything you offer suspension wise for the FD but was going to refer someone else to your site and they don't seem to be on there anymore.
Yeah, we discontinued them, unfortunately. They weren't selling very well and there are several other companies making them already, so we decided to discontinue them and put our resources towards focusing on new and innovative products.
This is pretty awesome. About how much did you spend on those various things and how did you come to the decisions you made on what thickness to buy? Just in case they change part numbers Id like to understand you though process on why you selected what you selected.
This is pretty awesome. About how much did you spend on those various things and how did you come to the decisions you made on what thickness to buy? Just in case they change part numbers Id like to understand you though process on why you selected what you selected.
Honestly, I'm not sure how much I spent. I did buy a couple of different types of foam to see what worked best. I probably spend around $100 in materials.
Basically, I just took it apart, and tried to figure out what the original thickness of the foam was. You can measure the width of it easily, but the thickness is a little difficult to figure out when the foam is flattened out and disintegrating. That 1/4" thickness worked well though. Then you kind of have to guess on the correct firmness based on the descriptions on McMaster.com. Also look at the different types of foam and get something that has a good temperature range, resiliency, etc for a reasonable price. You want something that will hopefully last longer than the OEM stuff. Closed-cell foam is also typically better than open cell.
Page G33? Where is this page G33 at? In the service manual G is the section for engine electrical components... Which manual is this? Because I have no clue how the heating system works and I want to know what all goes into it.
Page G33? Where is this page G33 at? In the service manual G is the section for engine electrical components... Which manual is this? Because I have no clue how the heating system works and I want to know what all goes into it.
You mean replacing just the copper radiator? It's not available separately, and at least on my car it was in good condition and wasn't leaking or anything. The only thing that can really go wrong with it is a leak. I did replace one of the pipes though, because it was damaged when I pulled the whole assembly.
You can buy a whole new heater core assembly. It's $452.10, if they're still even available. Mazda has been discontinuing a lot of parts lately.
First off, again, THANK YOU so much for pioneering this procedure.
We're TOTALLY rebuilding an FD here in Pensacola, going damn near down to the shell and back up. Of course I'm going to spend the time to do the heater core and everything!
JUST got done putting the heater core back together. Here's a few tricks and tips I figured out -
- For the foam on the doors, I used McMaster-Carr part number 86025K56. It's a 1/4" thick soft foam with excellent rebound and it's closed cell. I'm hoping it will hold up well. The adhesive is very strong on it and you get a BIG roll, enough to do more than one car.
- For the plastic doors, I cleaned the hell out of them and got all the old foam off. I then masked up the pivot points and sprayed 3M high strength contact adhesive on the panel. Let it set up then applied the foam. So far so good.
- For the "bumps" on the plastic panels, after adhering the new foam, I used an XActo knife to trim around the little bumps and cut the foam out. Then, I used a small Dynamat roller to roll the foam down and insure that it was well stuck on and pushed down around the foam bumps.
- On the other side, there's a raised square in the middle of the panel. Again, foam down then used the XActo knife to trim around both sides of the raised square then used the roller to press down. Some of the foam stuck up so I trimmed it off.
- This thread is VERY useful for pictures to re-assemble. It's a real maze of parts, the big one is make sure you have the flapper doors in the right position and orientation. I had one that was 180 out, I had to pull it apart again to re-orient. Make sure everything is where it should be first before putting the motors and linkage back on.
- I got a small tube of white lithium grease to grease all the moving parts, that's what the factory did and most of it has broken down over time. May not make a huge difference but it's worth doing.
I've also done the blower motor using RaceDriver7's guide, I recommend starting small and getting comfortable before doing the heater core. The heater core is NO JOKE of a job. Get a big, clean area to work on as well, I put towels down and used the dining room table (the wife loved it ).
Dale
I used the 5/32 firmer foam that came up when I searched the 93625K294 part number from the original post, which is similar to what I have seen recommended by some other members in the other two hvac restoration threads, but it sounds like maybe 1/4th was the necessary size? It seemed like the flappers were making contact with the foam I applied, but after reading this I am wondering if I should apply a small top layer of compressible foam to the 5/32 foam I have already used. Any thoughts?
Finished the evaporator and blower motor and in process of doing the heater core.some things that helped me and things I've replaced along the way:
-replaced blower motor with 4 seasons unit PN 35011 (no wheel) from Amazon for around $57. in the other rebuild thread of the evap or blower motor,someone did a test with the rx8 wheel and can confirm that the fd rx7 blower motor was plug and plug with intake tube.slight wiring needed to be done,as the 4 seasons unit only has bare wires going to it.taking the wheel off stock blower was a pain.combo of prying while trying to hold clip to free the wheel from shaft.good to have an extra set of hands here
-ac expansion valve.denso unit PN 475-0107 from Amazon for around $30 bucks. Came with 4 new prints
things that helped me:
- for metal flaps,I used a plastic scraping tool to get most of foam off,then an angle grinder with cup brush (copper) to get the rest of the adhesive off. Tried lacquer thinner and utility knife blades,but you're subjected to getting layers and layers off slowly
-plastic flaps,I used plastic scraping tool,then a wire hand brush with lacquer thinner.
-while the clips that hold pieces together and some of the metal swing arms,brackets,I cleaned them with clr and a brush,then hit it with some black engine paint that I had. Good thing I had done this,as I discovered a group of 8 or so wires going into a servo motor that was cut/gnawed off? That I needed to re-connect
-white lithium grease moving parts
-lysoled the evap,and ducts and boxes yo disinfect. Figured the boxes weren't ever coming apart again
I did blower motor,evap,then heater core. Everyone is right,take lots of pictures while disassembling heater core
I did wind up replacing the stock RX7 blower motor with a RX8 spec blower motor (Four Seasons part # 35364). I had to modify the plastic piece that came with it designed to direct cooling air into the motor assembly in order to accept the RX7 rubber hose but a Dremel tool and some JB Weld did the trick (see pictures). The motor accepted the RX7 wheel without issue. Also had the same sort of electrical connector so should be plug and play with the factory FD wiring harness. Hope this is helpful to folks who may be contemplating the same.
Last edited by OneQwickTwo; May 16, 2021 at 09:37 AM.
I need to remove my heater core due to a leak. I suspect the orings connecting the coolant pipes have failed. I'm trying to avoid removing the dash. Has anyone successfully done an R and R of the core and pipes with the dash in place?
Absolutely no way to do it without removing the dash, period.
All things considered pulling the dash isn't the worst thing. Just take your time with it. Also get the seats out of there so you have more room to work with.
Just finished rebuilding the heater core assembly. I pretty much just followed the thread instructions, but I had a couple of things to add.
I ended up using contact cement to stick the foam to the plastic flaps instead of using 3M spray, mostly because it's far less messy. I coated the plastic flap and also the adhesive side of the foam I was using. I know it sounds weird to be painting contact cement over the adhesive, but this stuff needs a layer on both sides (dried) to work. And it worked fabulously. Instant bond, and it sure feels as if it's not coming off. It worked so well I even plugged the holes I cut wrong for the pegs.
I also found that a lot of my hardware inside was covered in rust. I used Evapo-Rust to dissolve away the rust, and then zinc plated it using supplies from Amazon (power supply, buckets, wire, zinc bars) and gold chromate solution from Caswell Plating. I also used a gallon of muriatic acid from a pool supply store to dissolve the old plating and etch the metal before replating. It's a lot more work but I'm trying to restore the car without resorting to spray paints. If some of the smaller pieces look uneven, that's because if you want a shiny finish, you need to polish out the parts and I just wasn't going to sit around with a Dremel trying to do that to screw heads and the metal connecting clips.
Last edited by HyperRex; Nov 12, 2024 at 03:08 AM.
Reason: typos


 ).
).