
Fuel system upgrade how to - write up for KGparts kit.


FJO's injector driver is now smaller and cheaper, about $150 from Alamo:
http://www.alamomotorsports.com/fjo/injdrvr.htm
:-) neil
http://www.alamomotorsports.com/fjo/injdrvr.htm
:-) neil


Junior Member
Joined: Jul 2008
Posts: 16
Likes: 0
From: utah
I recently spoke with bruce from FJO motor sports who told me about some saturated top feed 1600 bosch injectors, I was unaware these were available, but the idea is you wouldn't have to run any drivers or resistors. It sounds great but does anyone know of any drawbacks? and what ohm I would need to be within the right perameters for this setup?
Full Member
Joined: Mar 2010
Posts: 53
Likes: 0
From: Northern Ontario
Do I need to change anything else?
I have found a mint 1993 fd3s rotary rocket in the most unlikely place in northern Ontario Canada. However the car was in storage and lookes like it was in the process of going through this same upgrade. The kg kit was still in a box in the boot. This post has answerd so many questions I had. But do I need to change the ecu or anything else to run this setup. I'm either going to plug in the stock setup again or run this kg setup. Whatever is better to do right now cause money is an issue right now. I got the car for pennies and I'm just dying to try it out. Always wanted one and now finally

Rotary Freak
Joined: Jan 2004
Posts: 1,891
Likes: 5
From: Belgium
My secondary fuel rail kit from KG has an extra black O-ring included which is thesame size as the aluminium injector spacer
I don't read anything on that here so I assume it was included in the meantime to sit UNDER the spacer (beteen spacer and LIM) in order to add a seal between them.
As has been mentioned in other threads the injector hole in the LIM is drilled by Mazda with a certain tolerance and may need additional sealing.
This is hypothetical, as I see it. Can anybody confirm the position of this O-Ring?
Thx
http://www.wannaspeed.com/index.php?...roducts_id=222
Originally Posted by Speedworks
My secondary fuel rail kit from KG has an extra black O-ring included which is thesame size as the aluminium injector spacer
I don't read anything on that here so I assume it was included in the meantime to sit UNDER the spacer (beteen spacer and LIM) in order to add a seal between them.
As has been mentioned in other threads the injector hole in the LIM is drilled by Mazda with a certain tolerance and may need additional sealing.
This is hypothetical, as I see it. Can anybody confirm the position of this O-Ring?
Thx
I don't read anything on that here so I assume it was included in the meantime to sit UNDER the spacer (beteen spacer and LIM) in order to add a seal between them.
As has been mentioned in other threads the injector hole in the LIM is drilled by Mazda with a certain tolerance and may need additional sealing.
This is hypothetical, as I see it. Can anybody confirm the position of this O-Ring?
Thx

quick question. the two vacuum fittings under the secondary rail in the LIM. There's the bigger one sticking up towards the front of the manifold and the smaller one pointing towards the rear of the car...Those can be removed and filled in right? or should they just be capped?
Last edited by JBF; May 23, 2012 at 02:26 PM.
Im having a hard time locating the sleeves for the primary injectors. Every where online just sells the lower intake manifold ones (secondary). I bought a used kit awhile back but it only had the lower mani sleeves with it.
Red Dragon
Joined: Dec 2002
Posts: 208
Likes: 0
From: DENMARK
Braided Lines
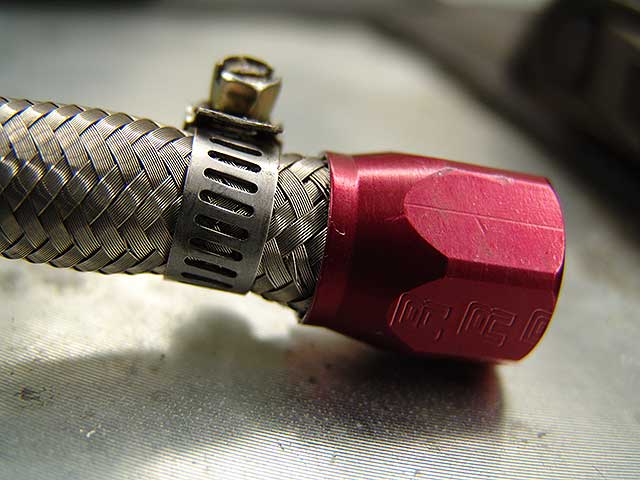
This is just a tip on how I used a small screw-clamp as my tool to get the ned fittings on without flaring out all the braids and making it impossible to get the fittings on. Basically I tightened the clamp where I wanted to cut the line and cut it right to the edge of the clamp. Then pushed the clamp back just a bit so there is some hose that can enter the fitting.
Here is a pic with the clamp pushed back a bit after the cut:

Keep the clamp on and tight enough to hold the braided line from flaring out, but loose enough so that it slides down the hose as you push the fitting on:
Below is a shot of my final setup. Notice how I wrapped the braided lines in that black spiral 'stuff'. Its meant to eliminate the situation where braided lines wear away things that they rub against. I also zip-tied them where i could to eliminate any possibility of braided lines vibrating around, everything is pretty tight and moves as one unit.
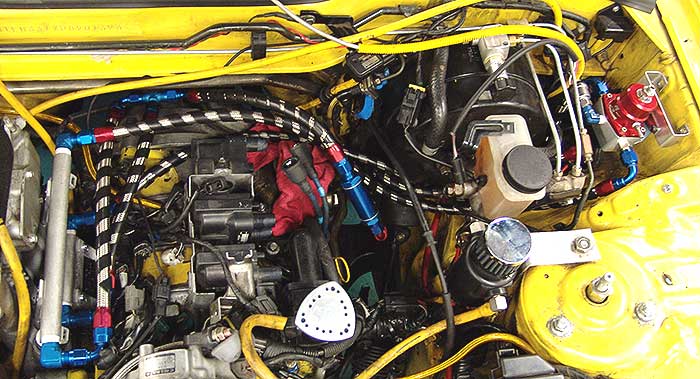
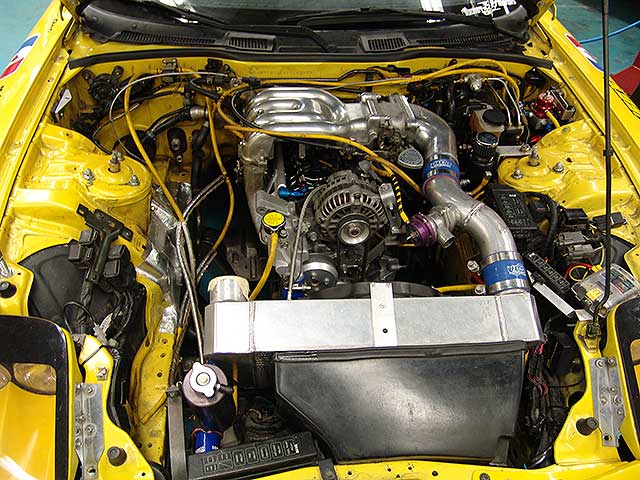
Basically once you put all the goodies back on the car you cant really see much.
Good luck!!!
This is just a tip on how I used a small screw-clamp as my tool to get the ned fittings on without flaring out all the braids and making it impossible to get the fittings on. Basically I tightened the clamp where I wanted to cut the line and cut it right to the edge of the clamp. Then pushed the clamp back just a bit so there is some hose that can enter the fitting.
Here is a pic with the clamp pushed back a bit after the cut:
Keep the clamp on and tight enough to hold the braided line from flaring out, but loose enough so that it slides down the hose as you push the fitting on:
Below is a shot of my final setup. Notice how I wrapped the braided lines in that black spiral 'stuff'. Its meant to eliminate the situation where braided lines wear away things that they rub against. I also zip-tied them where i could to eliminate any possibility of braided lines vibrating around, everything is pretty tight and moves as one unit.
Basically once you put all the goodies back on the car you cant really see much.
Good luck!!!
I have bought the RX7 store extreme fuelsystem and are about to install it, unfortunately no installation instructions came with the system ! I have found out I had to completely remove the ACV to get to the seconddary rail, wich is the one that comes with the new system, my question is, can I have the ACV installed with this new rail/injectors ? if not, I guess I would have a ACV block off plate ? that did NOT come with the system, I wonder why ? I still have my sequential turbo setup ! allso, I would get to the secondary fuelrail to get the injectors out and have them tested/cleaned, what do I have to remove/unbolt to get to that ? thank's in advance guys :-)
Rene
DENMARK
Hello Rotary freinds ;-)
I have bought the RX7 store extreme fuelsystem and are about to install it, unfortunately no installation instructions came with the system ! I have found out I had to completely remove the ACV to get to the seconddary rail, wich is the one that comes with the new system, my question is, can I have the ACV installed with this new rail/injectors ? if not, I guess I would have a ACV block off plate ? that did NOT come with the system, I wonder why ? I still have my sequential turbo setup ! allso, I would get to the secondary fuelrail to get the injectors out and have them tested/cleaned, what do I have to remove/unbolt to get to that ? thank's in advance guys :-)
Rene
DENMARK
You have to remove the ACV with that. We mention that in the product description. We sell a lot of these kits to those that already have block plates so we don't provide that in this kit. If you need one let me know and I can ship one out.
When taking out the stock injectors you need to take off the upper manifold. Once that is off its pretty straight forward on unbolting the rail.
Jason
Red Dragon
Joined: Dec 2002
Posts: 208
Likes: 0
From: DENMARK
Rene,
You have to remove the ACV with that. We mention that in the product description. We sell a lot of these kits to those that already have block plates so we don't provide that in this kit. If you need one let me know and I can ship one out.
When taking out the stock injectors you need to take off the upper manifold. Once that is off its pretty straight forward on unbolting the rail.
Jason
Ok, thank's, I allready have figured that out ;-) my problem is now, that I do not have that block off plate :-( I have send you an email allso.
Rene
DENMARK

Full Member
Joined: Dec 2012
Posts: 94
Likes: 0
From: indonesi
Ok, so here is my attempt at a comprehensive fuel system upgrade writeup. I need to thank Keith, Steve, and Shawn for helping me a lot in this process.
This writeup will be based on upgrading the primary and secondary rails and injectors, as well as SS braided line for everything in the engine bay to the firewall. My upgrade uses a kit from KGParts.
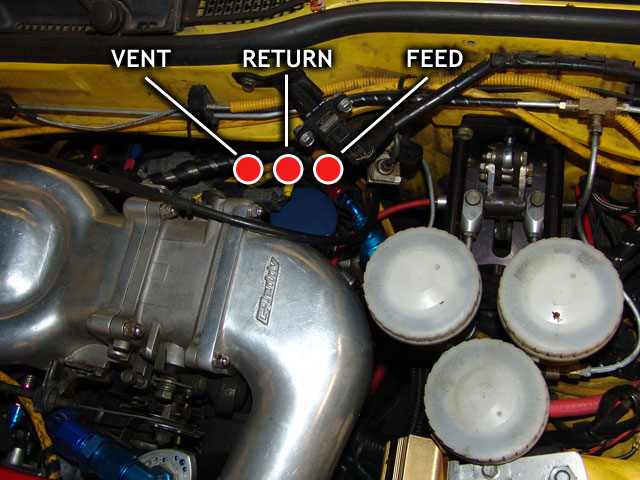
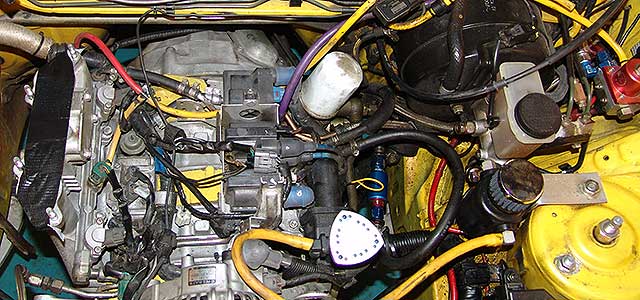
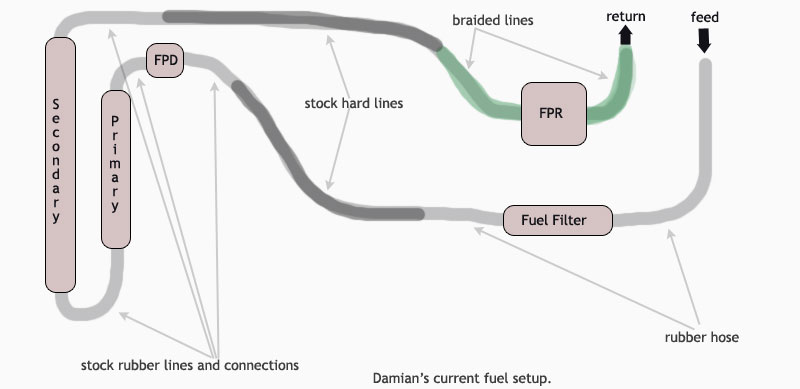
First lets start by looking at my system before the upgrade, as you will see I already had an aftermarket FPR and the fuel filter was moved up here from the rear.
Here is a drawing to better see how it was:
Here is a picture of the new kit from KGParts:
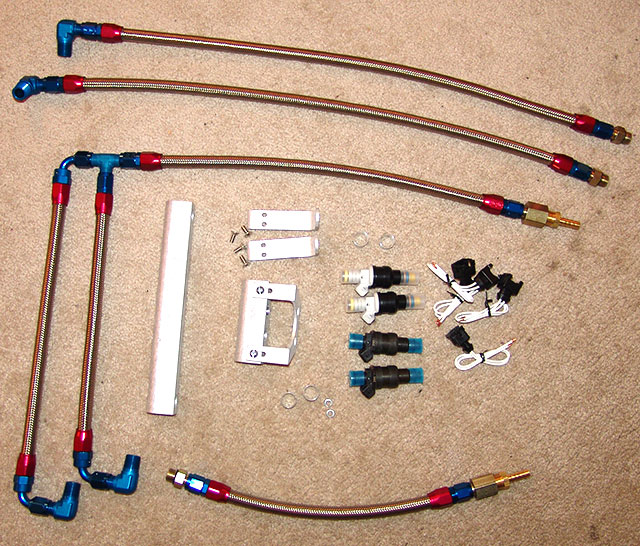
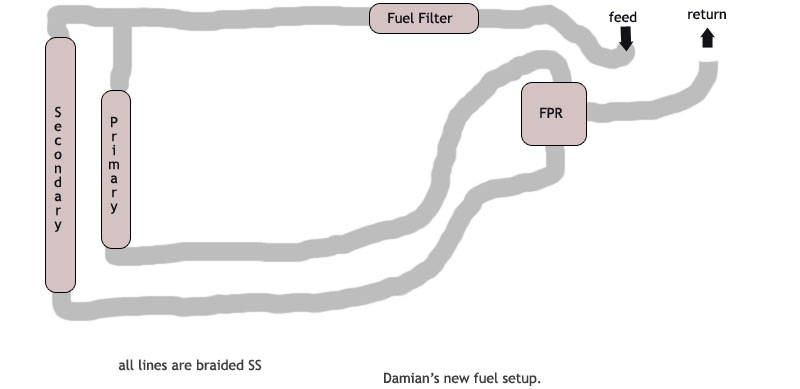
The new kit runs a bit differently, the rails are not in series like the stock system, they are in parallel, so they both get their own feed from the main feed line and they get their own return to the FPR.
Here is a drawing of how I planned to run my new setup:
Summary Of Install
1) relieve gas pressure (search forums, there is plenty of info on how to do this)
2) remove all old rails/injectors/lines
keep some towels around as there will be gas in the rails/lines and you want to place towels under these areas before disconnecting. Not a big deal as it evaporates fast anyway. I let a lot dump around and it was gone in minutes.
3) before installing anything, lay it out on the engine where its supposed to go, including the lines. This helps you plan if you need to change line lengths or use different fittings to make the lines go where you want them without kinking them up. This step saved me a lot of trouble in determining the FPR placement and fuel filter placement and what was needed to make both happen correctly.
4) Washed out the rails and checked all the holes for 'hangnails' that could be filed off. You dont want 'dirty rails' going in there :-)
5) Put the sleeves on the injectors, according to the info I got it was the shorter sleeves on the secondaries and the longer ones on the primaries. I also used a bit of motor oil to lube the injector 0-rings.
6) On the primaries, remove the stock diffuser and follow the process outlined below on using them as a seal for the injectors. on the secondaries pull out the old seal and diffuser. The injector install quirks are detailed below. I had to use things that looked like dentist tools in order to get the diffusers out without destroying them. YOU WANT TO KEEP THEM INTACT, YOU WILL END UP USING PART OF THEM.
7) Install the rails, lines, and whatever else you upgraded (fpr, gauge, et)
8) Setup your electrical connectors with the resistors, clip the old connectors and solder the new ones in. Apparently the resistor can go on either side and the connectors wires can go on either wire of the stock connector. Just keep track of what connector goes to what injector.
Those are the basics, here are pictures and details of certain aspects of the install.
This writeup will be based on upgrading the primary and secondary rails and injectors, as well as SS braided line for everything in the engine bay to the firewall. My upgrade uses a kit from KGParts.
First lets start by looking at my system before the upgrade, as you will see I already had an aftermarket FPR and the fuel filter was moved up here from the rear.
Here is a drawing to better see how it was:
Here is a picture of the new kit from KGParts:
The new kit runs a bit differently, the rails are not in series like the stock system, they are in parallel, so they both get their own feed from the main feed line and they get their own return to the FPR.
Here is a drawing of how I planned to run my new setup:
Summary Of Install
1) relieve gas pressure (search forums, there is plenty of info on how to do this)
2) remove all old rails/injectors/lines
keep some towels around as there will be gas in the rails/lines and you want to place towels under these areas before disconnecting. Not a big deal as it evaporates fast anyway. I let a lot dump around and it was gone in minutes.
3) before installing anything, lay it out on the engine where its supposed to go, including the lines. This helps you plan if you need to change line lengths or use different fittings to make the lines go where you want them without kinking them up. This step saved me a lot of trouble in determining the FPR placement and fuel filter placement and what was needed to make both happen correctly.
4) Washed out the rails and checked all the holes for 'hangnails' that could be filed off. You dont want 'dirty rails' going in there :-)
5) Put the sleeves on the injectors, according to the info I got it was the shorter sleeves on the secondaries and the longer ones on the primaries. I also used a bit of motor oil to lube the injector 0-rings.
6) On the primaries, remove the stock diffuser and follow the process outlined below on using them as a seal for the injectors. on the secondaries pull out the old seal and diffuser. The injector install quirks are detailed below. I had to use things that looked like dentist tools in order to get the diffusers out without destroying them. YOU WANT TO KEEP THEM INTACT, YOU WILL END UP USING PART OF THEM.
7) Install the rails, lines, and whatever else you upgraded (fpr, gauge, et)
8) Setup your electrical connectors with the resistors, clip the old connectors and solder the new ones in. Apparently the resistor can go on either side and the connectors wires can go on either wire of the stock connector. Just keep track of what connector goes to what injector.
Those are the basics, here are pictures and details of certain aspects of the install.

