When you click on links to various merchants on this site and make a purchase, this can result in this site earning a commission. Affiliate programs and affiliations include, but are not limited to, the eBay Partner Network.
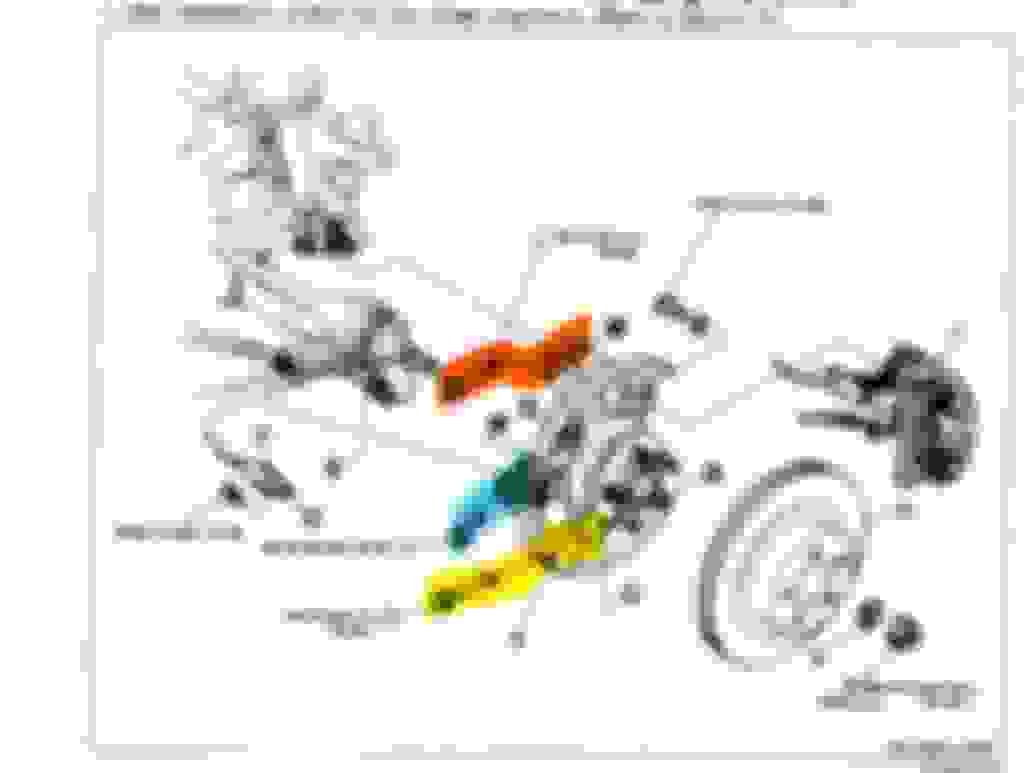
I'll be tackling replacing a leaky differential axle seal while my FD is in winter hibernation soon. Only the right side is leaking, but I'll be doing both sides while I'm in there. After reading thru some posts here on the R&R procedure, mainly from @Sgtblue and a follow up PM conversation, I think I understand how to do this job without as much disassembly as the FSM would have you do. But I figured posting up this marked up FSM diagram would be helpful to others doing the job, and answer a remaining question I had.
Here's the marked up FSM diagram:
So to get the axle out of the differential to replace the seal, you'll need to free up the hub carrier enough to get the axle out of the differential far enough to replace the seals. The question is do you need to remove ALL the highlighted bolts in the marked-up diagram to remove the entire carrier, or can it be done by removing only 2 of the 3 bolts, and if so, which ones? (i.e. blue & yellow, or red & blue, or ???)
Obviously before getting to this point you'll need to remove your parking brake cable, caliper & ABS sensor and hang them out of the way, but the rotor, wheel hub nut & bearing can stay put on hub carrier. As far as the seal R&R procedure itself, the FSM covers that well. One other point to bring up that may help avoid difficulty reinstalling the axle is to do one side at a time - if both axles are removed at the same time, things inside the diff may move around a bit, making reassembly more difficult.
Those bolts are all easily accessible and typically come off nice and easy, if you have to remove all 3 it's no big deal.
Those bolts have sliding sleeves in the aluminum, many times to put things back together you have to push the sleeves back out so you can get whatever goes in the middle back in. When you tighten the bolt the sleeve pushes in and makes a tight fit against the bushing/arm/whatever is in the middle. You can typically use a bolt, nut, and an appropriate sized socket to get them to move, they only have to come out a few millimeters to be able to re-assemble.
Popping the axle out isn't too bad, a pry bar goes a long way. Going back in sometimes is a little goofy, it will seem like it will never pop in then suddenly there it goes.
Done this recently as I had one leaking. I had put if off for a while as the car is off the road, when it came to doing the job it was all done in 15 minutes, really easy haha.
I left the lower control arm hooked up to the hub, there is enough movement undoing the other two to drop the driveshaft out the diff and gently push in a new seal.
IIRC without checking my thread on this I disconnected the lower (blue and yellow) points and swung things up as I popped the stub out of the differential. I think with the suspension in full droop there was more room. Again, just use some care with the new seal since there’s no “seat” to stop it from going in too far.
And sorry again about losing those pictures from the thread, but I don’t think you’ll really need them. You got this.
IIRC without checking my thread on this I disconnected the lower (blue and yellow) points and swung things up as I popped the stub out of the differential. I think with the suspension in full droop there was more room. Again, just use some care with the new seal since there�s no �seat� to stop it from going in too far.
And sorry again about losing those pictures from the thread, but I don�t think you�ll really need them. You got this.
No worries on the pictures, and I recall your thread said the lower two bolts (blue & yellow) were removed. And based on @Ceylon post above, it looks like you can remove the upper 2 (red & blue) and have the same result. I think I'll remove the lower like you did (blue & yellow), and if I run into difficulty getting the axle out & clear enough to install the new seals, then it won't be a much bigger deal to remove the upper bolt & yank the whole hub carrier out. Definitely a 2 fingers of scotch & a cigar job, but easy enough!
might even want to replace or relocate your fuel filter while you're at it. having the axles out of the diff gives you more room to stick your hands up above the diff to pull and tug on the filter and lines
might even want to replace or relocate your fuel filter while you're at it. having the axles out of the diff gives you more room to stick your hands up above the diff to pull and tug on the filter and lines
So I'm in the middle of replacing the leaky diff seal. Everything came apart with no real issues, except that it didn't look like I'd be able to get the shaft out enough & have clearance to install the new seal, so instead of removing 2 or the 3 hub carrier bolts (removed yellow & blue in previous diagram), I ended up removing all 3 and yanked the axle shaft & hub carrier out completely.
Anyway, I'm installing the new seal now and since I don't have the special tool called for in the FSM, I'm using the old seal and a large socket & rubber mallet to drive the new & lubed seal in. See picture below of the current result - does it look like the new seal is in enough? It appears to be even all the way around, but it's sticking out perhaps 3/64" away from being flush with the diff carrier edge surface. The old one looked about the same, but it was leaking, so I'm not exactly trusting that as a reference. FSM doesn't talk to the seal depth/placement, other than using the SST to drive it in even. It looks to me like it can be driven in significantly further if I were to hit it a bit harder, but I don't want to bugger it up and end up having to buy another seal..
I don’t remember them going in with all that much effort. I’m guessing you may have not gotten them started straight. IIRC I installed mine until the edge of the seal was even with the edge of the diff casing. I think it needs to be flush before reinstalling the stub. You just have to be careful not to go too far since there’s no “seat”. I just went slow and kept it even using the old seal on top of the new seal too, with a small flat-headed body hammer and a little oil film to help it go in.
I don�t remember them going in with all that much effort. I�m guessing you may have not gotten them started straight. IIRC I installed mine until the edge of the seal was even with the edge of the diff casing. I think it needs to be flush before reinstalling the stub. You just have to be careful not to go too far since there�s no �seat�. I just went slow and kept it even using the old seal on top of the new seal too, with a small flat-headed body hammer and a little oil film to help it go in.
Looks like I was just erring on the side of caution. Got the seal in flush with the diff carrier, just took a little more aggression with the hammer to drive it in that last 1/16" or so.
Now the problem is getting the freaking axle shaft in all the way & locked. Having a hell of a fight with that; following the FSM and I got the open end of the clip at 12 O' clock like it's supposed to be, but I just can't get that bitch in. Might be the reused clip though; FSM spec says it should measure 32mm max diameter, mine is 32.25mm. So I'm going to call it a day, have a scotch break and try again fresh tomorrow. If still no joy, guess I'll be ordering some new clips from Ray. Funny thing is when I ordered the seals from Ray a month or so ago, he said the clips are almost always reusable, and since they had plenty in stock I decided I could wait & see before ordering them.
I did the same thing when I replace the seals, pull the entire hub assembly, it was much easier and less headache.
When you say the shaft is not all the way in and locked, are you getting the initial moment (compression of the C clip) or you are having trouble getting the axle to move in at all? I recall it takes a couple good shove to get the C clip to budge, but once it move it will go all the way in and you can hear it lock.
FWIW, I used a big dead-blow hammer at the splined end of the axle. Even with the joints taking up some of the force they popped in.
Some naughty words, a good scotch and, if you’re so moved, a cigar, always helps me too.
Yeah, it doesn't take that much force. I just hold the hub with both hands and lean my body weight on it with back and forth motion and it went in. If it doesn't budge after a couple hard shove I would pull the axle back out to check the C clip, last thing you would want is a de-formed C clip that wedge inside the diff causing removal problem down the road.
When you say the shaft is not all the way in and locked, are you getting the initial moment (compression of the C clip) or you are having trouble getting the axle to move in at all? I recall it takes a couple good shove to get the C clip to budge, but once it move it will go all the way in and you can hear it lock.
It goes in fine, but it seems I'm hitting a brick wall when the axle has maybe 1/2"~3/4" more travel to go.
Originally Posted by Sgtblue
FWIW, I used a big dead-blow hammer at the splined end of the axle. Even with the joints taking up some of the force they popped in.
Some naughty words, a good scotch and, if you�re so moved, a cigar, always helps me too.
Lots of naughty words, neighbors probably thought it was a serious domestic violence crime about to go down. I usually hold off on the scotch & cigar till I'm done, or in this case taking a break! Haven't tried the dead blow hammer yet, was worried it might be a bit harsh on the joints.
Originally Posted by ZE Power MX6
Yeah, it doesn't take that much force. I just hold the hub with both hands and lean my body weight on it with back and forth motion and it went in. If it doesn't budge after a couple hard shove I would pull the axle back out to check the C clip, last thing you would want is a de-formed C clip that wedge inside the diff causing removal problem down the road.
I think my C-clip may be moving out of it's 12 O'clock alignment, probably because it's a tad out of spec (the 32mm diameter thing), so it's a little loose and likes to roll around in its groove. So far rather than brute forcing it, I've been removing & checking everything for alignment and trying again. If I fail tomorrow or Friday when I get time to work on it again, I'm going to order some new clips from Ray. May try a little sticky red grease on the clip to try to keep it from moving around while I try again.
I think my C-clip may be moving out of it's 12 O'clock alignment, probably because it's a tad out of spec (the 32mm diameter thing), so it's a little loose and likes to roll around in its groove. So far rather than brute forcing it, I've been removing & checking everything for alignment and trying again. If I fail tomorrow or Friday when I get time to work on it again, I'm going to order some new clips from Ray. May try a little sticky red grease on the clip to try to keep it from moving around while I try again.
You might need to try a new C-clip, if the clip is a bit too wide it can float out of the groove at the opening and cause extra friction, but usually in that case you can see the clip being a little bent and not 100% straight when you look directly at the opening.
So I managed to get the axle back in & locked. After trying to reach Ray to order a new clip and getting voicemail, I found a You Tube video that shows how to recondition a worn clip to become usable again. Apparently stretched clips is a common problem with aftermarket axles that come with the clips.
Basically all you need to do is use a channel lock or similar pliers to keep the clip in its fully compressed position on its axle shaft slot, then evenly heat the clip with a propane torch. Doesn't need to get too hot, you want to get it to the point where it's just starting to glow. Remove the heat, while holding the pliers to keep the clip compressed while it cools. That's what did it for me - the clip was now meeting the FSM max diameter spec (32mm max). With the clip oriented at 12 O'clock again and my son helping to keep the axle positioned straight in while I gave it a good whack with the dead blow hammer & block of wood, it popped right in on the first shot.


 I usually hold off on the scotch & cigar till I'm done, or in this case taking a break! Haven't tried the dead blow hammer yet, was worried it might be a bit harsh on the joints.
