
A/C Blower Rebuild w/ Photos

Thread Starter
Group Buy Vendor
iTrader: (9)
Joined: Dec 2005
Posts: 751
Likes: 17
From: Orlando, FL
A/C Blower Rebuild w/ Photos
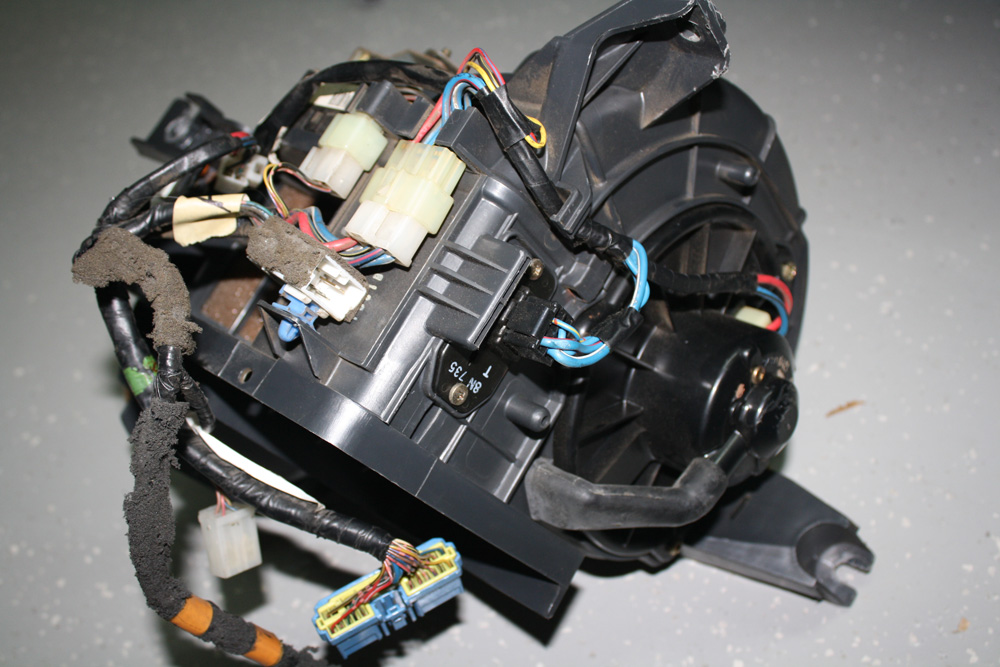
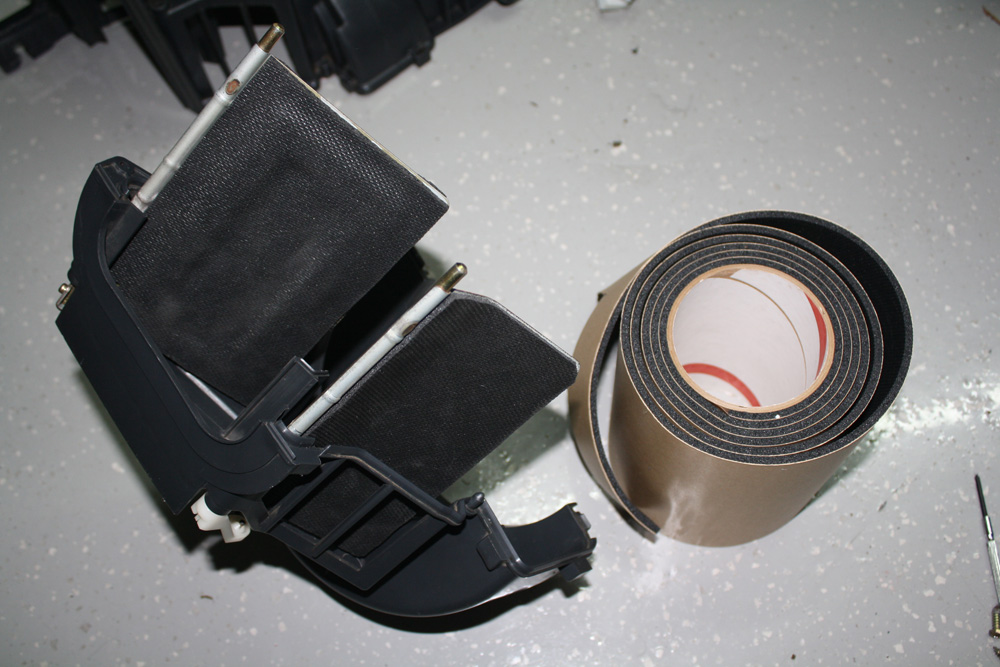
I got tired of my A/C system blowing broken pieces of foam through the vents, so I removed my A/C blower and evaporator to take a look. The main culprit was the blower, which has two foam-covered flaps (with foam on both sides of the flaps) to direct the airflow. I snapped some pics and thought I'd post them up in case anyone else might find this useful.
Here's what the blower looked like after removing it from the dash:
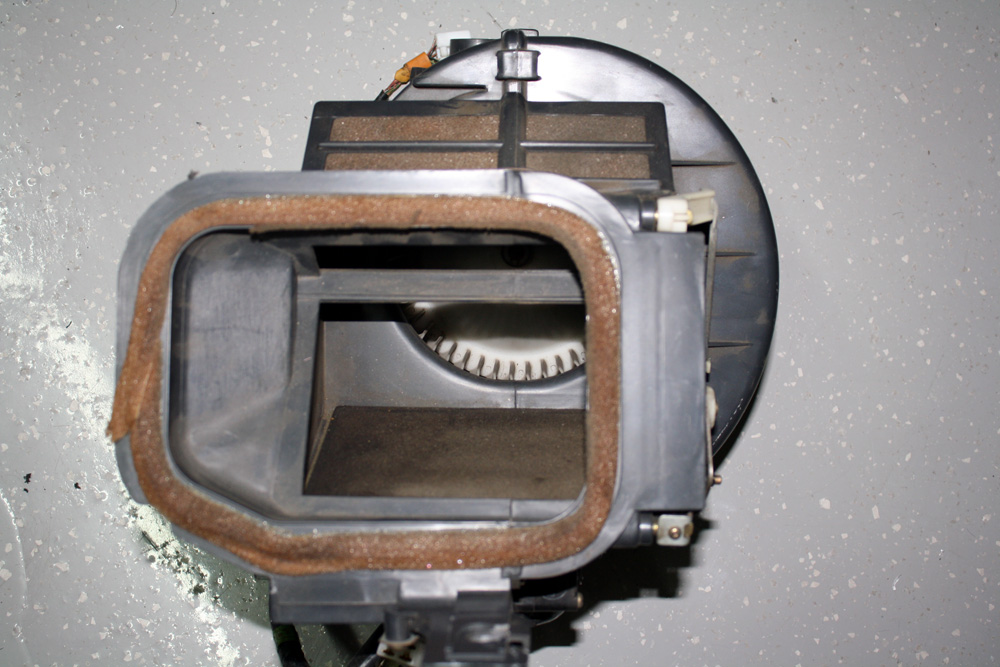
You can see the foam gasket is deteriorating, as well as the foam on the vent flaps:
Dismantling the unit is pretty simple. There are a few clips holding it together, and various screws. Here's what it looks like disassembled:

It would be easier to restore if you could completely remove the flaps, but on one of them the pin is secured by a plastic clip that would be difficult to remove without damaging it. The other flap is secured with a Phillips head set screw, but mine was somewhat seized and the screw head started to strip before I could get it out. So it's best to just leave the flaps attached to one side of the blower while you work on it.
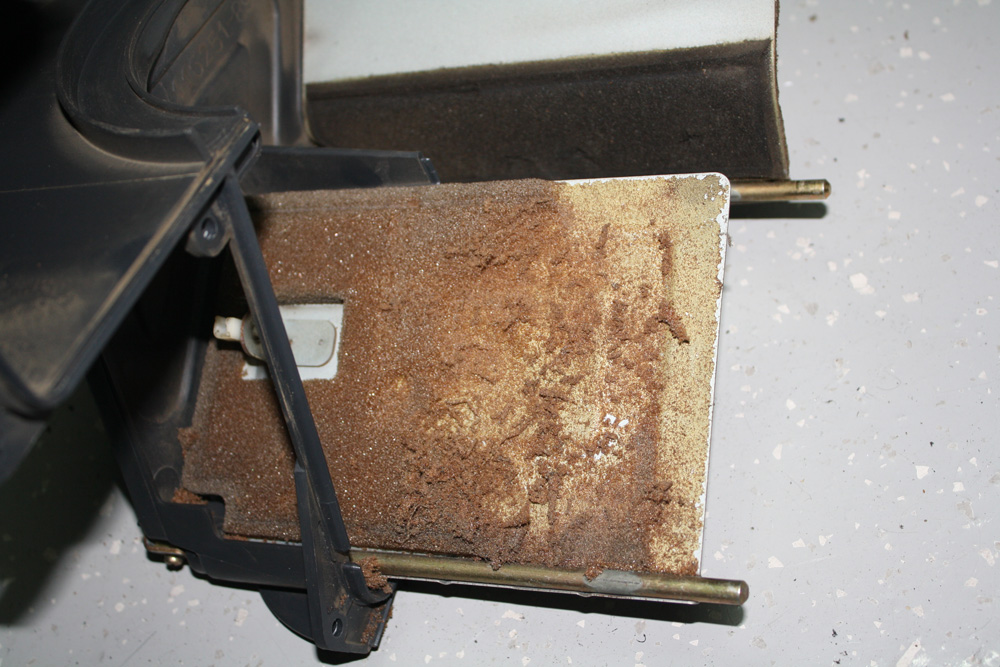
The foam was completely deteriorating, as you can see:
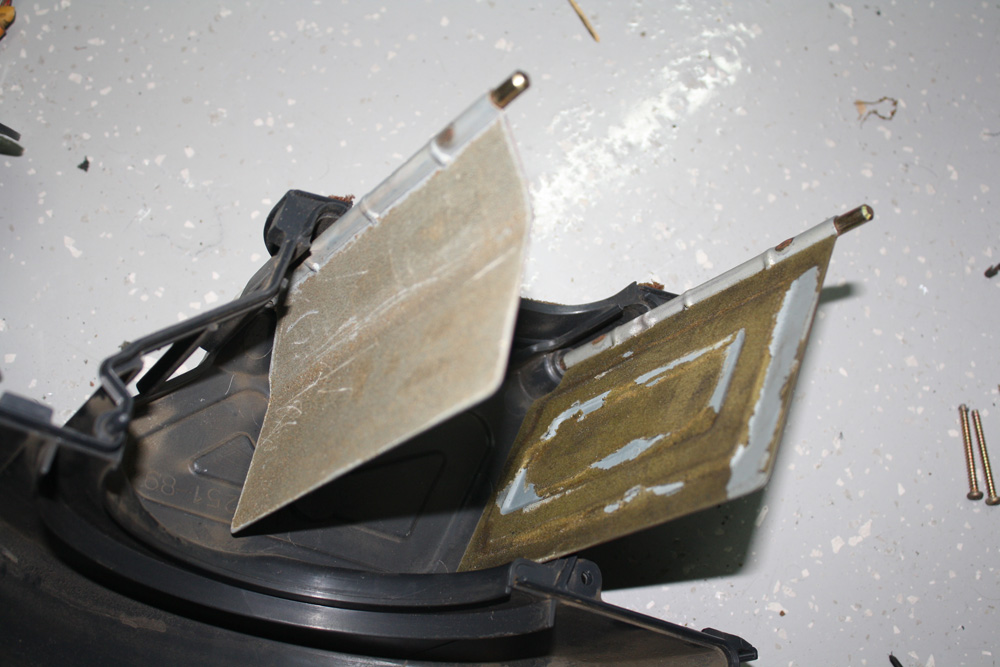
All of the old foam was scraped off the flaps:
(Continued in next post...)
Here's what the blower looked like after removing it from the dash:
You can see the foam gasket is deteriorating, as well as the foam on the vent flaps:
Dismantling the unit is pretty simple. There are a few clips holding it together, and various screws. Here's what it looks like disassembled:
It would be easier to restore if you could completely remove the flaps, but on one of them the pin is secured by a plastic clip that would be difficult to remove without damaging it. The other flap is secured with a Phillips head set screw, but mine was somewhat seized and the screw head started to strip before I could get it out. So it's best to just leave the flaps attached to one side of the blower while you work on it.
The foam was completely deteriorating, as you can see:
All of the old foam was scraped off the flaps:
(Continued in next post...)
Last edited by RaceDriver7; Mar 31, 2012 at 01:24 AM.
Thread Starter
Group Buy Vendor
iTrader: (9)
Joined: Dec 2005
Posts: 751
Likes: 17
From: Orlando, FL
I purchased some adhesive-backed foam rubber from McMaster.com that should hold up much better than the stock stuff. It worked pretty well, but if I were to do it again, I might buy something a little softer and less dense. It's hard to judge firmness without seeing it in person. The part number for the stuff I used is 93625K294 and it's 5/32" thick.
The foam was cut into the appropriate sizes and stuck to the flaps:
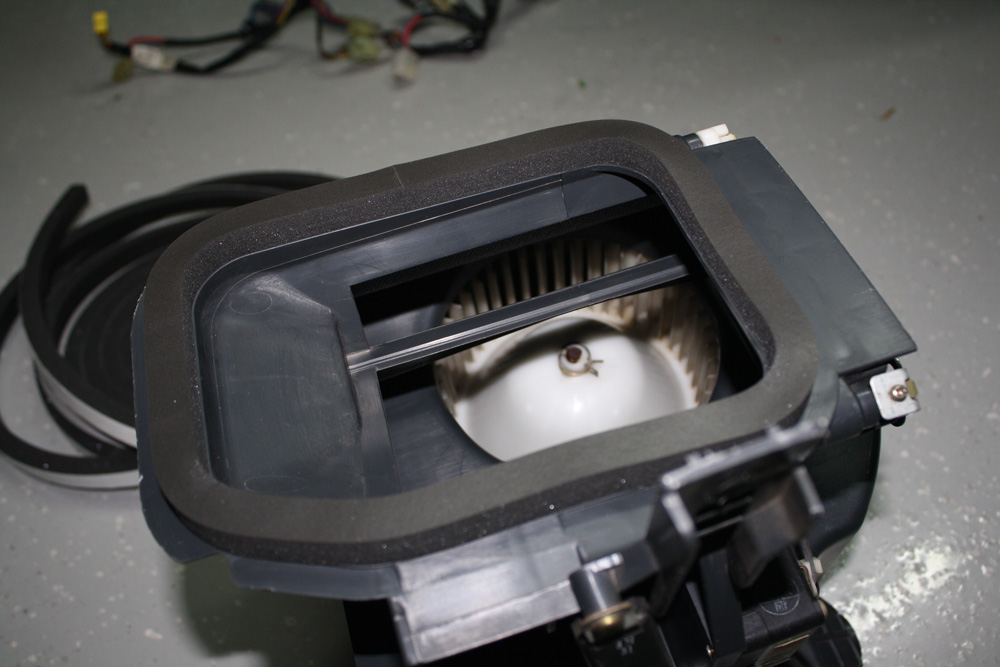
The unit was then cleaned and reassembled. Any moving parts were lubricated with dry Teflon wax and the rusty clips that hold the unit together were sprayed with rust-stop.
The foam gasket was replaced with McMaster part number 93275K52. It's 1/2" x 1/2" which I think might be a little too thick, but I won't know for sure until I reassemble everything. I also bought some 93725K72, which might work better. 1/2" x 1/4" would probably be ideal.
The foam on the wiring harness was also completely deteriorating, basically into sand, which makes a mess in the interior. So I freshened up the wiring harness with new foam rubber and some self-vulcanizing electrical tape. I plan on doing this with the rest of the dash wiring harness as well. The part number for the foam I used is 8614K71. It's adhesive-backed, 1/8" thick, "super-soft" Polyurethane foam.
Here's a pic of the cleaned up harness:

And finally, here's the reassembled unit:

I'll be restoring the A/C evaporator next so I'll try to snap some pics of that and post them up as well.
The foam was cut into the appropriate sizes and stuck to the flaps:
The unit was then cleaned and reassembled. Any moving parts were lubricated with dry Teflon wax and the rusty clips that hold the unit together were sprayed with rust-stop.
The foam gasket was replaced with McMaster part number 93275K52. It's 1/2" x 1/2" which I think might be a little too thick, but I won't know for sure until I reassemble everything. I also bought some 93725K72, which might work better. 1/2" x 1/4" would probably be ideal.
The foam on the wiring harness was also completely deteriorating, basically into sand, which makes a mess in the interior. So I freshened up the wiring harness with new foam rubber and some self-vulcanizing electrical tape. I plan on doing this with the rest of the dash wiring harness as well. The part number for the foam I used is 8614K71. It's adhesive-backed, 1/8" thick, "super-soft" Polyurethane foam.
Here's a pic of the cleaned up harness:
And finally, here's the reassembled unit:
I'll be restoring the A/C evaporator next so I'll try to snap some pics of that and post them up as well.
Last edited by RaceDriver7; Mar 31, 2012 at 01:25 AM.


Holy crap! Awesome job!
BIG kudos to finding and posting the Mcmaster-Carr part numbers for all that foam, that's the tricky part of the deal. I GOTTA get some of that anti-rattle foam for the harness, that's so cool!
Excellent writeup!
This NEEDS to go in the FAQ pronto!
Dale
BIG kudos to finding and posting the Mcmaster-Carr part numbers for all that foam, that's the tricky part of the deal. I GOTTA get some of that anti-rattle foam for the harness, that's so cool!
Excellent writeup!
This NEEDS to go in the FAQ pronto!
Dale

Thread Starter
Group Buy Vendor
iTrader: (9)
Joined: Dec 2005
Posts: 751
Likes: 17
From: Orlando, FL
Thanks guys, it's nice to know the post is appreciated.
I just finished restoring the A/C evaporator. I will post a write-up and pics tomorrow. Next will be the heater core, which also has the foam-covered vent flaps.
I just finished restoring the A/C evaporator. I will post a write-up and pics tomorrow. Next will be the heater core, which also has the foam-covered vent flaps.
Trending Topics
Thread Starter
Group Buy Vendor
iTrader: (9)
Joined: Dec 2005
Posts: 751
Likes: 17
From: Orlando, FL
I just did the write-up on rebuilding the evaporator. Here's the link: https://www.rx7club.com/3rd-generation-specific-1993-2002-16/c-evaporator-rebuild-w-photos-993467/
Thread Starter
Group Buy Vendor
iTrader: (9)
Joined: Dec 2005
Posts: 751
Likes: 17
From: Orlando, FL
Also, originally I said you couldn't remove those flaps, but you can. Just use a screw driver to pry them out.
I think I'm going to replace my blower resistor while I'm in there. I broke some of the clips for the actuator rods(little plastic ones that swing over and clip onto the rod). Any idea where to get these? And some of the pivot clips for the doors aren't in such great shape...

Hey Michael-
I have a number of your products (exceptional quality) and even though I have the AC components out of my car I wanted to say thank you for taking the time to contribute these two threads.
I have a number of your products (exceptional quality) and even though I have the AC components out of my car I wanted to say thank you for taking the time to contribute these two threads.
You know I think these ones would actually be good for the doors. The rods on the heater assembly are a little smaller, maybe 3mm? I'll keep looking.
Last edited by linnadawg; Nov 4, 2012 at 07:09 PM.

Thread Starter
Group Buy Vendor
iTrader: (9)
Joined: Dec 2005
Posts: 751
Likes: 17
From: Orlando, FL
I think I'm going to replace my blower resistor while I'm in there. I broke some of the clips for the actuator rods(little plastic ones that swing over and clip onto the rod). Any idea where to get these? And some of the pivot clips for the doors aren't in such great shape...
Thread Starter
Group Buy Vendor
iTrader: (9)
Joined: Dec 2005
Posts: 751
Likes: 17
From: Orlando, FL

Thread Starter
Group Buy Vendor
iTrader: (9)
Joined: Dec 2005
Posts: 751
Likes: 17
From: Orlando, FL
Where were you using it on the doors? If it's not something like those rubber gaskets that gets held in place by pressure after assembly, you probably need something stickier. Also, a softer foam will stick better. Look through the descriptions for the type and strength of adhesive it comes with on Mcmaster.com, and buy something stronger.