Brake Ducting


 05-05-06, 01:43 PM
#27
Rotary Enthusiast
Originally Posted by patfat
I'd take a set if the price was right and they fit w/ the 99 spec lip
 05-05-06, 08:19 PM
#29
Originally Posted by wanklin
I will be making some carbon or fiberglass scoops painted black to mate with my 99 lip to feed my N-tech ducting. If it helps someone else out maybe I'll get another set made.
 05-06-06, 12:25 AM
#31
I just made (and installed) a pair of fiberglass ducts for the NTech kit. It was pretty easy, and about a weekend's work.
1) Get some construction foam (the hard, open cell, extremely easy to sand foam). Those in the South Bay can get this at D&J Hobbies in Campbell.
2) Get some 3M spray adhesive to use with the foam. It quickly joins two pieces of foam, but you need to be sure not to use too much, because it also dissolves the foam.
3) Get some (expensive) epoxy resin (polyester resin will dissolve the foam) and some heavy-weight cloth fiberglass. Get some black dye to dye the resin. Get some fiberglass mold release wax. Those in the Bay Area can get all this stuff at Tap Plastics.
4) Remove the R1 front lip. Disassemble the lip into its two pieces.
5) Mark the two plastic under pieces immediately in front of both tires so as to note where the oil lines run. You don't want to put any mounting holes where these guys are. Now remove the two under pieces.
6) Remove the square air "channels" from these pieces and set aside. These are the pieces that help direct the airflow from the inlets in the lip. There was some guy in the for sale section that wanted to buy these, so if you want, sell them to him.
7) On your bench, screw together each underpiece with its mating lip. You will use each as the bottom of a mold for the fiberglass.
8) Buy a piece of 3" aluminum heating duct from Home Depot. Squash it into an oval shape. You will use it to cut outlet pieces from the foam. Cut some foam oval cylinders about 1.5 to 2" long, in the shape you want the ducting pipes to attach to. Sand them down about 1/8" all around to make room for the fiberglass, since the duct will need to fit on top of the fiberglass.
9) Shape the construction foam the way you want the duct to look. See the pictures to get an idea what I did. Start by shaping the bottom of the foam to fit cleanly over the bumps in the plastic under piece. Then shape the front of the foam to match the lip intake. Then glue the cylinder you just cut to the foam mold in the location you want it. Then shape the intervening space. Note the underpieces have bumps in them that will force the airflow up, so make the mold follow these bumps or you will cause a flow restriction.
10) After you get the shape you want, spackle (yes, spackle) the crap out of the foam to fill all the open cells. Sand the spackle smooth, being careful to not sand down into the foam.
11) Tape the foam mold down with blue masking tape. Put blue tape everywhere you plan to lay fiberglass. Mask off the rest of the lip and underpiece with wax paper. If you don't do a good job, you will end up with black epoxy resin all over your plastic car parts. Lay about three coats of mold release wax over everything.
12) Lay down two coats of fiberglass, and three coats around the duct outlet. The hardest part of the fiberglassing is the duct outlet, so take care to plan that well before you pour your resin.
13) Let cure. Remove from underpieces, lift, cut, or otherwise remove the foam mold. Trim the fiberglass.
14) Drill four mounting holes. I drilled two to match existing holes in the under piece and two others just for the duct.
15) Install in car.
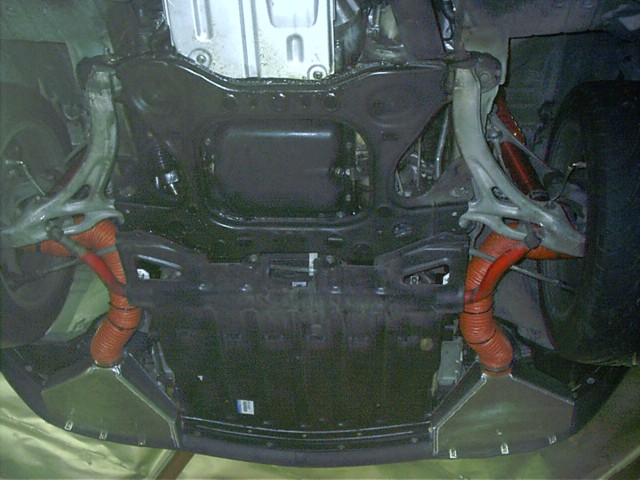
See picts for the result. This is about as good as I can imagine without cutting into the car's stock pieces. When installed you can't even see it there, and it doesn't extend down any further than the lowest part of the undertray. I still need to install the ducting, but don't imagine that will pose any problems as I was pretty careful to make sure it would route properly before I made the fiberglass molds.
I have also not yet tried this on the track. The one possible problem is that I am relying on the stock duct intake area (on purpose, so as to keep things looking as stock as possible). John Magnuson's posts indicate he also tried this and eventually had to enlarge the intake area (substantially, from the pictures of his aluminum work). If I do end up needing to enlarge the intake, I won't need to start from scratch though. I will just enlarge the opening in the R1 lip (by cutting into it), and then cut the existing fiberglass ducting in half, make a new half-mold, and fiberglass a new front half onto the rear to match the new lip opening. I hope I won't have to do that though, since the lip will then look, well, like someone cut a couple holes in it.
If someone has any track data with duct work using the stock R1 intake area, I would love to hear it. I am going to Thunderhill soon so will be able to try them on the track. I have stock brakes and rotors, and CarboTech XP10s with SuperBlue fluid, Avon R compound tires on the stock rims, and have not seen any fade even without the duct work. But I don't know how fast I am relative to how fast the car could be - I just know I am passing most of the corvettes, wrx's, bimmers and porches in my group.
1) Get some construction foam (the hard, open cell, extremely easy to sand foam). Those in the South Bay can get this at D&J Hobbies in Campbell.
2) Get some 3M spray adhesive to use with the foam. It quickly joins two pieces of foam, but you need to be sure not to use too much, because it also dissolves the foam.
3) Get some (expensive) epoxy resin (polyester resin will dissolve the foam) and some heavy-weight cloth fiberglass. Get some black dye to dye the resin. Get some fiberglass mold release wax. Those in the Bay Area can get all this stuff at Tap Plastics.
4) Remove the R1 front lip. Disassemble the lip into its two pieces.
5) Mark the two plastic under pieces immediately in front of both tires so as to note where the oil lines run. You don't want to put any mounting holes where these guys are. Now remove the two under pieces.
6) Remove the square air "channels" from these pieces and set aside. These are the pieces that help direct the airflow from the inlets in the lip. There was some guy in the for sale section that wanted to buy these, so if you want, sell them to him.
7) On your bench, screw together each underpiece with its mating lip. You will use each as the bottom of a mold for the fiberglass.
8) Buy a piece of 3" aluminum heating duct from Home Depot. Squash it into an oval shape. You will use it to cut outlet pieces from the foam. Cut some foam oval cylinders about 1.5 to 2" long, in the shape you want the ducting pipes to attach to. Sand them down about 1/8" all around to make room for the fiberglass, since the duct will need to fit on top of the fiberglass.
9) Shape the construction foam the way you want the duct to look. See the pictures to get an idea what I did. Start by shaping the bottom of the foam to fit cleanly over the bumps in the plastic under piece. Then shape the front of the foam to match the lip intake. Then glue the cylinder you just cut to the foam mold in the location you want it. Then shape the intervening space. Note the underpieces have bumps in them that will force the airflow up, so make the mold follow these bumps or you will cause a flow restriction.
10) After you get the shape you want, spackle (yes, spackle) the crap out of the foam to fill all the open cells. Sand the spackle smooth, being careful to not sand down into the foam.
11) Tape the foam mold down with blue masking tape. Put blue tape everywhere you plan to lay fiberglass. Mask off the rest of the lip and underpiece with wax paper. If you don't do a good job, you will end up with black epoxy resin all over your plastic car parts. Lay about three coats of mold release wax over everything.
12) Lay down two coats of fiberglass, and three coats around the duct outlet. The hardest part of the fiberglassing is the duct outlet, so take care to plan that well before you pour your resin.
13) Let cure. Remove from underpieces, lift, cut, or otherwise remove the foam mold. Trim the fiberglass.
14) Drill four mounting holes. I drilled two to match existing holes in the under piece and two others just for the duct.
15) Install in car.
See picts for the result. This is about as good as I can imagine without cutting into the car's stock pieces. When installed you can't even see it there, and it doesn't extend down any further than the lowest part of the undertray. I still need to install the ducting, but don't imagine that will pose any problems as I was pretty careful to make sure it would route properly before I made the fiberglass molds.
I have also not yet tried this on the track. The one possible problem is that I am relying on the stock duct intake area (on purpose, so as to keep things looking as stock as possible). John Magnuson's posts indicate he also tried this and eventually had to enlarge the intake area (substantially, from the pictures of his aluminum work). If I do end up needing to enlarge the intake, I won't need to start from scratch though. I will just enlarge the opening in the R1 lip (by cutting into it), and then cut the existing fiberglass ducting in half, make a new half-mold, and fiberglass a new front half onto the rear to match the new lip opening. I hope I won't have to do that though, since the lip will then look, well, like someone cut a couple holes in it.
If someone has any track data with duct work using the stock R1 intake area, I would love to hear it. I am going to Thunderhill soon so will be able to try them on the track. I have stock brakes and rotors, and CarboTech XP10s with SuperBlue fluid, Avon R compound tires on the stock rims, and have not seen any fade even without the duct work. But I don't know how fast I am relative to how fast the car could be - I just know I am passing most of the corvettes, wrx's, bimmers and porches in my group.
 05-08-06, 12:46 AM
#36
Junior Member
Join Date: Mar 2004
Location: Texas
Posts: 47
Likes: 0
Received 0 Likes
on
0 Posts
I have made brake ducts (at the rotor) before for my trans am. Took a piece of tubing in the desired size from Lowe�s, bend it using a vise into an oval so it better fits the back of the rotor, and clamp it in place with a U bolt. Not the best solution, but close for about 10 bucks�
As for waiting until you can out-drive your brakes, screw that. The brakes are the only thing keeping you from that ugly nasty wall (well, brakes tires and fluid). I would always do whatever possible to ensure that I always had more brakes than I might need.
Dan
P.S. I ended up turning the u-bolt over, to keep the sharp edges away from the ball-joint boot.
05-08-06, 07:24 AM
#37
Originally Posted by o0Dan0o
As for waiting until you can out-drive your brakes, screw that. The brakes are the only thing keeping you from that ugly nasty wall (well, brakes tires and fluid). I would always do whatever possible to ensure that I always had more brakes than I might need.
05-08-06, 08:27 AM
#38
Originally Posted by adax
Here's another option. I just trimmed down the typical 3" air ducts that race shops sell and enlarged the opening in the lip using a heat gun to get the plastic malleable.
How did you attach that duct to the back of the lip?
Crispy
05-08-06, 09:37 AM
#39
Senior Member
Join Date: Aug 2002
Location: DC
Posts: 587
Likes: 0
Received 0 Likes
on
0 Posts
Originally Posted by adax
Here's another option. I just trimmed down the typical 3" air ducts that race shops sell and enlarged the opening in the lip using a heat gun to get the plastic malleable.
05-08-06, 11:52 AM
#40
Rotary Enthusiast
Great pictures everyone!
One note: The owner of the race shop that fabricated my brake ducts felt that the stock inlet area of the R1 lip brake duct was entirely insufficient to gather enough air to properly cool the brakes. That is why he made such a wide inlet for me. The shop owner is a huge perfectionist and tends to overdue things at times, so I'll admit it's possible my ducts are overkill but I figured he has a lot more racing and race car building experience than me. However, it would be nice if it works well for some of you using just the stock R1 intake duct as this looks a lot cleaner.
- John
05-08-06, 12:08 PM
#41
Junior Member
Join Date: Mar 2004
Location: Texas
Posts: 47
Likes: 0
Received 0 Likes
on
0 Posts
Originally Posted by Mahjik
Which starts with the proper brake pad, not brake ducts.
Dan
05-08-06, 12:27 PM
#42
Originally Posted by Sled Driver
Most street pads are designed to be quiet with low dust. They are only effective from ambient to 400�F.
Repeated stops from above 100 mph will easily exceed that temp.
Hawk HP + pads optimum operational temperature range is 100-800 degrees F
Performance Friction #97 pads are effective from 167�F and can reach 2000�F
Repeated stops from above 100 mph will easily exceed that temp.
Hawk HP + pads optimum operational temperature range is 100-800 degrees F
Performance Friction #97 pads are effective from 167�F and can reach 2000�F
You select your pads by the temperature range. Numerous people have already posted this. I even quoted temperature ranges for two.
Race pads like the Performance Friction #97 are horrible for street use. They are worthless until they heat up.
Although quite entertaining at night when you see a shower of sparks coming from your wheels every time you hit the brake long & hard enough to slow you down. At the lower temperature range you can't properly "bed" them & they slowly machine your rotors away.
In order to properly "bed" ANY set of new pads you need to heat them up with repeated stops. You'll need to cover the ducts.
If your lapping in the rain (see my avatar?) you will also want to block the ducts.
05-08-06, 12:45 PM
#43
Lives on the Forum
Originally Posted by John Magnuson
The owner of the race shop that fabricated my brake ducts felt that the stock inlet area of the R1 lip brake duct was entirely insufficient to gather enough air to properly cool the brakes.
05-08-06, 02:47 PM
#44
Originally Posted by CrispyRX7
Adax,
How did you attach that duct to the back of the lip?
Crispy
How did you attach that duct to the back of the lip?
Crispy
Unfortunately they do not mate up well enough to seal the lip opening to the inside of the duct. The lip opening fits inside the duct an inch or so with appropriate dremel work on the duct. A cable tie around the 3" portion of the duct and through the belly pan piece keeps it in place. If I wasn't planning on getting a '99 bumper and lip, I'd make it look a bit better. I think you could cut the top of the duct piece off at an angle (saving the 3" portion) and make it fit almost perfectly.
05-08-06, 03:13 PM
#45
Senior Member
Join Date: Aug 2002
Location: DC
Posts: 587
Likes: 0
Received 0 Likes
on
0 Posts
Originally Posted by adax
Here's another option. I just trimmed down the typical 3" air ducts that race shops sell and enlarged the opening in the lip using a heat gun to get the plastic malleable.
05-08-06, 06:12 PM
#47
Originally Posted by o0Dan0o
Absolutely, I would not suggest that someone use brake ducting as a replacement to buying the proper brake pads. But at the same time, I would still not wait until I was cooking my brakes, even with the proper pads, to add ducts. They are relatively inexpensive and easy to make and will do a great deal to deter brake frade.
Dan
Dan
People should start with proper track pads and fluid first and then find out if they are still having brake overheating problems. After that assess if it really is a brake problem or a driving problem (i.e. riding the brakes on the track). Even then it will be different from track to track. Some tracks will be harder on the brakes than others.
05-08-06, 06:33 PM
#48
Rotary Enthusiast
True... I beat my brakes without mercy and the ducts are only really needed at tracks that are super hard on brakes (braking from 125mph to 40mph for turn two at Laguna Seca comes to mind).
05-08-06, 07:49 PM
#49
Racerwholesale has the 3" brake duct hose. They offer different temperature ranges. I bought the highest temp orange colored hose. Comes in a 10' length. It's expensive (I don't recall exactly what I paid but I shopped around a bit) but no where near as pricey as some of those "other" specialty RX7 vendors.
HTH,
Crispy
HTH,
Crispy
05-08-06, 09:56 PM
#50
Senior Member
Join Date: Aug 2002
Location: DC
Posts: 587
Likes: 0
Received 0 Likes
on
0 Posts
Originally Posted by CrispyRX7
Racerwholesale has the 3" brake duct hose. They offer different temperature ranges. I bought the highest temp orange colored hose. Comes in a 10' length. It's expensive (I don't recall exactly what I paid but I shopped around a bit) but no where near as pricey as some of those "other" specialty RX7 vendors.
HTH,
Crispy
HTH,
Crispy