VIDEO - Still crappy idle, no response to idle adjustment??
 07-04-07, 06:02 PM
#201
progress
Ok, so in preparation for the arrival of the new TB, UIM, LIM and other goodies I decided to remove the old LIM. I have had never removed the lower intake manifold before but I was gonna have to remove it sooner or later cause I not gonna put the old manifolds back on the car. I will keep the old one and try to clean, re finish the inside and outside of them as a side project.
So while removing the acv and junk i began to think it might be easier to reach some of the bolts for the LIM if the turbo was out of the way so:
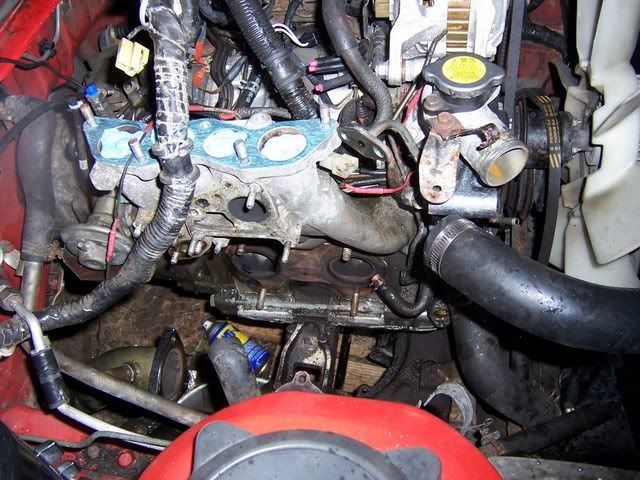
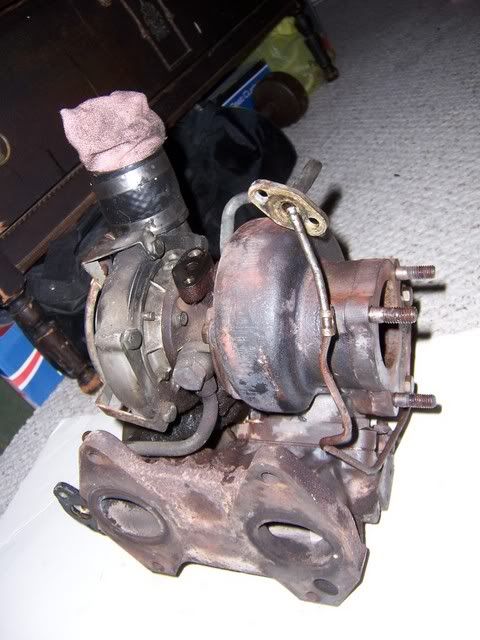
I got the turbo off and was ready to remove the LIM completely when it stared to rain heavily. So, I'll get it off when it stops raining, but here's my turbo which will be shipped out to BNR for a Stage 1 rebuild before it's reinstalled:


So while removing the acv and junk i began to think it might be easier to reach some of the bolts for the LIM if the turbo was out of the way so:
I got the turbo off and was ready to remove the LIM completely when it stared to rain heavily. So, I'll get it off when it stops raining, but here's my turbo which will be shipped out to BNR for a Stage 1 rebuild before it's reinstalled:
 07-08-07, 09:20 PM
#202
Okay, so today I continued to get the engine ready for the new parts, but as you'll see I was convinced that I wasn't content to just install the new parts, so I just went and took the whole motor/trans right out.
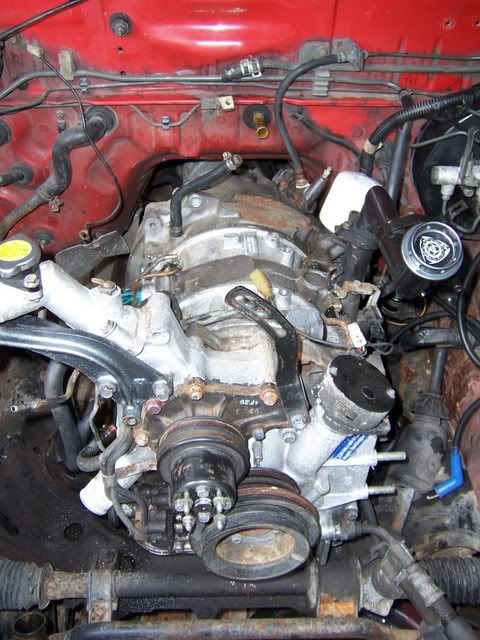
I removed the LIM and the alternator, disconnected the oil and water lines from the motor and got it down to the block pretty much.
LIM Removed:
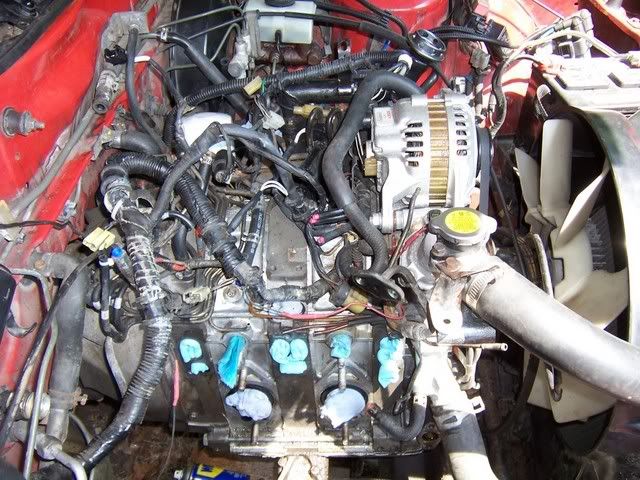
Vacuum hoses and harness removed, getting close:
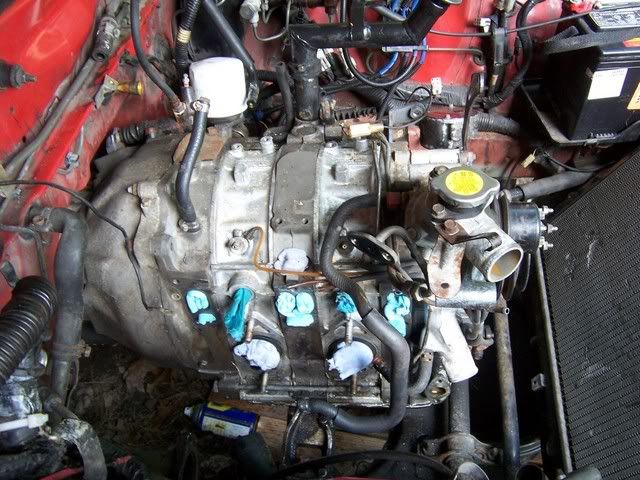
What a small engine this thing is:

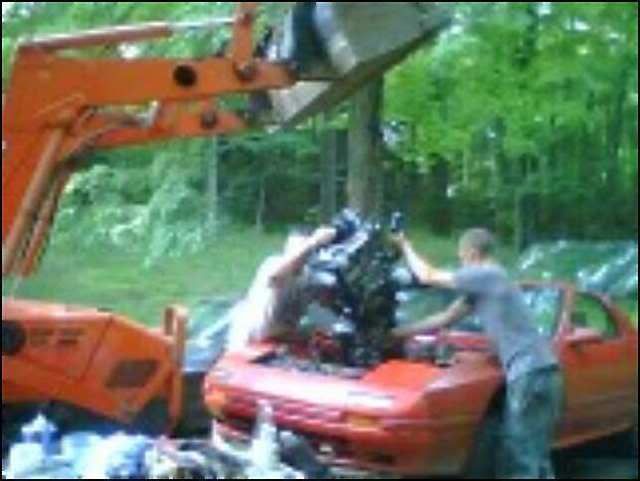
Right before pulling it, the trans cross member was unbolted from the car and the trans held up with a jack, the drive shaft was removed, the shifter taken off, speedometer cable and wires unhooked, plus the radiator was removed to prevent possible damage, the motor mounts were busted loose and a final check to make sure we were all disconnected was completed
Easiest way I could find today, flawless execution thank god, took a minute and when we put it in we will have another chain to balance the ftont to back a little more but this was way easier than using an engine hoist in my dirt and gravel work space:
This will all be cleaned and painted and gone over:
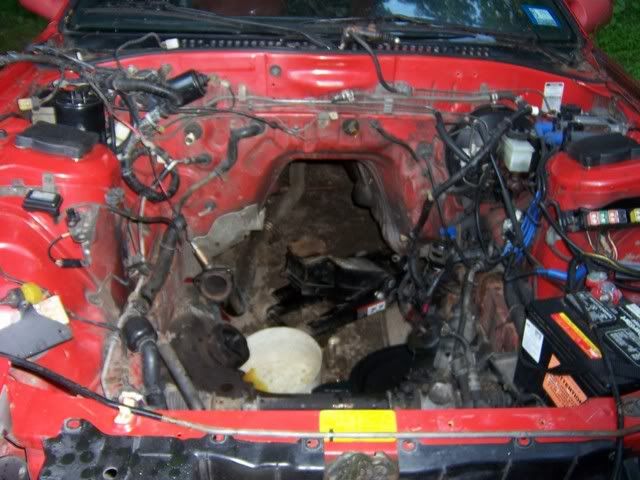
My workspace:

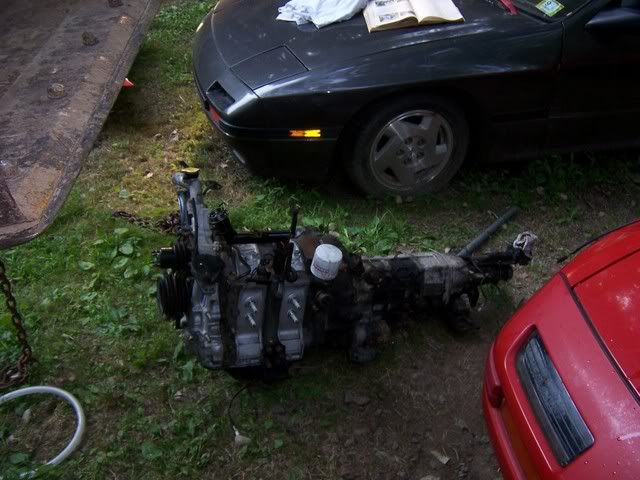
I actually separated the trans right after the last pic shown here, the trans will be replaced with a low mileage transmission, the engine block will be cleaned and painted with por15 engine paint, the BNR turbo will go in with all of the new manifolds. Sounds like fun to me....I'll keep you posted.
So I'm just gonna clean everything and replace as much broken worn out, old decrepit stuff as possible and reinstall with new gaskets and stuff, can u think of anuthing i should be doing while the engine is out in specific. i was thinking to check the main seals or whatever it is they tell you to replace when you have the chance, I'll probably swap out the clutch while I'm at it to a nice new one.
Any tips??
I removed the LIM and the alternator, disconnected the oil and water lines from the motor and got it down to the block pretty much.
LIM Removed:
Vacuum hoses and harness removed, getting close:
What a small engine this thing is:
Right before pulling it, the trans cross member was unbolted from the car and the trans held up with a jack, the drive shaft was removed, the shifter taken off, speedometer cable and wires unhooked, plus the radiator was removed to prevent possible damage, the motor mounts were busted loose and a final check to make sure we were all disconnected was completed
Easiest way I could find today, flawless execution thank god, took a minute and when we put it in we will have another chain to balance the ftont to back a little more but this was way easier than using an engine hoist in my dirt and gravel work space:
This will all be cleaned and painted and gone over:
My workspace:
I actually separated the trans right after the last pic shown here, the trans will be replaced with a low mileage transmission, the engine block will be cleaned and painted with por15 engine paint, the BNR turbo will go in with all of the new manifolds. Sounds like fun to me....I'll keep you posted.
So I'm just gonna clean everything and replace as much broken worn out, old decrepit stuff as possible and reinstall with new gaskets and stuff, can u think of anuthing i should be doing while the engine is out in specific. i was thinking to check the main seals or whatever it is they tell you to replace when you have the chance, I'll probably swap out the clutch while I'm at it to a nice new one.
Any tips??
07-09-07, 08:48 AM
#204
Oh yeah I'm having fun!!
I just can't be thankful enough that my new job has really come through, I've been so broke after college but I just got my raises last week plus the overtime on Saturdays, so all of this stuff I have been wanting to do for two years is finally an option.
I felt bad for my 7 having a new motor but all of this junk from '87 on her, so this is where we are now. My main objective is to remove all grease, grime, anything broken, loose or rotten anywhere in the bay or on the motor, I will be doing all of the vac lines that are left after emissions removal, and I will replace the one old fuel line that I never did before.
The OMP lines will be replaced, the turbo will be rebuilt, the down pipe needs to removed for the addition of the wide band bung, I am still debating whether to go with a FMIC kit from Greddy or an ebay core and custom piping.. The trans will be replaced, as well as the rear differential, then finish the suspsension w/ some tanabe gf210's, some whees and paint sounds like it to me...
I have heard that our stock ignition system is pretty much adequate for what I'm thinking, does that sound right. I'm looking to run maybe 10 psi max with the BNR Stage 1, Rtek7 Stage 2.0 w/ 255lph and (4) 720cc's and FMIC??
But you will see all of it done here....thanks.
07-09-07, 02:30 PM
#205
I have heard mixed reviews about the stock ignition system. Most I have heard, and this is my opinion as well, that the stock system is perfectly fine if you intend to keep your powerband in the mid-to- upper range (4000 to 8000 rpm) and boost levels to around 15 psi. Where the stock system's weaknesses tend to show up is under higher boost and above 8k rpm. I'm sure there are lots of opinions on that. A street/ strip car should be fine with stock, a dedicated track car probably upgrade to something else.
07-10-07, 09:23 AM
#206
All right, that pretty much coincides with what I had previously heard/read around here before, it seems to me that I'll be okay with the stock ignition system as long as it is in good shape.
I've got couple questions for ya though:
When I am installing the block off plates for my emissions, I do NOT want to remove the BAC Valve or the Thermowax Unit. So plan on just removing the air control valve and split air pipe, the EGR vavle, Sub zero start assist and the air supply valve. Is this wrong?
I had read somewhere on here about people having problems capping the coolant lines off of the engine, if I plan on keeping my T-wax and BAC than this doesn't apply to me right? I plan or removing that whole rats nest, and just capping off everything not needed. So I'll have to rig an oil catch can for the crankcase ventilation and extra fuel line but thats about it right?
I have no power steering or a/c and want to do the emissions removal primarily for simplification purposes.
I know there are write up on emissions removal which Iplan on using I just want to run it all by you as well, and I had more but i gotta get to work, so I'll post later, thanks.
07-10-07, 03:13 PM
#207
If you have a solenoid on the rat's nest that controls vacuum to the fuel pressure regulator, you might want to keep that, you can re-locate it elsewhere in the engine bay if you're not using the rat's nest bracket. It is used to help with hot restarts.And are you using a cat with the air pipe? And yes you're right about blocking off coolant lines. A block-off cap usually rots right off the rear iron port pretty quickly, but you're retaining the t-wax and BAC (good choice) so just connect those coolant hoses as usual. And don't throw away the air supply valve just yet until you're happy with your cold idle.
07-10-07, 10:09 PM
#208
Good to know about that FPR solenoid, I had heard you could cut it out but I also heard that it is part of that Hot Start Assist System that you mentioned so i wasn't sure about it. I'll relocate it like you suggested.
On the stock setup, there's also this line running from the oil filler neck to the intake, the same line from the oil neck goes up to the charcoal canister. I believe this is to vent the crankcase but my question is can eliminate the line to the intake and just run it to the charcoal canister or do I need to vent to the intake to release pressure?? I just don't want oil spitting back into my intake, maybe I should just look more into a oil catch can, is this what it's for??
Also I guess the other line to the charcoal canister is from my gas tank, is this right?
here, I scanned a pic to show you what i was talking about:

In writing this post, looking at that diagram now I'm a little confuddled, for instance what am i supposed to do about the "twin scroll turbocharger solenoid", there's alot going ont here that I don't understand yet, so I'm not quite sure how to preogress w/ the emissions removal.
I want to get rid of the air pump and acv for sure, I have straight 3" exhaust w/ no precats or cats. There is no sense in having all of that emissions stuff and no cats and I'd like to simplify my setup for my own reasons. But I'm gonna have to take some time and read up try to find out what still needs to be left of the rats nest or if i can remove it entirely and just runa few select new vac lines to choice components like boost sensor, blow off valve, fuel pressure regulator and whatever else is needed. i already have my new vac spider for the oil injectors.
I guess im off to read...thanks
On the stock setup, there's also this line running from the oil filler neck to the intake, the same line from the oil neck goes up to the charcoal canister. I believe this is to vent the crankcase but my question is can eliminate the line to the intake and just run it to the charcoal canister or do I need to vent to the intake to release pressure?? I just don't want oil spitting back into my intake, maybe I should just look more into a oil catch can, is this what it's for??
Also I guess the other line to the charcoal canister is from my gas tank, is this right?
here, I scanned a pic to show you what i was talking about:
In writing this post, looking at that diagram now I'm a little confuddled, for instance what am i supposed to do about the "twin scroll turbocharger solenoid", there's alot going ont here that I don't understand yet, so I'm not quite sure how to preogress w/ the emissions removal.
I want to get rid of the air pump and acv for sure, I have straight 3" exhaust w/ no precats or cats. There is no sense in having all of that emissions stuff and no cats and I'd like to simplify my setup for my own reasons. But I'm gonna have to take some time and read up try to find out what still needs to be left of the rats nest or if i can remove it entirely and just runa few select new vac lines to choice components like boost sensor, blow off valve, fuel pressure regulator and whatever else is needed. i already have my new vac spider for the oil injectors.
I guess im off to read...thanks
Last edited by NJGreenBudd; 07-10-07 at 10:34 PM.
07-10-07, 11:28 PM
#209
Okay, so i got the jist of the oil ventilation deal, I'll make sure to vent it to a catch can, I just want to eliminate most of the excess tubing and rats nest and started to get confused with all the lines everywhere, i see it has two nipples coming off the oil neck, I'll just use one for the can and block the other.
I believe I've figured out most of what I gotta do after removing the ACV, EGR, split air pipe, sub zero. rats nest mess:
the pressure sensor( what i called the boost sensor earlier, sorry), bov, fpr and primary injector bleed(keeping same vacuum nipple) all need to see vacuum.
I will leave the BAC and T-wax, but do we still need the Air Bypass Solenoid Valve on top of the UIM to assist the BAC during cold starts?? Would removing the Air Bypass Solenoid Valve get rid of the AWS but still leave me with my Fast Idle intact?
I don't want to sacrifice the ability to idle and run reliably, so at the same rate, what about removing the Air Supply Valve on the back of the UIM? I know it's used in conjunction with power steering, which i don't have, but I've read that it's also needed during hot starting.
I just want to know what I'm removing and what I'm keeping before I start installing block off plates and vac caps.
Thanks a million.
07-11-07, 08:51 AM
#210
Although you don't have p/s, I would retain the air supply valve. It gives you an extra 100 rpm on hot starts (actually there's an adjustment screw on it so you can play with that rpm a little to suit you). You could remove the air bypass valve (top of UIM) and see how you like your cold idle (remember that you can play with fast idle speed with the screw on the throttle body). As for the twin scroll, I'm not using mine at all. I picked up a used s5 turbo, rebuilt it myself using a larger t04b compressor housing and wheel and s5 exhaust manifold, so I have no twin-scroll solenoid or actuator. I would think you should retain the solenoid for that if you plan on using the s4 turbo. I am thinking about keeping the charcoal canister and oil vent on mine, not real sure yet. I'm still collecting parts to build my engine. I have my N/A as a daily driver right now.
07-11-07, 09:38 AM
#212
ok, sounds good, I'll keep the air supply valve then, and I'll see what the engine is like when cold with the Air Bypass Solenoid Valve removed, those are minor things at this point and can be done with the engine back in the car so they aren't holding me up any.
I plan on finalizing the cold idle after all vac lines have been replaced, most everything else has been check/replaced and the engine reinstalled. I just think I'll be able to address the specific idle condition when I know that there are NO vac leaks or broken wires or other crud.
I will keep the twin-scroll solenoid I guess then, I'll probably relocate it like the FPR solenoid.
I just wanted to keep going with this thread because it's already here, we have a running history of changes and a time line, so it'll be neat to see how many different things are covered and to look back over time and b=view the progress.
I'm off to work now.
Thanks scrip.
07-11-07, 09:53 PM
#213
You could use the solenoid portion of the rat's nest bracket i.e. cut, grind, polish or paint it, drill mounting holes or whatever and mount it on the firewall or some place inconspicuous and clean up the wiring harness going to your solenoids. Still a more appealing look than original IMO.
You were asking what else to do while the engine is out....you could replace the front and rear main seals ( I like OEM) and if you have an engine stand or large bucket you could take the time to modify the thermal pellet or replace it with a solid one, they are like 10 bucks. Just make sure the front of the engine points straight up so as to not allow the thrust bearings to slide out of place.
Perhaps some touch-up paint in your engine bay?
Last edited by scrip7; 07-11-07 at 10:01 PM.
07-12-07, 09:15 AM
#214
Thats a good idea for the solenoid rack, I'll try it out if need be, I am also going to be briefly going over the harness and any other wires/connectrs for visual check and clean them up as best I can.
So: UIM and LIM gaskets, Injector grommets, OMP Lines and washers, Coolant "O" Rings, Vac Spider for oil injectors, All New Vac Hose and Caps, Front and Rear Main Seals and the solid thermal pellet will be replaced while the motor is out or during the install as it happens.
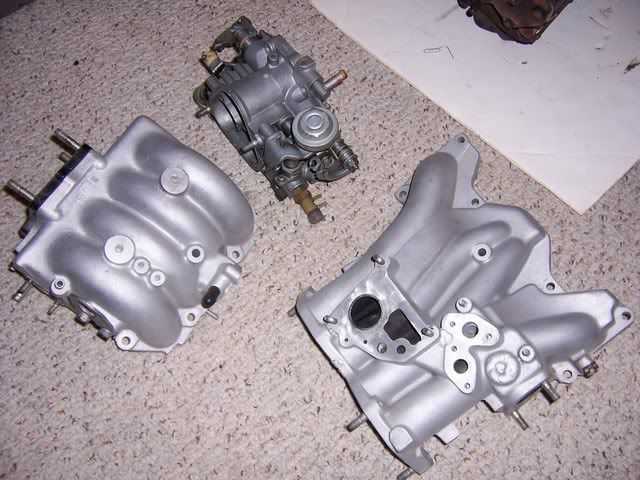
Before the engine goes back in, I will clean and paint the engine as well as the engine bay. I plan on just de-greasing everything as best i can, using a metal ready to inhibit rust and then I'll paint everything with POR 15, I already have the engine enamel I just need to figure what color to paint the engine bay, I'm thinking either black or gray.
Look at these guys, even cleaner than before and no peeling what so ever on the inside:
So: UIM and LIM gaskets, Injector grommets, OMP Lines and washers, Coolant "O" Rings, Vac Spider for oil injectors, All New Vac Hose and Caps, Front and Rear Main Seals and the solid thermal pellet will be replaced while the motor is out or during the install as it happens.
Before the engine goes back in, I will clean and paint the engine as well as the engine bay. I plan on just de-greasing everything as best i can, using a metal ready to inhibit rust and then I'll paint everything with POR 15, I already have the engine enamel I just need to figure what color to paint the engine bay, I'm thinking either black or gray.
Look at these guys, even cleaner than before and no peeling what so ever on the inside:
07-12-07, 09:29 AM
#215
Just a side note, I noticed you still have the a/c liquid line and evaporator still installed. If you wanted to tidy things up a bit, you can remove the evaporator case from under the dash, remove the evap core, put the case back in and use rubber plugs to cover the holes on the firewall. It's very easy to do and takes about an hour to do all that. Just remove the glove box, lower dash trim panel, evap case screws and the case comes right out. And if you haven't already done it, you can remove the condenser and dryer too. A little weight saving here and there adds up.
Nice lookin manifolds and t-body! Are they painted or just bead blasted?
I'd save my pennies and go with the Greddy FMIC. It will likely have less pressure drop across the core and I think you'd be happier with the fit of the piping and better end-tanks than the e-bay cores. I'm using a top-mount air-to-water i/c with a big front-mount heat exchanger with it's own electric fan and coolant pump. I'll post a writeup on it after I get the engine built and installed.
Last edited by scrip7; 07-12-07 at 09:55 AM.
07-12-07, 10:54 PM
#216
They were blasted.
Which of these is the real seal I'm supposed to replace:
Rear Eccentric Seal
Rear Gear O-Ring
Pilot Bearing Seal
I'm in the middle of ordering a butt load of parts and wasn't sure, if i don't hear back soon I'll just grab em all, can't hurt i suppose...
Which of these is the real seal I'm supposed to replace:
Rear Eccentric Seal
Rear Gear O-Ring
Pilot Bearing Seal
I'm in the middle of ordering a butt load of parts and wasn't sure, if i don't hear back soon I'll just grab em all, can't hurt i suppose...
07-13-07, 08:43 AM
#218
Good info, I found the two main seals for sale from atkins for like $10 for the set as well as their $7 solid thermal pellet, good prices. I'll get the pilot bearing seal from mazdatrix. I'll submit my orders today and start some work on my engine tonight after work, I got a light hooked up in my shed for night work now until my garage is finished. I'll take pics and keep you posted, thanks again.
07-14-07, 04:36 PM
#220
Lonely Driver

Join Date: Jan 2007
Location: Marietta, GA
Posts: 26
Likes: 0
Received 0 Likes
on
0 Posts
Regarding that screw GreenBudd turns clockwise to solve the rhythmic idling jumps, where is that on a NA ('88)? I can't seem to find it... My current RX7 has the same problem: idles at around 1200+ and does rhythmic jumps.
07-14-07, 07:29 PM
#221
Look for the t-wax unit on the back of the throttle body, it's got coilantr line running to it, the plunger should have a screw resting on it than moves when the plunger extends, you want to try to screw that screw to the right to try and see if the idle will come down and stabalize.
I'll go take a pic or two for you of my '88 GXL, one minute.
I'll go take a pic or two for you of my '88 GXL, one minute.
07-14-07, 07:49 PM
#222
here ya go, look for the t-wax and then look beneath it to find the screw, that looks like it's alot harder to reach then for a TII so good luck with that.
The t-wax unit itself:

The fast idle can adjustment screw:

The t-wax unit itself:
The fast idle can adjustment screw:
07-14-07, 07:54 PM
#223
I just ordered the main seals front and back, new grommets top and bottom for the injectors, all the gaskets, hoses, OMP lines, coolant "o" rings, solid thermal pellet, new oem thermostat and some other stuff..... the engine is currently being cleaned and prepped for paint and re installation.
What do you guys use as a degreaser when cleaning the engine/ engine bay?? I'm using simple green and carb cleaner.
What do you guys use as a degreaser when cleaning the engine/ engine bay?? I'm using simple green and carb cleaner.
07-14-07, 08:02 PM
#224
Lonely Driver
Join Date: Jan 2007
Location: Marietta, GA
Posts: 26
Likes: 0
Received 0 Likes
on
0 Posts
Heh, it does look a bit more difficult. Guess I'll try twisting it.
EDIT: Bloody impossible to see with the hood over my head (I've got a big head, lol). Going to try feeling around and see if I can feel the screw.
EDIT: Bloody impossible to see with the hood over my head (I've got a big head, lol). Going to try feeling around and see if I can feel the screw.
Last edited by chaz9999; 07-14-07 at 08:16 PM.
07-14-07, 08:35 PM
#225
Lonely Driver
Join Date: Jan 2007
Location: Marietta, GA
Posts: 26
Likes: 0
Received 0 Likes
on
0 Posts
OK, so I can't seem to get a solid grasp on the thing... I also don't see any way to tighten it unless I remove the hood.
Below are the pics I snapped, please let me know if I'm "feeling" the right thing?


Sorry for the bad camera angles, a bit hard to hold a flashlight and steady a camera in a space that doesn't even fit my head, haha.
Is there anyway to tighten the screw without removing the hood?
Below are the pics I snapped, please let me know if I'm "feeling" the right thing?
Sorry for the bad camera angles, a bit hard to hold a flashlight and steady a camera in a space that doesn't even fit my head, haha.
Is there anyway to tighten the screw without removing the hood?