
Started pulling the engine on my project...Pics(no 56k)

Carter 2.0
Joined: Jun 2004
Posts: 6,262
Likes: 7
From: Irvine Ca.
Originally Posted by Nismonic
Good to know... thanKs 
Any tips on the PS and AC removal and installation?
Any tips on the PS and AC removal and installation?
Next is getting the wiring harness ou tfrom under the passenger dash.
Well, here is a dcument that I used. I made changes
Engine Removal
Ok, first off, this is how I would do it. This is an important point to remember, b/c there will be certain disagreement between myself and others. Some things others will do (Haynes says to remove the oil cooler, it is a waste of time IMO), whereas some things others won�t (such as remove the radiator and the battery). I have done 5 engine swaps now:
-(1) 1988 S4 NA
-(1) 1990 S5 NA
-(2) 1990 S5 TII�s
-(1) 1991 TII
And this listed procedure allows me to get the job done most effectively. If you feel you can skip some parts of this list to go faster, by all means go ahead, but taking your time during an engine removal really should be an ideal to follow.
As a counterpart, if there is anything else you feel you should remove b/c you are worried about damaging it (air pump, alternator maybe?), by all means, label it and do it.
A few other points I would like to stress:
- Label EVERYTHING you remove. If you take apart a vacuum hose, label the nipple with a piece of masking tape with a letter and the hose end you take off with masking tape and a letter. Use a permanent pen, not a ball point one. (the fuel line labels tend to come off since gas dissolves glue, so make sure you take extra care with those ones)
-The Haynes Manual sucks for engine removal. Just use it for picture reference.
-You�ll want some kind of engine hoist. You can rent them VERY reasonably. Don�t even think about lifting the engine out without some kind of lift. I don�t care if you�re huge. I did my first R&R using a 4x4� beam through a hole in the ceiling to get into the attic above the garage, and chained up a 1 ton pull-along winch. Was a little slow, but worked great. I have since bought a 4000 lb engine lift.
-You do not need an engine leveler, but they help. If the rental comes with one, use it, if not, don�t pay extra.
-Have a place to set the engine. It will not sit flat, and setting it on the oil pan may damage it. If you do not have an engine stand, mock up a square of 2�x4� square to go around the bolts on the oil pan.
-Make sure you can remember where the bolts go. What I do is finger thread a bolt back into the hole it came out of. Example: After removing the hood, I finger thread the four 10mm bolts that came off it back into the holes in the hood. You WILL forget where some bolts go, so do this, or label them (more time consuming).
-When in doubt, seek help. When completely overwhelmed, take it to a mechanic.
- If you have access to a covered, cement floored garage, use it at any cost.
- I cannot stress this enough: TAKE YOUR TIME. Take notes if you need to, draw diagrams, and label where things came apart.
This is by no means hard. Really, all that is need is:
-a good set of metric sockets. Commonly used sizes are: 6mm, 8 mm, 10mm, 12mm, 14mm, 15mm, 17mm, 19mm, 22mm and a 23mm
-a good set of metric wrenches with the same sizes as above
-breaker bar, or a piece of pipe for your socket driver
-socket extensions
-set of screwdrivers
-hammer
-needle nose pliers
-channel lock pliers
-chain and u-bolts to attach them with (or bolts to bolt the chain in a loop).
-masking tape and permanent pen
-towels, rags, hand cleaner
-patience!
-Good vocabulary of swear words, and something for relaxation breaks, coffee, beer, or cigarettes if you smoke.
-A friend for some steps.
Of course, air tools, a torque wrench, etc. are all nice, but really, unnecessary.
*The below list is specific to N/A Standard cars. For TII and Automatic changes to the list, email me at shutup_billy@hotmail.com. As well, anyone finding missing steps or errors can email me as well. After all, this does all go by memory!
1. Relieve the fuel system pressure by disconnecting the fuel pump wiring located on the back side of the drivers side shock tower fire wall while the engine is running (if the engine runs�. If not, just crank it over with the wiring disconnected) The electronic ignition will be in the way of you seeing the square connector. Three 10mm nuts will hold the ignition. Loosen and lift the ignition to the side, put back the three nuts finger tight . You�ll see two connectors under, Disconnect the square four wire connector. Lay the ignition back on top of the post start the car and let it run until it dies on its own. Spray some form of penetrant on the exhaust bolts of the down pipe.
2. Disconnect the windshield washer sprayer hose from the hood. This is found on the passenger side rear of the engine. Label the line you take apart.
3. Remove the hood. Scroll around the mounting arms so you can realign it with something sharp, like a scribe or a pin. With some help from a friend to hold the hood, undo, the four 10mm bolts. I put towels under the corners of the hood in case it slides back. Put the hood on towels somewhere.
4. Cover the fenders with old towels or something. Wear pants that don�t have buttons or zippers (sweat pants); they�ll scratch the paint.
5. Disconnect the negative cable from the battery first, and then disconnect the positive cable.
6. Remove the two bolts that hold down the battery. Remove the battery and the plastic around it. You will see a plastic square when everything it removed. If you brush away all of the dust and dirt, you�ll see 4 bolts. The may be rusty, but you can remove them. You�ll need some extensions to get them.
7. Remove the 4 fan nuts. Use a box end wrench. Set the fan in the fan shroud and put the nuts back on the studs (you don�t need to take out the fan)
8. Remove the intake plastic up to the throttle body. This includes the two bolts on the front of the car for the ram-intake plastic piece, the air filter and AFM assembly, and the clamp going up to the throttle body. Label the vacuum lines from the air pump, etc. that you pull out of the intake plastic piping.
9. Jack up the car and put jack stands under the frame. If you still have the stock belly pans, remove them and replace their bolts. These bolts will be rusty and may break. Don�t worry about it; I buy new ones.
10. Remove the radiator cap (or bleed screw on S4 cars), and then using a container that can hold at least 8L, drain the fluid from the middle of the radiator below the car, from the plastic star-headed screw or plastic wing nut in the bottom of the radiator. I recommend replacing this screw, but it is not necessary. Hint: start unscrewing the screw and get it loose with the screwdriver, then unscrew it by hand. Let the plug just fall into the container and fish it out later. Using channel lock pliers on the clamps, take the radiator hoses off of the engine block. Some twisting by hand on the hoses will be necessary to get the bonded rubber off of the aluminum. If this does not work, you can cut the hoses off, but count on buying replacements (which is never a bad idea).
11. Take off the lower heater core clamp and hose, where the lower radiator meets the radiator. It is a small hose, maybe an inch in diameter, and usually the rusted iron is bonded to the rubber. Good Luck!
12. Label and remove the overflow coolant line. Set it out of the way.
13. Label and disconnect the coolant level sensor connector at the middle of the top of the radiator.
14. On S4 cars, from beneath the car, label and remove the two wires from the coolant sensor at the bottom drivers� side of the radiator.
15. Remove the four bolts holding on the radiator, and then lift the radiator up and out. Set it somewhere front-end down, and leave the fan in the shroud for the reinstall.
16. Remove all of the belts, and label them as you take them off.
17. Label and remove the plug wires.
18. Label and remove the two fuel lines. They run parallel to each other, and are located coming off of the fuel filter in the rear drivers side area. These are hard to get off their nipples; I use channel-lock pliers on the hose itself.
19. Unbolt the throttle cable/ cruise control cable. I normally remove where they connect to the throttle cam (careful! The plastic connector on the cruise control has a tendency to snap and break), and then remove the mount that holds them on. I then swing the entire assembly towards the front of the car, and lift the engine out of the hole it makes, but you can disassemble the mount for the cables and separate the two if you want to realign the system later. This is really only an issue if you have cruise control.
20. If you have A/C, remove the four bolts that mount the compressor. These are TOUGH to get out. Leave the hoses connected and let the compressor sit for now
21. If you have p/s, remove the nuts and bolts that mount the pump to the bracket. Do not remove the hoses. Just let it lay for a minute
22. Some people remove the bracket for the two pumps here but I leave it on the block. The Bracket is much easier to remove when the engine is out. You need to tie the two devices to the side wall. Take a rope and tie it to the two and then run it over the fender and tie the other end to the front wheel.
23. Grab a coffee or a beer. I recommend some good beer. �You can have any beer you want in this place, as long as it�s a corona.� Clean your hands, and stare at disdain at you poor car. Swear a few times, and kick the crap out of something small and inanimate, like that old a/c condenser.
24. On the passenger side of the car, on the interior, remove the screws and the plastic scuff plates Rocker plate first. Peel back the carpet and push it out of the way. Use something to prop the carpet out of your way. Again, don�t be afraid to push hard on the carpet.
25. Remove the four nuts that hold the cover over the ECU. Then, remove the connectors from the ECU. Also, there may be some connectors further up the wiring harness. You�ll only hear this from me. Your blower fan is in the way. Remove the plastic pieces under the dash disconnect hose clamp from the ducts and then unbolt the three 10mm to drop the fan. Disconnect the wiring from the fan and set aside. Now you can see the Yellow and orange/yellow connectors and the hole through the firewall.
26. Label the two hoses connected to the canister and then remove the charcoal canister behind the right rear shock tower. Or just lift the canister up and lay it on the windshield while it is still connected. If you have CSS (cold start assist), remove this container and block it off. Don�t reinstall this. This was the stupidest idea Mazda ever had.
27. Pull the ECU wires slowly out through the firewall. Get that friend to help you by feeding them through on the inside. It is not necessary to remove the Cruise control unit or the ABS to do this. Trust me on that one. Disconnect any connection of the ECU wires to the engine bay (such as the connector to the vacuum/pressure sensor and afm), and tape the wires to the top of the engine.
28. Label and disconnect the vacuum line leading to the vacuum/pressure sensor.
29. Drain the engine oil and reinstall the drain plug.
30. Label and disconnect the wiring from the driver�s side of the engine. This begins with the alternator (a bolt and a connector), and moves down the side of the engine, eventually ending up at the starter. The wiring disconnects from the starter via a single bolt. I believe the oil level sending unit and oil temp unit also plug into this harness, label and disconnect them as well.
31. Remove the coolant hose below the oil filter, leading up to the heater core in the firewall. Avoid using pliers to clamp onto the hose to twist it off, the nipples bend and crush shut VERY easily.
32. Separate the vacuum line for the power brake booster somewhere along the rear of the engine. There are a few places you can do this.
33. Remove the starter. The top bolt for the starter has a nut on the other end, and a grounding wire is attached to this nut. Make sure you put a wrench on both sides or you�ll spin it forever.
34. Unbolt the twin pre-cat mid pipe and remove it. This will be difficult, since the bolts will be rusted on. Use plenty of penetrant, a good breaker bar, and a torch if necessary. Unbolt the split air pipe from the ACV. This is the pipe leading off the catalytic converter going to the passenger side of the intake manifold. It bolts on and off via two 10mm nuts. You do not need a new gasket for this, I always re-use mine.
35. Unbolt the oil cooler lines. Use two wrenches of the proper size on the front, and a 23mm socket on the back. You should be using new crush washers anyway upon reinstallation, but you can reuse the old ones. Elastic a plastic (that rhymes!) bag over the ends of the lines to prevent oil from leaking onto the floor.
36. Bolt on the chains to the OEM engine lift mounts. Use good chain and good u-bolts. The rear engine lift connecting may bolt on through the tranny. Make sure to fix this first, so that the bolt is not connecting the tranny to the block.
37. Set up the lift and take the slack out of the middle of the chain. Just barely lift on the engine.
38. Unbolt the single bolt from the passenger side motor mount.
39. Unbolt the single bolt that from the cross member to the drivers side engine mount.
40. Unbolt the remaining 5 bolts holding the transmission to the engine. This may take some time as you won�t get many degrees to turn the wrench, be patient!
41. Put a block of wood on a jack and support the transmission.
42. Make sure there is nothing still connected to the engine, and begin be lifting the engine slightly. Pull the engine out of the transmission. It may take some wiggling, but it will pop forward. The pop forward is why I suggest removing the rad, as this pop can send the engine right through the rad core.
43. Lift the engine up and out of the car, being wary of anything still connected. I pull it out through the loop created by the cruise control and throttle cables connected together, but as stated earlier, you can disconnect them. It may be necessary to lower the car off of the jack stands in order to get enough clearance for the lift to get the engine over the car.
44. Lower the block onto the engine stand or the wooden blocks and take a break to feel satisfied with yourself.
Reinstallation is the reversal of the above steps.
Wiggling the engine into the tranny may take some persistence, but it is possible. Use that friend!
Thread Starter
Joined: Nov 2004
Posts: 936
Likes: 1
From: Lincoln Park, NJ
Thanks Jhammons1 but just a tad late... Everything I could see is disconnected, most of it labeled... I'm ready to start lifting it once I get the drive shaft disconnected and unbolt the engine/tranny from the mounts. Hopefully it will come out today...
Carter 2.0
Joined: Jun 2004
Posts: 6,262
Likes: 7
From: Irvine Ca.
Yea, but its good to see what others have done. The only mistake I made was unplugging the connectors that reside just above your Starter in the engine bay. (I didn't pull my Tranny) I could have left them in place and it would not have effected anything. So I waisted time both on pulling and replacing the motor.

Thread Starter
Joined: Nov 2004
Posts: 936
Likes: 1
From: Lincoln Park, NJ
Just got back from Utica... saw a white s5 FC in the mall parking lot...thought about stealing a fender.
Well the motor is out... but I just got GT4... so I have to go play! I will post pics later.
Well the motor is out... but I just got GT4... so I have to go play! I will post pics later.
Originally Posted by Nismonic
Just got back from Utica... saw a white s5 FC in the mall parking lot...thought about stealing a fender.
Well the motor is out... but I just got GT4... so I have to go play! I will post pics later.
Well the motor is out... but I just got GT4... so I have to go play! I will post pics later.

cant wait to see the pics of the engine out
Thread Starter
Joined: Nov 2004
Posts: 936
Likes: 1
From: Lincoln Park, NJ
I thought about writing the url for the forum on his windshield (it was hella dirty)... poor seven... being driven all winter long with the salt and crap on the roads...
Thread Starter
Joined: Nov 2004
Posts: 936
Likes: 1
From: Lincoln Park, NJ
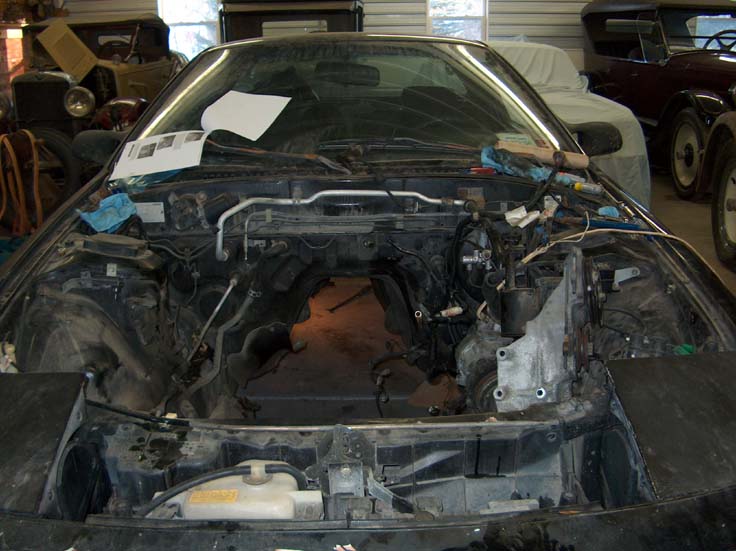
Finally out!
Today went smoothly and the engine came out as planned.... here are some pics from today... this is pretty much how it went...
Hoist hooked up...

Easing the engine out...
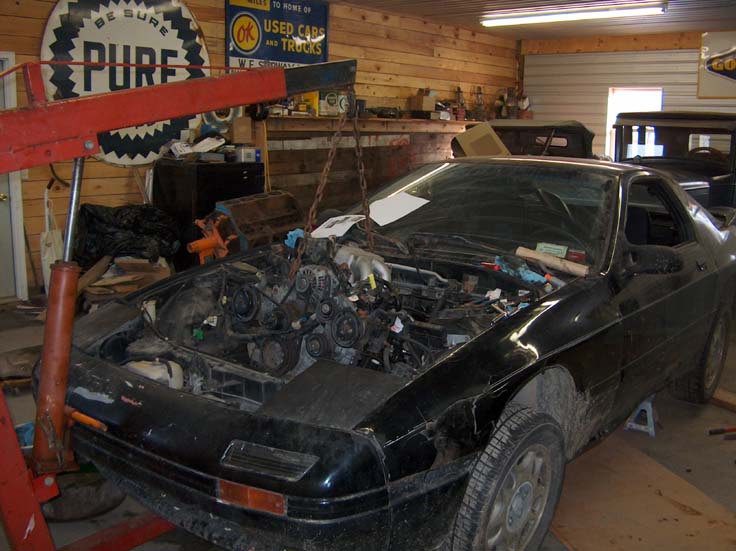


Empty...
Hoist hooked up...
Easing the engine out...
Empty...
Thread Starter
Joined: Nov 2004
Posts: 936
Likes: 1
From: Lincoln Park, NJ
And now for the engine!

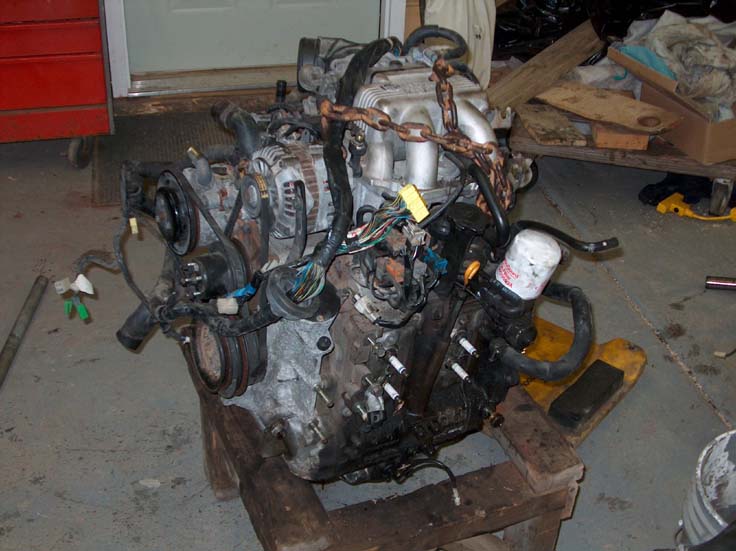
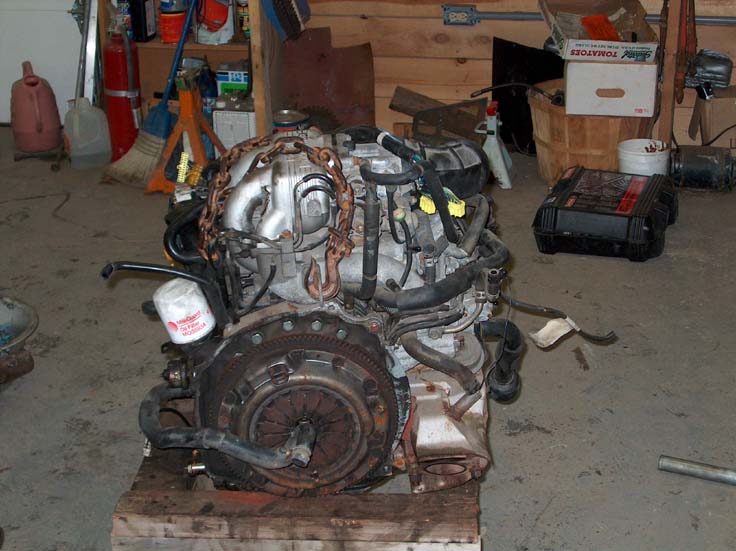
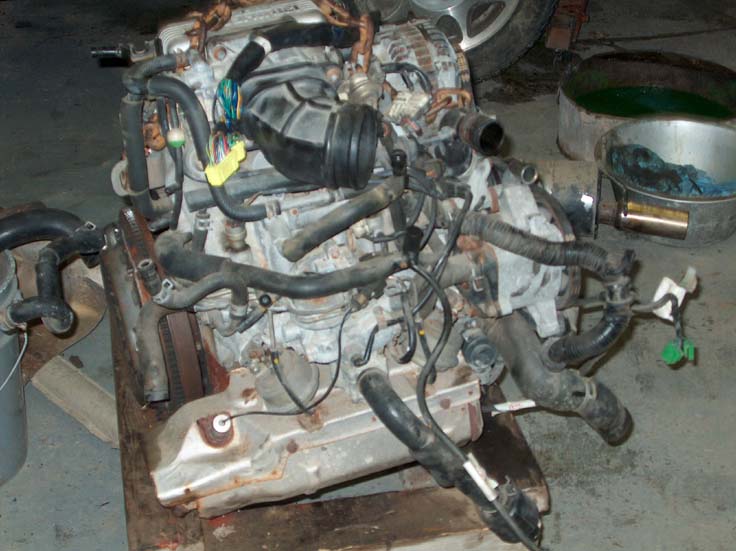
and then the tranny and drive shaft... man, this drive shaft is small!!!

So, I guess my plan now is a rebuild, maybe street port? I'm going to have to tear her down and see if she is in good enough shape to rebuild... Its been fun so far
and then the tranny and drive shaft... man, this drive shaft is small!!!
So, I guess my plan now is a rebuild, maybe street port? I'm going to have to tear her down and see if she is in good enough shape to rebuild... Its been fun so far


Thread
Thread Starter
Forum
Replies
Last Post
alphawolff
1st Generation Specific (1979-1985)
17
Nov 17, 2015 05:57 PM
CaptainKRM
2nd Generation Specific (1986-1992)
14
Aug 26, 2015 09:52 PM