
S4 Engine Bay Paint Job (Pic Heavy)


PIMP
Joined: Feb 2004
Posts: 1,012
Likes: 0
From: Greensboro, NC
awesome project, I hope I get more into restoring mine in a similar fashion. That powder coating on the subframes looks awesome. My car is also white and I guess because its old and clear coat has faded it has that same problem as others have said about it absorbing oil and staining easily. My whole freaking car is like that, degreasing and pressure washing helped my engine bay and I did have the engine out a month ago but I didn't have time for paint. Anyways mine has the black stains in the same place as yours on that passenger side frame rail, is that from the turbo heat or something. Mine also has rust on the driver frame rail from brake fluid leaking and it's on the subframe too. Next time I get a nice chunk of change saved up I'll get all new delrin and urethane bushings and powdercoat my **** like you've done. Thanks for the inspiration. GL

Thread Starter
Urban Explorer
Joined: May 2009
Posts: 86
Likes: 0
From: dexter mi
Ok, back to the RX7, school is done for 2009, and I have had a little time to work on the car.
I left the car last time with no trans mount in, just a trusty floor jack holding it up. Well the trans mount arrived just a few days ago, so you can imagine I was eager to install it.
[IMG]<a href="http://s169.photobucket.com/albums/u216/NateFrame69/Mazda/?action=view¤t=Mazda048-1.jpg" target="_blank"><img src="http://i169.photobucket.com/albums/u216/NateFrame69/Mazda/Mazda048-1.jpg" border="0" alt="Photobucket"></a>[/IMG]
With that out of the way I had to install the shifter to see how it felt. The trans is beat up, and I intend to beat it up some more....
[IMG]<a href="http://s169.photobucket.com/albums/u216/NateFrame69/Mazda/?action=view¤t=Mazda022-1.jpg" target="_blank"><img src="http://i169.photobucket.com/albums/u216/NateFrame69/Mazda/Mazda022-1.jpg" border="0" alt="Photobucket"></a>[/IMG]
Currently in the process of making some turbo coolant lines. I took this flange fitting off the intake manifold, there was some blackc rubber hose on it before and did a little work to it.
[IMG]<a href="http://s169.photobucket.com/albums/u216/NateFrame69/Mazda/?action=view¤t=Mazda012-1.jpg" target="_blank"><img src="http://i169.photobucket.com/albums/u216/NateFrame69/Mazda/Mazda012-1.jpg" border="0" alt="Photobucket"></a>[/IMG]
[IMG]<a href="http://s169.photobucket.com/albums/u216/NateFrame69/Mazda/?action=view¤t=Mazda013-1.jpg" target="_blank"><img src="http://i169.photobucket.com/albums/u216/NateFrame69/Mazda/Mazda013-1.jpg" border="0" alt="Photobucket"></a>[/IMG]
[IMG]<a href="http://s169.photobucket.com/albums/u216/NateFrame69/Mazda/?action=view¤t=Mazda014-1.jpg" target="_blank"><img src="http://i169.photobucket.com/albums/u216/NateFrame69/Mazda/Mazda014-1.jpg" border="0" alt="Photobucket"></a>[/IMG]
Origionally the black rubber hose ran directly over the downpipe, probally not a good idea. So I tried this. I happan to have already had this braided line already made, it came off my DSM. (R.I.P. DSM)
[IMG]<a href="http://s169.photobucket.com/albums/u216/NateFrame69/Mazda/?action=view¤t=Mazda019-1.jpg" target="_blank"><img src="http://i169.photobucket.com/albums/u216/NateFrame69/Mazda/Mazda019-1.jpg" border="0" alt="Photobucket"></a>[/IMG]
right side head light/running light/turn signal harness
[IMG]<a href="http://s169.photobucket.com/albums/u216/NateFrame69/Mazda/?action=view¤t=Mazda025-1.jpg" target="_blank"><img src="http://i169.photobucket.com/albums/u216/NateFrame69/Mazda/Mazda025-1.jpg" border="0" alt="Photobucket"></a>[/IMG]
As she sits
[IMG]<a href="http://s169.photobucket.com/albums/u216/NateFrame69/Mazda/?action=view¤t=Mazda045-1.jpg" target="_blank"><img src="http://i169.photobucket.com/albums/u216/NateFrame69/Mazda/Mazda045-1.jpg" border="0" alt="Photobucket"></a>[/IMG]
Thread Starter
Urban Explorer
Joined: May 2009
Posts: 86
Likes: 0
From: dexter mi
[IMG]<a href="http://s169.photobucket.com/albums/u216/NateFrame69/Mazda/?action=view¤t=Mazda049-1.jpg" target="_blank"><img src="http://i169.photobucket.com/albums/u216/NateFrame69/Mazda/Mazda049-1.jpg" border="0" alt="Photobucket"></a>[/IMG]
[IMG]<a href="http://s169.photobucket.com/albums/u216/NateFrame69/Mazda/?action=view¤t=Mazda050-1.jpg" target="_blank"><img src="http://i169.photobucket.com/albums/u216/NateFrame69/Mazda/Mazda050-1.jpg" border="0" alt="Photobucket"></a>[/IMG]
[IMG]<a href="http://s169.photobucket.com/albums/u216/NateFrame69/Mazda/?action=view¤t=Mazda051-1.jpg" target="_blank"><img src="http://i169.photobucket.com/albums/u216/NateFrame69/Mazda/Mazda051-1.jpg" border="0" alt="Photobucket"></a>[/IMG]
[IMG]<a href="http://s169.photobucket.com/albums/u216/NateFrame69/Mazda/?action=view¤t=Mazda052-1.jpg" target="_blank"><img src="http://i169.photobucket.com/albums/u216/NateFrame69/Mazda/Mazda052-1.jpg" border="0" alt="Photobucket"></a>[/IMG]
[IMG]<a href="http://s169.photobucket.com/albums/u216/NateFrame69/Mazda/?action=view¤t=Mazda053-1.jpg" target="_blank"><img src="http://i169.photobucket.com/albums/u216/NateFrame69/Mazda/Mazda053-1.jpg" border="0" alt="Photobucket"></a>[/IMG]
[IMG]<a href="http://s169.photobucket.com/albums/u216/NateFrame69/Mazda/?action=view¤t=Mazda006-1.jpg" target="_blank"><img src="http://i169.photobucket.com/albums/u216/NateFrame69/Mazda/Mazda006-1.jpg" border="0" alt="Photobucket"></a>[/IMG]
Any suggestions to plug these unused coolant nipples. I dont want to pull the motor at this point to fix this. i.e. no drilling, tapping or welding please.
[IMG]<a href="http://s169.photobucket.com/albums/u216/NateFrame69/Mazda/?action=view¤t=Mazda040-1.jpg" target="_blank"><img src="http://i169.photobucket.com/albums/u216/NateFrame69/Mazda/Mazda040-1.jpg" border="0" alt="Photobucket"></a>[/IMG]
Since its the end of the year, its a great time to relfect on this years accomplishments.
Here is the engine bay when the car last drove under its own power.
[IMG]<a href="http://s169.photobucket.com/albums/u216/NateFrame69/Mazda/?action=view¤t=Mazda002.jpg" target="_blank"><img src="http://i169.photobucket.com/albums/u216/NateFrame69/Mazda/Mazda002.jpg" border="0" alt="Photobucket"></a>[/IMG]
cheers everyone.
Have a happy and safe new years!
Fabrineer
Joined: Oct 2002
Posts: 976
Likes: 1
From: Charlotte, NC
Dude, this thing looks nice. I especially like the wiring for the starter. Kickass.
One thing I must contend... stainless steel bolt for the trans mount.
SS bolts are like grade 2. Check to see what mazda chose for those bolts, and chose that. Otherwise, this thing looks absolutely beautiful.
One thing I must contend... stainless steel bolt for the trans mount.
SS bolts are like grade 2. Check to see what mazda chose for those bolts, and chose that. Otherwise, this thing looks absolutely beautiful.
Thread Starter
Urban Explorer
Joined: May 2009
Posts: 86
Likes: 0
From: dexter mi
the 4 big bolts for the trans mount are zinc plated steel.
I did however use some stainless steel hardware on the mazda comp bushings. I got a feeling that the bushing will tear before the nut and washer give out.
The cross area of an M8 bolt is approx= 0.0000502640 meters^2 (not accounting for thread cut)
Yield strength of Stainless Steel (from the wiki) approx =520 MPa
Incase you forgot seth a pascal is one newton of force per one square meter of area.
Stress=load/area
Solving this gives an allowable load of 26137 newtons. But since were in america here and dont like the metric system its about 5800 pounds. Over twice the weight of my car.
So I guess that means i could hang my car from the rafters in my barn (if they were strong enough) with this bolt holding the cable to the rafters.
I took your advice and used zinc plated hardware on all major load bearing components, like the suspension. That is something we dont want to fail. But I am sorry to say that my haltech is supported by SS hardware, it might fail and the haltech could be destroyed. It could go right thru the firewall during hard breaking.
haha....you know i am kidding.
cheers
Thread Starter
Urban Explorer
Joined: May 2009
Posts: 86
Likes: 0
From: dexter mi
dident get a hole lot done today.
Made this nice little aluminum plate to replace the factory fuel pump assembly. Thus far it has been mated to the fuel level sender.
After my new fuel pump arrives I will make a bracket to hold it. As well as bulkhead AN fittings.
[IMG]<a href="http://s169.photobucket.com/albums/u216/NateFrame69/Mazda/?action=view¤t=Mazda054-1.jpg" target="_blank"><img src="http://i169.photobucket.com/albums/u216/NateFrame69/Mazda/Mazda054-1.jpg" border="0" alt="Photobucket"></a>[/IMG]
Really need some longer bolts here, this is all I had laying around in the M4 box. I would like to add some kind of gasket under this, or something to seal the bolt holes, just incase of a leek.
[IMG]<a href="http://s169.photobucket.com/albums/u216/NateFrame69/Mazda/?action=view¤t=Mazda061-1.jpg" target="_blank"><img src="http://i169.photobucket.com/albums/u216/NateFrame69/Mazda/Mazda061-1.jpg" border="0" alt="Photobucket"></a>[/IMG]
[IMG]<a href="http://s169.photobucket.com/albums/u216/NateFrame69/Mazda/?action=view¤t=Mazda060-1.jpg" target="_blank"><img src="http://i169.photobucket.com/albums/u216/NateFrame69/Mazda/Mazda060-1.jpg" border="0" alt="Photobucket"></a>[/IMG]
[IMG]<a href="http://s169.photobucket.com/albums/u216/NateFrame69/Mazda/?action=view¤t=Mazda059.jpg" target="_blank"><img src="http://i169.photobucket.com/albums/u216/NateFrame69/Mazda/Mazda059.jpg" border="0" alt="Photobucket"></a>[/IMG]

shut up you jack wagon
Joined: Nov 2007
Posts: 876
Likes: 2
From: Crystal MN
[IMG]<a href="http://s169.photobucket.com/albums/u216/NateFrame69/Mazda/?action=view¤t=Mazda417.jpg" target="_blank"><img src="http://i169.photobucket.com/albums/u216/NateFrame69/Mazda/Mazda417.jpg" border="0" alt="Photobucket"></a>[/IMG]
I would so like to do this to my car,hay man keep up the great work i hope everything come's out the way you want it.Happy new year...
I would so like to do this to my car,hay man keep up the great work i hope everything come's out the way you want it.Happy new year...


I am freaking jealous you had the time to do this project for your car 
I always wanted an extended period of time and money to work on my car but, its not going to happen probably until summer!!!
I always wanted an extended period of time and money to work on my car but, its not going to happen probably until summer!!!
Thread Starter
Urban Explorer
Joined: May 2009
Posts: 86
Likes: 0
From: dexter mi
Figured I would blow another item off the "big list" before I went to my new years party.
My wastegate dump tube. Yes, open gate, sorry people, just have to do it once. Big trucks with flowmasters better watch out. OMG, all you harley owners better watch out too! lol
Anyways, having bought my car second hard I really dont know what parts are on it, or where they came from.
It has a cast HKS turbo manifold, as well as some odd HKS wastegate. After about 20 minutes of google searching for an HKS wastegate discharge flange I said screw it.
Ended up getting a TiAL 38mm flange, everything it perfect except the bolts. A few minutes in the drill press fixed that(more like 1/2 hour).
[IMG]<a href="http://s169.photobucket.com/albums/u216/NateFrame69/Mazda/?action=view¤t=Mazda063-1.jpg" target="_blank"><img src="http://i169.photobucket.com/albums/u216/NateFrame69/Mazda/Mazda063-1.jpg" border="0" alt="Photobucket"></a>[/IMG]
After doing the mock up on the car I took all the tubes over to the bench to weld them.
This is 1.5 inch x .065 S.S. 304 turbing in case anyone is wondering.
[IMG]<a href="http://s169.photobucket.com/albums/u216/NateFrame69/Mazda/?action=view¤t=Mazda067-1.jpg" target="_blank"><img src="http://i169.photobucket.com/albums/u216/NateFrame69/Mazda/Mazda067-1.jpg" border="0" alt="Photobucket"></a>[/IMG]
This is the first time on a TIG in awile, even logner since I did any stainless. So bear with me. Mistakes do happan, I am not so mad since its not a virgin flange.
[IMG]<a href="http://s169.photobucket.com/albums/u216/NateFrame69/Mazda/?action=view¤t=Mazda068-1.jpg" target="_blank"><img src="http://i169.photobucket.com/albums/u216/NateFrame69/Mazda/Mazda068-1.jpg" border="0" alt="Photobucket"></a>[/IMG]
Me and S.S. butt welds went getting along today. I switched to smaller filler rod on the second weld joint, clostest to the flange, it seemed to help a little. I am not too happy with these, but I can make another one someday, if I ever findout about these odd hks flanges.
[IMG]<a href="http://s169.photobucket.com/albums/u216/NateFrame69/Mazda/?action=view¤t=Mazda075-1.jpg" target="_blank"><img src="http://i169.photobucket.com/albums/u216/NateFrame69/Mazda/Mazda075-1.jpg" border="0" alt="Photobucket"></a>[/IMG]
On the car.
[IMG]<a href="http://s169.photobucket.com/albums/u216/NateFrame69/Mazda/?action=view¤t=Mazda078-1.jpg" target="_blank"><img src="http://i169.photobucket.com/albums/u216/NateFrame69/Mazda/Mazda078-1.jpg" border="0" alt="Photobucket"></a>[/IMG]
Close up of the mating point, still no gasket, its in the mail somewhere.
[IMG]<a href="http://s169.photobucket.com/albums/u216/NateFrame69/Mazda/?action=view¤t=Mazda081-1.jpg" target="_blank"><img src="http://i169.photobucket.com/albums/u216/NateFrame69/Mazda/Mazda081-1.jpg" border="0" alt="Photobucket"></a>[/IMG]
Thats all for 2009, its been a year of learning about rx7's, dont get me started on the rest.
Hope everyone makes it home safe tonight,
cheers
My wastegate dump tube. Yes, open gate, sorry people, just have to do it once. Big trucks with flowmasters better watch out. OMG, all you harley owners better watch out too!
lolAnyways, having bought my car second hard I really dont know what parts are on it, or where they came from.
It has a cast HKS turbo manifold, as well as some odd HKS wastegate. After about 20 minutes of google searching for an HKS wastegate discharge flange I said screw it.
Ended up getting a TiAL 38mm flange, everything it perfect except the bolts. A few minutes in the drill press fixed that(more like 1/2 hour).
[IMG]<a href="http://s169.photobucket.com/albums/u216/NateFrame69/Mazda/?action=view¤t=Mazda063-1.jpg" target="_blank"><img src="http://i169.photobucket.com/albums/u216/NateFrame69/Mazda/Mazda063-1.jpg" border="0" alt="Photobucket"></a>[/IMG]
After doing the mock up on the car I took all the tubes over to the bench to weld them.
This is 1.5 inch x .065 S.S. 304 turbing in case anyone is wondering.
[IMG]<a href="http://s169.photobucket.com/albums/u216/NateFrame69/Mazda/?action=view¤t=Mazda067-1.jpg" target="_blank"><img src="http://i169.photobucket.com/albums/u216/NateFrame69/Mazda/Mazda067-1.jpg" border="0" alt="Photobucket"></a>[/IMG]
This is the first time on a TIG in awile, even logner since I did any stainless. So bear with me. Mistakes do happan, I am not so mad since its not a virgin flange.
[IMG]<a href="http://s169.photobucket.com/albums/u216/NateFrame69/Mazda/?action=view¤t=Mazda068-1.jpg" target="_blank"><img src="http://i169.photobucket.com/albums/u216/NateFrame69/Mazda/Mazda068-1.jpg" border="0" alt="Photobucket"></a>[/IMG]
Me and S.S. butt welds went getting along today. I switched to smaller filler rod on the second weld joint, clostest to the flange, it seemed to help a little. I am not too happy with these, but I can make another one someday, if I ever findout about these odd hks flanges.
[IMG]<a href="http://s169.photobucket.com/albums/u216/NateFrame69/Mazda/?action=view¤t=Mazda075-1.jpg" target="_blank"><img src="http://i169.photobucket.com/albums/u216/NateFrame69/Mazda/Mazda075-1.jpg" border="0" alt="Photobucket"></a>[/IMG]
On the car.
[IMG]<a href="http://s169.photobucket.com/albums/u216/NateFrame69/Mazda/?action=view¤t=Mazda078-1.jpg" target="_blank"><img src="http://i169.photobucket.com/albums/u216/NateFrame69/Mazda/Mazda078-1.jpg" border="0" alt="Photobucket"></a>[/IMG]
Close up of the mating point, still no gasket, its in the mail somewhere.
[IMG]<a href="http://s169.photobucket.com/albums/u216/NateFrame69/Mazda/?action=view¤t=Mazda081-1.jpg" target="_blank"><img src="http://i169.photobucket.com/albums/u216/NateFrame69/Mazda/Mazda081-1.jpg" border="0" alt="Photobucket"></a>[/IMG]
Thats all for 2009, its been a year of learning about rx7's, dont get me started on the rest.
Hope everyone makes it home safe tonight,
cheers


Old Rotary Dog
Joined: Feb 2003
Posts: 1,461
Likes: 2
From: Durham, NC
Nice fab work. It's inspiring me to get out and do some work on my track car, as well as signing up for a welding course this spring! 
Regarding the battery placement - yeah, in the bin space behind the passenger seat would have been "better" from a performance point off view, but it's not a huge deal and if you are keeping your interior, then your placement does have some advantages (keeping the bins, for instance ). The only changes I would make would be:
a) put a main fuse or circuit breaker block *at* the positive battery terminal. In case you nick your long positive feed line (that runs under the car) and it shorts to the frame, you don't want your battery blowing up inside the car.
b) you need to put serious rubber grommets of some sort wherever that battery line goes through the frame. Short pieces of coolant hose that have been sliced lengthwise and zip-tied on work well here. Personally, I would thing about running that line through the interior (under the trans tunnel trim) rather than under the car. There is too big a risk of cutting it on road debris (even if you send it down inside the frame rail).
Keep up the good work and welcome to the New Year!
-b
Regarding the battery placement - yeah, in the bin space behind the passenger seat would have been "better" from a performance point off view, but it's not a huge deal and if you are keeping your interior, then your placement does have some advantages (keeping the bins, for instance
). The only changes I would make would be:a) put a main fuse or circuit breaker block *at* the positive battery terminal. In case you nick your long positive feed line (that runs under the car) and it shorts to the frame, you don't want your battery blowing up inside the car.
b) you need to put serious rubber grommets of some sort wherever that battery line goes through the frame. Short pieces of coolant hose that have been sliced lengthwise and zip-tied on work well here. Personally, I would thing about running that line through the interior (under the trans tunnel trim) rather than under the car. There is too big a risk of cutting it on road debris (even if you send it down inside the frame rail).
Keep up the good work and welcome to the New Year!
-b
Fabrineer
Joined: Oct 2002
Posts: 976
Likes: 1
From: Charlotte, NC
the 4 big bolts for the trans mount are zinc plated steel.
I did however use some stainless steel hardware on the mazda comp bushings. I got a feeling that the bushing will tear before the nut and washer give out.
The cross area of an M8 bolt is approx= 0.0000502640 meters^2 (not accounting for thread cut)
Yield strength of Stainless Steel (from the wiki) approx =520 MPa
Incase you forgot seth a pascal is one newton of force per one square meter of area.
Stress=load/area
Solving this gives an allowable load of 26137 newtons. But since were in america here and dont like the metric system its about 5800 pounds. Over twice the weight of my car.
So I guess that means i could hang my car from the rafters in my barn (if they were strong enough) with this bolt holding the cable to the rafters.
I took your advice and used zinc plated hardware on all major load bearing components, like the suspension. That is something we dont want to fail. But I am sorry to say that my haltech is supported by SS hardware, it might fail and the haltech could be destroyed. It could go right thru the firewall during hard breaking.
haha....you know i am kidding.
cheers
I did however use some stainless steel hardware on the mazda comp bushings. I got a feeling that the bushing will tear before the nut and washer give out.
The cross area of an M8 bolt is approx= 0.0000502640 meters^2 (not accounting for thread cut)
Yield strength of Stainless Steel (from the wiki) approx =520 MPa
Incase you forgot seth a pascal is one newton of force per one square meter of area.
Stress=load/area
Solving this gives an allowable load of 26137 newtons. But since were in america here and dont like the metric system its about 5800 pounds. Over twice the weight of my car.
So I guess that means i could hang my car from the rafters in my barn (if they were strong enough) with this bolt holding the cable to the rafters.
I took your advice and used zinc plated hardware on all major load bearing components, like the suspension. That is something we dont want to fail. But I am sorry to say that my haltech is supported by SS hardware, it might fail and the haltech could be destroyed. It could go right thru the firewall during hard breaking.
haha....you know i am kidding.
cheers
NICE calculations!
Nice welds! I like the WG dump. looks good.
Thread Starter
Urban Explorer
Joined: May 2009
Posts: 86
Likes: 0
From: dexter mi
wrankin,
I think your right about the high current cables. It probally dosent help that I have ran the cables right next to the fuel lines.
I think I will re route them next free moment i get. At the moment I am dealing with my jeep again, a large piece of the piston skirt broke off, now the engine is toast.
Fabrineer
Joined: Oct 2002
Posts: 976
Likes: 1
From: Charlotte, NC
Depending on the quality of the bolt, it can either be around a grade 2 or up to a grade 5. It seems there's a large range for strength which indicates to me that there probably isn't a national standard for stainless grade strength.
Here's some useful information:

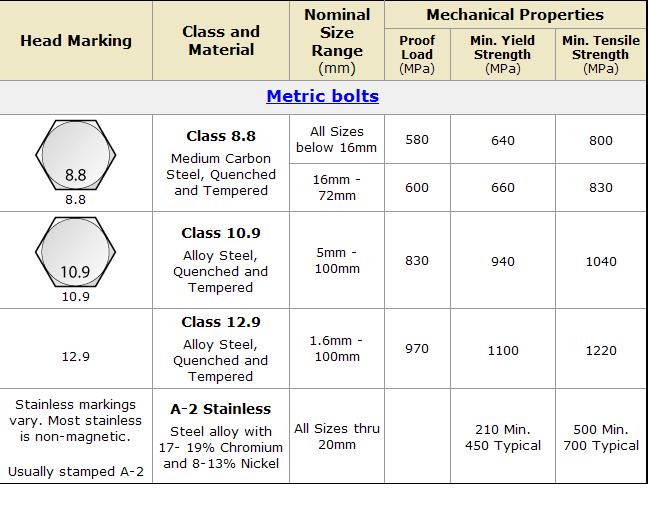
So, in a worst-case scenario, taking the m8 bolt as a 40,000 psi yield strength, (an M8 bolt has a minor diameter of about 6mm, which has an area of approx 0.043825 in^2 - i'm an *******, i switched to english units mid problem!) and a yield load of 1753 lbs. Now, assuming your car makes 280 ft lbs of torque, and in 1st gear you have a 3.483:1 gear ratio, you will be making approx 975 ft lbs of torque at the back of the transmission.
I will approximate the distance from the center of the mount to the bolt location as 6 inches: so you have 975 ft lbs/0.5 ft = 1950 lbs force on the bolt. However, since you have 2 of them on each side, and the torque is actually resisted by a force couple, you have 1950 lbs/4 = 487 lbs on each bolt.
Also, if I recall correctly, your transmission bolts are like an M10, so there's even more factor of safety.
From a statics standpoint, it looks like your stainless steel bolts should hold up, should you chose to use them.
Fatigue is a different story.
But I still wonder why the engineers at Mazda (or Toyota for that matter) chose to go so overkill on the bolts. There has to be a reason we are missing.
In conclusion, I should stop giving you a hard time about stainless steel.
Here's some useful information:
So, in a worst-case scenario, taking the m8 bolt as a 40,000 psi yield strength, (an M8 bolt has a minor diameter of about 6mm, which has an area of approx 0.043825 in^2 - i'm an *******, i switched to english units mid problem!) and a yield load of 1753 lbs. Now, assuming your car makes 280 ft lbs of torque, and in 1st gear you have a 3.483:1 gear ratio, you will be making approx 975 ft lbs of torque at the back of the transmission.
I will approximate the distance from the center of the mount to the bolt location as 6 inches: so you have 975 ft lbs/0.5 ft = 1950 lbs force on the bolt. However, since you have 2 of them on each side, and the torque is actually resisted by a force couple, you have 1950 lbs/4 = 487 lbs on each bolt.
Also, if I recall correctly, your transmission bolts are like an M10, so there's even more factor of safety.
From a statics standpoint, it looks like your stainless steel bolts should hold up, should you chose to use them.
Fatigue is a different story.
But I still wonder why the engineers at Mazda (or Toyota for that matter) chose to go so overkill on the bolts. There has to be a reason we are missing.
In conclusion, I should stop giving you a hard time about stainless steel.
Thread Starter
Urban Explorer
Joined: May 2009
Posts: 86
Likes: 0
From: dexter mi
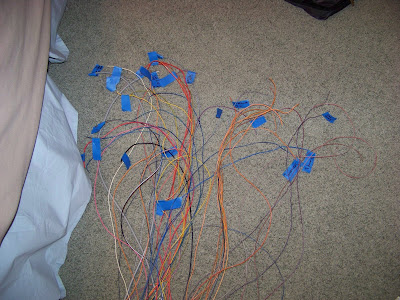
wiring woes...
In one of the local irish pub's there is a poster of murphy's laws. One goes something like this, "Never argure with an idiot, others might not know the difference".
I have replaced the stainless bolts with grade 10.9 Metric zinc plated bolts. If this is not good enough I will widdle some out of NASA steel for you. Is there even such a thing?
Anyways enough of that.
I am trying to make the horn work with the factor buttons, There is alot of resistance in this piece, I figured cleaning up some of the oxidation would help, it dident. The two buttons on the steering wheel are very position dependent, they are probally just old.
[IMG]<a href="http://s169.photobucket.com/albums/u216/NateFrame69/Mazda/?action=view¤t=Mazda082-1.jpg" target="_blank"><img src="http://i169.photobucket.com/albums/u216/NateFrame69/Mazda/Mazda082-1.jpg" border="0" alt="Photobucket"></a>[/IMG]
In order to remove the lock cylinder thing I used my favorite trick. I have been told that vice grips take these suckers off, well I guess my vice grips are not up to snuff.
[IMG]<a href="http://s169.photobucket.com/albums/u216/NateFrame69/Mazda/?action=view¤t=Mazda085-1.jpg" target="_blank"><img src="http://i169.photobucket.com/albums/u216/NateFrame69/Mazda/Mazda085-1.jpg" border="0" alt="Photobucket"></a>[/IMG]
I believe this is the reverse fifth gear switch, makes sense to me because it seems that reverse and fifth would be on the same shift rail, hard to tell in the pic, i was doing a conductance check, the switch appears totally dead. I discovered this because my reverse lights dident work, asfter checking all my wires this was all that was left. origionally I had them hooked up to the neutral saftey switch. Of all the cars I have worked on, the FC takes the cake for the biggest amount of unnecessary ****, I will never get another one unless its going to be fully stripped and race prepped.
[IMG]<a href="http://s169.photobucket.com/albums/u216/NateFrame69/Mazda/?action=view¤t=Mazda089-1.jpg" target="_blank"><img src="http://i169.photobucket.com/albums/u216/NateFrame69/Mazda/Mazda089-1.jpg" border="0" alt="Photobucket"></a>[/IMG]
The engines brain
[IMG]<a href="http://s169.photobucket.com/albums/u216/NateFrame69/Mazda/?action=view¤t=Mazda095-1.jpg" target="_blank"><img src="http://i169.photobucket.com/albums/u216/NateFrame69/Mazda/Mazda095-1.jpg" border="0" alt="Photobucket"></a>[/IMG]
More Haltech ****, i'm worried about wiring this thing.
[IMG]<a href="http://s169.photobucket.com/albums/u216/NateFrame69/Mazda/?action=view¤t=Mazda097-1.jpg" target="_blank"><img src="http://i169.photobucket.com/albums/u216/NateFrame69/Mazda/Mazda097-1.jpg" border="0" alt="Photobucket"></a>[/IMG]
Back of switch panel, it worked before, but I am adding some quick disconnects for easy servicing. Yes, for the same reason the battery is in the way back and not stuck up my *** under the seat, because RX-7 never work the way they are supposted to.
At this point I have 10hrs of work for ever minute of seat time. 600 to 1 aint bad!
[IMG]<a href="http://s169.photobucket.com/albums/u216/NateFrame69/Mazda/?action=view¤t=Mazda098-1.jpg" target="_blank"><img src="http://i169.photobucket.com/albums/u216/NateFrame69/Mazda/Mazda098-1.jpg" border="0" alt="Photobucket"></a>[/IMG]
Cheers and good night!

PIMP
Joined: Feb 2004
Posts: 1,012
Likes: 0
From: Greensboro, NC
Thanks for making this thread and continuing your updates on it. I have been following it and have definitely been inspired to work on mine for sure. I like your work too, and it looks like you have a lot of fun welding and fabricating.
I'm about to install all these parts I just ordered. Delrin bushings from mmr-direct.com for the differential, subframe, front and rear control arms, and DTSS eliminators. B&G drop springs on KYB AGX adjustables, and some BF Goodrich KDW T/A 225/50/ZR16 tires. AEM wideband, and a NXS boost controller. I'm getting ready to track the hell out of my car. The next time I get some money I think I might get one of those Haltech E8 computers, your setup looks nice! where did you buy yours? I noticed you can buy on ebay with a 'long harness' which includes relays, and connectors and some other required stuff, I wonder if the wiring looks as nice as yours though?
Anyways, I think to block off those coolant hoses on your block (they were the heater hoses right?) you could just run a hose from the inlet to the outlet couldn't you? I blocked the coolant hose on top of the block that goes to the thermowax by cutting the hose short at a straight section and plugging it with a bolt clamped in place. The bolt I used had about 3" of shank before the threads and I just cut the little bit of threads off. It has worked perfectly fine.
Continue to update please!
Don't worry about the wiring, just take your time with it.
Doing two things helped me out a bunch.
One,
This loser researched a bunch and created an excel sheet with everything he needed. You can check out his sheet here, you will need to redo it for your setup.
https://www.rx7club.com/haltech-forum-62/platinum-sport-cheat-sheet-830731/
And two,
Mark all the wires before you touch anything. This makes it sooo simple. I marked the wire, the purpose, and what pin it was.
Thread Starter
Urban Explorer
Joined: May 2009
Posts: 86
Likes: 0
From: dexter mi
rotary rocket, I got my E8 @ Kinsler Fuel Injection in Troy michigan. A few years ago I think it was near the top of the haltech lineup, now I am sure you could get something alot better for the same price.
Been a long time since any new pictures, as uasual I will let the pics do the talking.
I was sidelined for a week while moving my new welding table into my shop. This sucker is heavy, 1.5inch top on it. Shouldent break anytime soon.
[IMG]<a href="http://s169.photobucket.com/albums/u216/NateFrame69/Mazda/?action=view¤t=Mazda103-1.jpg" target="_blank"><img src="http://i169.photobucket.com/albums/u216/NateFrame69/Mazda/Mazda103-1.jpg" border="0" alt="Photobucket"></a>[/IMG]
Welding a -6AN fitting on the radiator and capped off the little coolant plug on the water pump outlet. It was so close to the exhaust manifold, like .5inch, something better had to be done.
[IMG]<a href="http://s169.photobucket.com/albums/u216/NateFrame69/Mazda/?action=view¤t=Mazda132-1.jpg" target="_blank"><img src="http://i169.photobucket.com/albums/u216/NateFrame69/Mazda/Mazda132-1.jpg" border="0" alt="Photobucket"></a>[/IMG]
Worked today on getting my wipers to work. I figured i'll never drive it in the rain, but just incase. Here is the wiring to the motor. I dont have the delay function, and they dont return to the home position, anyone know how to do this? You just have to turn them off at the right time.
[IMG]<a href="http://s169.photobucket.com/albums/u216/NateFrame69/Mazda/?action=view¤t=Mazda136-1.jpg" target="_blank"><img src="http://i169.photobucket.com/albums/u216/NateFrame69/Mazda/Mazda136-1.jpg" border="0" alt="Photobucket"></a>[/IMG]
Custom fuel bulkhead, complete with supra fuel pump. One hell of a nice unit. The -8 fitting will be for the wires. 12AWG all the way to the pump, or whatever size the haltech has, probally 14awg. There are provisions for the factory level sender, it will get wired up to an autometer gauge, I believe its a 0-90ohm for a GM car, very close to the factory resistance specs, not like fuel gauges are ever accurate anyway.
[IMG]<a href="http://s169.photobucket.com/albums/u216/NateFrame69/Mazda/?action=view¤t=Mazda128-1.jpg" target="_blank"><img src="http://i169.photobucket.com/albums/u216/NateFrame69/Mazda/Mazda128-1.jpg" border="0" alt="Photobucket"></a>[/IMG]
I'm sure everyone has seen this before. You can see where why soft lines end, pictured here are the feed and return lines. This is earls proflex hose, way easier to work with then that summit **** hose. I always cheaped out on the SS hose, not anymore, this stuff is to die for.
[IMG]<a href="http://s169.photobucket.com/albums/u216/NateFrame69/Mazda/?action=view¤t=Mazda126-1.jpg" target="_blank"><img src="http://i169.photobucket.com/albums/u216/NateFrame69/Mazda/Mazda126-1.jpg" border="0" alt="Photobucket"></a>[/IMG]
This is where those softlines from above end, kinda above the rear left control arm. From here forward its hardline.
[IMG]<a href="http://s169.photobucket.com/albums/u216/NateFrame69/Mazda/?action=view¤t=Mazda122-1.jpg" target="_blank"><img src="http://i169.photobucket.com/albums/u216/NateFrame69/Mazda/Mazda122-1.jpg" border="0" alt="Photobucket"></a>[/IMG]
Its a close fit, but it appears to clear. I am not as worried as I would be about the clearence because I have delrin in the subframe, shouldent move around too much.
Labeled them here, still have to do that at the pump. dont want to criss cross them!!
[IMG]<a href="http://s169.photobucket.com/albums/u216/NateFrame69/Mazda/?action=view¤t=Mazda123-1.jpg" target="_blank"><img src="http://i169.photobucket.com/albums/u216/NateFrame69/Mazda/Mazda123-1.jpg" border="0" alt="Photobucket"></a>[/IMG]
Up under the firewall is the fuel filter, fairly easy to get out. Damn nice unit.
[IMG]<a href="http://s169.photobucket.com/albums/u216/NateFrame69/Mazda/?action=view¤t=Mazda117-1.jpg" target="_blank"><img src="http://i169.photobucket.com/albums/u216/NateFrame69/Mazda/Mazda117-1.jpg" border="0" alt="Photobucket"></a>[/IMG]
I was left facing one problem. I have a total of 4 hardlines and 3 high current cables running the length of the car. How do I secure them all? The alum hardline wont fit where the factory hardfuel lines fit, even after some dremel work, so that was out. and I am not good enough with the bender to exactly match the factory lines. The answer was some alum strip and about 20 p-clamps. These things are life savers.
[IMG]<a href="http://s169.photobucket.com/albums/u216/NateFrame69/Mazda/?action=view¤t=Mazda112-1.jpg" target="_blank"><img src="http://i169.photobucket.com/albums/u216/NateFrame69/Mazda/Mazda112-1.jpg" border="0" alt="Photobucket"></a>[/IMG]
[IMG]<a href="http://s169.photobucket.com/albums/u216/NateFrame69/Mazda/?action=view¤t=Mazda113-1.jpg" target="_blank"><img src="http://i169.photobucket.com/albums/u216/NateFrame69/Mazda/Mazda113-1.jpg" border="0" alt="Photobucket"></a>[/IMG]
[IMG]<a href="http://s169.photobucket.com/albums/u216/NateFrame69/Mazda/?action=view¤t=Mazda115-1.jpg" target="_blank"><img src="http://i169.photobucket.com/albums/u216/NateFrame69/Mazda/Mazda115-1.jpg" border="0" alt="Photobucket"></a>[/IMG]
At the rear subframe I made an additional bracket that used an exhisting threaded hole in the subframe, to keep the lines in this nice large radius bend. Then they go into the car, never to be seen again.
[IMG]<a href="http://s169.photobucket.com/albums/u216/NateFrame69/Mazda/?action=view¤t=Mazda120-1.jpg" target="_blank"><img src="http://i169.photobucket.com/albums/u216/NateFrame69/Mazda/Mazda120-1.jpg" border="0" alt="Photobucket"></a>[/IMG]
Hopfully more to come tomorrow.
Haltech soon, than gauges.
cheers!!
PIMP
Joined: Feb 2004
Posts: 1,012
Likes: 0
From: Greensboro, NC
beautiful, I wonder though, why did you not run the SS lines from back all the way to front? A guy I work with is building an S2000 race car and recently installed full SS flex front to back. I'm definitely gonna show him your pics. Really nice way to mount those lines with that aluminum strip and clamps. I'm absorbing from you man, one day..one day.