Rear Hub Removal Tips


Thread Starter
Full Member
Joined: Oct 2003
Posts: 70
Likes: 0
From: Sparks, MD
Rear Hub Removal Tips
When removing the rear hub to replace the rear wheel bearings, what is the proper method to move the little collar in the upper hub mount so that the hub can be pulled? I typically force a large sized flat screw driver through and pound on it with a mull, but this can't be correct.
Also, I have an Ingersoll Rand 2131 impact gun with 600 ft lbs of torque and I can't seem to break the lower 21mm bolt free. I hit it with MAP gas and pb blaster but nothing helps. Does anyone have a good method to remove this bolt?
Also, I have an Ingersoll Rand 2131 impact gun with 600 ft lbs of torque and I can't seem to break the lower 21mm bolt free. I hit it with MAP gas and pb blaster but nothing helps. Does anyone have a good method to remove this bolt?

HOT DOGS! 8======D
Joined: Jul 2007
Posts: 173
Likes: 0
From: Columbia, MO
When removing the rear hub to replace the rear wheel bearings, what is the proper method to move the little collar in the upper hub mount so that the hub can be pulled? I typically force a large sized flat screw driver through and pound on it with a mull, but this can't be correct.
Also, I have an Ingersoll Rand 2131 impact gun with 600 ft lbs of torque and I can't seem to break the lower 21mm bolt free. I hit it with MAP gas and pb blaster but nothing helps. Does anyone have a good method to remove this bolt?
Also, I have an Ingersoll Rand 2131 impact gun with 600 ft lbs of torque and I can't seem to break the lower 21mm bolt free. I hit it with MAP gas and pb blaster but nothing helps. Does anyone have a good method to remove this bolt?

The 21mm is the diagonal one, right?
I just used a 1/2" drive ratchet, a pipe over the end of the ratchet, and my jack handle inside that...it's about a 4 or 5 foot breaker bar, which means I'm multiplying the force on the bolt 4 or 5x. Something's gonna give...lol.
As for the top part...use a bigger hammer. I got the other bolts off, rotated the hub up and pulled the halfshaft out, and then wiggled the largest crowbar I could find between the hub and the car. Pry upwards to separate and then twist...and then remove the crowbar and just wriggle it off the rest of the way.
Again, probably not the right way to do it, but it's how I did it.
Rotary Freak


Joined: Nov 2001
Posts: 1,528
Likes: 233
From: Alexandria, VA
The top collar that you refer to is part of bearing's inner race. The inner race is split into two pieces. I use a large bearing separator to grasp the bottom of the bearing's inner race, and then a hydraulic press to remove the bearing from the hub.
The bolt that you're referring to is probably the bolt for the DTSS bushing. The DTSS bushing consists of inner and outer metal races, which are bonded together with a rubber core. Occasionally, the bolt becomes corroded and will seize to bushing's inner race. The bolt cannot be broken loose because the rubber will acts like a spring and absorb any impact that's imparted to the bolt. You need to heat the busing with a torch until the rubber is destroyed. After this is done, then you'll be able to unscrew the bolt. Obviously, you'll need to replace the DTSS bushings, and probably the bolts too, during reassembly. I would recommend putting some anti-seize compound on these bolts during reassembly. This way, they won't "freeze-up" on you, should you need to remove them again sometime in the future.
Hot_Dog
'90 RX7 GXL
Thread Starter
Full Member
Joined: Oct 2003
Posts: 70
Likes: 0
From: Sparks, MD
The top collar that you refer to is part of bearing's inner race. The inner race is split into two pieces. I use a large bearing separator to grasp the bottom of the bearing's inner race, and then a hydraulic press to remove the bearing from the hub.
The bolt that you're referring to is probably the bolt for the DTSS bushing. The DTSS bushing consists of inner and outer metal races, which are bonded together with a rubber core. Occasionally, the bolt becomes corroded and will seize to bushing's inner race. The bolt cannot be broken loose because the rubber will acts like a spring and absorb any impact that's imparted to the bolt. You need to heat the busing with a torch until the rubber is destroyed. After this is done, then you'll be able to unscrew the bolt. Obviously, you'll need to replace the DTSS bushings, and probably the bolts too, during reassembly. I would recommend putting some anti-seize compound on these bolts during reassembly. This way, they won't "freeze-up" on you, should you need to remove them again sometime in the future.
Hot_Dog
'90 RX7 GXL
The bolt that you're referring to is probably the bolt for the DTSS bushing. The DTSS bushing consists of inner and outer metal races, which are bonded together with a rubber core. Occasionally, the bolt becomes corroded and will seize to bushing's inner race. The bolt cannot be broken loose because the rubber will acts like a spring and absorb any impact that's imparted to the bolt. You need to heat the busing with a torch until the rubber is destroyed. After this is done, then you'll be able to unscrew the bolt. Obviously, you'll need to replace the DTSS bushings, and probably the bolts too, during reassembly. I would recommend putting some anti-seize compound on these bolts during reassembly. This way, they won't "freeze-up" on you, should you need to remove them again sometime in the future.
Hot_Dog
'90 RX7 GXL

Trending Topics
After a period of use the bushing will move to the rear and not allow the assembly to be removed. I've taken a screwdriver and used as a small pry bar. Slid it in behind the upper arm and forced the sleeve back into position, then the arm can be removed easily. Some have had to cut the sleeve and go from there.
Mother****ing Wow
Joined: Jul 2008
Posts: 1,290
Likes: 0
From: NJ
After a period of use the bushing will move to the rear and not allow the assembly to be removed. I've taken a screwdriver and used as a small pry bar. Slid it in behind the upper arm and forced the sleeve back into position, then the arm can be removed easily. Some have had to cut the sleeve and go from there.
Does anyone know if I can find a replacement sleeve? I have been looking with no luck. Mazdatrix wanted to sell me replacement rear knuckles as a solution.

meh
Joined: Sep 2002
Posts: 801
Likes: 0
From: Tallahassee
When I put in new Energy Suspension bushings, I had to remove the sleeve, and the new bushing went in without a sleeve.
If I tried putting the new bushing in before removing the old sleeve, it didn't fit.
Never had a problem with it after installation.
If I tried putting the new bushing in before removing the old sleeve, it didn't fit.
Never had a problem with it after installation.
i just messed with this same stuff last weekend. I used a drift and hammer going through the hub to the little collar. a couple good whacks and it had backed off enough to slide the hub off the trailing arm.
Mother****ing Wow
Joined: Jul 2008
Posts: 1,290
Likes: 0
From: NJ
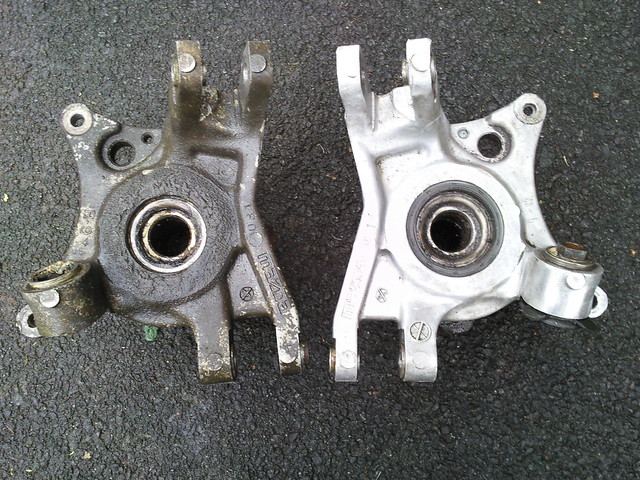
Thanks guys... I got them out with some heat, PB blaster, HUGENORMOUS prybar and BFH.
Did some cleaning... new wheel bearings and seals on the way. I think I'm going to trim the sleeve a little to get them back in.
Did some cleaning... new wheel bearings and seals on the way. I think I'm going to trim the sleeve a little to get them back in.
Mother****ing Wow
Joined: Jul 2008
Posts: 1,290
Likes: 0
From: NJ
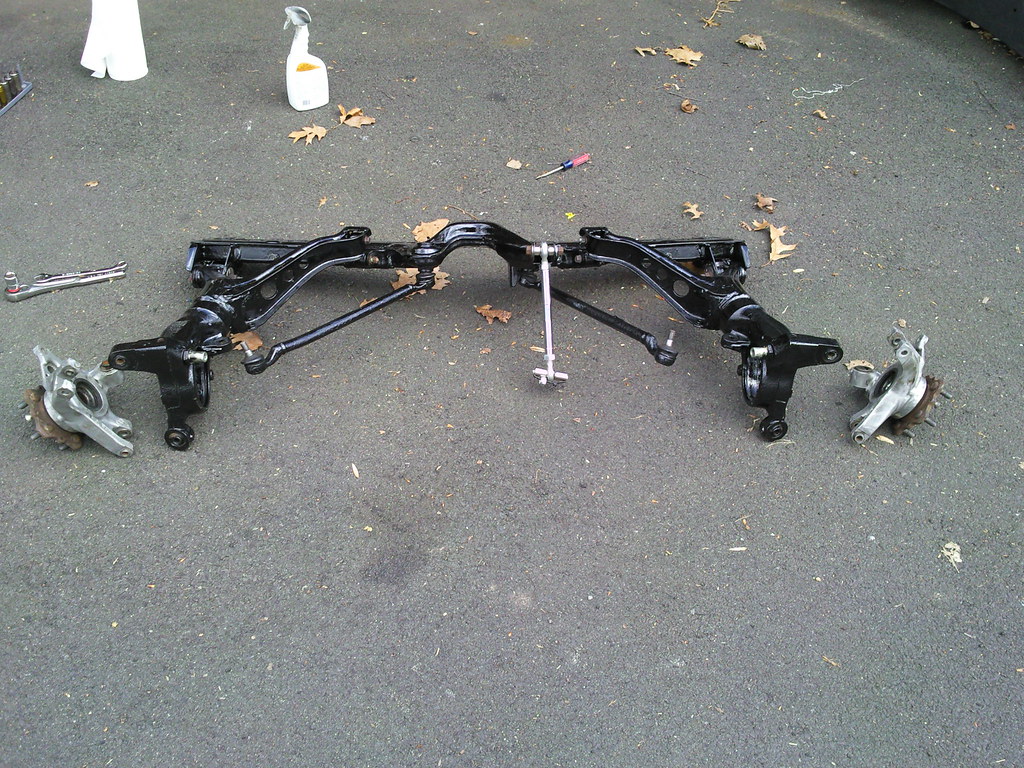
Yeah I am installing DTSS solid subframe mounts, mazda comp front diff mount, center camber arm, pinion snubber, wheels bearings and I have a spare subframe that I blasted and coated.
you might want to do some research before you tackle all that. iirc solid subframe mounts will make that camber bar unusable. the camber bar moves the subframe around because the mounts are rubber and have some compliance in them. if you go delrin or some other solid material then you cannot get that flex in the mounts. you'll have to get the individual camber adjusters like mazdatrix or mmr sells.
last weekend i basically did everything you mentioned except solid mounts, but i did a full poly kit and bearing+ball joint up front.
last weekend i basically did everything you mentioned except solid mounts, but i did a full poly kit and bearing+ball joint up front.
Mother****ing Wow
Joined: Jul 2008
Posts: 1,290
Likes: 0
From: NJ
you might want to do some research before you tackle all that. iirc solid subframe mounts will make that camber bar unusable. the camber bar moves the subframe around because the mounts are rubber and have some compliance in them. if you go delrin or some other solid material then you cannot get that flex in the mounts. you'll have to get the individual camber adjusters like mazdatrix or mmr sells.
last weekend i basically did everything you mentioned except solid mounts, but i did a full poly kit and bearing+ball joint up front.
last weekend i basically did everything you mentioned except solid mounts, but i did a full poly kit and bearing+ball joint up front.
Joined: Sep 2005
Posts: 25,581
Likes: 136
From: Smiths Falls.(near Ottawa!.Mapquest IT!)
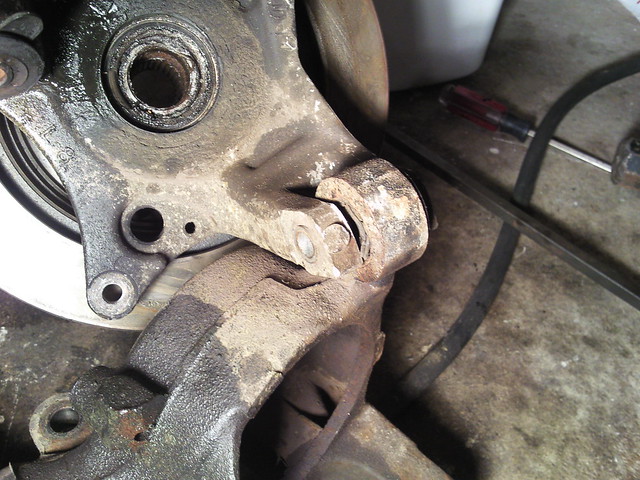
you see where the Sleeve is?.in relation to the Part of that assembly where the bolt goes through??
Here is what you can do to drive the Sleeve back enough so that it wil not Bind on the other part when you install again.
Get a Bolt and nut..Place the nut onto the sleeve,and now put a Bolt through the Outside hole of the assembly,and then thread it on to the Nut.
You can now BANG the bolt with a hammer and the NUT will hit the Sleeve and force it Flush to the assembly,,Voila!.No grinding of the sleeve.

Coolant Leak
Joined: Aug 2005
Posts: 490
Likes: 0
From: Dallas, TX
i dont mean to thread jack, but im about to do this same thing.. i have ridiculous wheel wobble which im guessing is attributed to needing new wheel bearings, i was just going to replace the entire hub, but it looks like he's actually replacing just the bearing? advice?
Mother****ing Wow
Joined: Jul 2008
Posts: 1,290
Likes: 0
From: NJ
you see where the Sleeve is?.in relation to the Part of that assembly where the bolt goes through??
Here is what you can do to drive the Sleeve back enough so that it wil not Bind on the other part when you install again.
Get a Bolt and nut..Place the nut onto the sleeve,and now put a Bolt through the Outside hole of the assembly,and then thread it on to the Nut.
You can now BANG the bolt with a hammer and the NUT will hit the Sleeve and force it Flush to the assembly,,Voila!.No grinding of the sleeve.
Here is what you can do to drive the Sleeve back enough so that it wil not Bind on the other part when you install again.
Get a Bolt and nut..Place the nut onto the sleeve,and now put a Bolt through the Outside hole of the assembly,and then thread it on to the Nut.
You can now BANG the bolt with a hammer and the NUT will hit the Sleeve and force it Flush to the assembly,,Voila!.No grinding of the sleeve.
i dont mean to thread jack, but im about to do this same thing.. i have ridiculous wheel wobble which im guessing is attributed to needing new wheel bearings, i was just going to replace the entire hub, but it looks like he's actually replacing just the bearing? advice?