
Re-packing and Torquing Front Wheel Bearings - Write-up

Re-packing and Torquing Front Wheel Bearings - Write-up
Ok, so the back-story is that at the last auto-x, I noticed some noise from one of the wheels on hard corners, so it seemed like time to pull the hubs off and check the wheel bearings. So, to start, I ordered & picked up new inner seals (the only seals for the front bearings), since I didn't know the state of the ones that were there, and they were only about $10 each.
Starting work, I jacked up the front of the car since I was checking both out, and put it firmly on jack-stands. Then, you have to remove the wheels, remove the two caliper mounting bolts and the tab that holds the brake line to the strut, and remove and hang the caliper so that the line isn't stressed. I used a zip-tie to tie it to one of the coils of the struts, a piece of metal or wire would work fine, etc - just don't leave the soft line kinked or bend the hard line. After that, I removed the brake disk (on one side anyway, the other side didn't want to come off the hub, so I left it on, its just harder to work with the hub when the disk is still attached.
(picture was too blurry to post, sorry).
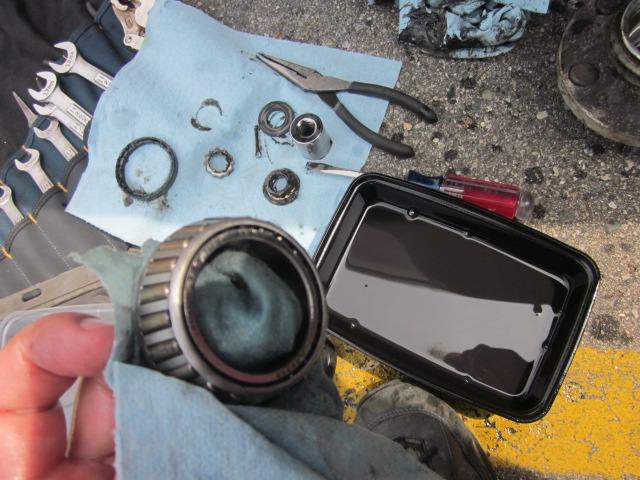
Then, I took the jack handle (or crow bar, or any long piece of metal etc) and stuck it between the lug studs so that it was braced against the ground, and the hub couldn't rotate, and used a large pair of adjustable pliers to twist the hub cap and pull it off. You'll be faced with a sight like the below picture, but with the grease probably looking much blacker, and the castle-cap and cotter pin installed.

Unbend the cotter pin & pull it out with needle-nosed pliers, and pull off the castle cap, and you'll be looking at the nut that holds the wheel on, as shown in the above picture. Now, remove that nut and the washer behind it with the tab, and the hub should pretty much fall off of the spindle.

Pull it off (making sure to catch the inner and outer needle bearing cages), and wipe all the grease off the inside of the hub, the outside of the cages, and as much as you can squeeze out of the cages. I soaked them in a bath of WD40 for a while, shaking and spinning them and wiping up the old bearing grease until they were clean
Inspect the races that are pressed in the hub
Now its time to re-pack them. I take some of the grease in my palm, and repeatedly smack a part of the larger-diameter side of the bearing against my palm to force the grease up between the cage and the inner race. You need to keep doing this on each part of the diameter until you see the grease getting pushed out of the top (smaller diameter) part of the bearing, as shown in the following pic.

You can see how the grease is pushing up between the rollers and bubbling out the top at about 11 o'clock to 1 o'clock on the bearing. The bearing is only fully greased when the whole volume between the cage and the race is filled that way. Then, do the other bearing (inner & outer), and slather more grease around the outside. Do the same with new grease around the inside of the hub, so that everything is very well lubricated. Then, sit the inner bearing cage in the hub, and press the new seal in. The seal should press in pretty easily with your thumb - don't press it all the way in, or it could rub on the inner bearing and get torn up or pulled loose. I left about a screwdriver-thickness between them, since that's approximately the way they had been when I pulled them apart.

Next, put the outer bearing cage into the hub (there should be a bit of a "whoosh" as the seal goes on and air pushes past it), grease the spindle a little bit, and put the whole hub assembly back on the spindle. Put the washer back on, lining the tab up with the groove in the spindle, and thread the axle nut back on. Torque it to approx 22 ft-lbs (very light for a nut that size), and spin the hub around at least 3 times to help seat all the bearings.

At this point, you're supposed to pull one of the studs with 1.5 to 2 lbs of force, and loosen the axle nut until the hub moves with this much force. To do this, I took a set of sockets, weighed them & removed sockets from the set til I got 2 lbs, and then hung the incomplete set from one of the lugs, such that the lug and the hub were in line parallel to the ground (so that the force of gravity would be acting at the maximum torque arm), and slowly loosened the nut. With each 1/4 turn, i'd tap the top of the weights to see how close they were to turning.

In theory (and according to the FSM), once the hub begins moving under this weight, the axle nut should be tightened appropriately. At this point, you reinstall the castle-cap and a new cotter pin to keep the nut from backing off, pack the hub cap with some more grease and press it back into the hub, then reinstall the disk brake and caliper, and then the wheel.

Once the wheel is back on and tightened to the hub (but the car is still on jack stands), tug on the top and bottom of the wheel and see if you can feel any play. I found that in my case, it was a little bit loose at this point, such that after I put the wheel back on and felt that I could still move it slightly (with a noticable "clunk") when tugging top-to-bottom. To fix this, I pulled the cap back off with the wheel still on, unbent the cotter pin and removed the castle-cap, and continued to torque the nut until the wheel did not move when pulling on the top or bottom of it. It still spun the same amount with approximately the same force applied to the outside of the tire once torqued - if your wheel has noticeably more resistance to spinning after you tighten it to the point of not "clunking", then you probably need either more grease & time seating the bearings, or the bearings are shot.
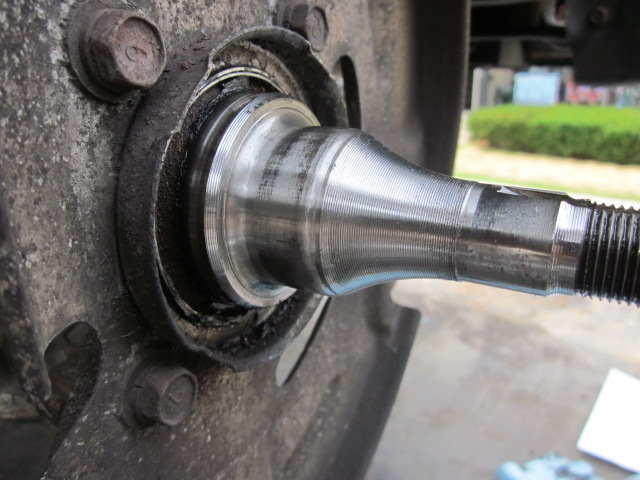
I did notice that the area where the inner bearing sits on the spindle on the driver's side was a consistent silver, while on the passenger side it was silver on the rear side of the spindle, but looked like it had been worn through to a darker grey on the front side of the spindle (see last pic). It was still completely smooth and I didn't feel any play when putting the inner race back over it and trying to wiggle it, but I wasn't sure about the change in coloring. It looked like the outer silver color had been rubbed through.
Rear (normal silver) side :
Front (worn darker grey) side :

Is this something to be worried about? It seemed a consistent mix of silver & grey on the drivers side.
Starting work, I jacked up the front of the car since I was checking both out, and put it firmly on jack-stands. Then, you have to remove the wheels, remove the two caliper mounting bolts and the tab that holds the brake line to the strut, and remove and hang the caliper so that the line isn't stressed. I used a zip-tie to tie it to one of the coils of the struts, a piece of metal or wire would work fine, etc - just don't leave the soft line kinked or bend the hard line. After that, I removed the brake disk (on one side anyway, the other side didn't want to come off the hub, so I left it on, its just harder to work with the hub when the disk is still attached.
(picture was too blurry to post, sorry).
Then, I took the jack handle (or crow bar, or any long piece of metal etc) and stuck it between the lug studs so that it was braced against the ground, and the hub couldn't rotate, and used a large pair of adjustable pliers to twist the hub cap and pull it off. You'll be faced with a sight like the below picture, but with the grease probably looking much blacker, and the castle-cap and cotter pin installed.
Unbend the cotter pin & pull it out with needle-nosed pliers, and pull off the castle cap, and you'll be looking at the nut that holds the wheel on, as shown in the above picture. Now, remove that nut and the washer behind it with the tab, and the hub should pretty much fall off of the spindle.
Pull it off (making sure to catch the inner and outer needle bearing cages), and wipe all the grease off the inside of the hub, the outside of the cages, and as much as you can squeeze out of the cages. I soaked them in a bath of WD40 for a while, shaking and spinning them and wiping up the old bearing grease until they were clean
Inspect the races that are pressed in the hub
Now its time to re-pack them. I take some of the grease in my palm, and repeatedly smack a part of the larger-diameter side of the bearing against my palm to force the grease up between the cage and the inner race. You need to keep doing this on each part of the diameter until you see the grease getting pushed out of the top (smaller diameter) part of the bearing, as shown in the following pic.
You can see how the grease is pushing up between the rollers and bubbling out the top at about 11 o'clock to 1 o'clock on the bearing. The bearing is only fully greased when the whole volume between the cage and the race is filled that way. Then, do the other bearing (inner & outer), and slather more grease around the outside. Do the same with new grease around the inside of the hub, so that everything is very well lubricated. Then, sit the inner bearing cage in the hub, and press the new seal in. The seal should press in pretty easily with your thumb - don't press it all the way in, or it could rub on the inner bearing and get torn up or pulled loose. I left about a screwdriver-thickness between them, since that's approximately the way they had been when I pulled them apart.
Next, put the outer bearing cage into the hub (there should be a bit of a "whoosh" as the seal goes on and air pushes past it), grease the spindle a little bit, and put the whole hub assembly back on the spindle. Put the washer back on, lining the tab up with the groove in the spindle, and thread the axle nut back on. Torque it to approx 22 ft-lbs (very light for a nut that size), and spin the hub around at least 3 times to help seat all the bearings.
At this point, you're supposed to pull one of the studs with 1.5 to 2 lbs of force, and loosen the axle nut until the hub moves with this much force. To do this, I took a set of sockets, weighed them & removed sockets from the set til I got 2 lbs, and then hung the incomplete set from one of the lugs, such that the lug and the hub were in line parallel to the ground (so that the force of gravity would be acting at the maximum torque arm), and slowly loosened the nut. With each 1/4 turn, i'd tap the top of the weights to see how close they were to turning.
In theory (and according to the FSM), once the hub begins moving under this weight, the axle nut should be tightened appropriately. At this point, you reinstall the castle-cap and a new cotter pin to keep the nut from backing off, pack the hub cap with some more grease and press it back into the hub, then reinstall the disk brake and caliper, and then the wheel.
Once the wheel is back on and tightened to the hub (but the car is still on jack stands), tug on the top and bottom of the wheel and see if you can feel any play. I found that in my case, it was a little bit loose at this point, such that after I put the wheel back on and felt that I could still move it slightly (with a noticable "clunk") when tugging top-to-bottom. To fix this, I pulled the cap back off with the wheel still on, unbent the cotter pin and removed the castle-cap, and continued to torque the nut until the wheel did not move when pulling on the top or bottom of it. It still spun the same amount with approximately the same force applied to the outside of the tire once torqued - if your wheel has noticeably more resistance to spinning after you tighten it to the point of not "clunking", then you probably need either more grease & time seating the bearings, or the bearings are shot.
I did notice that the area where the inner bearing sits on the spindle on the driver's side was a consistent silver, while on the passenger side it was silver on the rear side of the spindle, but looked like it had been worn through to a darker grey on the front side of the spindle (see last pic). It was still completely smooth and I didn't feel any play when putting the inner race back over it and trying to wiggle it, but I wasn't sure about the change in coloring. It looked like the outer silver color had been rubbed through.
Rear (normal silver) side :
Front (worn darker grey) side :
Is this something to be worried about? It seemed a consistent mix of silver & grey on the drivers side.
When I took it apart, all the races & bearing cages looked fine, no signs of wear or anything, so it looked like it was safe to re-use them. I know there's a write-up for how to back-cut the hub a little so that you can push out the races from inside the hub, but it didn't look like that was necessary with mine. The one bit of wear that I was unsure of was on the spindle, which I posted pictures of.
I just got back from an auto-x this afternoon, and they felt very solid & didn't make a sound, so they appear to be good, at least preliminarily
I just got back from an auto-x this afternoon, and they felt very solid & didn't make a sound, so they appear to be good, at least preliminarily

Great write up ~
I probably gonna do it this next weekend. It's long overdue I think my S5 is still on original bearing, it makes this funny "woosh woosh" noise at speed ... Not just 1 wheel, talking about all 4 wheels ... I don't know how the previous 5 owners (I'm 6th) stand this.
hope the race is still good so I don't have to deal with it, but if it's really still original ... I bought all parts last year already but without a grinder I think it will be a bitch to remove it.
Trending Topics
The colour change on the hub states that there has been slippage of the bearing on the hub, or at least some wiggling under load.
You can NOT feel this by trying wiggling it yourself
If there is a noise coming from a bearing, don't half-*** it and just replace it.
A bearing that is worn, can do damage to the shaft aswell.
In the industrial automation i am in, you dont want to know how many shafts or hubs i had to replace because the bearing ate them
Previous threads have pretty much said that if a bearing has actually gone bad, it will take the race with it. When I did mine, I just used a welder to shrink the race. It took longer to cool down than it did to get the race out!
Joined: May 2006
Posts: 3,881
Likes: 3
From: Jacksonville, Tampa & Tallahassee
Most people don't have access to a welder, and replacing those races is a pita otherwise. The races might be "out of spec" without visable damage, but unless you drive around for a while on a known bad bearing the difference it makes in a street car is negligible
Then again there are gradations of "bad". I replaced a bearing that had fairly significant play w/o changing the race and its been fine for 20,000 miles.
Then again there are gradations of "bad". I replaced a bearing that had fairly significant play w/o changing the race and its been fine for 20,000 miles.
The races looked very consistent all the way around anyway, without noticeable irregularities axially or radially. I figured that the marks on the spindle were from chatter when the bearings were loose - I don't know whether it was caused by the inner bearing race spinning on the spindle or vibrating around though.
The races as they appeared in the hub, just for reference:
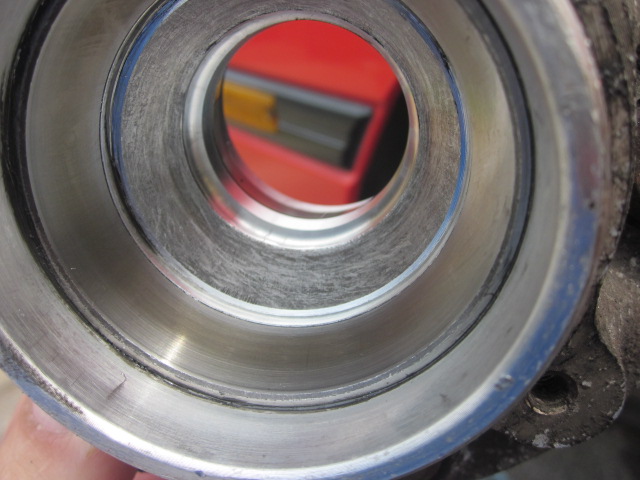
The races as they appeared in the hub, just for reference:
The bearing races also looked good on my car, but were in fact out of spec.
Just to add to this thread:
THE EASY WAY TO REMOVE BEARING RACES
What's Needed:
Just to add to this thread:
THE EASY WAY TO REMOVE BEARING RACES
What's Needed:
- Propane or MAP gas torch, Oxy-Acetylene also works
- Heat the hub up evenly, usually takes about 10-15 minutes depending on how hot your torch gets. Try not to apply direct heat to the bearing surfaces. Apply more heat to thicker areas for even expansion.
- When sufficiently heated, take the hub and tap it on a table, and the bearings will fall right out. No tools needed.
- With the hub still hot, the new bearings should fall right in with a little tap. If the bearings were kept in the freezer, this job is even easier.

Alternative I've been told:
Heat the hub in an oven at 350 degrees F for about 30 minutes. Carefully take out. Take a rag soaked in ice water and rub it on the race. The race should just fall out
Heat the hub in an oven at 350 degrees F for about 30 minutes. Carefully take out. Take a rag soaked in ice water and rub it on the race. The race should just fall out
Just to add, an easy way to position the nut correctly-I first tighten down the nut to seat everything, back off, then with a screwdriver inside the hub next to the washer move the washer with the screwdriver, you'll need to move the screwdriver back and forth from one side of the hub to the other alternately, tighten until the washer no longer moves, back the nut off until it begins to move and that's the spot.


What?? Are you a woman? I can make the hub unable to turn by tightening the spindle nut by hand!
RE: Bearing wear.
In the setup used in the front of our cars (and a lot of others) - isn't setting the preload actually accounting for bearing wear, as long as the wear is even around the race? I thought as the bearing wears, repacking the bearings and tightening the nut will account for the wear.
Obviously, this doesn't apply to bearing/hub/spindles like the design in the rear "sealed bearing'. When those wear, you replace.
edit: maybe Hot Dog meant tightening by hand with hand on the socket itself - no ratchet?
^True, but after a certain point, no amount of tightening will take out the slop. At that point, you'll notice odd wear in your brake pads, and for those with big brake kits, decreased clearance between the rotor and the relocation bracket.
RE: Bearing wear.
In the setup used in the front of our cars (and a lot of others) - isn't setting the preload actually accounting for bearing wear, as long as the wear is even around the race? I thought as the bearing wears, repacking the bearings and tightening the nut will account for the wear.
Obviously, this doesn't apply to bearing/hub/spindles like the design in the rear "sealed bearing'. When those wear, you replace.
edit: maybe Hot Dog meant tightening by hand with hand on the socket itself - no ratchet?
In the setup used in the front of our cars (and a lot of others) - isn't setting the preload actually accounting for bearing wear, as long as the wear is even around the race? I thought as the bearing wears, repacking the bearings and tightening the nut will account for the wear.
Obviously, this doesn't apply to bearing/hub/spindles like the design in the rear "sealed bearing'. When those wear, you replace.
edit: maybe Hot Dog meant tightening by hand with hand on the socket itself - no ratchet?
EDIT: seems like one of my images disappeared... it was just a pic of the hub, similar to the 3rd from the bottom
RX-792P
Joined: Aug 2004
Posts: 21
Likes: 1
From: Pennsylvania
Great write-up and pics. When I replaced mine, I used (2) one pound boxes of baking soda (very cheap) suspended in a plastic shopping bag to set my bearing pre-load. I looked around for one of those scales shown in the FSM and nobody seemed to know what I was talking about.
A fish scale or luggage scale should be identical to the "FSM scale". basically its a spring scale with a hook on the end. Typically you hang a fish or some luggage on the end of the hook and hold the scall off the ground. The spring compresses, and a scale or dial should indicate the weight. I found mine (a luggage scale) at Ace hardware
fuhh the inner race is a BEEZY!!! i just finished replacing front bearings, both inner and outer, on one hub the car had terible race wear. the other was fine. i noticed that when i packed and put everything back on the wheel doesnt turn easy at all, i think it just needs weak and the bearings need to sit. i had to put my hub in the oven! 400F and left it in there 15 min, and still had to hammer that thing out took too much time even following the mazdatrix procedure. the shop who replaced these before i bought this car didnt not torque the spindle at all! came off using my fingers and on one side they had a nail instead of a cotter pin.
when i replace bearings i crank them down psuedo tight with a crescent wrench, loosen the nut then tighten it by finger then apply about 1/16 turn from there.
rather surprising how many people have never serviced their front wheel bearings on these cars, even more surprising how little they still have front wheel bearing failures with that 25 year old grease.
rather surprising how many people have never serviced their front wheel bearings on these cars, even more surprising how little they still have front wheel bearing failures with that 25 year old grease.