
Piggy back keyless entry to factory S4 alarm

Piggy back keyless entry to factory S4 alarm
Hi Guys,
I've been wanting to do this for a loooong time. My 10AE has power locks and a perfectly working factory alarm. I would like to add keyless entry to the system and thus far have only purchased a door lock actuator.
I'm curious if anyone has successfully installed a simple keyless entry-only system and have the factory alarm Arm/Disarm via the keyless remote. I'm thinking the DEI Avital system with on board relays
It looks like I could wire into the factory alarm and can tap directly into the factory door lock motors with this system.
The system has
-Ground when armed <-Assume this can trigger the factory system to arm. Which wire at factory box?
-Factory alarm disable <-I believe this to go to LG/B at the factory box
-parking light flash (-)to LG @ factory box
-horn honk (-) to G/O at factory box
-lock/unlock tap into factory wiring on pass side. Extend to drivers side. Where does everyone pickup the pass side lock/unlock wires?
+12V suggestion? if the keyless has relays...probably needs high amp circuit. I'm thinking at the door lock relay so everything power door lock related stays on the door lock fuse

Duh, since we have a follow system all I need to do is take the lock/unlock to the new actuator on the drivers side and the pass side will follow
Does anyone know if the factory system is activated by "locking" the system on the drivers side with the new actuator or do I need to pickup/trigger a circuit on the factory box? If anything perhaps the "door lock link switch
Does anyone know if the factory system is activated by "locking" the system on the drivers side with the new actuator or do I need to pickup/trigger a circuit on the factory box? If anything perhaps the "door lock link switch
MECP Certified Installer
Joined: Feb 2009
Posts: 3,176
Likes: 3
From: Mesquite, TX-DFW
Duh, since we have a follow system all I need to do is take the lock/unlock to the new actuator on the drivers side and the pass side will follow
Does anyone know if the factory system is activated by "locking" the system on the drivers side with the new actuator or do I need to pickup/trigger a circuit on the factory box? If anything perhaps the "door lock link switch
Does anyone know if the factory system is activated by "locking" the system on the drivers side with the new actuator or do I need to pickup/trigger a circuit on the factory box? If anything perhaps the "door lock link switch
the system is "disarmed" by the micro switches in the door lock cylinders/hatch. If you pop the door actuator this doesn't happen and you alarm honks. the 10AE has the alarm under the dash so it is really easy to pull it and just put in an after market alarm with actuators. That's what i did. and it works great.
Trending Topics

Hi, Chuck. I don't have any specific experience with this. None of my FCs has power locks. But, like a good little engineer, I took a close look at the wiring diagram of the theft deterrent system. Disarming looks pretty straightforward. Pulling terminal D (door key cylinder switches) or E (hatch key cylinder switch) to ground with a relay contact should do it.
Arming is a bit more complicated. The control unit is 'ready to arm' when a door is open and then that door is locked (and other doors are already locked). The system arms when that door is closed. If I have interpreted the logic correctly, you would need to pull terminal H (door switch) to ground, then change the state of terminal F (power door lock relay) by locking the doors. I can't tell for sure from the wiring diagram whether the terminal needs voltage or ground to arm but it looks like it needs to be open to arm.
All this seems manageable but complicated. Looks to me like using the remote to disarm but arming manually when you get out of the car would be a good compromise.
Good luck.
Rob
MECP Certified Installer
Joined: Feb 2009
Posts: 3,176
Likes: 3
From: Mesquite, TX-DFW
Hi, Chuck. I don't have any specific experience with this. None of my FCs has power locks. But, like a good little engineer, I took a close look at the wiring diagram of the theft deterrent system. Disarming looks pretty straightforward. Pulling terminal D (door key cylinder switches) or E (hatch key cylinder switch) to ground with a relay contact should do it.
Arming is a bit more complicated. The control unit is 'ready to arm' when a door is open and then that door is locked (and other doors are already locked). The system arms when that door is closed. If I have interpreted the logic correctly, you would need to pull terminal H (door switch) to ground, then change the state of terminal F (power door lock relay) by locking the doors. I can't tell for sure from the wiring diagram whether the terminal needs voltage or ground to arm but it looks like it needs to be open to arm.
All this seems manageable but complicated. Looks to me like using the remote to disarm but arming manually when you get out of the car would be a good compromise.
Good luck.
Rob
Arming is a bit more complicated. The control unit is 'ready to arm' when a door is open and then that door is locked (and other doors are already locked). The system arms when that door is closed. If I have interpreted the logic correctly, you would need to pull terminal H (door switch) to ground, then change the state of terminal F (power door lock relay) by locking the doors. I can't tell for sure from the wiring diagram whether the terminal needs voltage or ground to arm but it looks like it needs to be open to arm.
All this seems manageable but complicated. Looks to me like using the remote to disarm but arming manually when you get out of the car would be a good compromise.
Good luck.
Rob
Yes, my DEI box has a trigger when "locked" as well as "unlock". So in theory I should be able to splice into the above mentioned locations to get it to work.
Since it is -10,000 F outside again, I've put this on hold until it warms up again. I'll flowchart the arm procedure to make sure I've got it. 1st test will be car off, lock the door from inside. Arm or not armed. I'll roll the window down and see if I can get the motion sensors to trigger.
Since it is -10,000 F outside again, I've put this on hold until it warms up again. I'll flowchart the arm procedure to make sure I've got it. 1st test will be car off, lock the door from inside. Arm or not armed. I'll roll the window down and see if I can get the motion sensors to trigger.
MECP Certified Installer
Joined: Feb 2009
Posts: 3,176
Likes: 3
From: Mesquite, TX-DFW
Yes, my DEI box has a trigger when "locked" as well as "unlock". So in theory I should be able to splice into the above mentioned locations to get it to work.
Since it is -10,000 F outside again, I've put this on hold until it warms up again. I'll flowchart the arm procedure to make sure I've got it. 1st test will be car off, lock the door from inside. Arm or not armed. I'll roll the window down and see if I can get the motion sensors to trigger.
Since it is -10,000 F outside again, I've put this on hold until it warms up again. I'll flowchart the arm procedure to make sure I've got it. 1st test will be car off, lock the door from inside. Arm or not armed. I'll roll the window down and see if I can get the motion sensors to trigger.

You'll want to branch off your Green and blues wires to the lock actuators. Green is lock and blue is unlock. It is a high current relay circuit from the brain so you don't need to do anything special with them to run both actuators.
You'll need to run the Green/Black arm wire off of the brain to the arm wire and the Blue/Black wire to the disarm wire on the factory theft deterrent unit.
Cool, I know DEI stuff like the back of my hand because I install them at work everyday. You'll want to branch off your Green and blues wires to the lock actuators. Green is lock and blue is unlock. It is a high current relay circuit from the brain so you don't need to do anything special with them to run both actuators. You'll need to run the Green/Black arm wire off of the brain to the arm wire and the Blue/Black wire to the disarm wire on the factory theft deterrent unit.
You'll want to branch off your Green and blues wires to the lock actuators. Green is lock and blue is unlock. It is a high current relay circuit from the brain so you don't need to do anything special with them to run both actuators. You'll need to run the Green/Black arm wire off of the brain to the arm wire and the Blue/Black wire to the disarm wire on the factory theft deterrent unit.MECP Certified Installer
Joined: Feb 2009
Posts: 3,176
Likes: 3
From: Mesquite, TX-DFW
I don't see where he mentioned what specific model system he's using...DEI has gone to negative, low current outputs exclusively for quite some time on all their units except 211HV (and similar entry level units across their various brands). So unless he's using a 211 platform that's not accurate, he'll need to be using a 451M which is a little more involved. Not that it still isn't simple for those of us that get paid to do it everyday, but sounds like he's not a professional.
I have done RS in about 10 F150's straight recently (with FLCAN).
I've got the Avital Model 2101L
Ground when armed is a -500 mA output (orange)
Factory disarm is Chanel 3 output -200 mA output (Lt green/black)
Door locks have power relays on board
Since my unit outputs ground, all I need to know is if the factory arm and disarm needs + or -, I can figure it out from there.
Same for the horn honk and parking light trigger at the alarm brain. + or -?
Lastly for dome light supervision, I believe I take chassis ground to DEI input and tie the output into the door trigger.
MECP Certified Installer
Joined: Feb 2009
Posts: 3,176
Likes: 3
From: Mesquite, TX-DFW
I've got the Avital Model 2101L
Ground when armed is a -500 mA output (orange)
Factory disarm is Chanel 3 output -200 mA output (Lt green/black)
Door locks have power relays on board
Since my unit outputs ground, all I need to know is if the factory arm and disarm needs + or -, I can figure it out from there.
Same for the horn honk and parking light trigger at the alarm brain. + or -?
Lastly for dome light supervision, I believe I take chassis ground to DEI input and tie the output into the door trigger.
Ground when armed is a -500 mA output (orange)
Factory disarm is Chanel 3 output -200 mA output (Lt green/black)
Door locks have power relays on board
Since my unit outputs ground, all I need to know is if the factory arm and disarm needs + or -, I can figure it out from there.
Same for the horn honk and parking light trigger at the alarm brain. + or -?
Lastly for dome light supervision, I believe I take chassis ground to DEI input and tie the output into the door trigger.
Horn honk is negative at the cpu. There are positive and negative parking light wires at the light switch. Tap onto the negative one. Since you are already there, go ahead and do this...
https://www.rx7club.com/2nd-gen-arch...urnout-164931/
As far as the dome light, yes that is correct.
For FYI, I did check the factory system and indeed you need the door open to trigger the system when the drivers side lock is pushed down.
I do not see a blue/black on the factory schematic as a trigger. I think Robby is right. I need to trick the car into thinking the door is open when the "lock" button is pressed on the remote. So that being said,
1) DEI lock output to drivers side actuator (pass side will follow using factory system/logic)
2) Arm trigger (-) to door switch L/W (terminal H at brain)
3) Disarm trigger (-) to key cylinder switch Green/Black (terminal D at brain)
Need to test
4) Dome supervision can also be tied into L/W (terminal H at brain) as it is in the door switch circuit.
5) Horn can be picked up at terminal O G/O which goes to the horn switch and looks like apart of the ground circuit
6) Hazards to Terminal C LG at the brain to -, I assume
I will also relay the head lights when I get Sakebomb's HID kit.
MECP Certified Installer
Joined: Feb 2009
Posts: 3,176
Likes: 3
From: Mesquite, TX-DFW
I chose Compustar because you can easily upgrade remotes and antennas easily for range. I have the 1000ft range, 1-way, water proof remotes for my car now but let's say I want 1 mile range and LCD remote, I can slap that on there tommorow if I want.
I do however very much like DEI/Viper products. Hell, I install them everyday. You can't just go and upgrade remotes as easily.
Does anyone have a picture of how they installed the actuator for the hatch? I want to keep the cable pull as backup. It looks like there is enough "meat" on the pull lever to drill a hole for the new actuator rod to slip into. What did you guys do?
We may get a break in the weather this weekend...and by break, I mean it will be slightly above freezing in Detroit.
God I can't wait for temps north of 40F.
I'll wrap this thread up with the final configuration that gets everything to work
We may get a break in the weather this weekend...and by break, I mean it will be slightly above freezing in Detroit.
God I can't wait for temps north of 40F.
I'll wrap this thread up with the final configuration that gets everything to work
MECP Certified Installer
Joined: Feb 2009
Posts: 3,176
Likes: 3
From: Mesquite, TX-DFW
For FYI, I did check the factory system and indeed you need the door open to trigger the system when the drivers side lock is pushed down.
I do not see a blue/black on the factory schematic as a trigger. I think Robby is right. I need to trick the car into thinking the door is open when the "lock" button is pressed on the remote. So that being said,
1) DEI lock output to drivers side actuator (pass side will follow using factory system/logic)
2) Arm trigger (-) to door switch L/W (terminal H at brain)
3) Disarm trigger (-) to key cylinder switch Green/Black (terminal D at brain)
Need to test
4) Dome supervision can also be tied into L/W (terminal H at brain) as it is in the door switch circuit.
5) Horn can be picked up at terminal O G/O which goes to the horn switch and looks like apart of the ground circuit
6) Hazards to Terminal C LG at the brain to -, I assume
I will also relay the head lights when I get Sakebomb's HID kit.
I do not see a blue/black on the factory schematic as a trigger. I think Robby is right. I need to trick the car into thinking the door is open when the "lock" button is pressed on the remote. So that being said,
1) DEI lock output to drivers side actuator (pass side will follow using factory system/logic)
2) Arm trigger (-) to door switch L/W (terminal H at brain)
3) Disarm trigger (-) to key cylinder switch Green/Black (terminal D at brain)
Need to test
4) Dome supervision can also be tied into L/W (terminal H at brain) as it is in the door switch circuit.
5) Horn can be picked up at terminal O G/O which goes to the horn switch and looks like apart of the ground circuit
6) Hazards to Terminal C LG at the brain to -, I assume
I will also relay the head lights when I get Sakebomb's HID kit.
Don't use the orange wire on the DEI unit for factory arm, just use the green/black on the DEI unit and diode isolate it.
I wouldn't run the white parking light wire from the DEI unit to the hazards as it will cause erratic light flashes and the negative parking light wire is super easy to get to.
MECP Certified Installer
Joined: Feb 2009
Posts: 3,176
Likes: 3
From: Mesquite, TX-DFW
Does anyone have a picture of how they installed the actuator for the hatch? I want to keep the cable pull as backup. It looks like there is enough "meat" on the pull lever to drill a hole for the new actuator rod to slip into. What did you guys do?
We may get a break in the weather this weekend...and by break, I mean it will be slightly above freezing in Detroit.
God I can't wait for temps north of 40F.
I'll wrap this thread up with the final configuration that gets everything to work
We may get a break in the weather this weekend...and by break, I mean it will be slightly above freezing in Detroit.
God I can't wait for temps north of 40F.
I'll wrap this thread up with the final configuration that gets everything to work
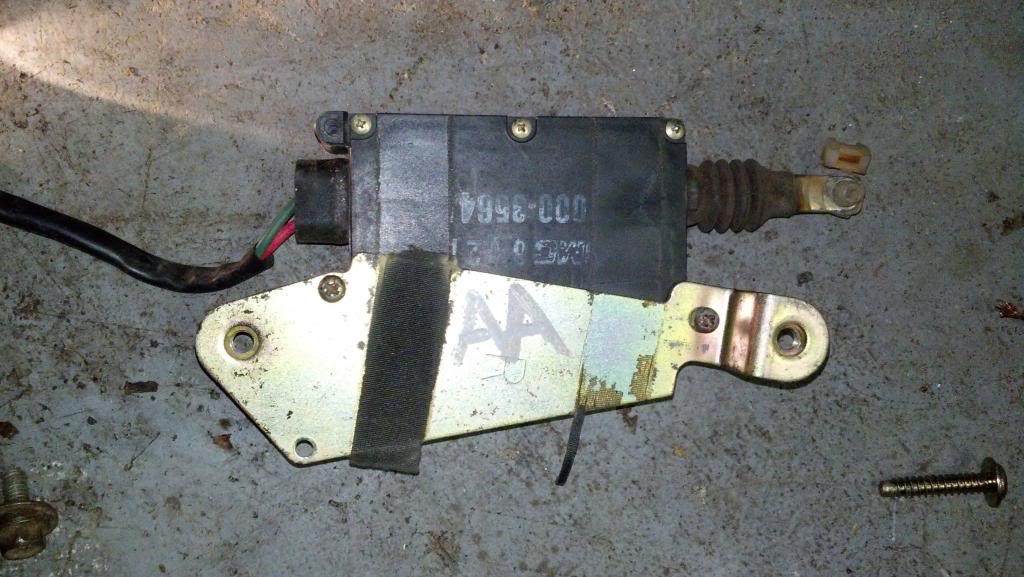
Hi Guys, Got the DEI 524 installed on the hatch. I made it so I could keep the manual pull as well. Both work perfectly
Only 2 holes were needed. 1 in the body and 1 in the hatch pop assembly. The pull rod was bent in a U on the hatch side to capture it in the hole. I pulled the 2 10mm nuts holding the factory assembly in place to assemble everything
Note, I do not run a spare tire and have a battery kill/charge terminals behind the license plate.
Doing it again I would have made the rod a little longer going the the factory pull to make it a little more of a straight run for the DEI 524 (see 2nd pic). When I wire it in permanently I'll trim the universal mount bar to clean it up.


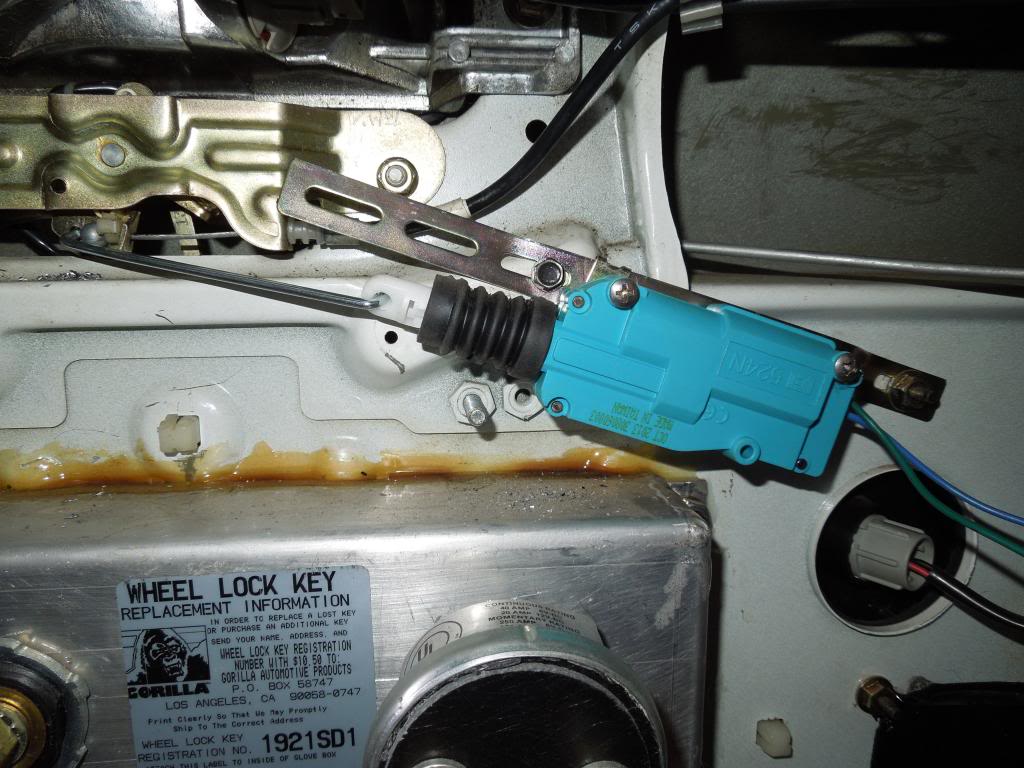
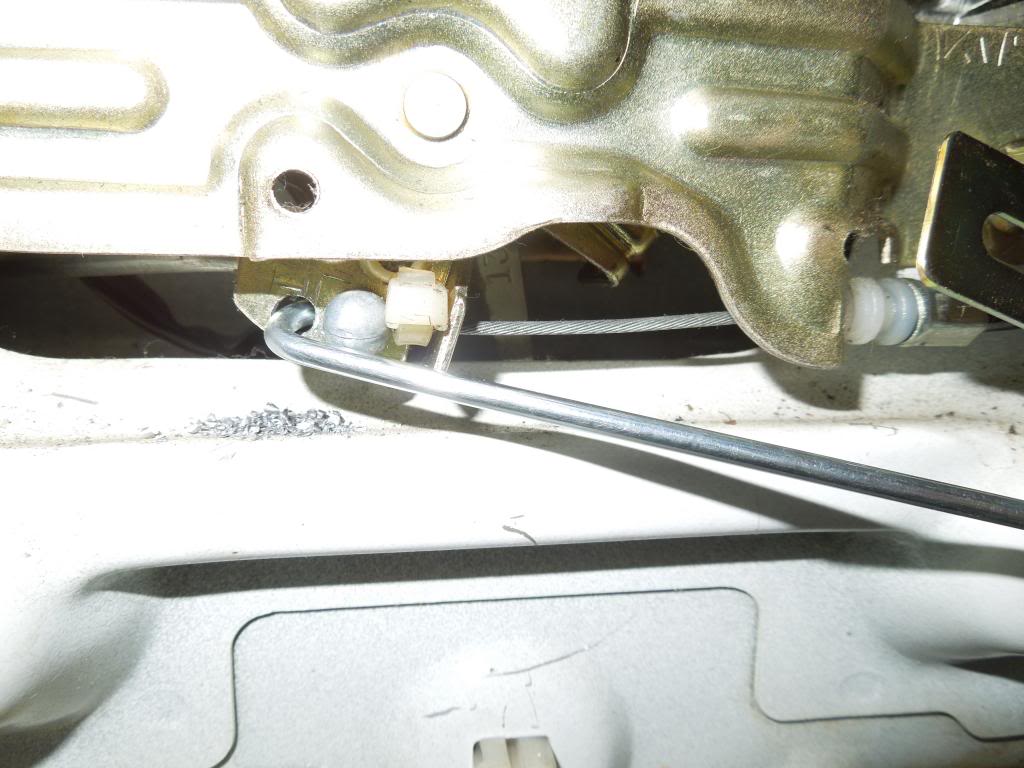
To continue with this thread, tonight I installed a pass side factory door lock actuator on the drivers side. No one really explains how to do this so I will.
The holes are in the sheet metal to mount the actuator. It goes in the bottom rear corner of the door. You can look at the passenger side for reference if need be. The bracket the actuator is mounted to needs to be flipped to the other side and shifted over.
Next the white clip that holds the rod to the actuator needs to be removed and installed on the other side.
Lastly, unclip the rod from the actuator, leave the clip "opened". Install the factory rod into the yellow door lock rod clip (use HELP dorman kit from parts store) and insert it into the lock actuator in the back of the door. Install the actuator and mark where the rod should be positioned in the white clip. Remove from vehicle, press the rod firmly into the white clip and close the clip. Reinstall in the door. Done
