my custom aluminum reverse airflow hood
 07-14-06, 05:03 PM
#26
Originally Posted by Unseen24-7
what kind of e-fan is that, and what is the CFM on it.
the electric fan is off of a pontiac fiero bein rear engine car it needed a powerful fan and it flows plenty fo cfm surprisingly it does not draw much amperage i have it wired up with a 30 amp fure right now through the thermostat and have not blown it meaning the initial cranking amps did not excede that 30 amps
 im not sure what year that fiero was but search and ull be able to find out on here
 07-14-06, 05:09 PM
#27
Originally Posted by staticguitar313
Cool thanks alot, sure beats dropping money on an Fd alt, and once again clean car, great attention to detail, you couls post more pics of the rest of that beast
o ya man i hear that, exactly why i did this mod lol and ill get more pics up here shortly heres soem i have already on the comp a little older (before the swap) all in all this car will forever be a work in progress
Last edited by R_PROWESS; 07-14-06 at 05:33 PM.
07-14-06, 05:15 PM
#28
Originally Posted by Cwaters
Dude, what shocks are those... looks like they'd hit the hood
Nice work man. I like the "look".
CW
Nice work man. I like the "look".
CW
thanks and to tell the truth i have no idea whats up with the shocks. the owner before me did that (about the only thing he did) it must be some sort of lowering attempt lol it worked whatever he did the hood JUST clears them and thats about the only thing i didnt paint i forgot to
 07-14-06, 09:50 PM
#29
still love the FC
Join Date: May 2002
Location: Dayton, Ohio
Posts: 360
Likes: 0
Received 0 Likes
on
0 Posts
Originally Posted by keithrulz
o ya i left the rivets visable. im not sure how i like it with visable rivets, kind of gives it a aircraft appearance which is cool. pitch in your opinion if you'd like. i also have an engine bay pic thrown in from this winters progress. any questions ask
07-14-06, 09:58 PM
#30
Originally Posted by cbrinega
Wow! That is looking good. I'd love to do something like that to my hood eventually. What kind of engine/turbo setup do you have?
07-14-06, 11:53 PM
#31
Junior Member

Join Date: Sep 2004
Location: PIKEVILLE TN. 37367
Posts: 28
Likes: 0
Received 0 Likes
on
0 Posts
very nice man. where did u get the top brace with the rotors cut in it or did u make it.
and please post the wiring details on the alt, thats nice , never would have thought of
a Buick alt. did u powercoat the parts or have it done.
and please post the wiring details on the alt, thats nice , never would have thought of
a Buick alt. did u powercoat the parts or have it done.
07-15-06, 12:55 AM
#32
Not a rotor? Not a motor.
Join Date: Dec 2005
Location: BC, Canada
Posts: 185
Likes: 0
Received 0 Likes
on
0 Posts
I hate to burst your bubble.. But I believe your seat clashes with the rest of your interior. 
Just kidding man, very clean car - props on the nice hood too!
Just kidding man, very clean car - props on the nice hood too!
07-15-06, 01:10 AM
#33
Originally Posted by bah12
very nice man. where did u get the top brace with the rotors cut in it or did u make it.
and please post the wiring details on the alt, thats nice , never would have thought of
a Buick alt. did u powercoat the parts or have it done.
and please post the wiring details on the alt, thats nice , never would have thought of
a Buick alt. did u powercoat the parts or have it done.
Last edited by R_PROWESS; 07-15-06 at 01:13 AM.
07-15-06, 01:13 AM
#34
Originally Posted by Denholm
I hate to burst your bubble.. But I believe your seat clashes with the rest of your interior.
Just kidding man, very clean car - props on the nice hood too!
Just kidding man, very clean car - props on the nice hood too!
haha no joke man that maroon color.... im in need of some seats. another thing on my list. and if im goin to get seats im going to get a 4pt harness and if im getin a 4 pt harness im goin to fabricate myself a rear strut tower because ya.. spinal compression... ill pass
07-15-06, 01:19 AM
#35
Beast Mode
iTrader: (8)
Join Date: Mar 2002
Location: USA!
Posts: 820
Likes: 0
Received 0 Likes
on
0 Posts
Originally Posted by keithrulz
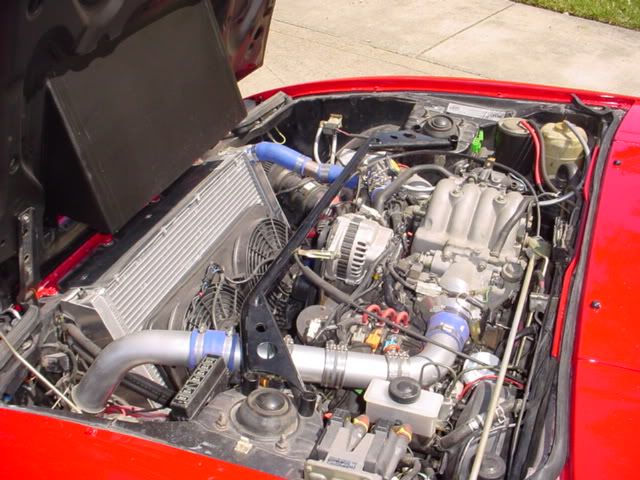
no there were no mounting location modings heres a closer pic as you can see the gm alt has only 1 arm that connects to the coolant neck as opposed to the two that stock has. i have had no integrity problems like the alt breaking at the arm or any of that it seems very durable and sturdy
How much abuse can this alternator take with only one bolt holding it up, meaning what type of HARD driving will it endure before coming lose?
The other concern is how will that Buick alternator hold up to continuous 8k rpm shifts? After all it was only designed to see at most 5k rpm
There is no way that alternator will last on an RX7 for very long. I personally have torn through several alternators new and used because of hard driving. Think about it for a second, that alternator has to be able to take the punishment of high revs and high heat. Again there is no way a GM alternator off a Buick could withstand that over time. The money you are saving upfront with this mod is going to be short lived when you continually need to replace it. Therefore in the long run I personal think the FD alternator would be the way to go just because it would be cheaper in those aspects.
BUT hey I could be wrong!
Other than that, you have a very well put together engine bay!!!!
07-15-06, 01:23 AM
#36
Beast Mode
iTrader: (8)
Join Date: Mar 2002
Location: USA!
Posts: 820
Likes: 0
Received 0 Likes
on
0 Posts
Originally Posted by keithrulz
because ya.. spinal compression... ill pass
If you want I have a complete Auto Power 6 point roll cage Im thinking about selling.
07-15-06, 09:10 AM
#38
Originally Posted by trueimport
The only concerns I have with this mod are these.......
How much abuse can this alternator take with only one bolt holding it up, meaning what type of HARD driving will it endure before coming lose?
The other concern is how will that Buick alternator hold up to continuous 8k rpm shifts? After all it was only designed to see at most 5k rpm
There is no way that alternator will last on an RX7 for very long. I personally have torn through several alternators new and used because of hard driving. Think about it for a second, that alternator has to be able to take the punishment of high revs and high heat. Again there is no way a GM alternator off a Buick could withstand that over time. The money you are saving upfront with this mod is going to be short lived when you continually need to replace it. Therefore in the long run I personal think the FD alternator would be the way to go just because it would be cheaper in those aspects.
BUT hey I could be wrong!
Other than that, you have a very well put together engine bay!!!!
07-15-06, 09:19 AM
#39
Originally Posted by ZeroDrift
I'm curious.. How did you go about making that, and would you have done anything else differently? I like it alot! Nice job!
hmm thats a good question. to start off. that aluminum hood is very thin. i got a marker and a level and straight edge oh ya and a sharpie. marked out the plan i drew up on cad. i didnt use a cutting wheel i used a razor blade. it takes alot of strokes to cut through all the way but it was a clean cut in the end. wouldn't recoment a razor on steel hood ofcorse lol but for the other half of ur question the only thing i MIGHT of dont diffrently was use aircraft rivets that sink themselves flush with the surface and then maybe bondo over that sand it then paint. all in all the hood was a easy project because i cept it simple it took 2 days to do and by the 3rd day sanded and i painted it i can post skreenshot of the simple cad drawing i made
07-15-06, 09:56 AM
#40
sence it seems there are alot of people interested in my car i thought id post what all is done to it
-87 turbo II engine rebuilt with 86 N/a rotors and s4 turbo trany
-no emissions/cats or idle control
-throttle body mod
-rear mounded 1000 amp battery behind passenger seat in compartment (rear seats replaced with compartments)
-electric fan
-grounding kit from ebay mounted to passenger side firewall
-grounded exhaust pipe for o2 sensor
-strut tower
-after market enkei rims yokohama parada tires 205/40/17
-short shifter
-interior carpet riped out replaced by rubberized under coating
-2.5 inch exhaust from manifolt to muffler stright
-push button ignition pannel with fuel pump toggle and round key for "on"
-fm modulator mounted in center of steering wheel flush. usb cord ran from modulator to ignition pannel under sterio to plug jump drive into
-the hood ofcorse
-sloted and drilled brake rotors nickle plated
-window tint
-gm alt
-3 pod pillar mount with boost gauge
-oil catch can
soon: real intake piping
seats and harness
rear strut tower
sacf-2
radiator plate for airflow
lsd rear end. thats right i still have the n/a diff
theres more thats all i could think of off the top of my head
07-15-06, 11:20 AM
#41
Originally Posted by trueimport
The only concerns I have with this mod are these.......
How much abuse can this alternator take with only one bolt holding it up
How much abuse can this alternator take with only one bolt holding it up
Originally Posted by trueimport
The other concern is how will that Buick alternator hold up to continuous 8k rpm shifts? After all it was only designed to see at most 5k rpm
Originally Posted by trueimport
Think about it for a second, that alternator has to be able to take the punishment of high revs and high heat. Again there is no way a GM alternator off a Buick could withstand that over time.
Your concerns are valid but I believe you'll have decent longevity from the alternator for sure.
07-15-06, 01:47 PM
#42
Beast Mode
iTrader: (8)
Join Date: Mar 2002
Location: USA!
Posts: 820
Likes: 0
Received 0 Likes
on
0 Posts
Originally Posted by classicauto
Umm, the stock one is held up by one bolt on the tension adjusting side? how is having the exact same thing inferior?
No he is only using 1 bolt not 2 in fact it is inferior
Originally Posted by classicauto
Keith covered this with the underdrive pulley....and regardless of engine speed the alternator was designed to work at a certain internal RPM - the pulley size dictates that - so using an underdrive pulley will take care of this. Not to mention if your car is seeing 8,000 rpm that much more than it is seeing idle, Id be more worried about water pump cavitation then burning out a 50 dollar alternator.
Sorry I forgot that he had the under drive pulley. I understand that the alternator RPM is not actual crank RPM but none the less the GM alternator was not designed to spin as fast as an RX7. I understand that 8k RPM is higher than idle BUT at the same time it only takes ONE 8k pull for the alternator bearing to seize. I wouldn�t worry about the water pump considering it was meant to be on a rotary and built to see 8k RPM not a grammas Buick at idle. I DO hope this mod works for him, I have never heard of anybody using a GM alternator so I thought I would put up some concerns before I put my money on it, that�s ALL.
Are you saying that the temp out put of a Buick is the same as a turbo?? The engine internal temp SURE I can see that being around the same as the Buick nut come on I would LOVE to see you say that the hot side of a turbo gets to only be 180 degrees! I�m sorry but red hot metal is not 180 degrees.
The point I was trying to make was not operation temp it was under hood temps. I was also not trying to pinpoint Keith and his set up because he obviously can dissipate the heat rater well with his hood. I was more or less speaking about the mod in general because not everybody has as low under hood temps as Keith due to them having stock hoods.
Originally Posted by classicauto
Your concerns are valid but I believe you'll have decent longevity from the alternator for sure.
Are you saying that from experience? I hope so.
07-15-06, 04:26 PM
#44
Originally Posted by Twofer
Hmm? How do you powder coat your own stuff?
its easy i got a ebay powder coater for 120 dollars i think it was. i was sceptical but i saw a guy i kno had one and saw what he did with it. it was the harbor freight one, its yellow. also you can buy any color of powder you want on ebay even kamelean (sp) in as much as you want and its very cheep. i got a 5 pound bag of 120% gloss black for 20 dollars. i did some figuring because before i got that 5 pound bag i went to sears and got a little 6 oz bag of signal blue package said it will cover 7 square feet and thats only 6 oz. the 5 pound bag will cover over 2 football fields of square surface area. other then the powder coater you need an old kitchen oven perferably electric so fumes dont explode. one that you can just put in your grauge. oh ya and store the powder bags in a frige.. it wont draw moisture that way. i made that mistake with my black and when i coat something it comes out of the oven speckled. looks kind of cool with faint white speckles but thats not what i want. so i got another bag. i did everything in that engine bay with about a hand full of powder. the bags still look full. lol anyway it is easy as painting with a spray can and it looks 10 times as good and more durable too
Last edited by R_PROWESS; 07-15-06 at 04:28 PM.


 07-15-06, 06:59 PM
#47
Senior Member
Join Date: Feb 2002
Location: sav GA
Posts: 260
Likes: 0
Received 0 Likes
on
0 Posts
Originally Posted by keithrulz
sence it seems there are alot of people interested in my car i thought id post what all is done to it
-3 pod pillar mount with boost gauge
-3 pod pillar mount with boost gauge
it fit fine in the rx7?
i can only find 2 pod pillar mount
07-15-06, 07:13 PM
#49
Originally Posted by tri_tam
what kind of car is for?
it fit fine in the rx7?
i can only find 2 pod pillar mount
it fit fine in the rx7?
i can only find 2 pod pillar mount
its a cheapest universal one i could find on ebay. and no lol it does not fit well. i did alot of cutting and it still doesnt fit perfectly but works and looks good enouth for me