
JerryLH3's RX-7 Turbo II Restoration

Thread Starter

Joined: Feb 2001
Posts: 2,854
Likes: 225
From: Tampa, FL
I wouldn't bag some of the larger parts (i.e. doors) because you may be trapping humidity.
Label ALL hardware (I see you're doing this, but just reiterating). Take lots of pictures of where grommets and screws go if you don't put a good description on the bag. Sometimes this is quicker.
Nothing wrong with getting some bodywork experience on the fenders, but having said that, a new (CAPA certified is a must) fender is not that expensive, if someone other than mazda makes one. You can get them for a lot of cars, but haven't looked for one for an RX-7 recently.
Pay close attention to rust prone spots like rear wheelwell arches and rocker panels. Rustproof these at least if you're not cleaning them up to slow down the rust. Now's a good time since the interior is off and you have to drill less holes to get to these spots.
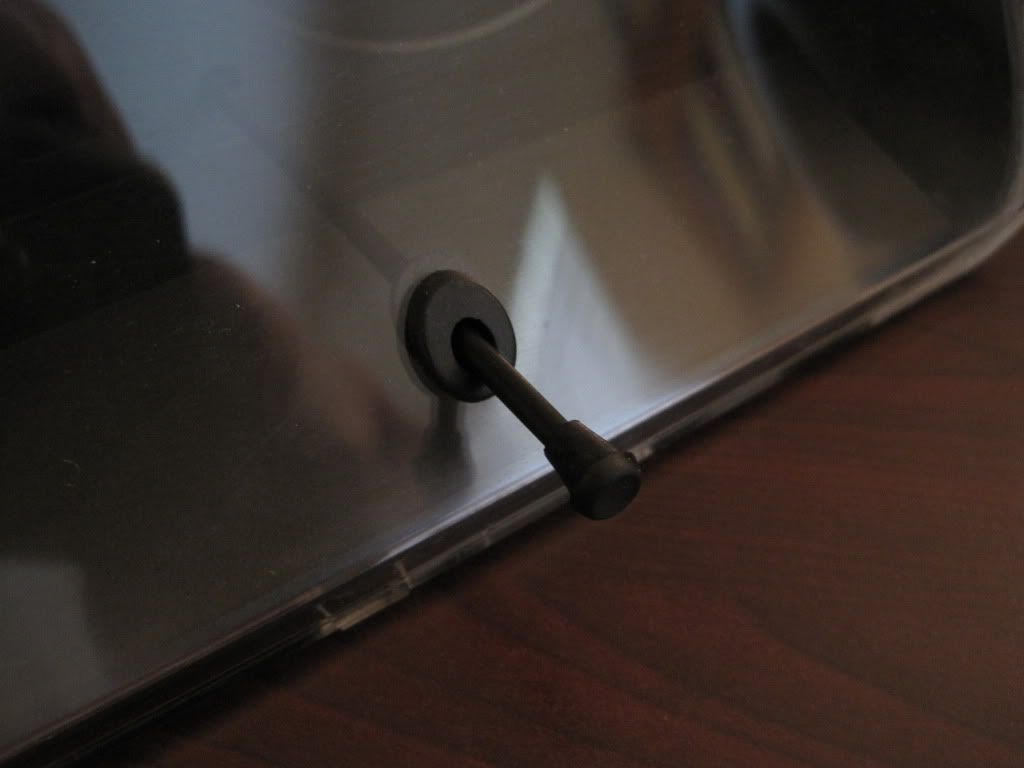
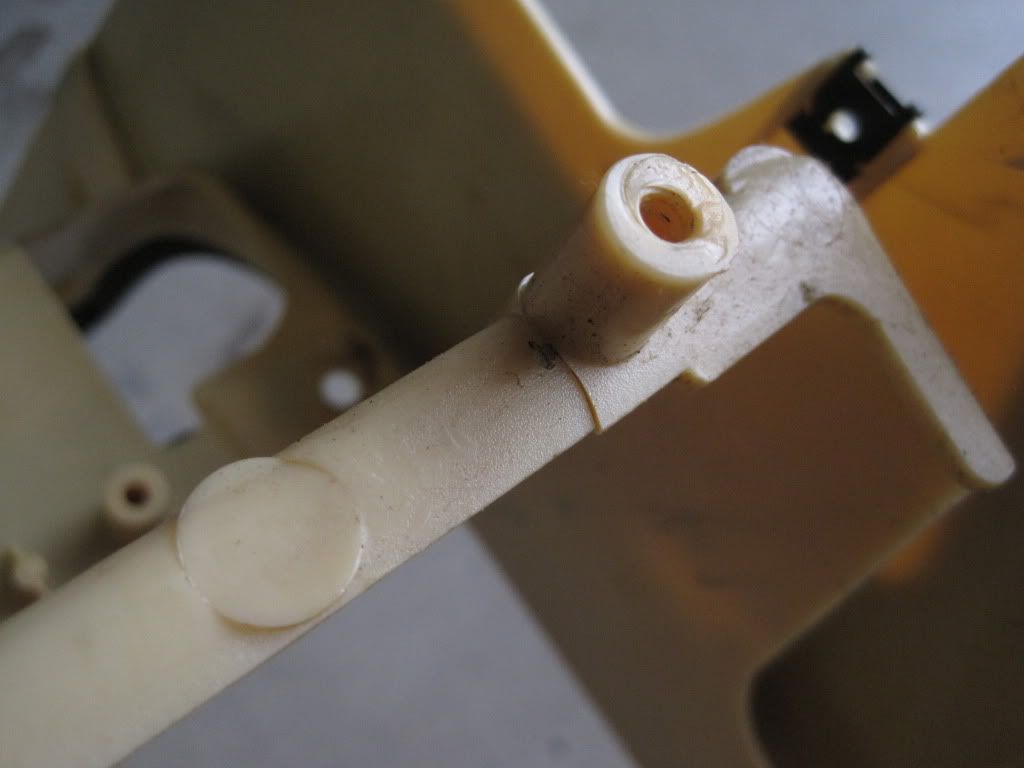
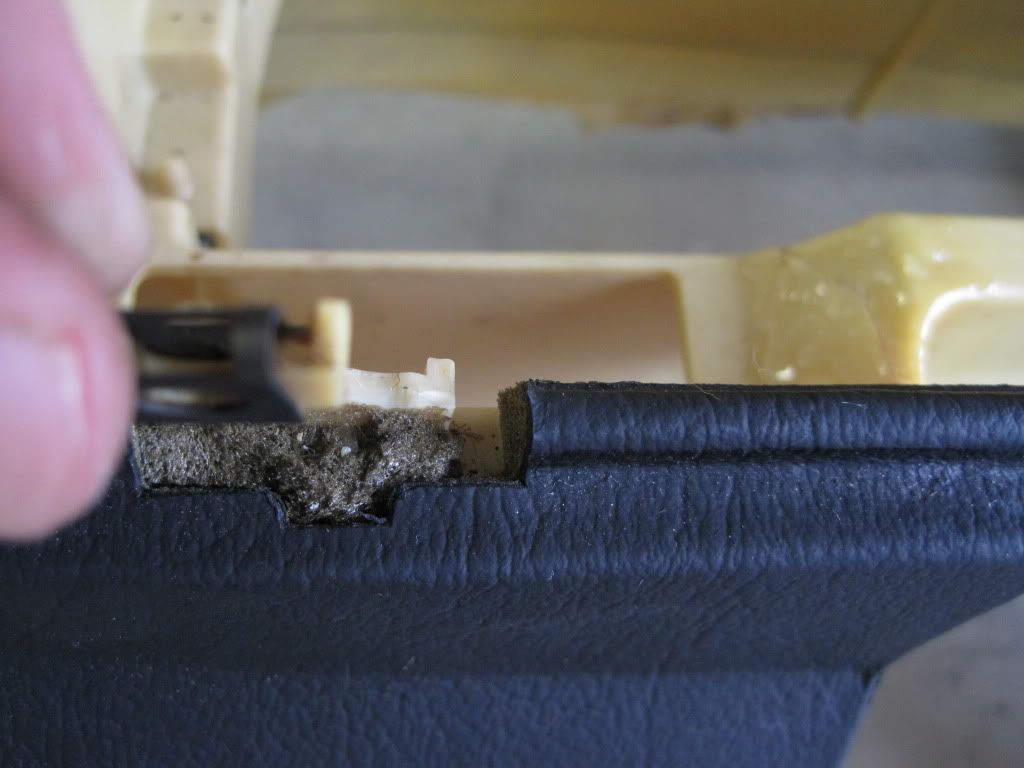
edit: lol, wth man...you loose points for cutting that plug...you should have a set of picks, tweezers, small pliers and small sloted screwdrivers....just giving some grief, lol. Oh, and some trim tools. And that horizontal trim outer weatherstrip is bad on all the cars up here. Got one more to replace.
The upper strip hasn't been ordered, but is still available from Mazda. You're right, it is quite crusty as well.
edit some more: FORGOT THE MOST IMPORTANT PART. GET THE CAR APPRAISED AND MAKE SURE YOUR POLICY COVERS THE AMOUNT IN CASE OF LOSS. Otherwise, they won't care about all the money in it.
Good luck....and subscribed.
Thanks, I might need it!
Thread Starter
Joined: Feb 2001
Posts: 2,854
Likes: 225
From: Tampa, FL
In my last post I made yesterday afternoon, I made reference to trying to save some of my hatch trim. It is faded and has some scratches on it, but finding replacements in "perfect" condition is next to impossible, especially since I can't personally inspect most of what is available before I purchase. The internet has been a vast help in locating and sourcing parts for this restoration, but parts always look better in pictures than they do in person.
There are basically two options when it comes to trying to restore a piece of faded plastic trim:
Option one is very hopeful and can work in some instances, but if you would describe the color of a supposed black trim piece as "gray" then it probably needs option two. I looked at my options at the auto parts store and the two best candidates for refinishing were already on my paint shelf. I took two trim pieces from a pile of trim I picked up for next to nothing a couple of years ago and refinished them both to see which option I liked best. Here are the two identical pieces before refinishing:

I have no clue where these pieces go. I believe they may be a convertible trim piece, but I can't confirm that. I know I don't ever recall seeing them on a coupe. They both were in good shape and wouldn't need refinishing, but I had to test for proof of concept.
The two paints I used were the same Dupli-Color Trim Paint I used a while back on the headlight trim and Dupli-Color Dash and Vinyl Covering. The trim is supposed to provide a flat finish, while the dash and vinyl covering is a gloss black. Here are the results, the Trim paint is on the left and the Dash and Vinyl covering on the right:
I like the look of the one on the left better, as the right is too glossy for my tastes. The one on the left has the look of a good piece of trim that just got cleaned and has a slightly wet appearance.
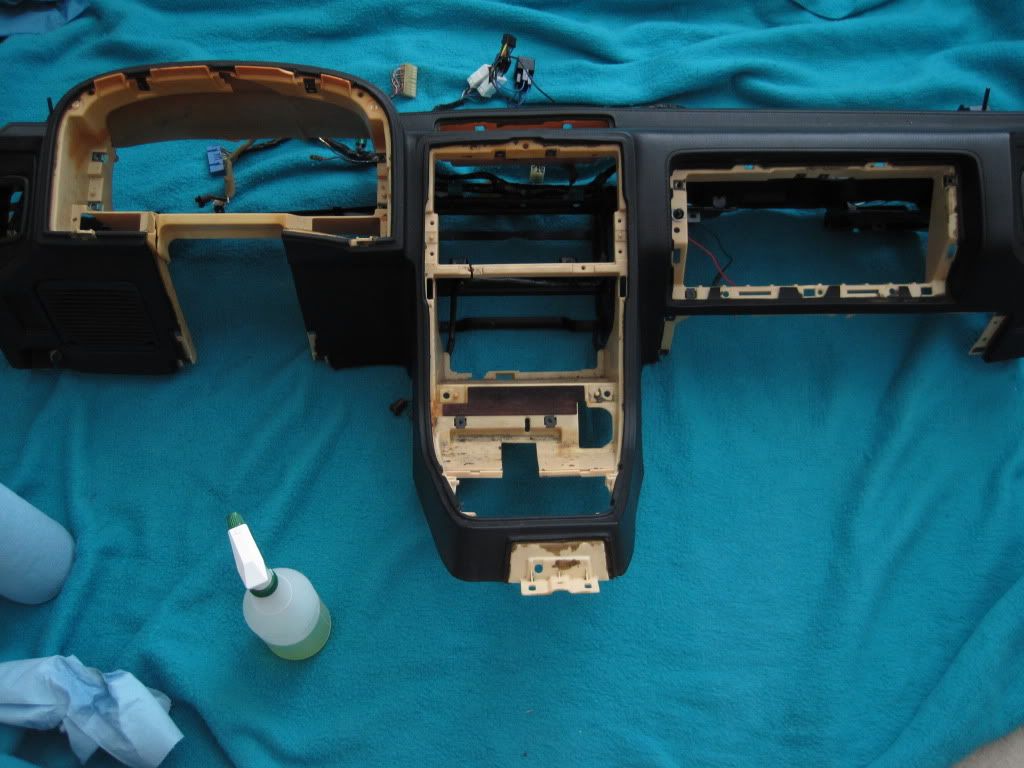
What will be getting repainted with this trim paint is the rear speaker covers and everything aft of that, almost every piece of plastic in the hatch, as mine has considerable fading. Also, the cargo bin covers will probably be painted as well, as I have amassed a few sets of these and none of them look all that great. Doing this and fixing a few minor problem areas on my dash are the next items on the to do list.
There are basically two options when it comes to trying to restore a piece of faded plastic trim:
- Repeated cleanings with an interior trim cleaner to try and restore moisture and color to the piece
- Refinish the item with some sort of paint or surface treatment
Option one is very hopeful and can work in some instances, but if you would describe the color of a supposed black trim piece as "gray" then it probably needs option two. I looked at my options at the auto parts store and the two best candidates for refinishing were already on my paint shelf. I took two trim pieces from a pile of trim I picked up for next to nothing a couple of years ago and refinished them both to see which option I liked best. Here are the two identical pieces before refinishing:
I have no clue where these pieces go. I believe they may be a convertible trim piece, but I can't confirm that. I know I don't ever recall seeing them on a coupe. They both were in good shape and wouldn't need refinishing, but I had to test for proof of concept.
The two paints I used were the same Dupli-Color Trim Paint I used a while back on the headlight trim and Dupli-Color Dash and Vinyl Covering. The trim is supposed to provide a flat finish, while the dash and vinyl covering is a gloss black. Here are the results, the Trim paint is on the left and the Dash and Vinyl covering on the right:
I like the look of the one on the left better, as the right is too glossy for my tastes. The one on the left has the look of a good piece of trim that just got cleaned and has a slightly wet appearance.
What will be getting repainted with this trim paint is the rear speaker covers and everything aft of that, almost every piece of plastic in the hatch, as mine has considerable fading. Also, the cargo bin covers will probably be painted as well, as I have amassed a few sets of these and none of them look all that great. Doing this and fixing a few minor problem areas on my dash are the next items on the to do list.
Thread Starter
Joined: Feb 2001
Posts: 2,854
Likes: 225
From: Tampa, FL
Did some searching (novel concept) and found that it is available at a lot of auto paint supply stores. I'll call some dealers or may just order it online.
Thread Starter
Joined: Feb 2001
Posts: 2,854
Likes: 225
From: Tampa, FL
Well, it's been over a week since the last update, about time for another one. A few things have been accomplished over the past week.
First, after further research about SEM Color Coat, I found a document on their site that listed formulas for specific makes and interior colors that can be mixed at an SEM distributor that has those capabilities. I found a formula for a Mazda black and contacted their technical support staff to inquire if they had any more information. Steve from SEM responded within the hour to tell me that the formula is a Mazda black from 1992. This should work for an FC interior. So, when the time comes, I'll have a couple of pints of Color Coat mixed for me and spray it myself.
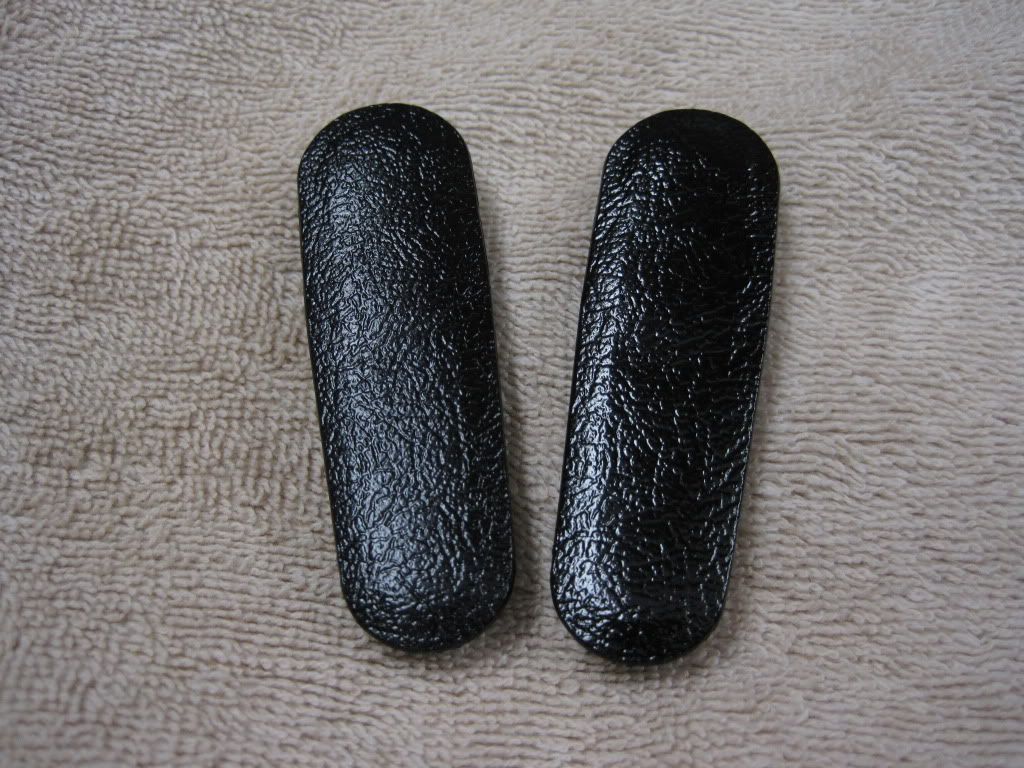
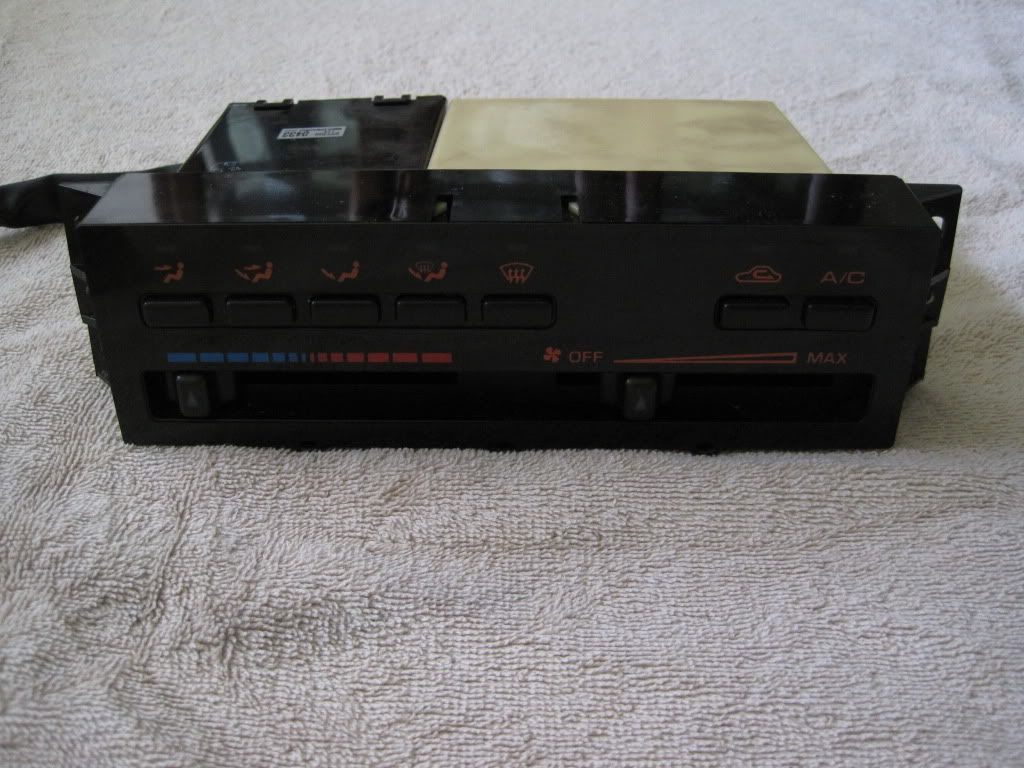
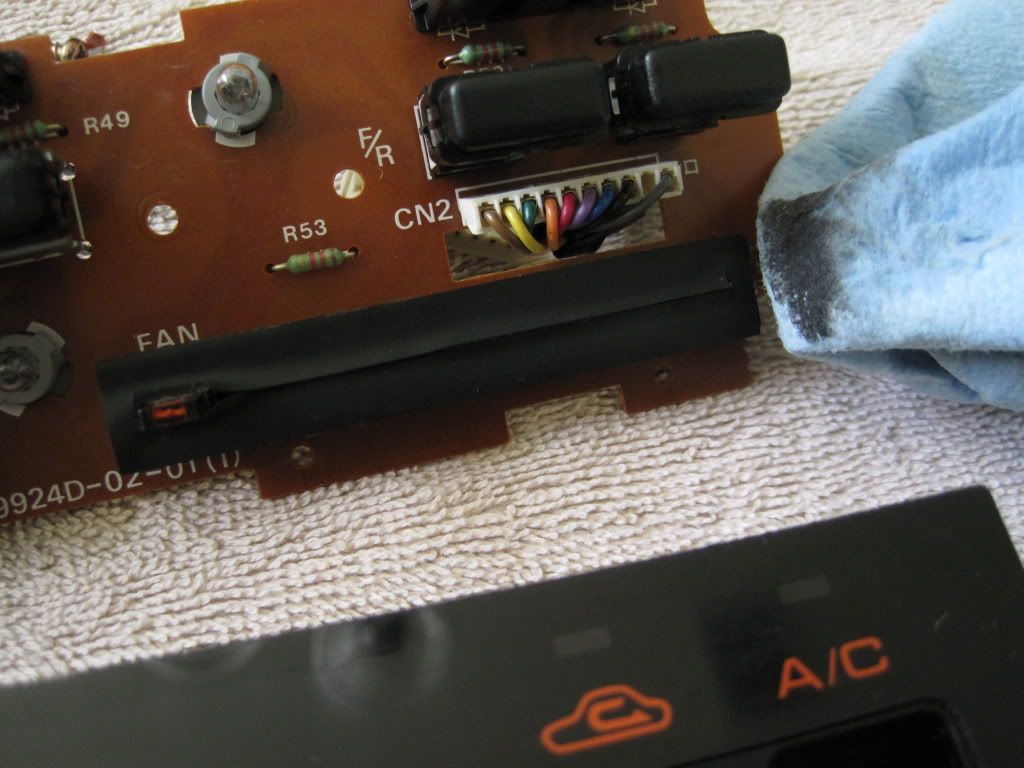
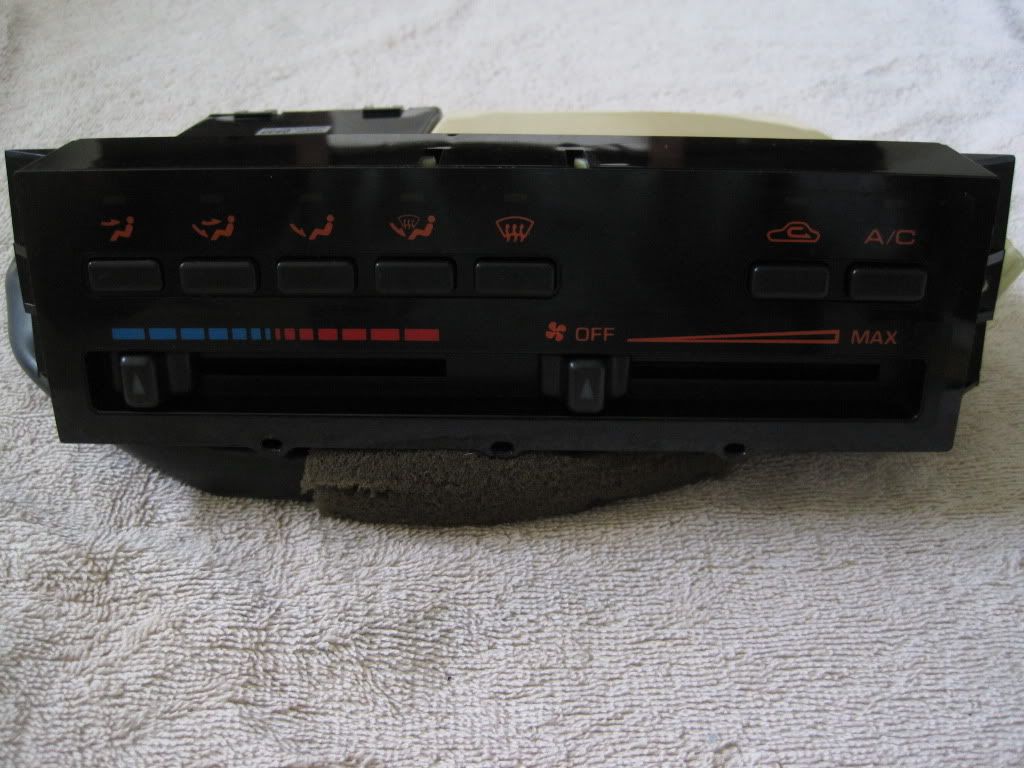
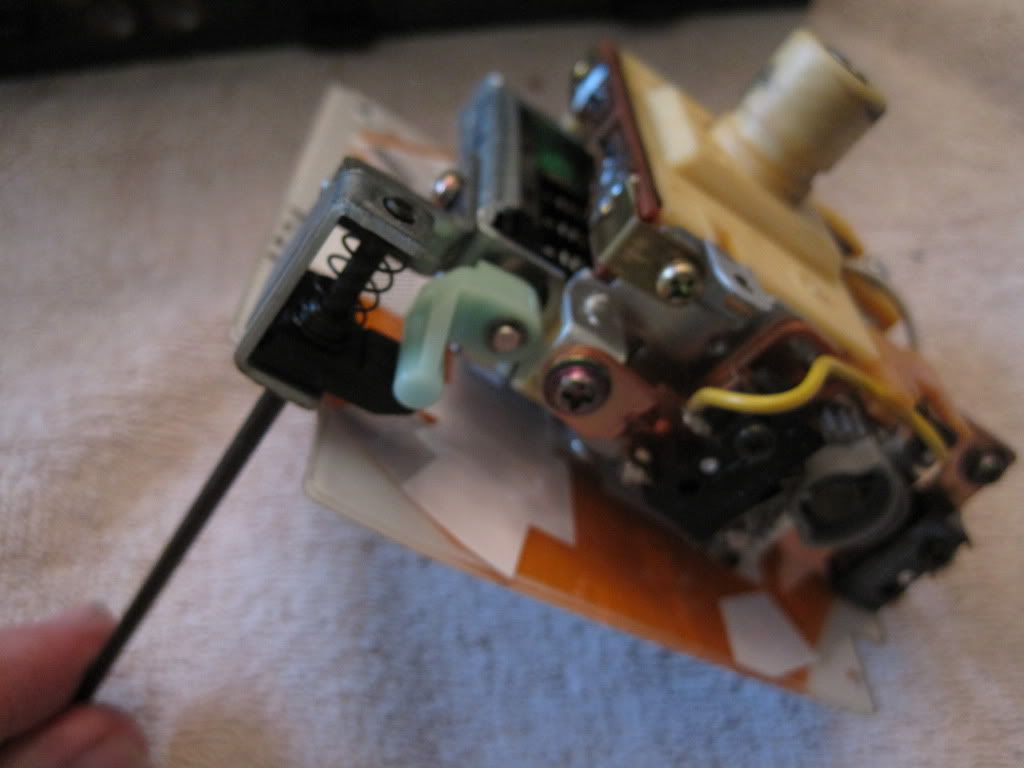
Continuing on, today I spent some time on a few mini projects. First up was the AC logicon. I finally sourced a used one from the forum classifieds in good shape, but it still needed cleaning and I went ahead and replaced the bulbs. Logicon disassembly for a thorough cleaning and bulb replacement is straightforward.
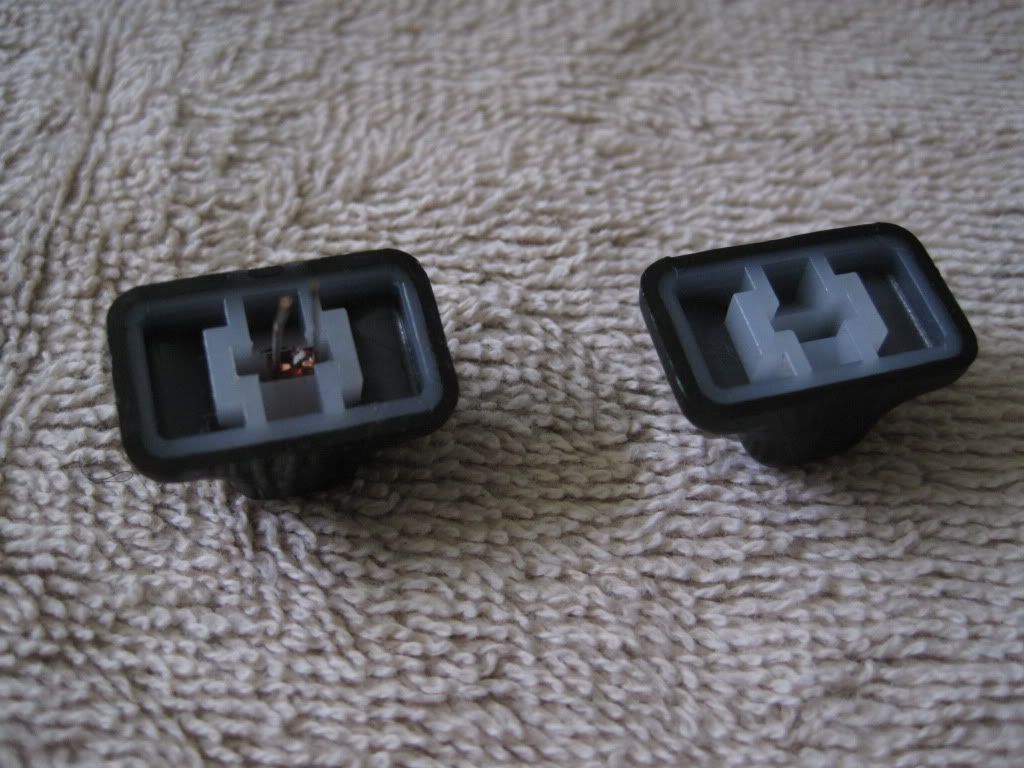
The ***** for the sliders come off first, a simple pry with a screwdriver works well. One of the bulbs on the slider came off with the ****.
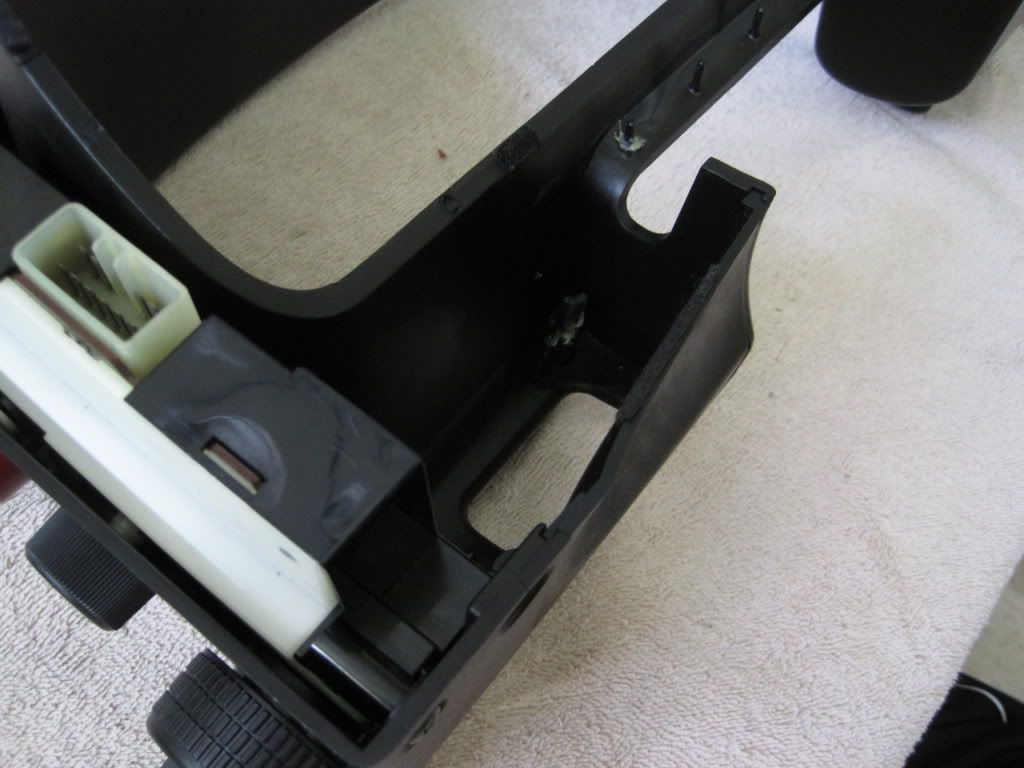
The four screws holding the logicon together can then be removed. There are also a couple of snap clips on the top and bottom that hold it together. To get further inside, the two harnesses can be disconnected from the main case of the logicon.
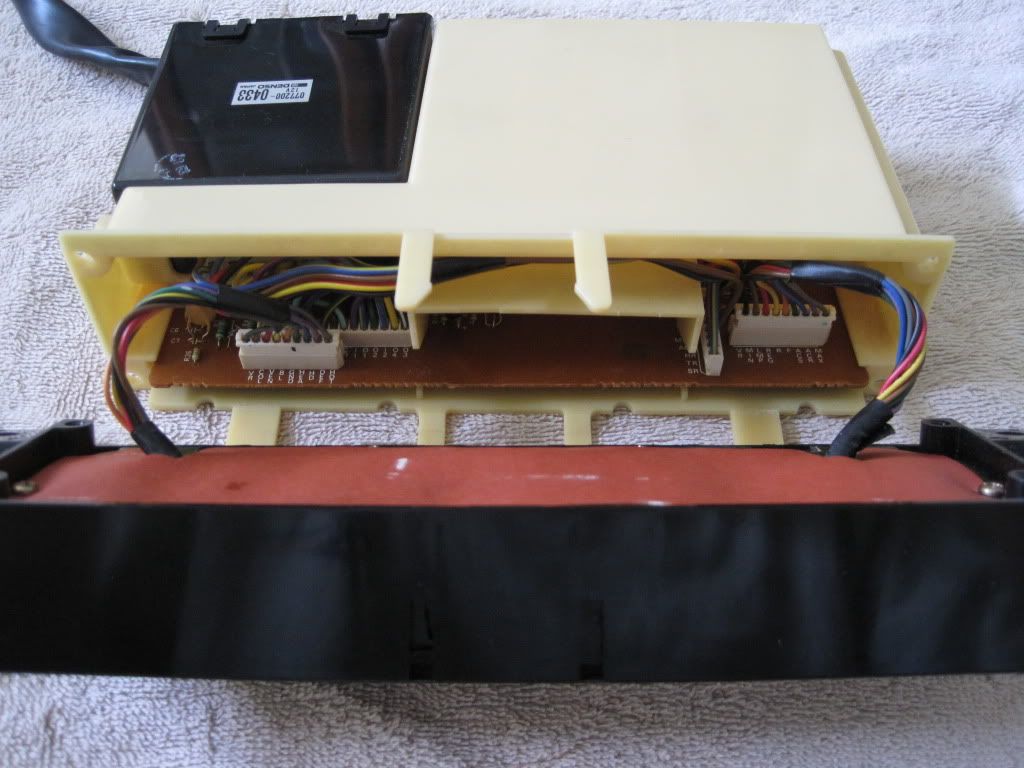
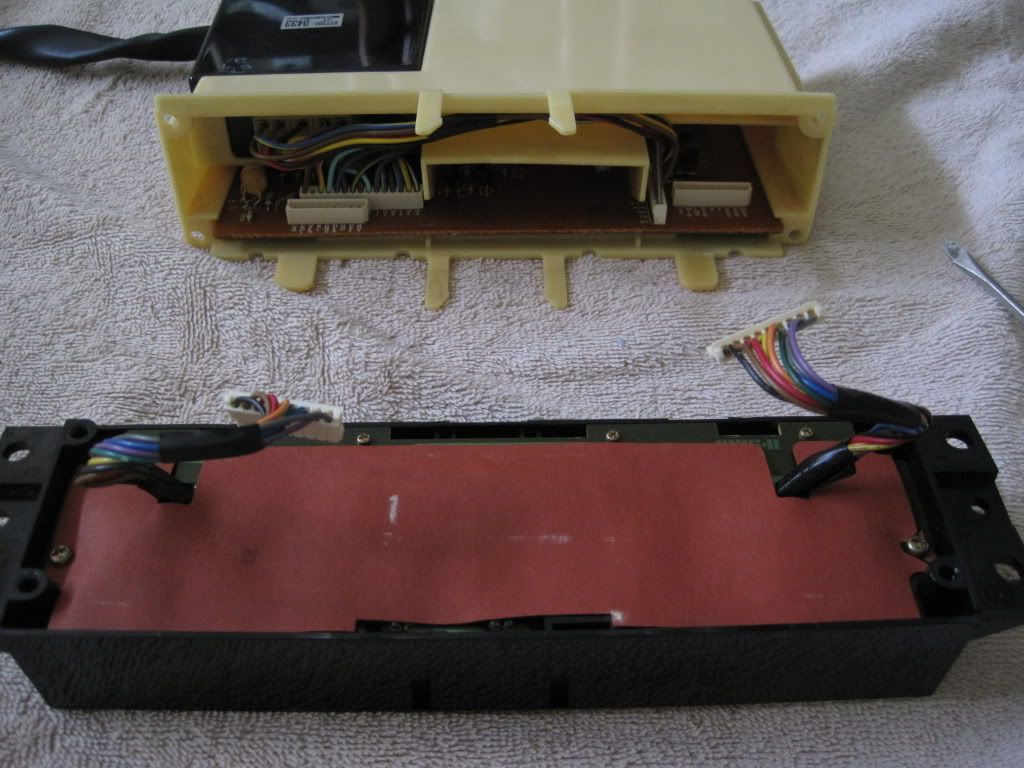
The screws holding the PCB to the front part of the case can then be removed and the logicon is completely disassembled.
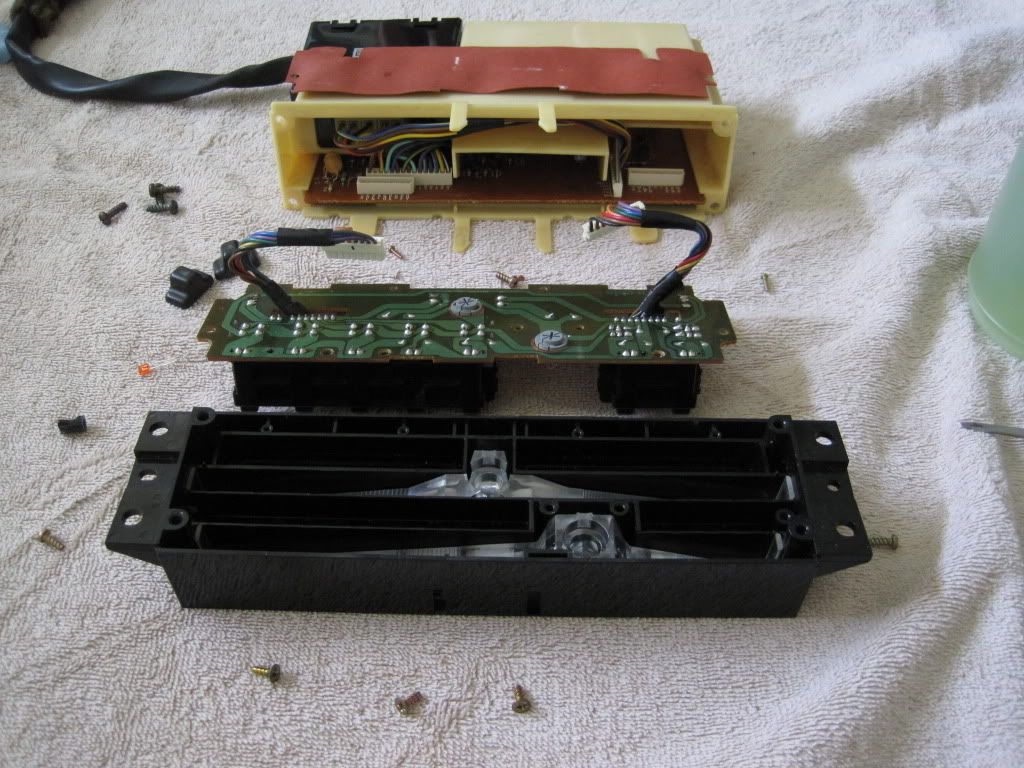
A shot of how much dirt was removed from the rubber covering of one of the sliders:
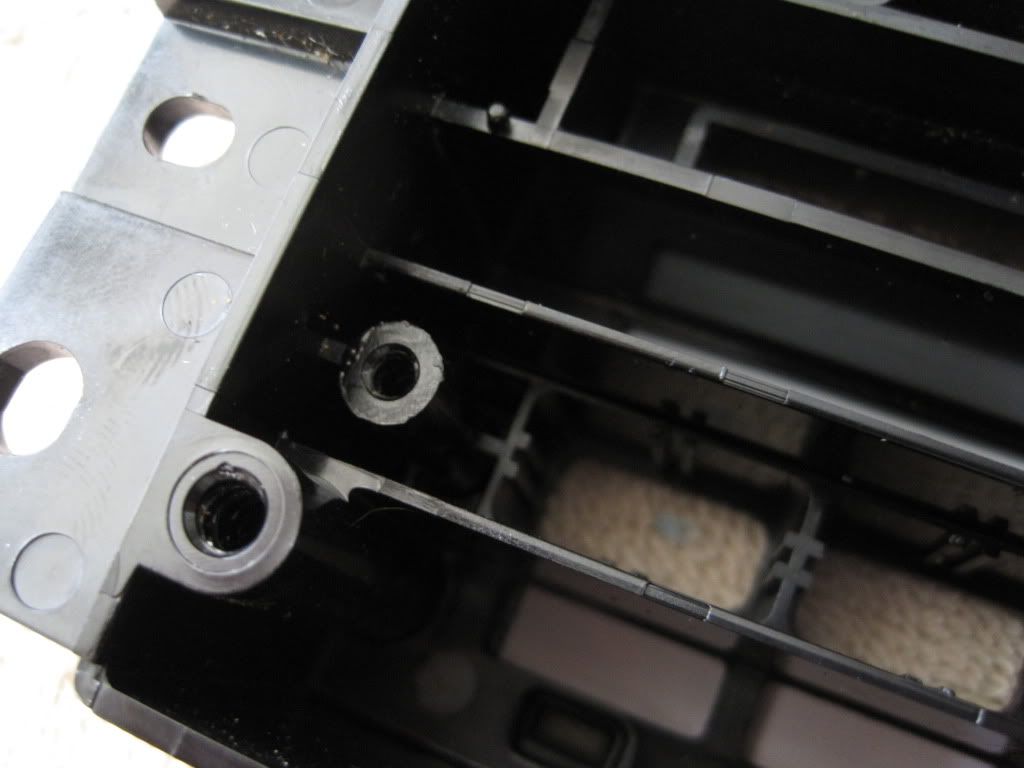
Typical FC broken plastic. One of the posts for the PCB mount broke. I epoxied it back on.
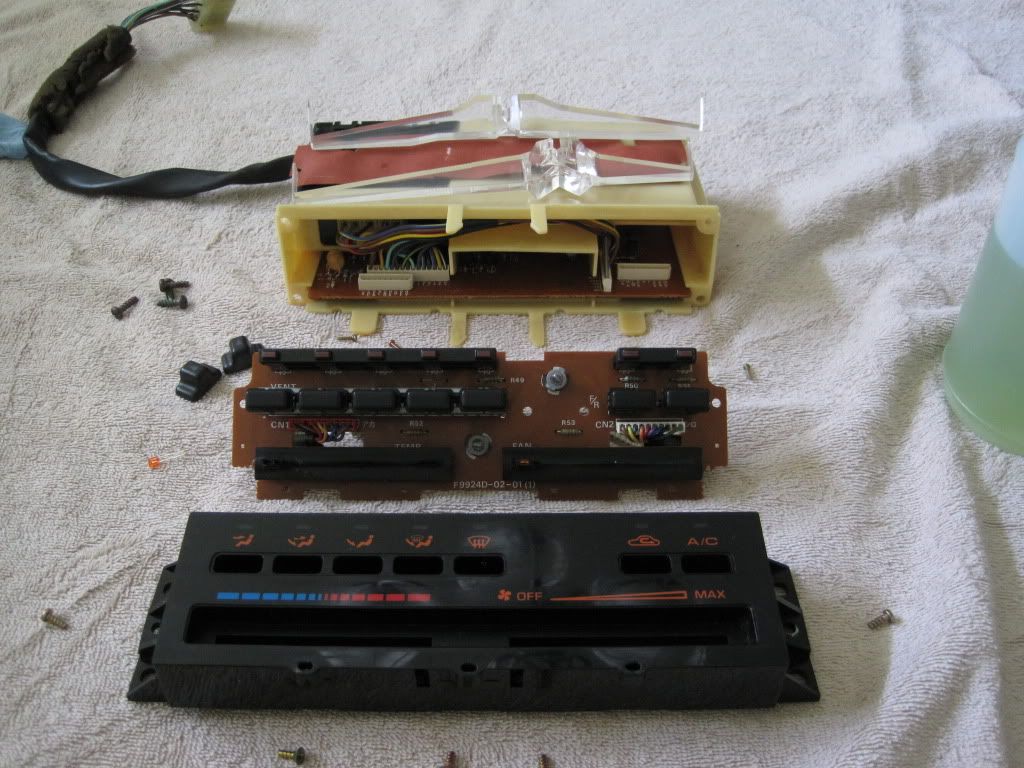
Some new bulbs and I put everything back together after all the ***** and controls were cleaned.
First, after further research about SEM Color Coat, I found a document on their site that listed formulas for specific makes and interior colors that can be mixed at an SEM distributor that has those capabilities. I found a formula for a Mazda black and contacted their technical support staff to inquire if they had any more information. Steve from SEM responded within the hour to tell me that the formula is a Mazda black from 1992. This should work for an FC interior. So, when the time comes, I'll have a couple of pints of Color Coat mixed for me and spray it myself.
Continuing on, today I spent some time on a few mini projects. First up was the AC logicon. I finally sourced a used one from the forum classifieds in good shape, but it still needed cleaning and I went ahead and replaced the bulbs. Logicon disassembly for a thorough cleaning and bulb replacement is straightforward.
The ***** for the sliders come off first, a simple pry with a screwdriver works well. One of the bulbs on the slider came off with the ****.
The four screws holding the logicon together can then be removed. There are also a couple of snap clips on the top and bottom that hold it together. To get further inside, the two harnesses can be disconnected from the main case of the logicon.
The screws holding the PCB to the front part of the case can then be removed and the logicon is completely disassembled.
A shot of how much dirt was removed from the rubber covering of one of the sliders:
Typical FC broken plastic. One of the posts for the PCB mount broke. I epoxied it back on.
Some new bulbs and I put everything back together after all the ***** and controls were cleaned.
Thread Starter
Joined: Feb 2001
Posts: 2,854
Likes: 225
From: Tampa, FL
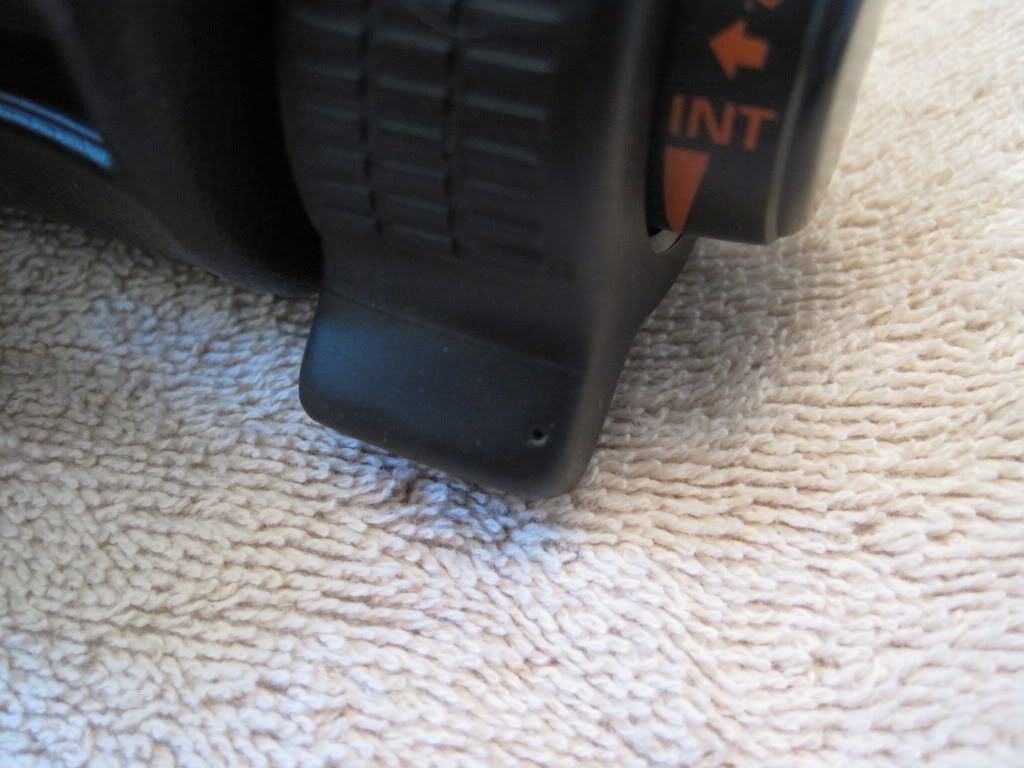
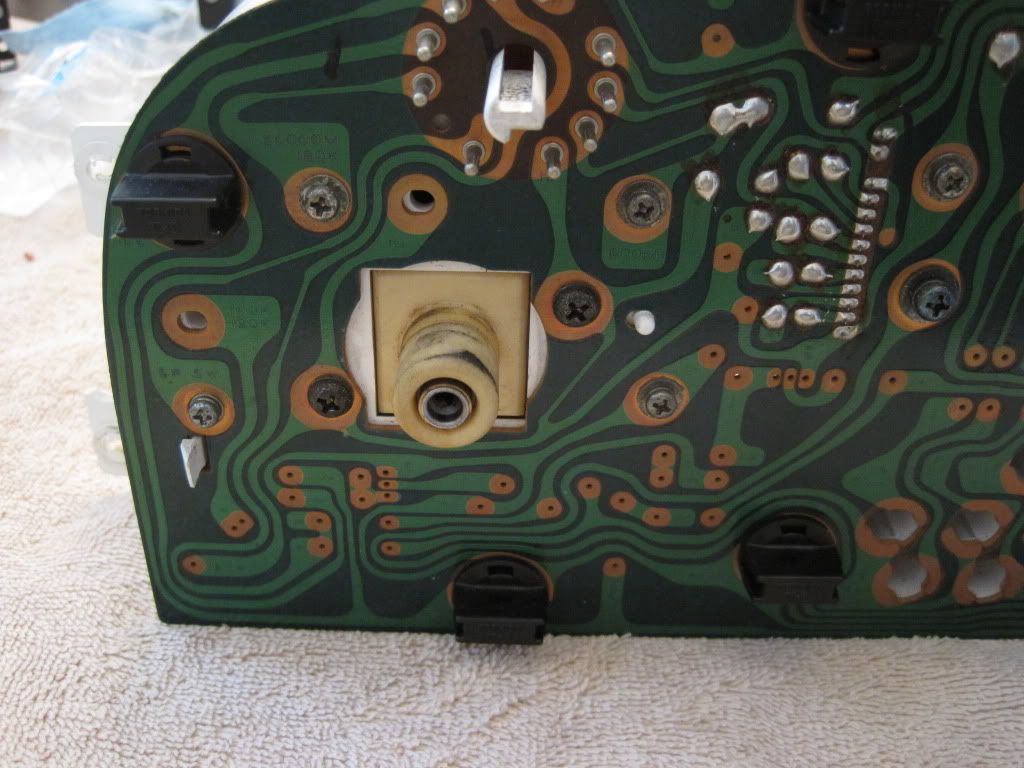
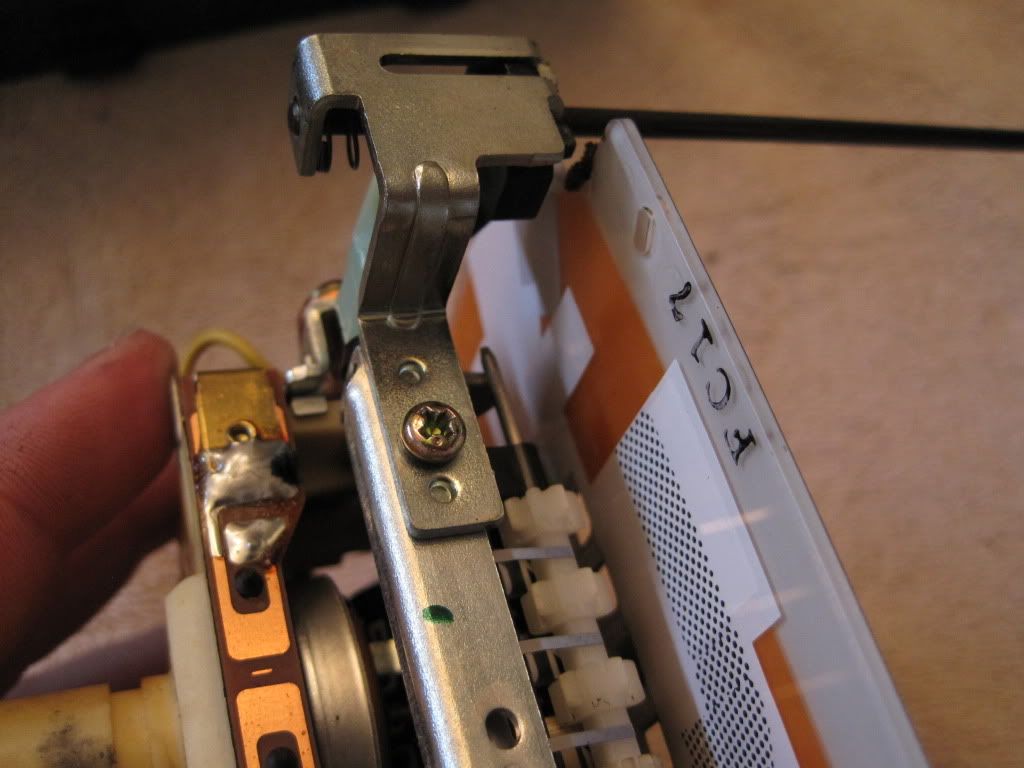
After that is was onto fixing the instrument cluster. One of the mounting posts for the cruise control switch broke a long time ago and I finally got around to fixing it. As I put the cluster down, wouldn't you know it - one of the posts for the turn signal switch broke.
I epoxied the piece of plastic that I could find, then just epoxied the switches to the remnants of the posts and inserted/screwed in the screws. It's sturdy. If a switch goes bad, it'll be a disaster, but that would have been the case if I hadn't epoxied them in. These things can't take repeated installation/removal of switches.
Apparently, a careless storage job by me has put a pinhole in one of my new *****. Bummer.
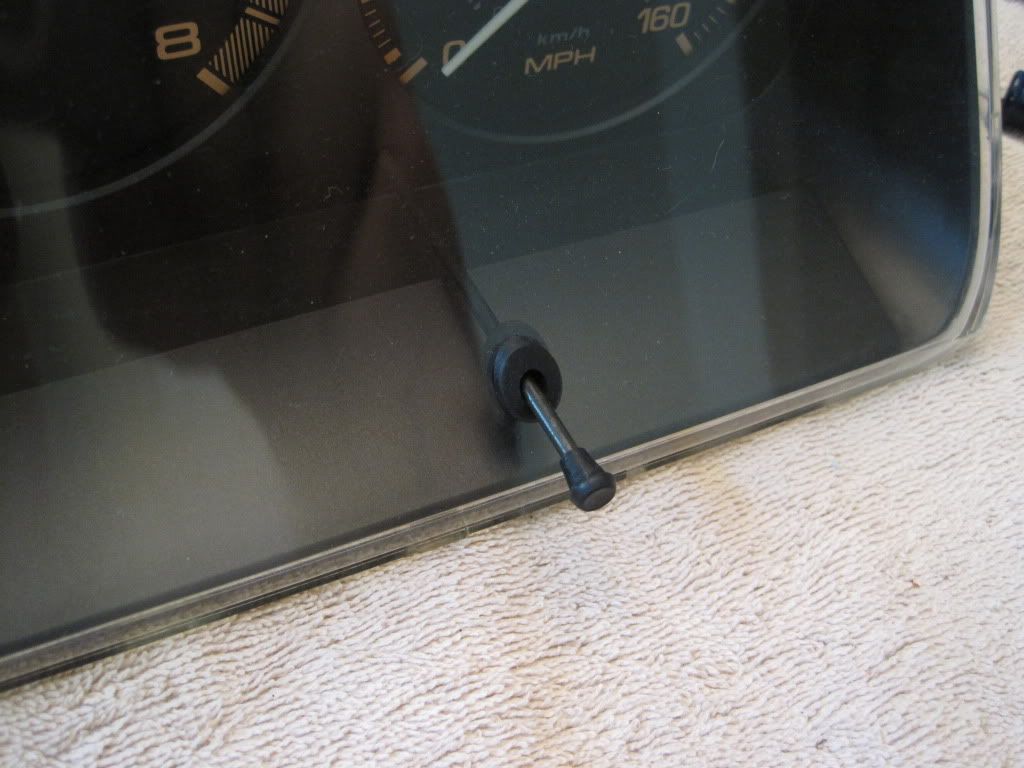
Finally, I like uniformity. So the trip odometer reset **** needed to be painted in the same fashion the clock reset **** was. Removal of the speedometer is easy enough. Just take off the **** cover and then push the plastic portion of the cluster away from the gauge housing.
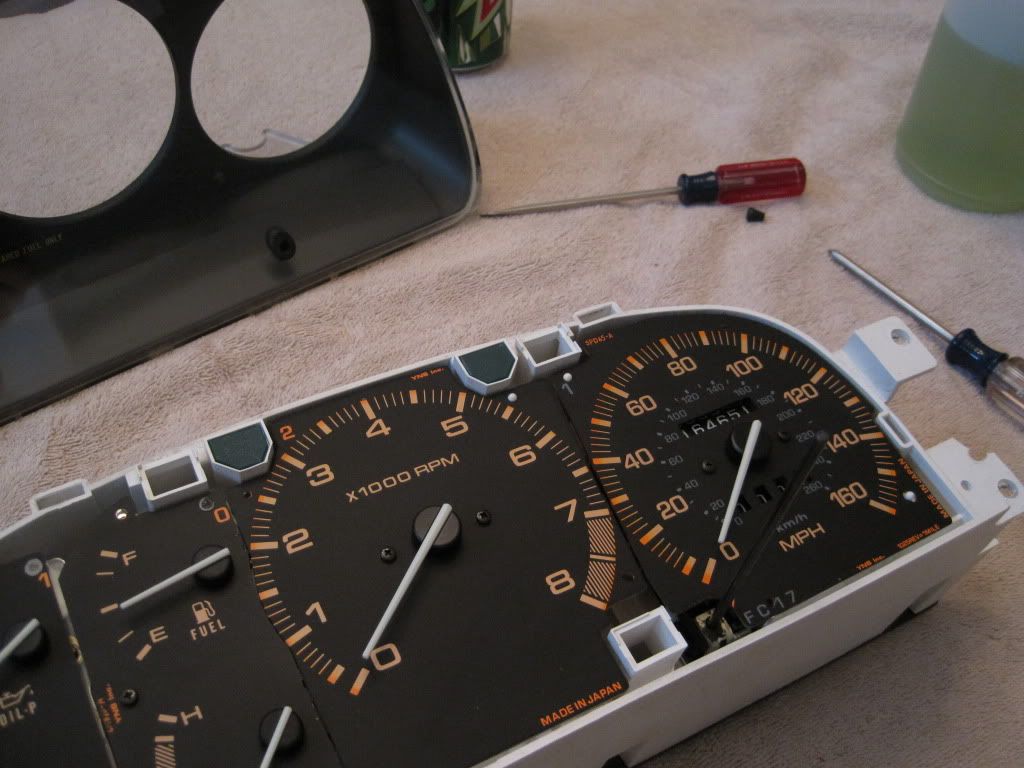
Six screws hold in the speedometer.
The reset **** assembly can be removed by undoing a simple screw. The metal **** itself can be removed after taking off a circlip which holds it into the assembly.

The **** has been sanded and primed, but it's time to throw some steaks on the grill, so I'll finish that up later.
I epoxied the piece of plastic that I could find, then just epoxied the switches to the remnants of the posts and inserted/screwed in the screws. It's sturdy. If a switch goes bad, it'll be a disaster, but that would have been the case if I hadn't epoxied them in. These things can't take repeated installation/removal of switches.
Apparently, a careless storage job by me has put a pinhole in one of my new *****. Bummer.
Finally, I like uniformity. So the trip odometer reset **** needed to be painted in the same fashion the clock reset **** was. Removal of the speedometer is easy enough. Just take off the **** cover and then push the plastic portion of the cluster away from the gauge housing.
Six screws hold in the speedometer.
The reset **** assembly can be removed by undoing a simple screw. The metal **** itself can be removed after taking off a circlip which holds it into the assembly.
The **** has been sanded and primed, but it's time to throw some steaks on the grill, so I'll finish that up later.

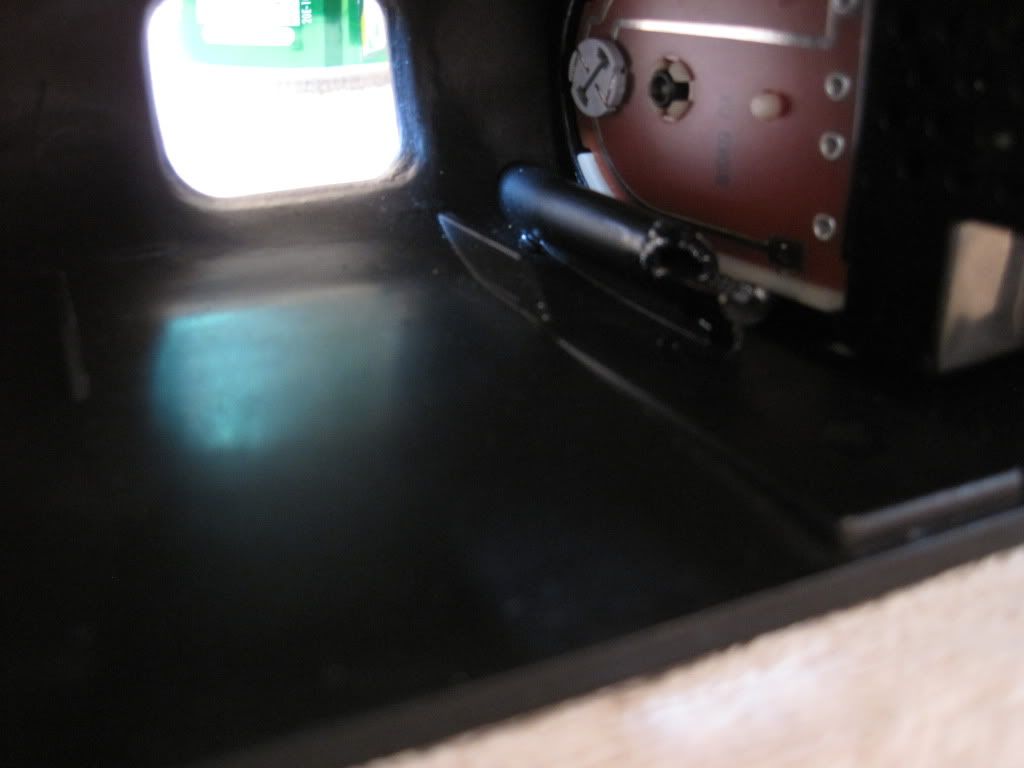
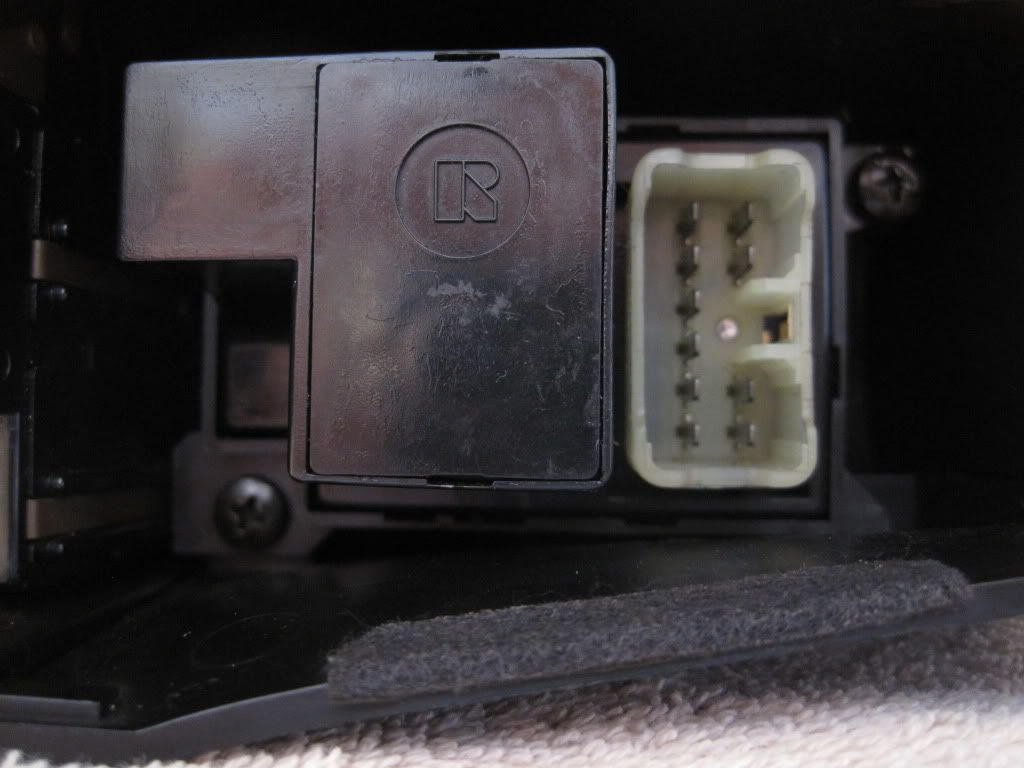
I dislike those auto belts with a passion. I've thought so many times about trying to find a nice set of black S4 or Canadian S5 trim to ditch that garbage, but I've read other people's stories of trying to track it all down and it just seems like a big headache. Especially considering if the piece isn't darn close to perfect, I won't be happy. I have the seat belt control box on my workbench and was going to clean it and attach it to the dash frame, but I had done enough today and couldn't bring myself to have that be the last thing I work on for the day.

Full Member
Joined: Dec 2010
Posts: 65
Likes: 0
From: Texas
I'm enjoying your thread Jerry!
Regarding those brittle plastic posts: they can be restored to better than new. If the post is merely split wrap the outside tightly with thread (or fiberglass thread is even better) to close the split and then saturate with ca (superglue). If the threads are stripped or there are pieces of the post that have gone missing you need to locate some aluminum tubing (K&S Engineering) available at better hobby shops everywhere. Holding the tube with vice grips, thread the self tapping screw into the metal tubing. (Hold the tube with the vice grips below the length of tube the screw will tap.) The aluminum is quite soft and you can actually see the threads being formed on the outside of the tubing. Now roll cut the metal tube to the correct length using an xacto on a hard surface, backdrill the post and glue the new metal insert into the post with epoxy. I developed this trick restoring my old HP 41CX calculator. Me and that calculator go waaaay back!
Regarding those brittle plastic posts: they can be restored to better than new. If the post is merely split wrap the outside tightly with thread (or fiberglass thread is even better) to close the split and then saturate with ca (superglue). If the threads are stripped or there are pieces of the post that have gone missing you need to locate some aluminum tubing (K&S Engineering) available at better hobby shops everywhere. Holding the tube with vice grips, thread the self tapping screw into the metal tubing. (Hold the tube with the vice grips below the length of tube the screw will tap.) The aluminum is quite soft and you can actually see the threads being formed on the outside of the tubing. Now roll cut the metal tube to the correct length using an xacto on a hard surface, backdrill the post and glue the new metal insert into the post with epoxy. I developed this trick restoring my old HP 41CX calculator. Me and that calculator go waaaay back!
Last edited by Cratecruncher; Jul 5, 2011 at 11:07 AM.

Jerry,
I used a repair similar to the one shown in the following link to repair the broken posts in my instrument cluster (turn signals, cruise switch, wiper and headlight switches)
http://www.slotcarcorner.com/pages/B...placement.html
It's been almost 6 months now, and it's holding solid. I'm not gentle with the switches either.
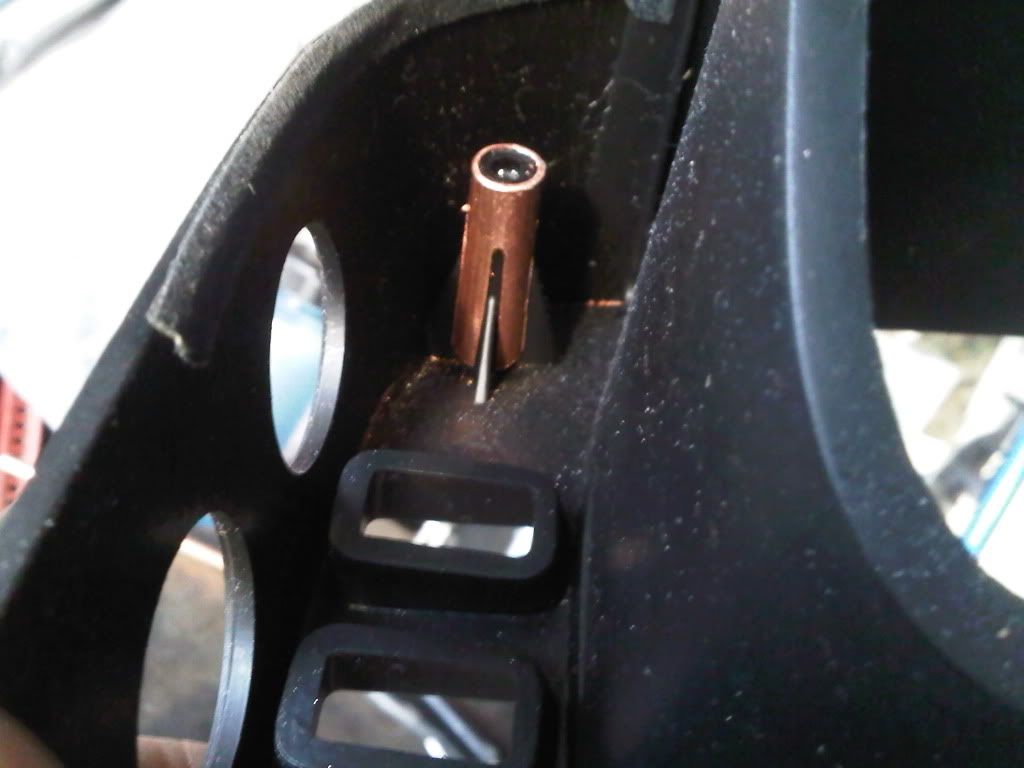
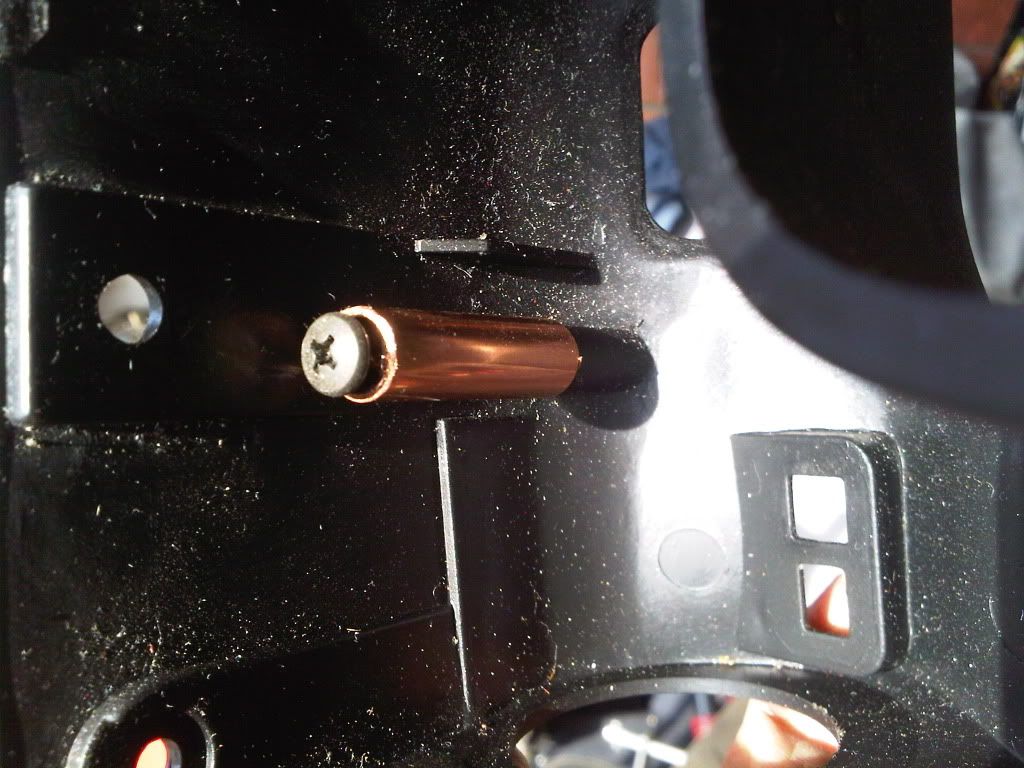
You would have to shave down the "registers" on the switches themselves, as the copper reinforcement increases the overall diameter of the post. Shaping the copper pieces with a normal angle grinder with a cutoff wheel was an exercise in dexterity - it would be much easier if you have a dremel!
I used a repair similar to the one shown in the following link to repair the broken posts in my instrument cluster (turn signals, cruise switch, wiper and headlight switches)
http://www.slotcarcorner.com/pages/B...placement.html
It's been almost 6 months now, and it's holding solid. I'm not gentle with the switches either.
You would have to shave down the "registers" on the switches themselves, as the copper reinforcement increases the overall diameter of the post. Shaping the copper pieces with a normal angle grinder with a cutoff wheel was an exercise in dexterity - it would be much easier if you have a dremel!
Thread Starter
Joined: Feb 2001
Posts: 2,854
Likes: 225
From: Tampa, FL
I love the ideas posted on instrument cluster fixes. Excellent stuff. If I ever have to replace a switch, I will take the time and do it right with one of those methods mentioned.
I assume you are talking about the fading? It's pretty crazy. The S5 clusters don't stay as orange as the S4s. It doesn't look bad once it's back in the shade of the cluster, but it looks fairly pinkish in those pictures.
I did finish up painting the trip odometer reset **** and got that all back together.
Next, I'm turning my attention to the rough spots on the dash:
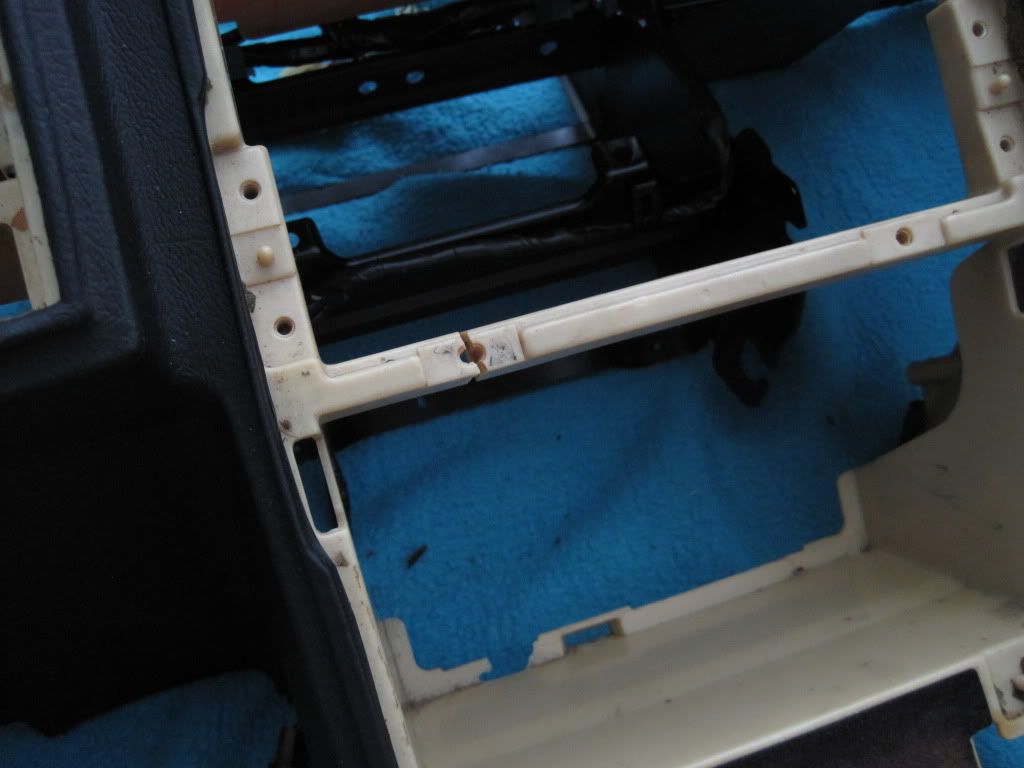
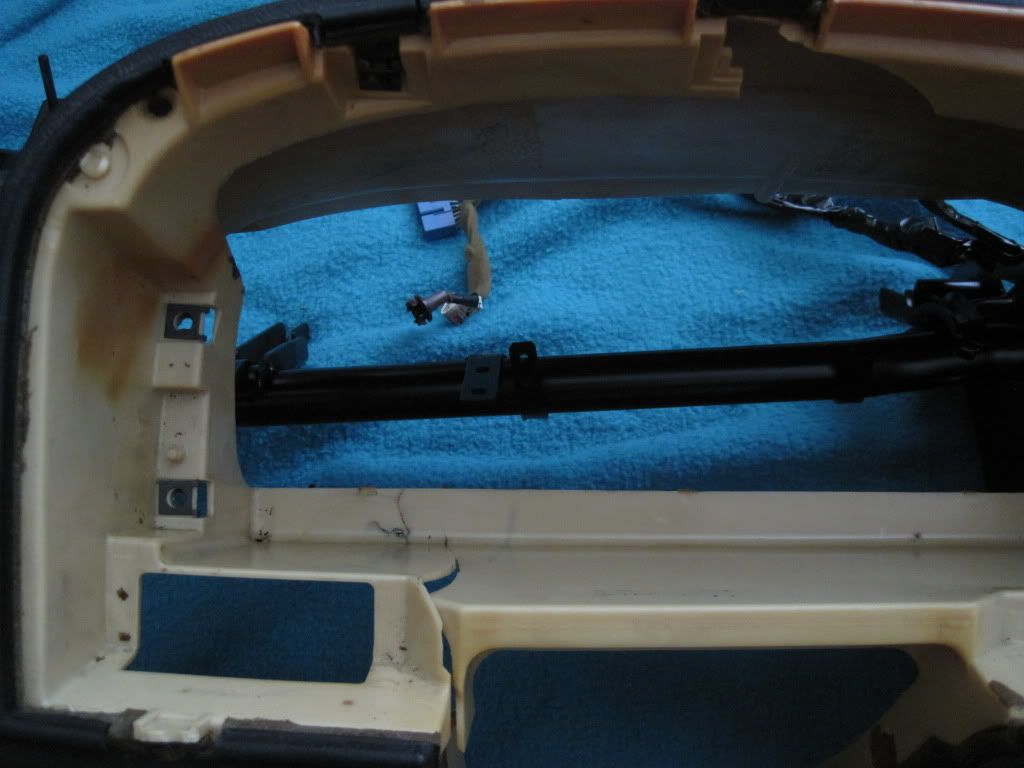
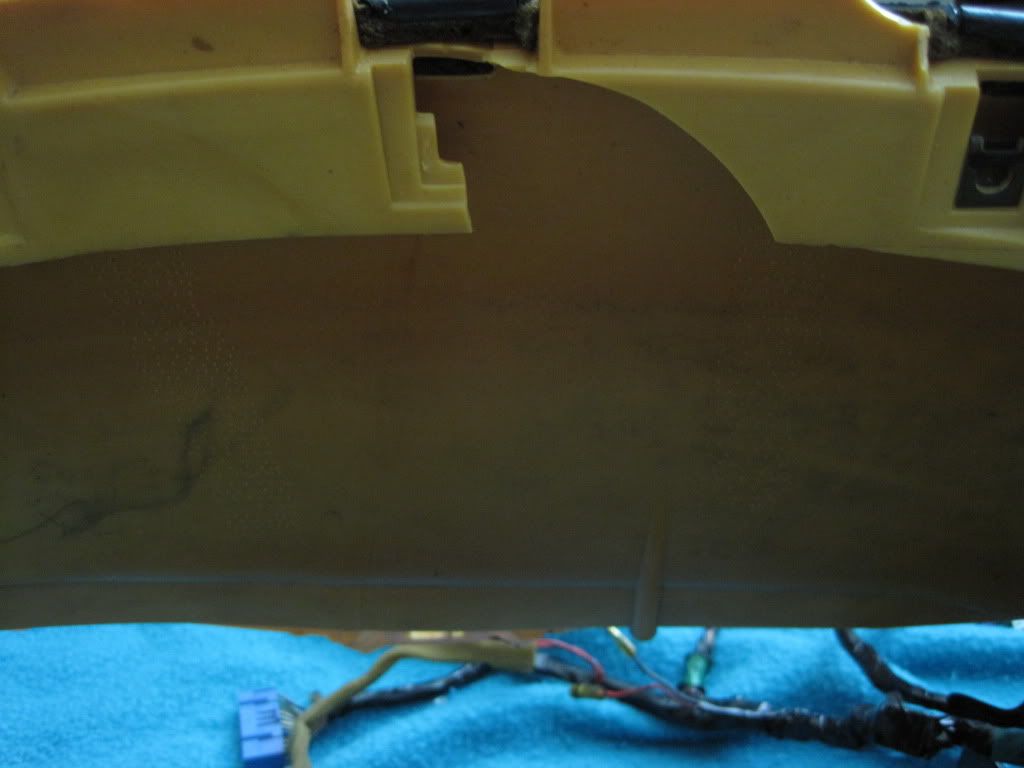
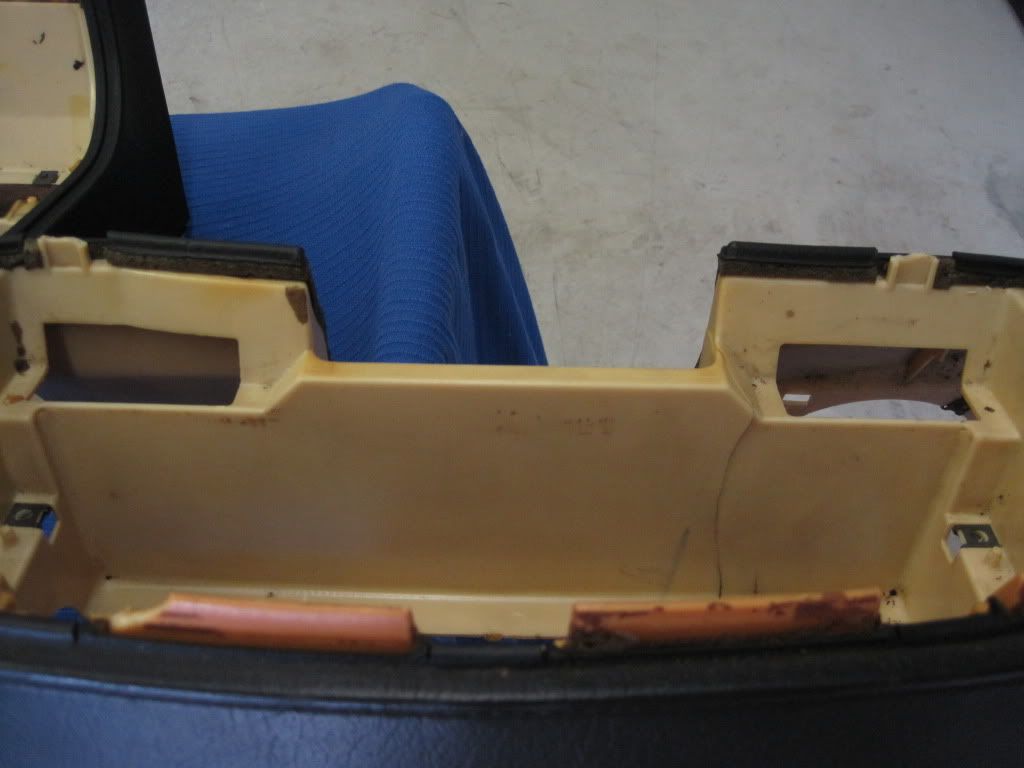
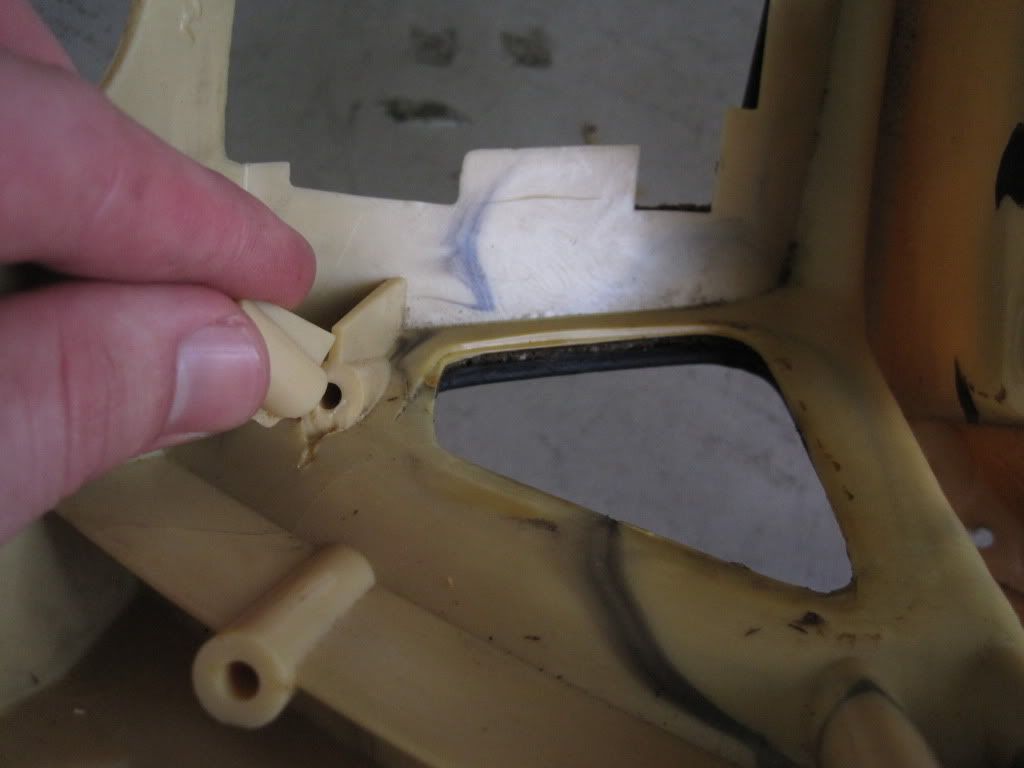
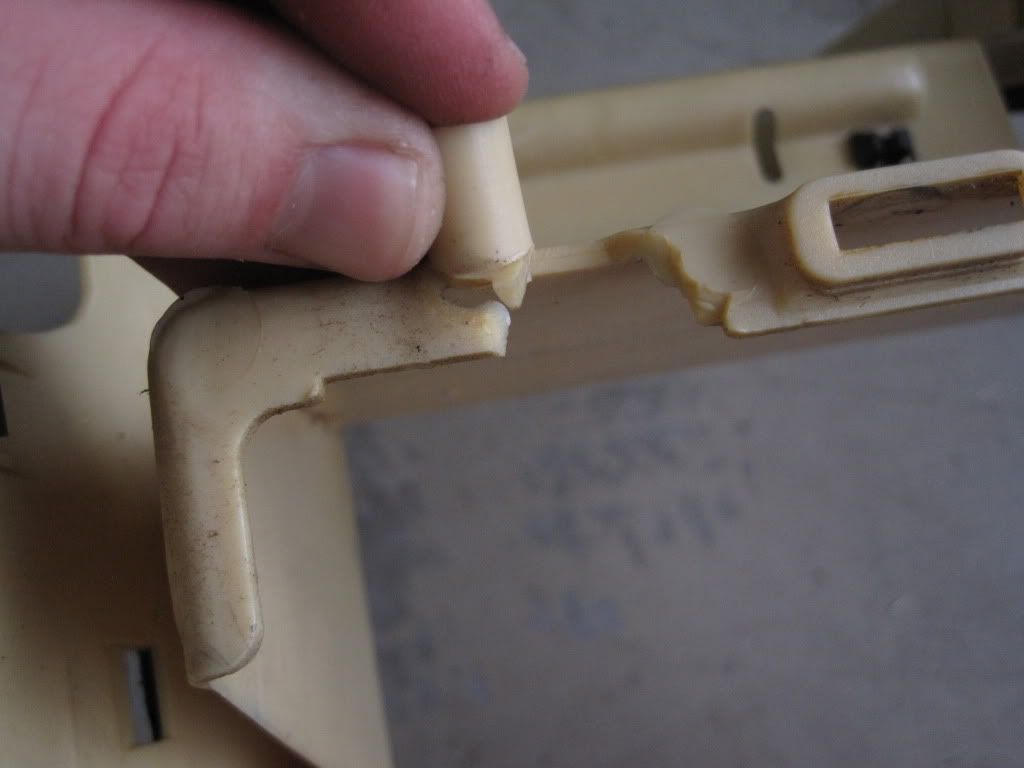
The broken mounts have already been epoxied back into place. I'm thinking of doing some fiberglass repairs for the cracks in the structure.
I did finish up painting the trip odometer reset **** and got that all back together.
Next, I'm turning my attention to the rough spots on the dash:
The broken mounts have already been epoxied back into place. I'm thinking of doing some fiberglass repairs for the cracks in the structure.
 Every time I remove any plastic trim I think about how it's going to blow up like a bomb...and where I left the epoxy. Really nice work so far.


Thread Starter
Joined: Feb 2001
Posts: 2,854
Likes: 225
From: Tampa, FL
I haven't looked at the mounts on the dash I fixed, but I think I came out on top there. It's time to tackle the random cracks next. The instrument cluster is very sturdy, even with just the epoxy. It stays for now.
As far as what epoxy, I am using, it is just standard 5 minute set epoxy I bought at Advance Auto.
I haven't posted anything lately, but work has been getting done in the background. I set aside my best set of hatch trim, storage bins and some other bits to be refinished at a later date. I need to start clearing some space in the garage for a couple weeks from now. Let's just say it will look like I'm actually doing something. I'm taking a week of vacation and the RX-7 will be getting plenty of attention.
Thread Starter
Joined: Feb 2001
Posts: 2,854
Likes: 225
From: Tampa, FL
I'd say it's about time for an update. Lots of work was completed yesterday and will be throughout the week as I am on vacation as is a friend of mine.
So, on to the work...
I've about reached the point where cleaning and restoring parts that I've already taken off of the car has come to a close. There are still some things that need attention - seats, taillights, etc, but the time has finally come to shift my attention to the car. There are many things to do there - suspension replacement, new exhaust, and the actual body work and paint itself. I'm also still tossing the idea around of a preemptive rebuild.
Yesterday started with front suspension work and wheel well cleaning. First the car was jacked up, the wheel taken off and then the car was lowered onto a "jackstand".
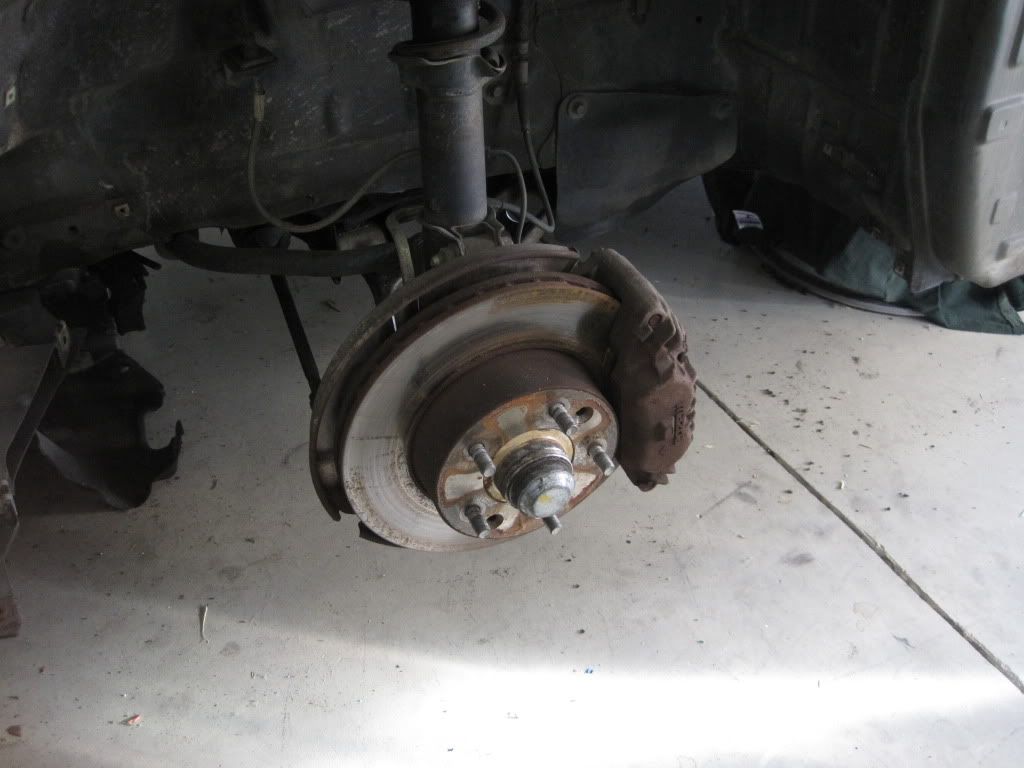
The brake caliper was the first thing to come off. A 10 mm flare nut wrench to take off the hard line and then two 17 mm bolts hold the caliper to the steering knuckle/spindle.

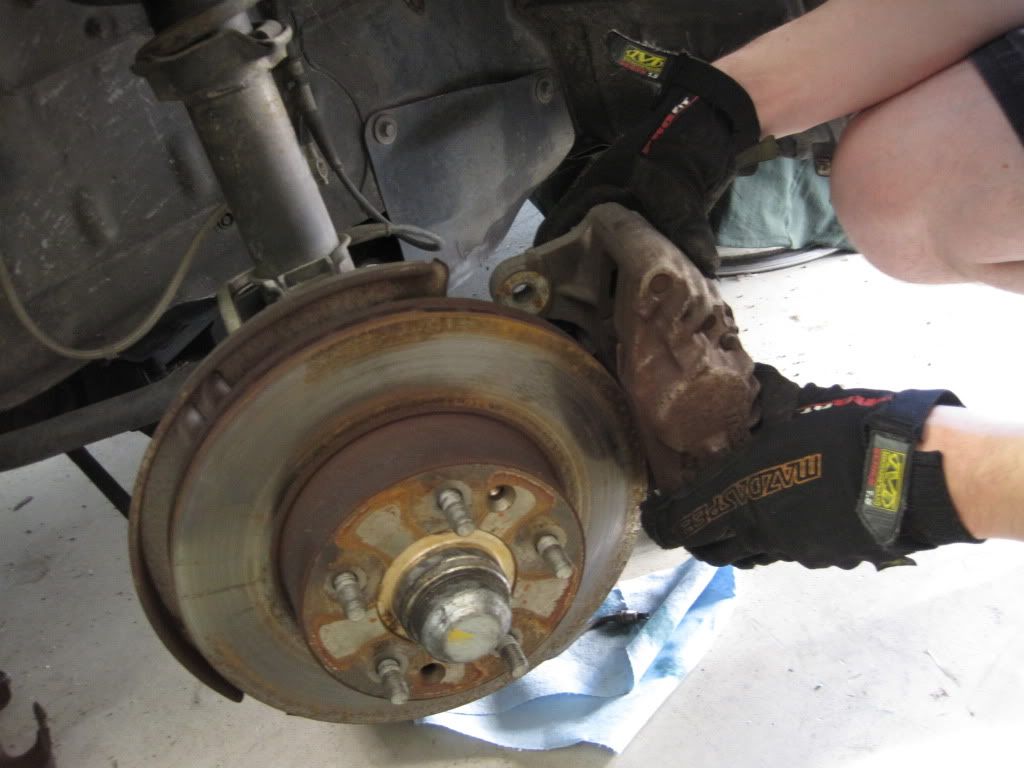
A few taps with a rubber mallet and the brake rotor was off. The screws that hold it in are non existent on this car as I had to drill them out when I replaced the rotors when I first bought it.
Next off is the hub. A hammer and chisel can CAREFULLY be used to remove the hub cap.
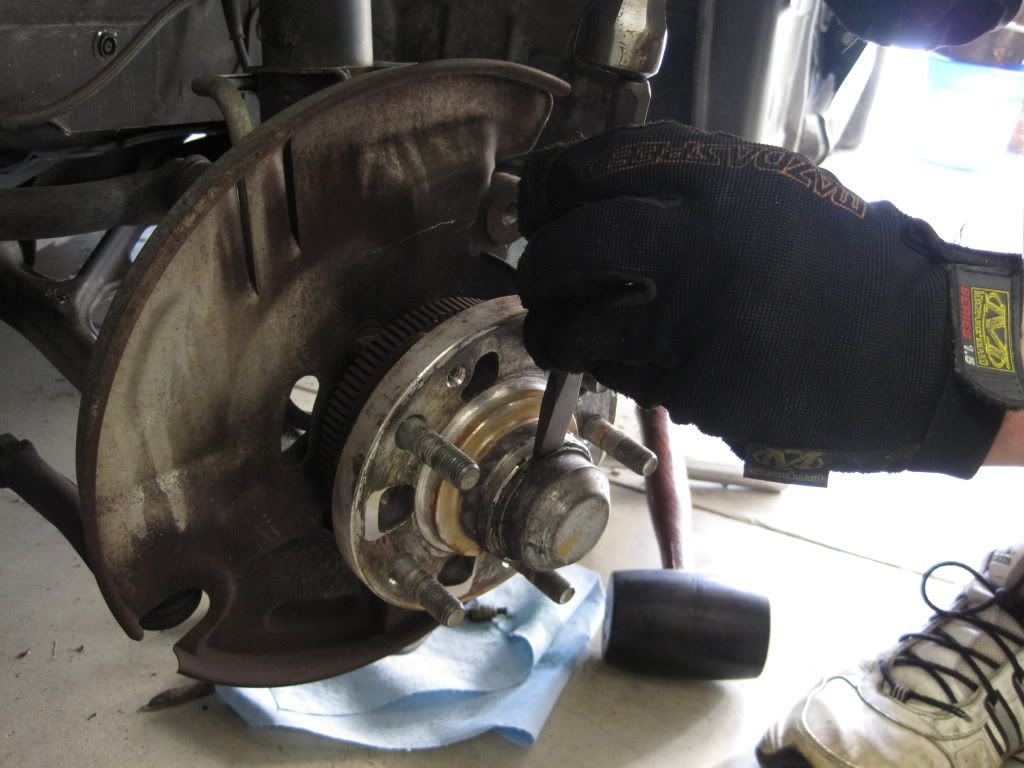

The cotter pin and set cover can then be removed. After that, the lock nut can be taken off and the hub can be pulled off of the spindle. Don't let the bearings fall out.

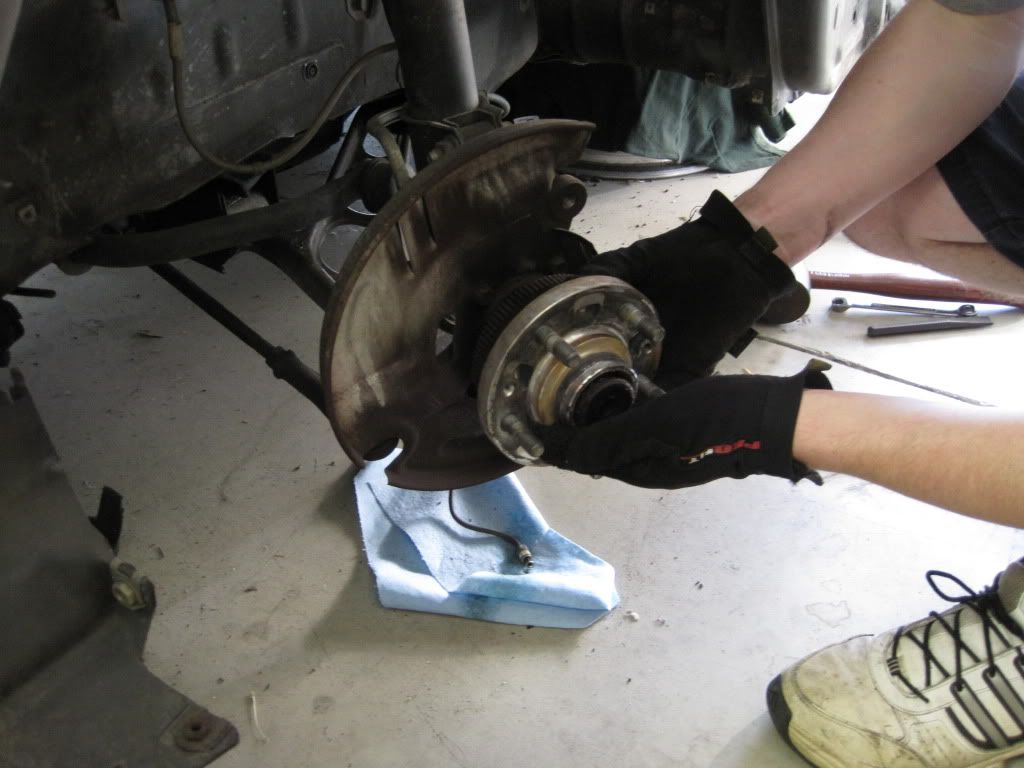
Four 12 mm bolts hold the brake shield onto the steering knuckle/spindle.
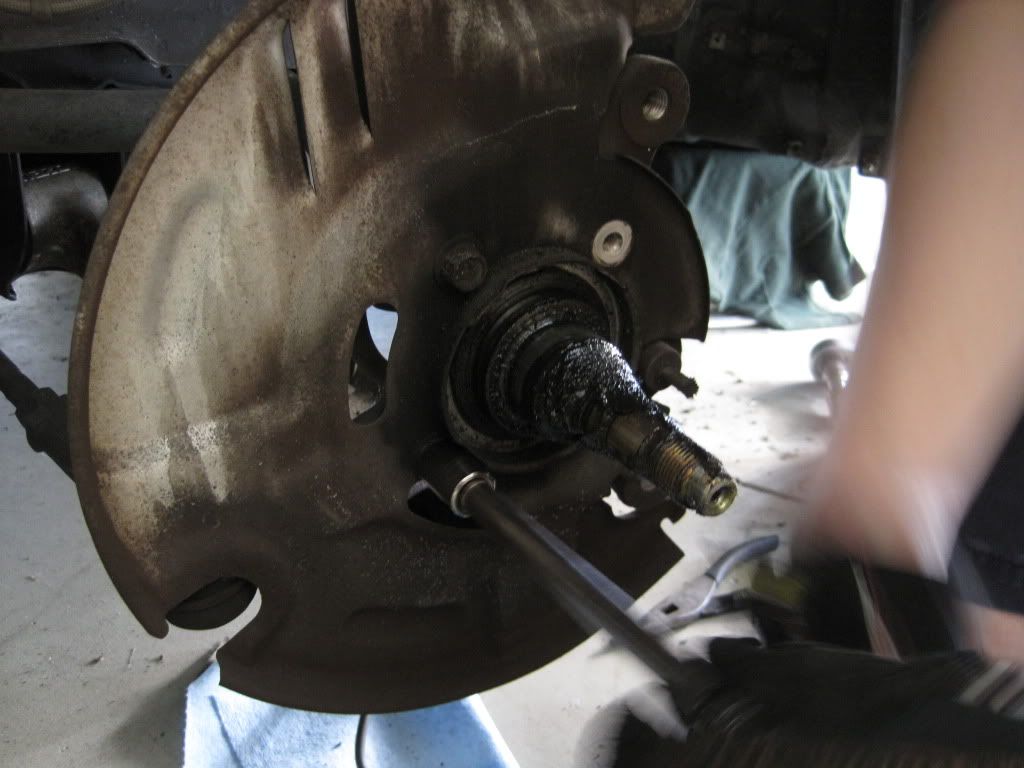
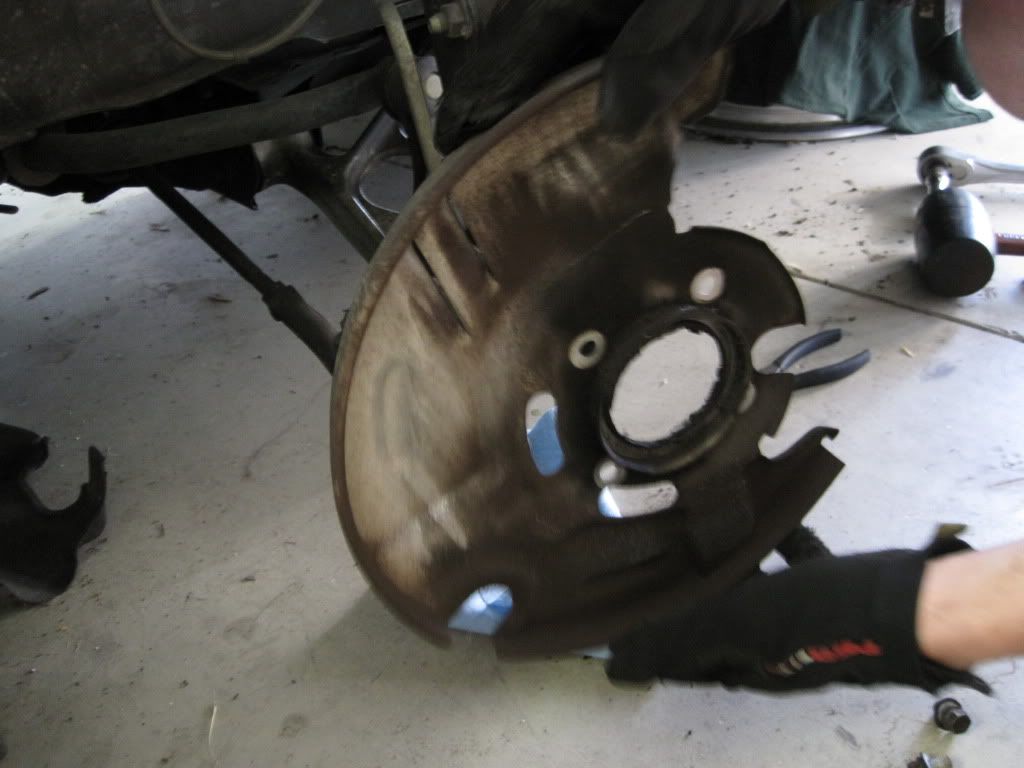
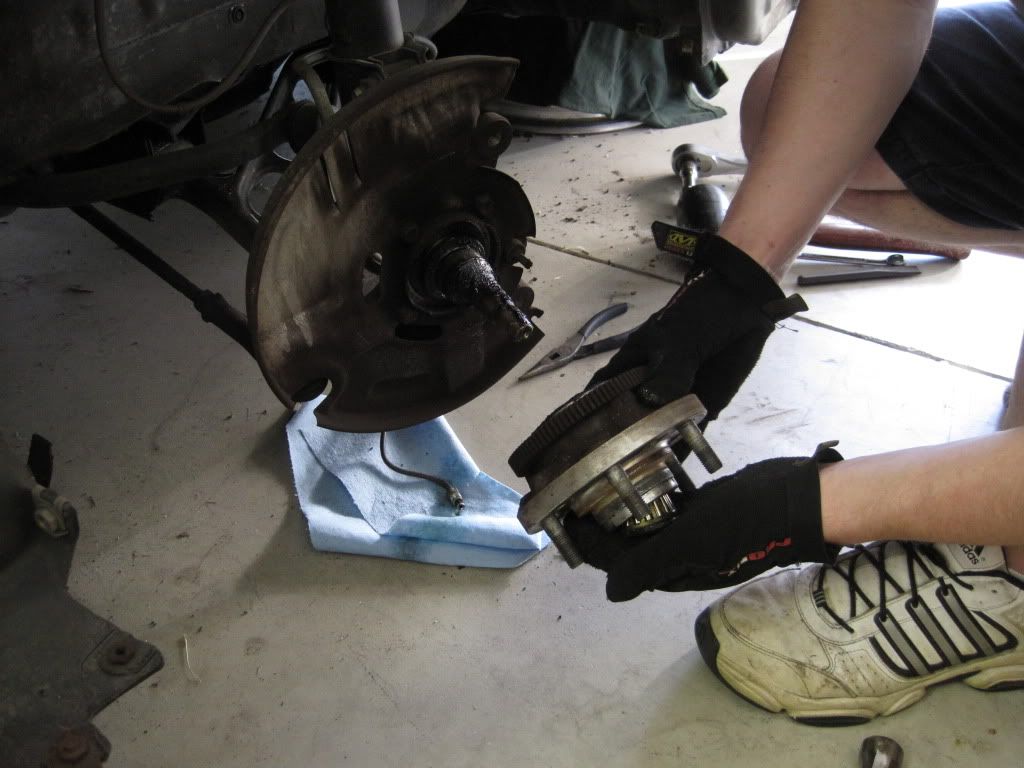
And this is what's left after that:
So, on to the work...
I've about reached the point where cleaning and restoring parts that I've already taken off of the car has come to a close. There are still some things that need attention - seats, taillights, etc, but the time has finally come to shift my attention to the car. There are many things to do there - suspension replacement, new exhaust, and the actual body work and paint itself. I'm also still tossing the idea around of a preemptive rebuild.
Yesterday started with front suspension work and wheel well cleaning. First the car was jacked up, the wheel taken off and then the car was lowered onto a "jackstand".
The brake caliper was the first thing to come off. A 10 mm flare nut wrench to take off the hard line and then two 17 mm bolts hold the caliper to the steering knuckle/spindle.
A few taps with a rubber mallet and the brake rotor was off. The screws that hold it in are non existent on this car as I had to drill them out when I replaced the rotors when I first bought it.
Next off is the hub. A hammer and chisel can CAREFULLY be used to remove the hub cap.
The cotter pin and set cover can then be removed. After that, the lock nut can be taken off and the hub can be pulled off of the spindle. Don't let the bearings fall out.
Four 12 mm bolts hold the brake shield onto the steering knuckle/spindle.
And this is what's left after that:
Thread Starter
Joined: Feb 2001
Posts: 2,854
Likes: 225
From: Tampa, FL
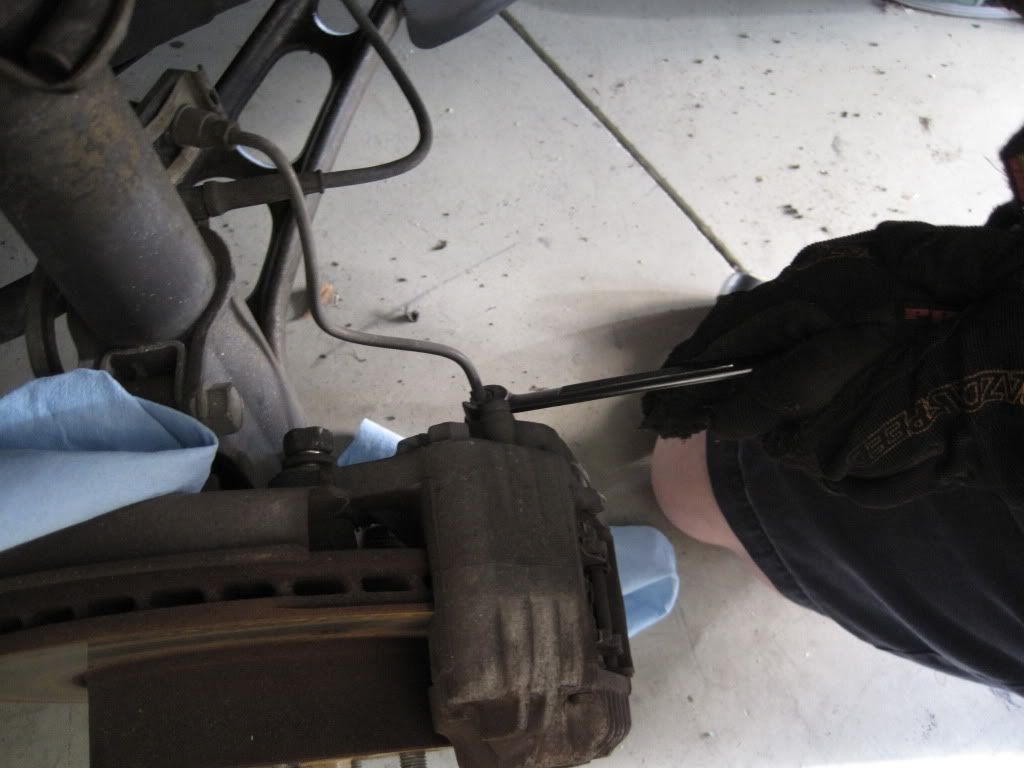
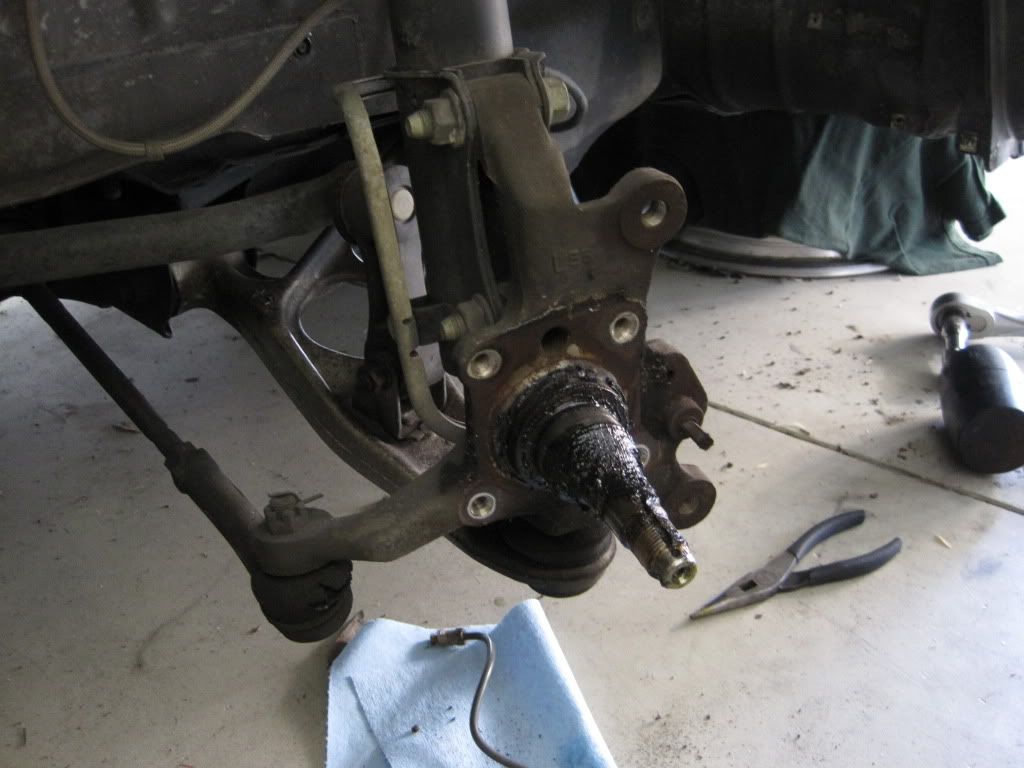
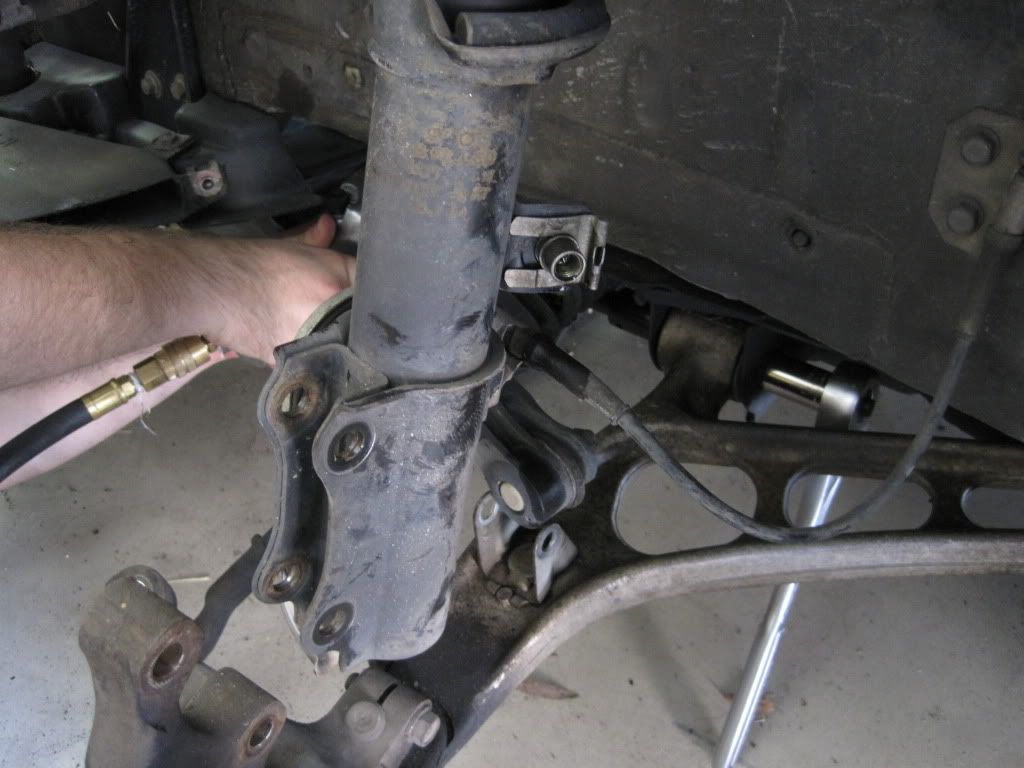
I find it easier to remove the lower control arm and steering knuckle as a unit, as clearance is pretty tight to try and get the knuckle off of the ball joint while still inside the wheel well.
One 12 mm bolt holds on the ABS speed sensor.
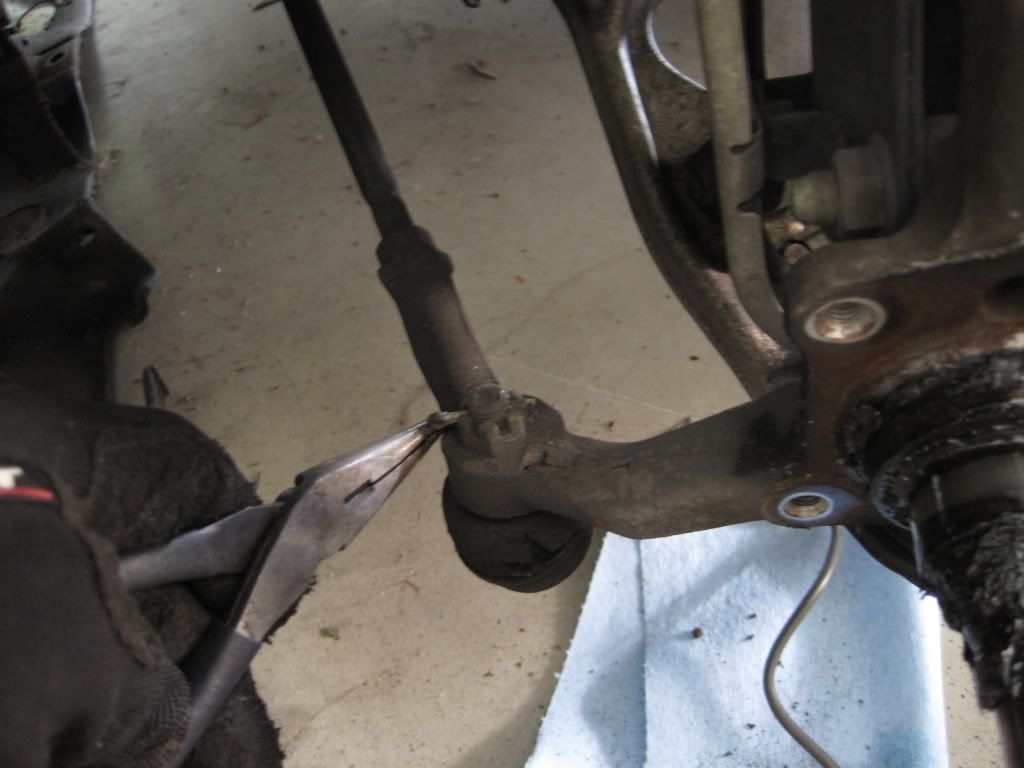
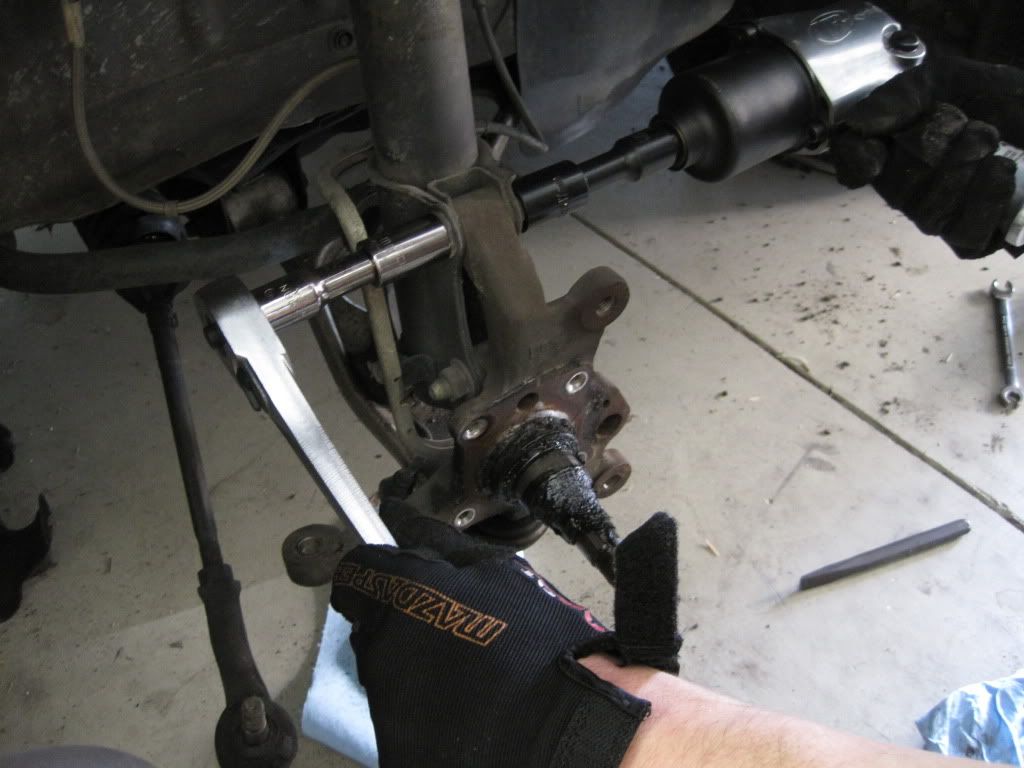
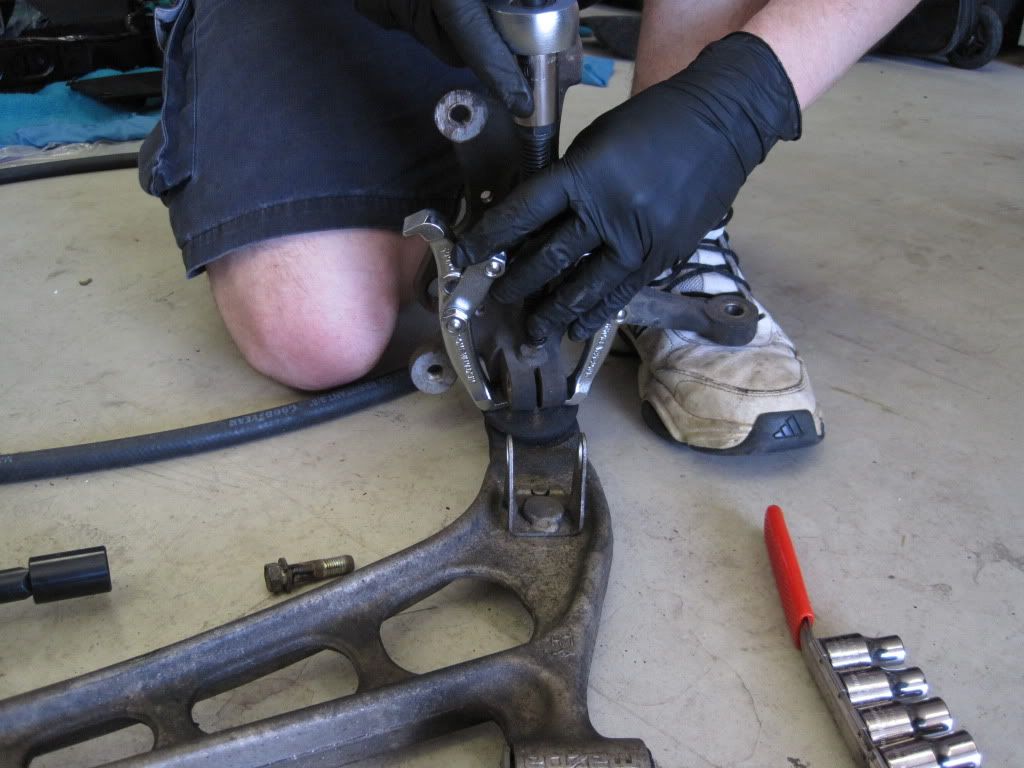
The cotter pin and 17 mm castle nut on the tie rod are next to be removed.
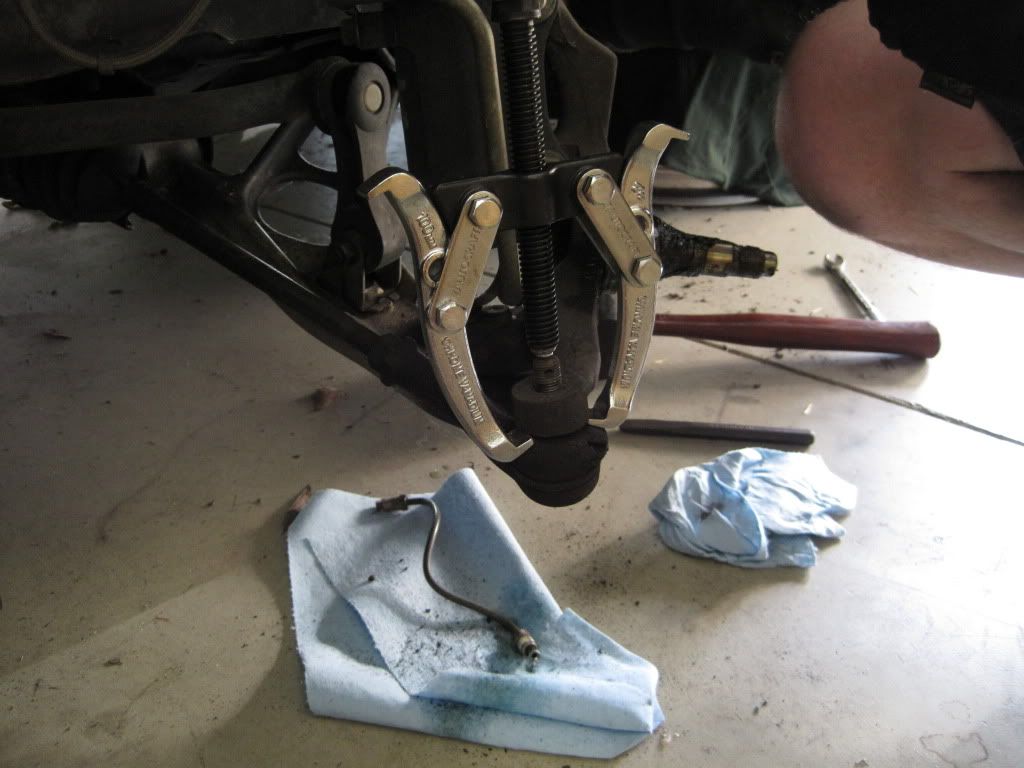
A two jaw puller was then used to remove the tie rod from the steering knuckle.
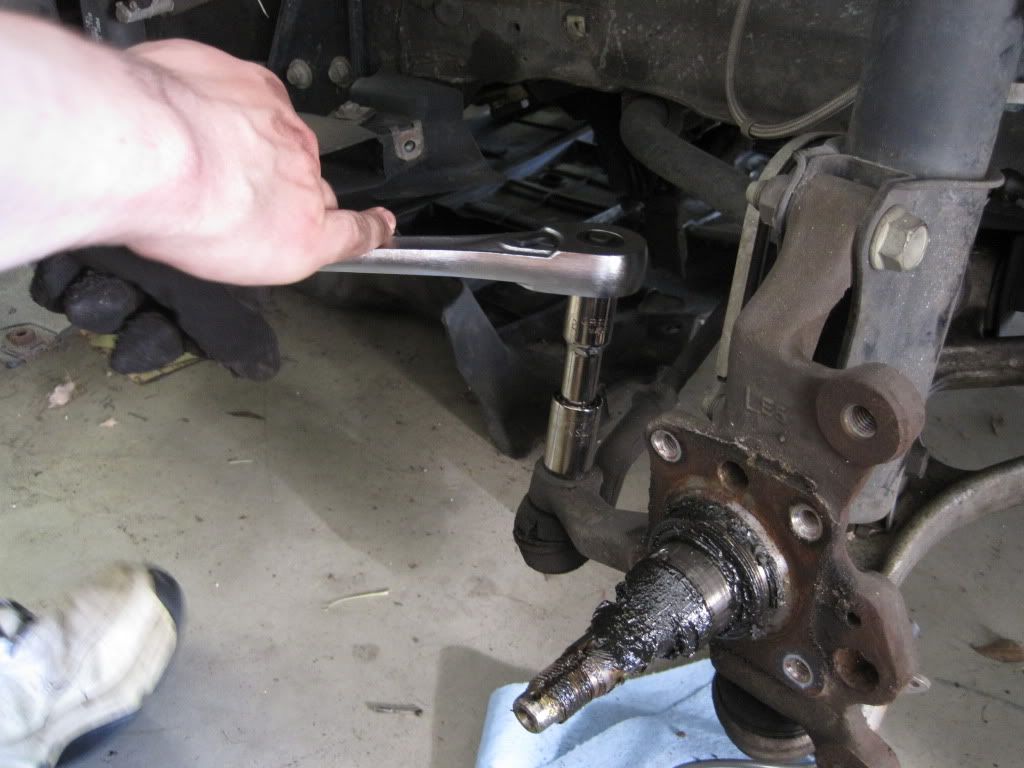
The strut to steering knuckle nuts and bolts were removed next. The nut and bolt are both 17 mm. A ratchet and socket was used on one side and an impact wrench on the other. If you've ever read the Carroll Smith books, specifically The Nuts, Bolts, Fasteners and Plumbing Handbook (originally released as Screw to Win), you know I committed a faux pas here. I left the nut stationary and used the impact wrench on the bolt.
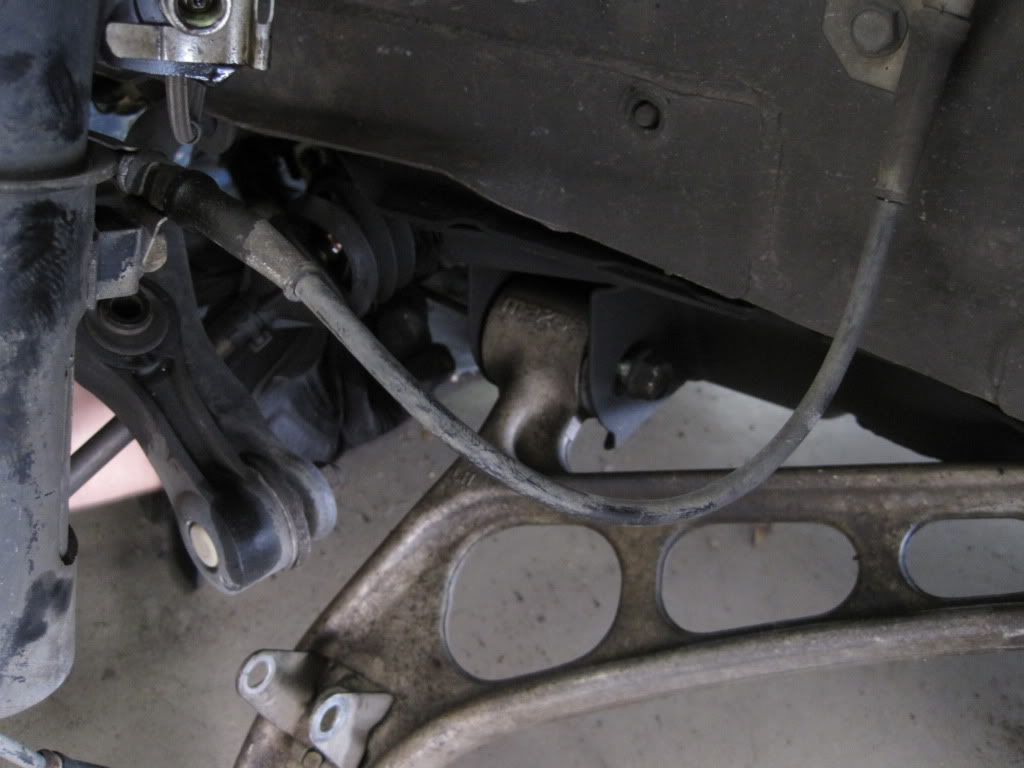
The anti-roll bar endlinks can then be removed in the same fashion. They are a 14 mm nut and bolt.
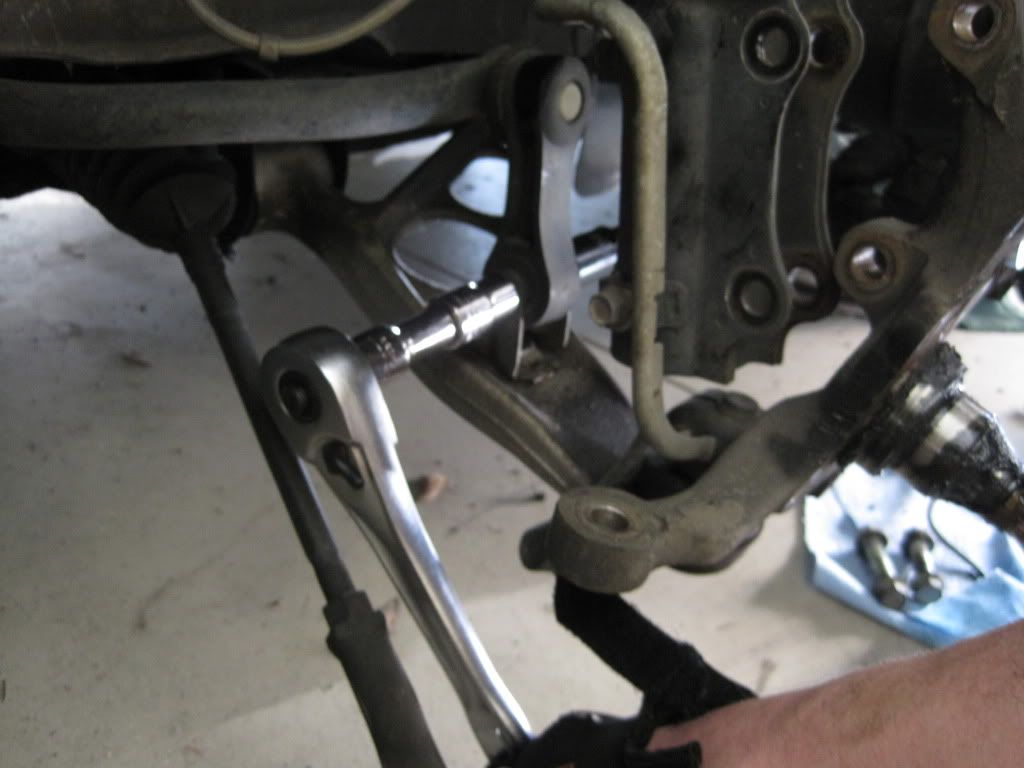
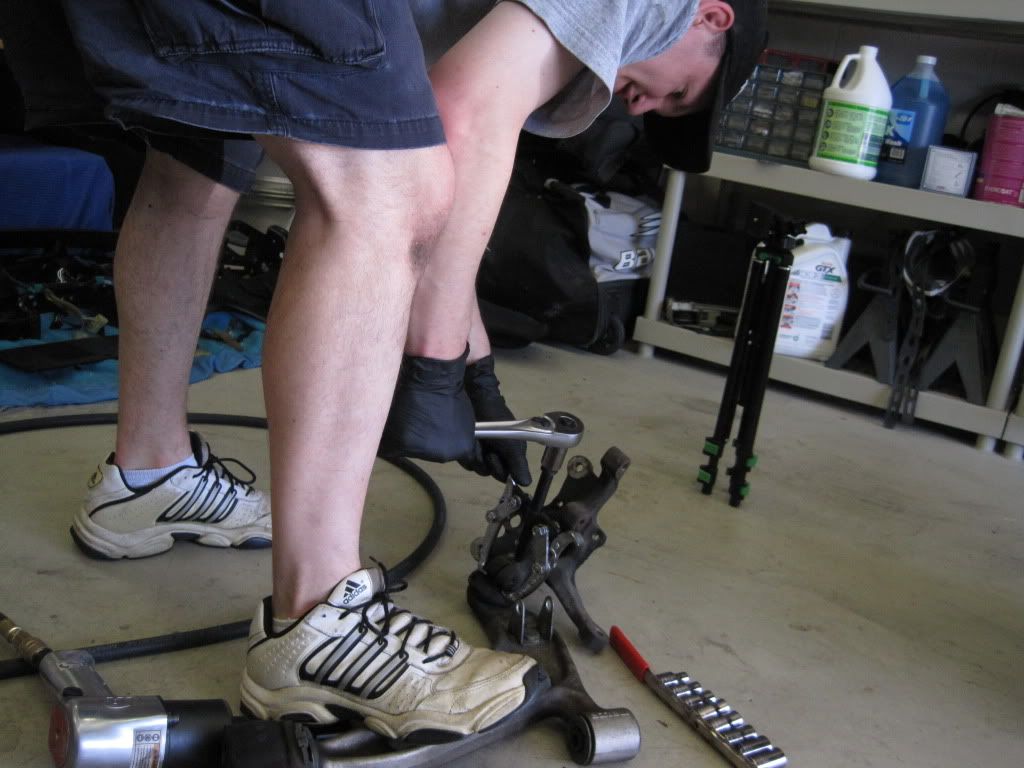
Two 10 mm nuts hold on a dust shield hiding the rear mounts for the lower control arm.
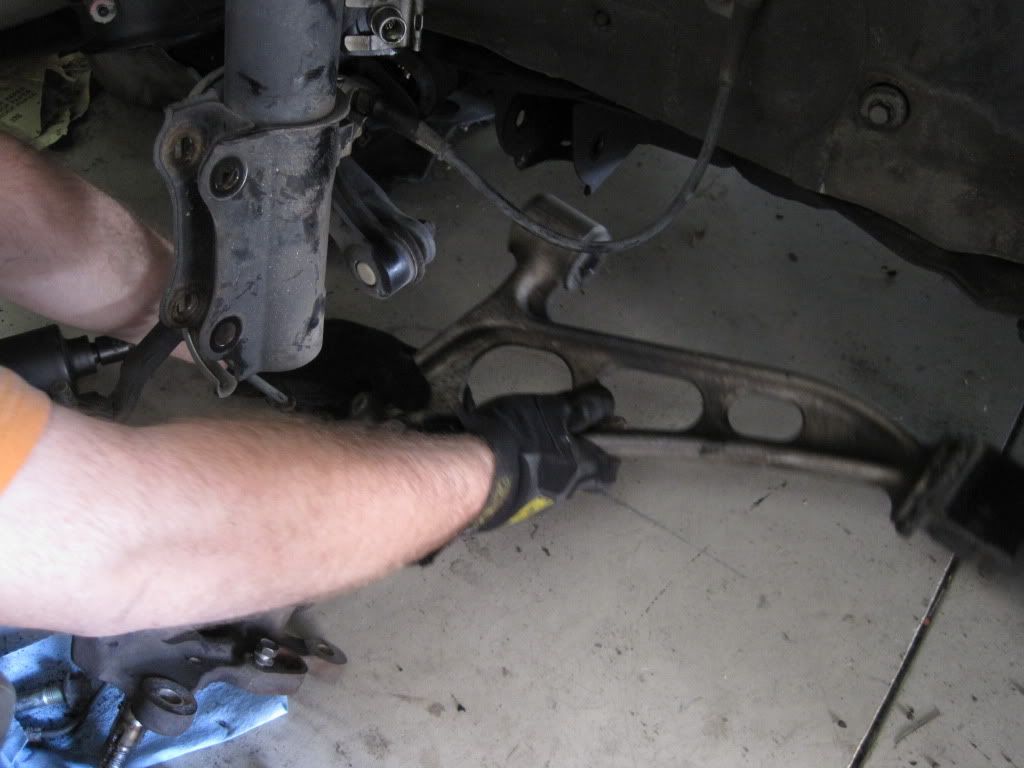
Two 14 mm bolts hold on the bracket to the subframe for the rear mount. My He-Man strength did not accomplish this task with a ratchet and socket. The impact was used.
A 17 mm nut and bolt comprise the front mount. Again, this was removed with a ratchet and socket and an impact on the other side. The bolt was then punched out, and the control arm and knuckle dropped as a unit.
One 12 mm bolt holds on the ABS speed sensor.
The cotter pin and 17 mm castle nut on the tie rod are next to be removed.
A two jaw puller was then used to remove the tie rod from the steering knuckle.
The strut to steering knuckle nuts and bolts were removed next. The nut and bolt are both 17 mm. A ratchet and socket was used on one side and an impact wrench on the other. If you've ever read the Carroll Smith books, specifically The Nuts, Bolts, Fasteners and Plumbing Handbook (originally released as Screw to Win), you know I committed a faux pas here. I left the nut stationary and used the impact wrench on the bolt.
The anti-roll bar endlinks can then be removed in the same fashion. They are a 14 mm nut and bolt.
Two 10 mm nuts hold on a dust shield hiding the rear mounts for the lower control arm.
Two 14 mm bolts hold on the bracket to the subframe for the rear mount. My He-Man strength did not accomplish this task with a ratchet and socket. The impact was used.
A 17 mm nut and bolt comprise the front mount. Again, this was removed with a ratchet and socket and an impact on the other side. The bolt was then punched out, and the control arm and knuckle dropped as a unit.
Thread Starter
Joined: Feb 2001
Posts: 2,854
Likes: 225
From: Tampa, FL
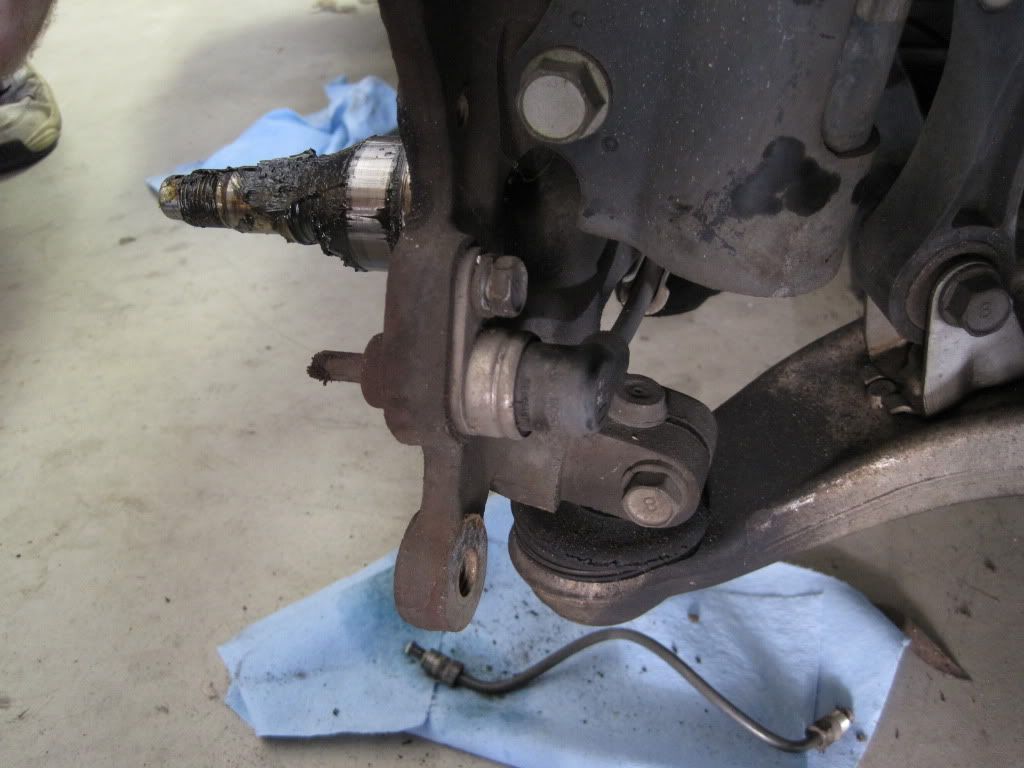
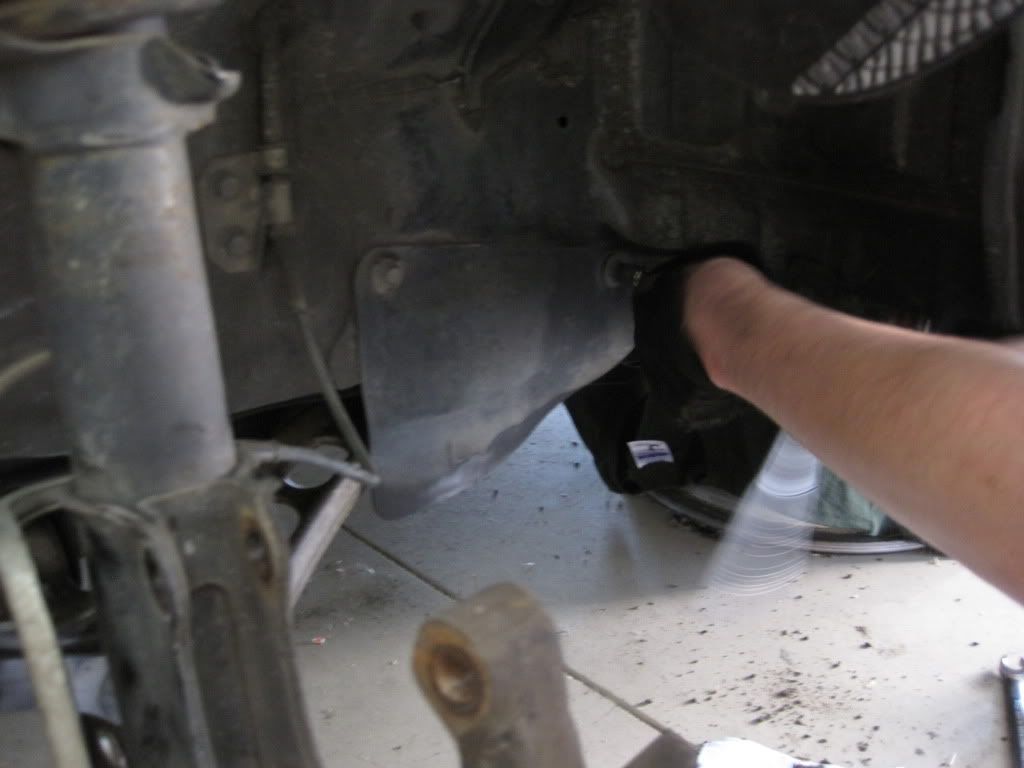
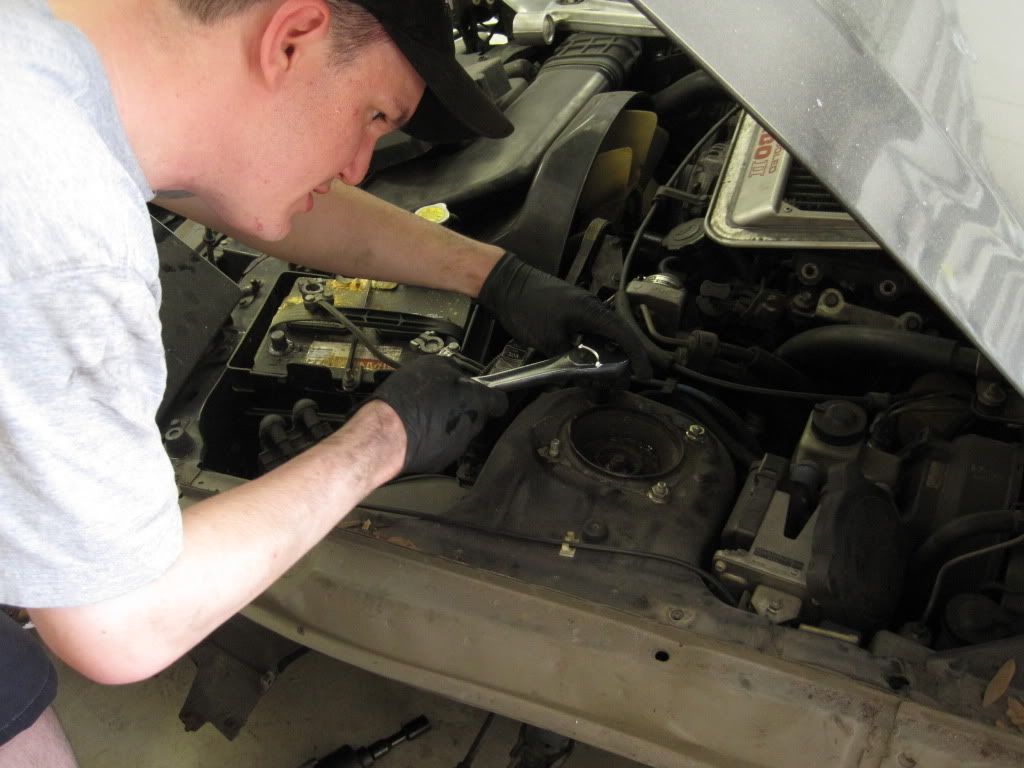
Two 12 mm bolts hold the ABS speed sensor wire bracket to the strut.
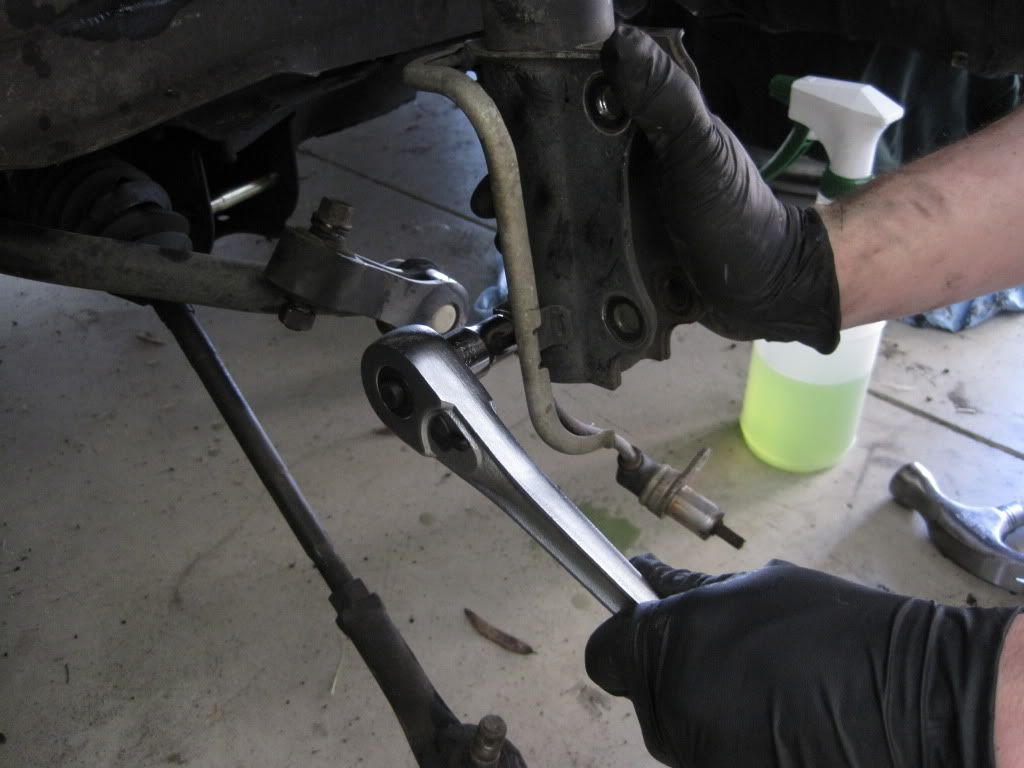
Four 14 mm nuts hold the strut assembly in.
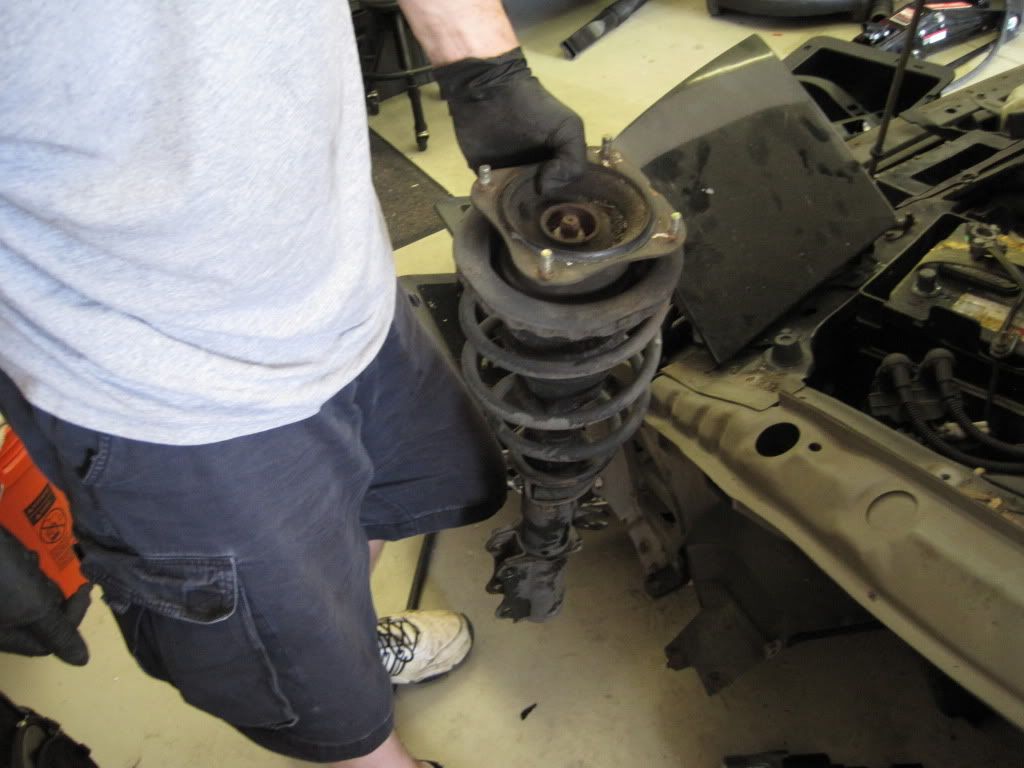
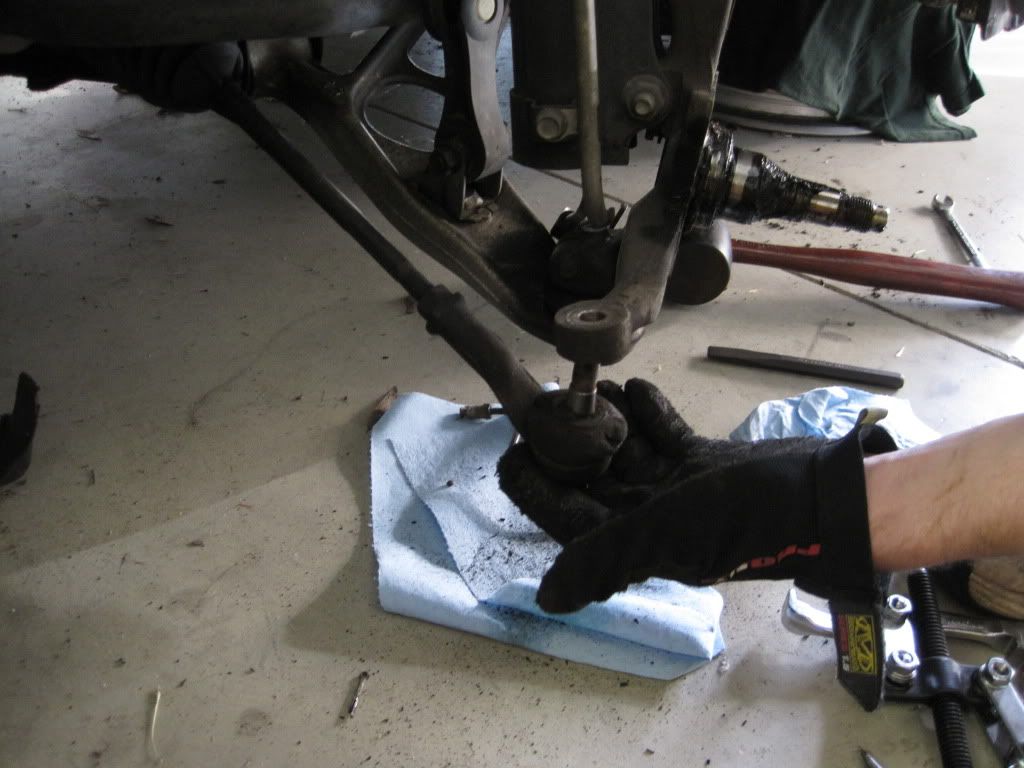
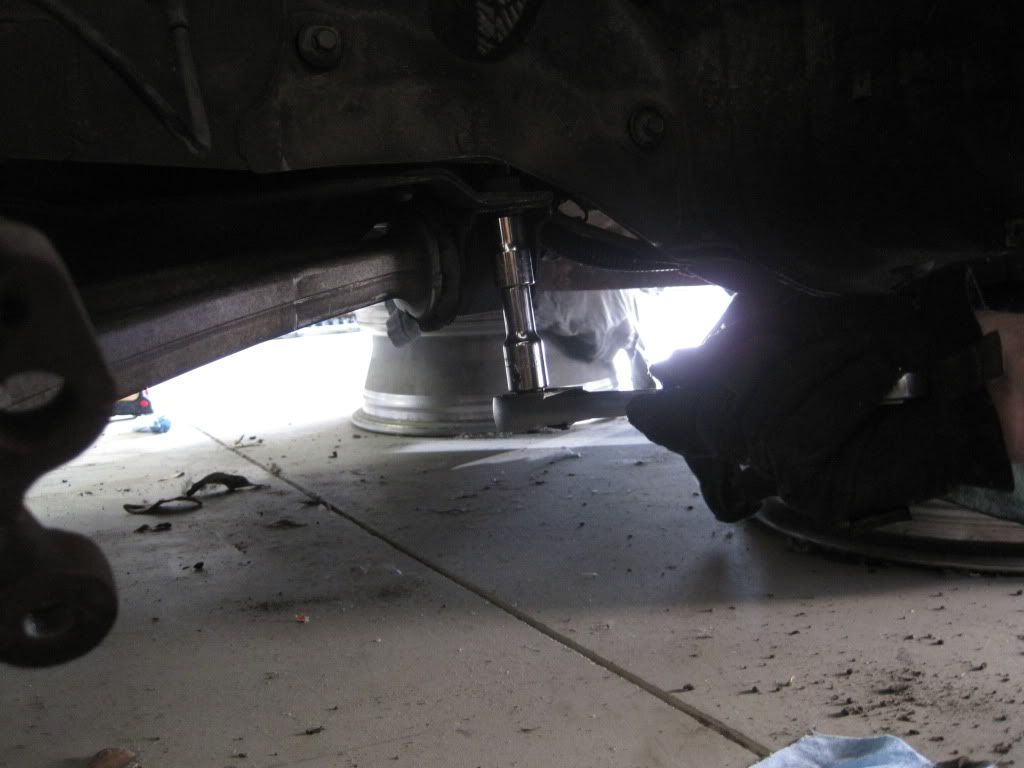
The two jaw puller was then used again to remove the knuckle from the control arm.
That completes disassembly of the front suspension, except for the removal of the anti-roll bar, which is still attached to the car. More to come later today.
Four 14 mm nuts hold the strut assembly in.
The two jaw puller was then used again to remove the knuckle from the control arm.
That completes disassembly of the front suspension, except for the removal of the anti-roll bar, which is still attached to the car. More to come later today.