
Hypertek's budget elec fan install

Hypertek's budget elec fan install
Im on a no-job budget and probably shouldnt be taking this on since money is short, but I wont skip on a quality job 
As some of you know, i picked up a fiero gt elec fan from the junk yard for $15 during new years half off sale.
http://www.youtube.com/watch?v=P9hq_...e=channel_page
I been waiting for my other items to come in. Not wanting to half *** this, i did some homework.
Ordered a Parts America/Hayden 3651 adjustible fan controller *typically around $45, scored it new on ebay for $25*


38mm radiator hose temp sensor adapter $8 plus shipping on ebay

30/40 amp relay

New VDO water temp gauge $10bucks *seller had a surplus of these he bought in bulk*., and $9 for the temp sender unit
*I choose VDO for its inexpensive price and quality... Known to be great gauges, typically found in european cars. I prefer them over Autometer *I dislike them* or any other cheap gauges*

1/8 npt drill tap, a few bucks on ebay*not pictured, still waiting for delivery*
----------------------------------------------------------
I plan to plumb the elec fan controller temp sending unit in the 38mm rad hose sensor adapter. This should be more accurate then typical probe style fan controllers.
When i plumb the water temp gauge, i will do that at the typical water pump jacket area which will require drilling out/tapping threads into the hole , which should supply accurate readings for the gauge.
Back to the adapter piece, WHen i ordered the fan controller, i figured the temp sender piece would be 1/8 npt thread as I thought i read somewhere, and turns out it is not, its actually bigger... 1/2 maybe?


I believe I can just simply drill and tap this out.. I will see if I have any taps in this size.
As some of you know, i picked up a fiero gt elec fan from the junk yard for $15 during new years half off sale.
http://www.youtube.com/watch?v=P9hq_...e=channel_page
I been waiting for my other items to come in. Not wanting to half *** this, i did some homework.
Ordered a Parts America/Hayden 3651 adjustible fan controller *typically around $45, scored it new on ebay for $25*
38mm radiator hose temp sensor adapter $8 plus shipping on ebay
30/40 amp relay
New VDO water temp gauge $10bucks *seller had a surplus of these he bought in bulk*., and $9 for the temp sender unit
*I choose VDO for its inexpensive price and quality... Known to be great gauges, typically found in european cars. I prefer them over Autometer *I dislike them* or any other cheap gauges*
1/8 npt drill tap, a few bucks on ebay*not pictured, still waiting for delivery*
----------------------------------------------------------
I plan to plumb the elec fan controller temp sending unit in the 38mm rad hose sensor adapter. This should be more accurate then typical probe style fan controllers.
When i plumb the water temp gauge, i will do that at the typical water pump jacket area which will require drilling out/tapping threads into the hole , which should supply accurate readings for the gauge.
Back to the adapter piece, WHen i ordered the fan controller, i figured the temp sender piece would be 1/8 npt thread as I thought i read somewhere, and turns out it is not, its actually bigger... 1/2 maybe?
I believe I can just simply drill and tap this out.. I will see if I have any taps in this size.
just got done tapping
3/8 18 npt drill tap
was a pain in the *** since i dont have a bench clamp or drill press, i had to use a hand drill and kept moving up a size in drill bits til i was able to use the tap. But the end product is beautiful
weeeeeeeeeee


That will be going right here

3/8 18 npt drill tap
was a pain in the *** since i dont have a bench clamp or drill press, i had to use a hand drill and kept moving up a size in drill bits til i was able to use the tap. But the end product is beautiful
weeeeeeeeeee
That will be going right here
Wheres the stock location? I wasnt aware of that being an option. I didnt really want to mess with touching any of the stock gauge equipment, dont really want any functionless gauges inside... just a more accurate water temp gauge for the elec fan.
Im planin to tap the gauge sensor here as Phower did to his
http://img.photobucket.com/albums/v6...C/DSC00402.jpg
Pros/Cons of locations:
1. Throttle Body coolant lines.
Pros: Easy to do. You can use a freely available tee-line with a 1/8 NPT tap in the tee to install the sensor. Reasonably accurate block coolant temperatures regardless of the thermostat state.
Cons: Slow rate of change. Less room for installation when the TB coolant lines are commonly bypassed. No advantage over the other locations except for ease of installation. Due to the flow of coolant through the block, this is really only showing you temperatures indicative of coolant passing through about half the block, post-radiator cooled. Grounding issues.
2. Upper radiator hose.
Pros: High rate of change when the thermostat is open. Harder to find a tee-line adapter for the size of the radiator hose compared to the throttle body.
Cons: Somewhat useless when the thermostat is closed as the readings are more stagnant. This can be an issue when one has a stuck thermostat. In addition we are really interested in the sum of block AND post-radiator temperatures which this location isn't best for. Grounding issues.
3. Thermostat housing.
Pros: High rate of change when thermostat is open. Medium rate of change when thermostat is closed. Since the upper radiator hose is the one delivering coolant to the radiator, as regulated by the thermostat, changes in block coolant temps. are fairly immediate. No grounding issues.
Cons: Requires removal, drilling, and tapping. Stuck thermostat is still an issue, but less so due to the proximity of the sensor to the thermostat itself - basically you'll know when things are wrong before you warp the block.
Since the goal is to do things the right way and monitor coolant temps with the most accuracy and highest rate of change one should mount the thermo-sensor in the thermostat housing. It's a good position as it lets you gauge the rate of change in coolant temps _exiting_ the block, but pre-radiator. If you are seeing a fast rise from 185 to 220F, you should know fairly quickly that there is a problem and to reduce the load on the engine or go full heater/fans and shut it down.
http://img.photobucket.com/albums/v6...C/DSC00402.jpg
Trending Topics

Joined: Apr 2005
Posts: 3,785
Likes: 30
From: And the horse he rode in on...
I think the spot you are referring to is on the bottom of the rad on the Driver Side. The stock sender is a 3/8" pipe thread and that looks like the size of his switch.
I had my sensor there for a while. The downside is that you are measuring the coolant AFTER passing through the radiator. This makes for interesting info, but is in no way a good indicator of the coolant temp. Also, since the coolant is already passing the rad, this might make a poor place for the fan switch. OTOH, with the adjustable switch, maybe it's a great place?
I had my sensor there for a while. The downside is that you are measuring the coolant AFTER passing through the radiator. This makes for interesting info, but is in no way a good indicator of the coolant temp. Also, since the coolant is already passing the rad, this might make a poor place for the fan switch. OTOH, with the adjustable switch, maybe it's a great place?
Joined: Apr 2005
Posts: 3,785
Likes: 30
From: And the horse he rode in on...
Wheres the stock location? I wasnt aware of that being an option. I didnt really want to mess with touching any of the stock gauge equipment, dont really want any functionless gauges inside... just a more accurate water temp gauge for the elec fan.
Im planin to tap the gauge sensor here as Phower did to his
http://img.photobucket.com/albums/v6...C/DSC00402.jpg
Im planin to tap the gauge sensor here as Phower did to his
http://img.photobucket.com/albums/v6...C/DSC00402.jpg
yeah jackhild gave me alot of suggestions and help =D
All pics are taken from my cell phone btw, dont feel like stopping during my process to bust out my old digital cam and snapping, usually having the phone in my pocket i can quickly snap a few pics as I go
I cleaned up the fan and test fitted, to check how it fits and what needs to be done.


Onto making mounting brackets, I did left and right.. I used some aluminum sheetmetal that i had scraps of from prior projects.

My favorite tool... Dremel Rotary tool... lol

This part is pretty straightforward, just drill a hole in the piece, trial mount, and bend it around to form to the fan..


Get an idea of where to drill the other hole to bolt to the fan shroud. Trim some of the plastic where it meets against the rad so you can have clearance to mount the brackets on the inside of the fan.


Mounted


*I might need to make one more bracket for the bottom of the fan to be more secure. It only takes like 5 minutes to make one*
And thats where Im at for today.. it got dark and i dont have a garage here... Ill tackle the wiring tomarrow, and hope that my 1/8 npt tap arrives in the mail so i can get onto installing the temp gauge.
All pics are taken from my cell phone btw, dont feel like stopping during my process to bust out my old digital cam and snapping, usually having the phone in my pocket i can quickly snap a few pics as I go
I cleaned up the fan and test fitted, to check how it fits and what needs to be done.
Onto making mounting brackets, I did left and right.. I used some aluminum sheetmetal that i had scraps of from prior projects.
My favorite tool... Dremel Rotary tool... lol
This part is pretty straightforward, just drill a hole in the piece, trial mount, and bend it around to form to the fan..
Get an idea of where to drill the other hole to bolt to the fan shroud. Trim some of the plastic where it meets against the rad so you can have clearance to mount the brackets on the inside of the fan.
Mounted
*I might need to make one more bracket for the bottom of the fan to be more secure. It only takes like 5 minutes to make one*
And thats where Im at for today.. it got dark and i dont have a garage here... Ill tackle the wiring tomarrow, and hope that my 1/8 npt tap arrives in the mail so i can get onto installing the temp gauge.

Joined: Apr 2005
Posts: 3,785
Likes: 30
From: And the horse he rode in on...
I think the spot you are referring to is on the bottom of the rad on the Driver Side. The stock sender is a 3/8" pipe thread and that looks like the size of his switch.
I had my sensor there for a while. The downside is that you are measuring the coolant AFTER passing through the radiator. This makes for interesting info, but is in no way a good indicator of the coolant temp. Also, since the coolant is already passing the rad, this might make a poor place for the fan switch. OTOH, with the adjustable switch, maybe it's a great place?
I had my sensor there for a while. The downside is that you are measuring the coolant AFTER passing through the radiator. This makes for interesting info, but is in no way a good indicator of the coolant temp. Also, since the coolant is already passing the rad, this might make a poor place for the fan switch. OTOH, with the adjustable switch, maybe it's a great place?
I know you have seen this, but for the thread continuity here is some data+analysis-
From my Taurus thread:
So, I have been playing around (What?!!!) with my efan setup. I installed a VDO temp sensor in the Bottom of my Radiator in the OEM spot. I have been watching the RETURN coolant temps, trying to determine the right temp setting on my adjustable fan thermostat. My goal is to determine the correct temp setting by monitoring the coolant after the heat rejection occurs in the radiator. This has been going on for a couple of weeks now.
I believe that the following is true:
A.) If the fan temp is set above the initial coolant thermostat opening, ie. 185* and
B.) the return temp stays below the initial thermostat opening temp, then
C.) I have sufficient cooling without
D.) excessive e-fan running. (excessive alternator/fuel consumption)
The temp controller measures the coolant at the top hose to the radiator. Fan is always temp controlled on *low* speed.
If I set the fan to run on low continuously, the return coolant temp will hover in the 160* range all the time. This is city driving, parked etc. It slowly rises up to about 185* on the highway, 55-60 mph and stays.
If I set the fan temp controller to 215*, the return temps get very erratic. The temps range from 185* to 250*. Yes, I said 250*. Evans Coolant, Baby! The temp is obviously overshooting. The highway temps will hover around 195*.
If I set the temp controller to 195*, the return runs from 170-185*. No overshooting, no overcooling etc.
This testing was done with day temps in the 80* range as we have had over the last couple of weeks here in the Dallas area.
need some help understanding the relay.. got a 5 pin relay..

86 is ground, 85 is constant positive via fuse box??
Then one of the other wise can go to the ignition source, and the other will be the source for the fan controller. Which should lead to the ignition source?
86 is ground, 85 is constant positive via fuse box??
Then one of the other wise can go to the ignition source, and the other will be the source for the fan controller. Which should lead to the ignition source?
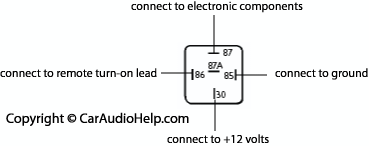
Yep. Pins 30 and 87 are the "HIGH" side of the relay and are switched together using 86 and 85.
Also - someone mentioned earlier to put the sender where the stock sender was.................
The OEM water temp sending unit is in the REAR IRON under the oil pressure sending unit. If you want to put it there that is.
Also - someone mentioned earlier to put the sender where the stock sender was.................
The OEM water temp sending unit is in the REAR IRON under the oil pressure sending unit. If you want to put it there that is.
uhh yeah thanks =\
I dunno about you but i enjoy doing write ups, helps people out, and im also going to be listing this on my site since this will probably get buried on this forum http://tunerbase.com/forum/viewtopic.php?f=5&t=21
I dunno about you but i enjoy doing write ups, helps people out, and im also going to be listing this on my site since this will probably get buried on this forum http://tunerbase.com/forum/viewtopic.php?f=5&t=21
Banned. I got OWNED!!!
Joined: Mar 2006
Posts: 1,970
Likes: 1
From: Connecticut
I think the spot you are referring to is on the bottom of the rad on the Driver Side. The stock sender is a 3/8" pipe thread and that looks like the size of his switch.
I had my sensor there for a while. The downside is that you are measuring the coolant AFTER passing through the radiator. This makes for interesting info, but is in no way a good indicator of the coolant temp. Also, since the coolant is already passing the rad, this might make a poor place for the fan switch. OTOH, with the adjustable switch, maybe it's a great place?
I had my sensor there for a while. The downside is that you are measuring the coolant AFTER passing through the radiator. This makes for interesting info, but is in no way a good indicator of the coolant temp. Also, since the coolant is already passing the rad, this might make a poor place for the fan switch. OTOH, with the adjustable switch, maybe it's a great place?
This is also why standalones are just far superior IMO. I have ONE sensor, where the factory put it. The gauge sender is still in place as a plug. That one sensor is used by the Motec as an input for fuel/spark and then that same sensor is used as the input for the AIM dash. Oh yeah, I can also set my fan on/off with a few keystrokes. If you're going to have multiple sensors. 4 in this case if I'm not mistaken (the factory coolant temp, factory gauge, new gauge, fan set
Yep. Pins 30 and 87 are the "HIGH" side of the relay and are switched together using 86 and 85.
Also - someone mentioned earlier to put the sender where the stock sender was.................
The OEM water temp sending unit is in the REAR IRON under the oil pressure sending unit. If you want to put it there that is.
Also - someone mentioned earlier to put the sender where the stock sender was.................
The OEM water temp sending unit is in the REAR IRON under the oil pressure sending unit. If you want to put it there that is.
http://www.imperialinc.com/pdf/I_Tap&DieChart.pdf
Dremels suck. Period.
Joined: Apr 2005
Posts: 3,785
Likes: 30
From: And the horse he rode in on...
Drivers side, 3/8" pipe, and I agree that it's a horrible place to put a sensor for a fan switch. What happens if your T-Stat goes bad? Doesn't fully open and you're out doritoing not watching the gauge? The coolant will have MORE time in the rad due to the less flow and be cooler as it passes the sensor. Leaving your engine baking and no fan at all. Bad idea.
This is also why standalones are just far superior IMO. I have ONE sensor, where the factory put it. The gauge sender is still in place as a plug. That one sensor is used by the Motec as an input for fuel/spark and then that same sensor is used as the input for the AIM dash. Oh yeah, I can also set my fan on/off with a few keystrokes. If you're going to have multiple sensors. 4 in this case if I'm not mistaken (the factory coolant temp, factory gauge, new gauge, fan set ) try to keep them as close together as possible. As in ALL PRE T-stat.
This is also why standalones are just far superior IMO. I have ONE sensor, where the factory put it. The gauge sender is still in place as a plug. That one sensor is used by the Motec as an input for fuel/spark and then that same sensor is used as the input for the AIM dash. Oh yeah, I can also set my fan on/off with a few keystrokes. If you're going to have multiple sensors. 4 in this case if I'm not mistaken (the factory coolant temp, factory gauge, new gauge, fan set
And before someone tells me how superior the belt driven fan is, lets see how it actually works: The primary loop t-stat opens, the radiator warms up, then the air begins to warm up, then the fan clutch begins to warm up then the fan clutch tightens and speeds up the fan speed. ****, it's amazing that the system even works. I think that system relies heavily on the primary loop stat controlling the engine temp. It's totally overblown, pun intended. Except in traffic at low engine speeds.
Rant off.
Question, TTT- could a standalone stage the cooling like many OBDII PCM's do? If one could pick different temps and A/C pressures to activate low and high fan speeds and enable/disable the A/C compressor, that would be very very cool.
I believe that one is 1/8" BPT;
thanks.. im not even sure now if i really even need the relay... the fan controller has a wire for ignition source, and a seperate wire to constant positive..
Right now i got it planned out that I was going to rock the relay to power up that ignition wire on the controller, then the constant positive all teh way to the fuse terminal... I will be mounting the controller on the passanger side, and run the power wires tucked in a hose above the rad support to the drivers side.
Jackhild where is the a/c positive wire located? Dont recall ever seeing a a/c fan on my car, tho i do have the a/c components intact that I will eventually get serviced.
heres my kids diagram in cool colors!
Cmanns will get mad at me fore watermarking my pictures, because we should all give away our authorship on the net lmao
esp when i post this on other forums besides rx7club, its nice to remember where/who the source came from.

I soldered most of my wires where needed and shrink wrapped for durability. I just need to test the fan harness and make sure the polarity is correct, than ill shorten and solder the harness up.
Cmanns will get mad at me fore watermarking my pictures, because we should all give away our authorship on the net lmao
esp when i post this on other forums besides rx7club, its nice to remember where/who the source came from.
I soldered most of my wires where needed and shrink wrapped for durability. I just need to test the fan harness and make sure the polarity is correct, than ill shorten and solder the harness up.
Joined: Apr 2005
Posts: 3,785
Likes: 30
From: And the horse he rode in on...
thanks.. im not even sure now if i really even need the relay... the fan controller has a wire for ignition source, and a seperate wire to constant positive..
Jackhild where is the a/c positive wire located? Dont recall ever seeing a a/c fan on my car, tho i do have the a/c components intact that I will eventually get serviced.
Jackhild where is the a/c positive wire located? Dont recall ever seeing a a/c fan on my car, tho i do have the a/c components intact that I will eventually get serviced.
That unit has a relay built in. If it is replaceable, ie if it unplugs and a new one can plug right in, then I would use it to control your fan. You could even replace it with a 30/40 amp relay to upgrade the system to higher capacity.
Banned. I got OWNED!!!
Joined: Mar 2006
Posts: 1,970
Likes: 1
From: Connecticut
I know the oil pressure fitting is 1/8 BSP.... not sure about the coolant sensor though. If it is, I'm ordering a 1/8" BSP plug. Thanks Jack