
How to: Pinion snubber install

Thread Starter


Joined: Jan 2006
Posts: 833
Likes: 53
From: Redmond, WA
How to: Pinion snubber install
Rationale:
I got tired of the clunking coming from the rear end of my car. Last year I replaced the front differential mount with the Mazda Comp version. My mount wasn't broken and it didn't help. What I saw was that since my car was lowered a lot, my rear suspension would hit the underbody at times. I think this is due the aftermarket one piece rear-link (camber link) design used to correct rear camber I have installed. It brings the sub-frame and front of the differential closer to the body. A pinion snubber is cheap at less than $10 dollars, and the job is pretty easy to do. There wasn't a good write up on the forum so here you go. The pictures are gathered from other posts and from the service manual.
Tools needed:
Hydraulic jack
Jack stands
17mm wrench
Various sockets 10mm, 17mm, 20mm (maybe it was 21mm?)
Ratchet
Torque wrench
Phillips head screwdriver
Drill and bits up to 3/8"
Parts needed:
Pinion snubber (came with locknut) http://www.summitracing.com/parts/ENS-9-9101G/
3/8" x 2" fender washers
Installation:
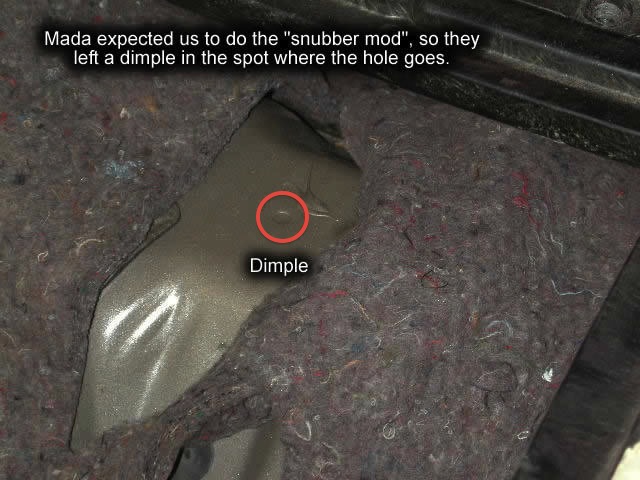
1. Remove the rear bins.
2. Drill a 3/8" hole in the dimpled area on the tunnel. The dimple is underneath the sound deadening mat in between the recessed bin areas.
3. Jack up the car enough to comfortably work under the diff area. Be safe and use jack stands. You'll need to use the jack to assist in adjusting snubber preload later; so you can't skip this.
4. Loosen the front mounts on the rear subframe. Only loosen the large nuts attaching the subframe to the mount bracket. Do not loosen mount bracket from the body. These mounts are on either side of the body just in front of the rear wheel well.
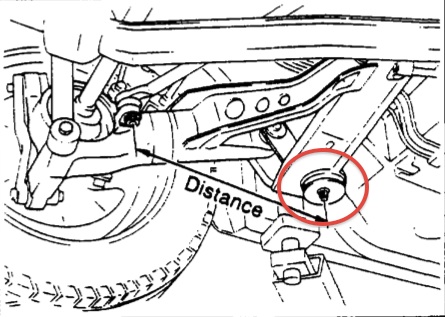
5. Remove the lower bolt from the rear link.
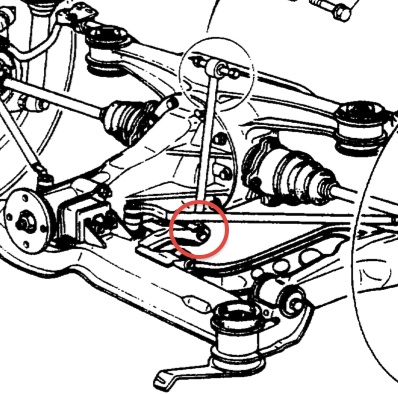
6. Install the pinion snubber in the hole you drilled earlier. It should be visible above the front differential mount area right in between the parking brake cables. Pull down on the front of the differential housing to create clearance to install the snubber.
7. Reinstall the bottom bolt in the sub-link.
8. Jack up the subframe to its normal position.
9. Check to make sure that your snubber is slightly preloaded. If there is a gap, lower the subframe, the revert back to step 5. Add fender washers in between the snubber and bottom of the body to space it out. I added two fender 3/8" x 2" fender washers to mine to get the preload just where I wanted.
10. Tighten up the pinion snubber. I used another fender washer up top as well to tighten on a flat surface.
11. Tighten the subframe nuts to 74-87 ft/lbs.
12. Tighten the sub-link nut to 54-69 ft/lbs.
13. Install the rear bins.
14. Lower the car off of the jacks.
14. Go test drive and enjoy your non-wheel hopping, non-clunking rear end!
Josh
I got tired of the clunking coming from the rear end of my car. Last year I replaced the front differential mount with the Mazda Comp version. My mount wasn't broken and it didn't help. What I saw was that since my car was lowered a lot, my rear suspension would hit the underbody at times. I think this is due the aftermarket one piece rear-link (camber link) design used to correct rear camber I have installed. It brings the sub-frame and front of the differential closer to the body. A pinion snubber is cheap at less than $10 dollars, and the job is pretty easy to do. There wasn't a good write up on the forum so here you go. The pictures are gathered from other posts and from the service manual.
Tools needed:
Hydraulic jack
Jack stands
17mm wrench
Various sockets 10mm, 17mm, 20mm (maybe it was 21mm?)
Ratchet
Torque wrench
Phillips head screwdriver
Drill and bits up to 3/8"
Parts needed:
Pinion snubber (came with locknut) http://www.summitracing.com/parts/ENS-9-9101G/
3/8" x 2" fender washers
Installation:
1. Remove the rear bins.
2. Drill a 3/8" hole in the dimpled area on the tunnel. The dimple is underneath the sound deadening mat in between the recessed bin areas.
3. Jack up the car enough to comfortably work under the diff area. Be safe and use jack stands. You'll need to use the jack to assist in adjusting snubber preload later; so you can't skip this.
4. Loosen the front mounts on the rear subframe. Only loosen the large nuts attaching the subframe to the mount bracket. Do not loosen mount bracket from the body. These mounts are on either side of the body just in front of the rear wheel well.
5. Remove the lower bolt from the rear link.
6. Install the pinion snubber in the hole you drilled earlier. It should be visible above the front differential mount area right in between the parking brake cables. Pull down on the front of the differential housing to create clearance to install the snubber.
7. Reinstall the bottom bolt in the sub-link.
8. Jack up the subframe to its normal position.
9. Check to make sure that your snubber is slightly preloaded. If there is a gap, lower the subframe, the revert back to step 5. Add fender washers in between the snubber and bottom of the body to space it out. I added two fender 3/8" x 2" fender washers to mine to get the preload just where I wanted.
10. Tighten up the pinion snubber. I used another fender washer up top as well to tighten on a flat surface.
11. Tighten the subframe nuts to 74-87 ft/lbs.
12. Tighten the sub-link nut to 54-69 ft/lbs.
13. Install the rear bins.
14. Lower the car off of the jacks.
14. Go test drive and enjoy your non-wheel hopping, non-clunking rear end!
Josh

Can you explain why the subframe has to be lowered? On my install I just jacked the car up and installed the snubber b/w the diff and chassis and adjusted preload as necessary.
Also remember that most advance and autozone stores should carry the pinion snubber! Its made by energy suspension and its called a bump stop or something.
Also remember that most advance and autozone stores should carry the pinion snubber! Its made by energy suspension and its called a bump stop or something.
great writeup! I have gone through like 3 diff mounts and 2 rear subframes. If I dont break a diff mount, the subframes diff mount will break instead -_- Getting sick of going under and replacing the subframe and diff over and over... I shall do this mod haha

Good writeup. Maybe I should do this to my car, I still have stock diff mount and I'm worried about breaking something. So can this install be done without loosening the subframe bolts then, depending on how much the car has been lowered? Also, did you remove your exhaust for this?
Finally, a write up! This mod is very common among v8 FC owners, and it works!
Pinion snubber + MMR diff bushings + comp. front mount = Bulletproof
My sub-link camber adjuster is practically useless now since the diff is so firmly mounted and "snubbed".
It's possible to install this with your exhaust on, but the job is just so much simpler with it out of the way.
Pinion snubber + MMR diff bushings + comp. front mount = Bulletproof
My sub-link camber adjuster is practically useless now since the diff is so firmly mounted and "snubbed".
It's possible to install this with your exhaust on, but the job is just so much simpler with it out of the way.
Thread Starter
Joined: Jan 2006
Posts: 833
Likes: 53
From: Redmond, WA
Good writeup. Maybe I should do this to my car, I still have stock diff mount and I'm worried about breaking something. So can this install be done without loosening the subframe bolts then, depending on how much the car has been lowered? Also, did you remove your exhaust for this?
Trending Topics
i did mine without touching the subframe. What helps is using a dremel to make a "slot" in the stub for the bumpstop so when you have it in the hole, from the inside, you can use a flathead screwdriver to keep the stud from spinning while you tighten the bolt.
Could you elaborate a little further? Maybe post a crude MS Paint diagram or something?
Sequentially broken
Joined: Apr 2003
Posts: 448
Likes: 1
From: Wisconsin
I believe he's saying to dremel a channel in the threaded stud coming out of the snubber. When you have it in the hole you drilled while tightening you can use a flat-head in the channel to keep it from rotating while tightening the nut.

Since the pinion snubber goes over the little block on the front diff mount, it should be possible for me to install that with a broken diff mount (Rubber separated from mount) or do I have to replace the diff mount before I put that on?
Yup, thats part of the reason why this mod is so popular. I'm running mine with a broken front diff mount (but new rear mounts) and it feels waaay better. Not perfect though, you still hear a light thud when shifting but way better than a clunk.

