
How to open the headlight switch?

Thread Starter
Joined: Mar 2004
Posts: 1,529
Likes: 0
From: St. Paul, Minnnesota
How to open the headlight switch?
Right now I have a ghetto wire running from the headlight output from the switch to the parking and instrument lights (not my doing, previous owner) because the switch isn't throwing voltage down the rail that's supposed to power them normally.
It's not a huge deal, but I'd rather have it be wired the way it should, and my remote start is powering up all the lights right now instead of just the parking ones and it kinda bugs me. I'd also like to have my aftermarket flash to pass lights power on in the parking light position (the 1st click on the switch that should just power the parking lights and cluster lights, which does nothing right now).
I checked the harness that runs from the switch to the lower connector, and it's good, but upon checking the switch, there's no voltage being applied to the parking light/cluster light wire.
I attempted to pull the switch assembly apart, and I can't seem to find a way to get at the main switch assembly without breaking crud open. I did spray tons of contact cleaner in there with no results, but some crud did come out.
Has anyone ever pulled one of those switches apart without destroying it (aside from Icemark)?
Former Moderator. RIP Icemark.
Joined: Apr 2001
Posts: 25,896
Likes: 24
From: Rohnert Park CA
Headlight output is ground not 12volts +.
Parking light and dash is 12 volts.
two different circuits controlled by two different parts of the switch.
Maybe if you searched you would have found this:
 which would have helped.
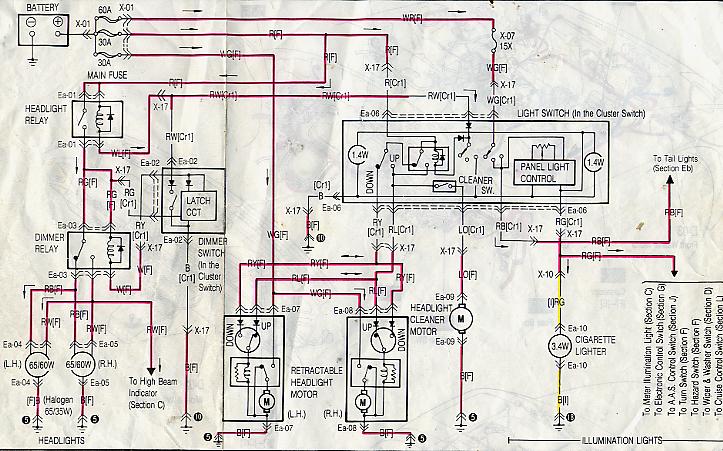
anyway, for parking and dash lights, look at the wht/green it should have voltage.
And the headlight switch assemblies have a cover on one side and you would need to un-solder the board to get to the other side.
I also would use a external relay if you wanted to add any additional lights such as FTP lights. The stock switch is already at its limit on the parking light circuit.
Parking light and dash is 12 volts.
two different circuits controlled by two different parts of the switch.
Maybe if you searched
you would have found this:anyway, for parking and dash lights, look at the wht/green it should have voltage.
And the headlight switch assemblies have a cover on one side and you would need to un-solder the board to get to the other side.
I also would use a external relay if you wanted to add any additional lights such as FTP lights. The stock switch is already at its limit on the parking light circuit.
Last edited by Icemark; Dec 27, 2004 at 08:07 PM.
Thread Starter
Joined: Mar 2004
Posts: 1,529
Likes: 0
From: St. Paul, Minnnesota
Originally Posted by Icemark
Headlight output is ground not 12volts +.
Parking light and dash is 12 volts.
two different circuits controlled by two different parts of the switch.
Maybe if you searched you would have found this:
which would have helped.
anyway, for parking and dash lights, look at the wht/green it should have voltage.
And the headlight switch assemblies have a cover on one side and you would need to un-solder the board to get to the other side.
I also would use a external relay if you wanted to add any additional lights such as FTP lights. The stock switch is already at its limit on the parking light circuit.
Parking light and dash is 12 volts.
two different circuits controlled by two different parts of the switch.
Maybe if you searched
you would have found this:which would have helped.
anyway, for parking and dash lights, look at the wht/green it should have voltage.
And the headlight switch assemblies have a cover on one side and you would need to un-solder the board to get to the other side.
I also would use a external relay if you wanted to add any additional lights such as FTP lights. The stock switch is already at its limit on the parking light circuit.
In your experience, what do you think is causing it to not work on the second position? I'm guessing the contacts are toast, or I have to resolder all the connections.
Former Moderator. RIP Icemark.
Joined: Apr 2001
Posts: 25,896
Likes: 24
From: Rohnert Park CA
Originally Posted by uRizen
Cool, so you do have to de-solder that puppy. I'll have to print that diagram off and go over it. Whatever that wire is connected to, it goes hot when the switch is clicked to the full on position. I'll have to yank it off on my next consecutive days off and play with it.
In your experience, what do you think is causing it to not work on the second position? I'm guessing the contacts are toast, or I have to resolder all the connections.
In your experience, what do you think is causing it to not work on the second position? I'm guessing the contacts are toast, or I have to resolder all the connections.
It is difficult for the above average person with above average soldering skills to remove the board. Expect to waste a couple in your learning process.
Thread Starter
Joined: Mar 2004
Posts: 1,529
Likes: 0
From: St. Paul, Minnnesota
Originally Posted by Icemark
Burnt traces, rather than contacts.
It is difficult for the above average person with above average soldering skills to remove the board. Expect to waste a couple in your learning process.
It is difficult for the above average person with above average soldering skills to remove the board. Expect to waste a couple in your learning process.
I am going to hit up the yard to see if I can snag a switch for cheap and rebuild that one rather then rushing myself to get my DD back together before I have to work. Thanks for the advice though, I have another project to keep me busy until the snow thaws.

Thread
Thread Starter
Forum
Replies
Last Post
Jeff20B
1st Generation Specific (1979-1985)
73
Sep 16, 2018 07:16 PM
The1Sun
1st Generation Specific (1979-1985)
0
Sep 7, 2015 10:21 PM