
The Holy Grail (Part Deux)

... I figured that the worst that could happen was the brakes dragging for a little bit.
The original measurements lead to a pushrod that was .625" with a .400 recess to slip over the Honda rod...so I was extending by .225" to mate with the MC piston.
I made a new piece (with the same recess) that was .685 long and figured I could whittle it down if need be.
Doesn't seem to be necessary.
Even with this "preload" on the piston, the brakes don't drag...I must admit I'm somewhat at a loss for an explanation.
The brakes DO drag, it just takes a few hard stops to make it happen.
I traveled a very twisty, curvy road today and by the bottom the brake pedal had almost no play left at all. They weren't seized but getting close, I think.
Fortunately, I had come prepared and ten minutes later the correct spacer was in and all was good.
So, for the record...DO NOT SCREW WITH THE PUSHROD LENGTH.
Make sure it's correct and let it be.
You CANNOT "tune" the brake feel by preloading the MC piston.
Live and learn.
Fate conspires against me.
As I wandered the junkyard yesterday I had to make way for one of their giant forklifts bringing in a new victim...er, car, which was dropped almost literally at my feet.
It was a 929, the first one I've seen since I began this brake treasure hunt.
There was no hesitation or questioning, I knew I was going to nab the booster/MC- after all, this was the mythological combo that triggered the whole quest in the first place.
The car was intact, engine in place.
Looking back on it, I wonder what the book time would be to R&R a Mazda 929 booster assembly, cause it ain't easy to do. After clearing away the obvious impediments- wiper motor, cruise control actuator, various hoses and electrical runs- I thought I was ready to weasel the booster out.
HA!
Not gonna happen.
OK then, remove the MC from the booster, something I'd been hoping to avoid so brake fluid wasn't dripping all over the place.
Helped some, but still no go.
Long- agonizing, frustrating, sweaty- story short, I ended up removing the entire intake and driver's side valve cover before the booster was able to be squeezed- by the hair of it's chinny, chin chin, out off the firewall.
Took 3 1/2 hours all told.
So, what did all this effort net me and, more important to the (hazily distant) spirit of this thread, how difficult is this combo to adapt to a stock RX?
The booster is deeper than the single diaphragm unit I started with (lo, these many iterations ago) by about 1".
Shouldn't be a problem for most folks.
The port for the vacuum hose is on the wrong side- think 10 o'clock instead of 2 o'clock- and poorly angled...the vacuum hardline on the firewall will have to be modified to suit.
On the upside, the booster pushrod is a 10mm thread, so the stock clevis for the pedal will screw right on.
Thank Jeebus for small favors.
The master cylinder itself has but two outlet ports instead of our stock three.
Fortunately, the front circuit port (at the very end of the unit) comes stock with a banjo, so it's already machined flat and will accept the two port banjo from the Mitsubishi Montero I noted previously.
The stock proportioning valve bracket from the RX will not fit, you'll be on your own figuring where and how to locate this valve.
The 929 low fluid sensor looks strikingly similar to the stocker- even down to the connector- but if it won't work, I'm sure the RX piece will go right in...the reservoirs appear identical save that the 929 part has a screw retaining tab and my stocker does not. The reservoir caps will interchange.
All in all, starting with a stock car, swapping to the 929 set up would not be terribly difficult as long as you were careful with the proportioning valve placement. You'd have to tweak the hardlines to mate with the valve and the driver side front line would need a bit of bending as well, but nothing too major.
I suppose I'm almost duty bound to install this and report on how it feels but the prospect does not thrill me- I've installed more boosters/MCs in the past month than most folks do in a lifetime.
If it does go in, it's going to be the final install (oh yeah, like you haven't said that before!) before winter, so I'll redo the hardlines (again!) to make it look pretty. I'm going to clean and paint the booster first- it took some abuse trying to get it out- so it looks nice as well. I'll also have to fab up some sort of bracket to mount the prop valve...so anyway, it may be a week or so before I know whether this is truly the "Holy Grail" or just a tin cup.
I'll keep you posted.
Lives on the Forum
Joined: Sep 2003
Posts: 5,707
Likes: 6
From: BC, Canada
The guys at the junkyard where I got my booster indicated that the engine had to be pulled, you seem to have pretty much confirmed this.
I should be starting in on my install this weekend, but I won't be able to report back for a while, as I'm still waiting on some parts that I need to finish the job. I'll do a writeup when I'm done.
I should be starting in on my install this weekend, but I won't be able to report back for a while, as I'm still waiting on some parts that I need to finish the job. I'll do a writeup when I'm done.
Well, pulling the engine would have made life a lot simpler but was not an option, so I did what I had to do.
I usually try to be respectful towards my donor cars- and the people who will follow me picking at it- but I admit that halfway through this removal, all the nice-guy stuff ended and I went medieval on it's ***.
Sadly, this car was not up on blocks and I couldn't access the engine mounts, which would have been my first choice...undo the motor and just wedge it over the necessary 1/2", done.
Oh well, what's done is done.
Lives on the Forum
Joined: Sep 2003
Posts: 5,707
Likes: 6
From: BC, Canada
Well my 929 booster and MC are in the car and I've hooked up the front lines (came from a 1992 929 with ABS if anyone wants to know). Because I'm ditching the stock proportioning valve and going with one that's adjustable from the driver's seat, I've got some more plumbing changes to make for the rear lines, and I've got to wait on some fittings for that. Because of that it'll be a while before I can report back on how it feels. I mounted a tee for the front lines on the proportining valve bracket (same tee as on the rear axle). I trimmed the bracket so that it's only held on by the one nut, which I'm hoping will be alright, as the reservoir gets in the way of it reaching the far nut. The 929 reservoir looks bigger than the FC reservoir (seems appropriate, bigger MC needs more fluid) and the connection on my sensor was different, so I swapped in the FC sensor, it fits right in. The clevis definitely needs to be swapped since it's narrower than the FC one.
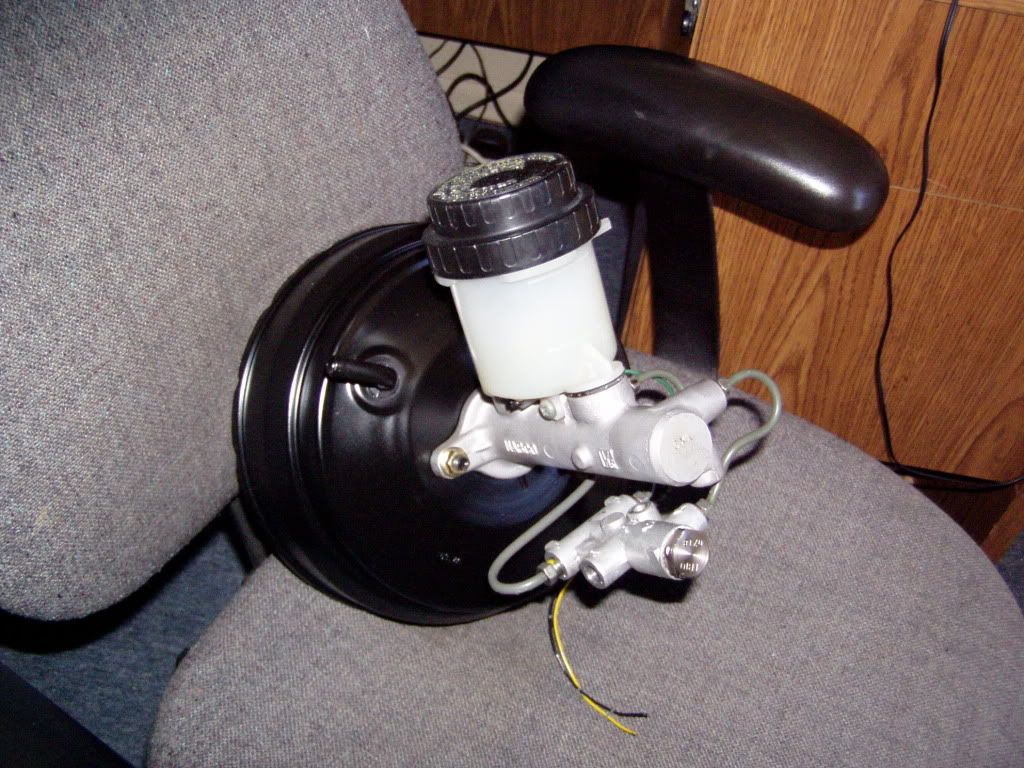
I took some side by side pictures of it and my stock MC/booster, I'll post them up later.
I took some side by side pictures of it and my stock MC/booster, I'll post them up later.
Yup, that's it all right.
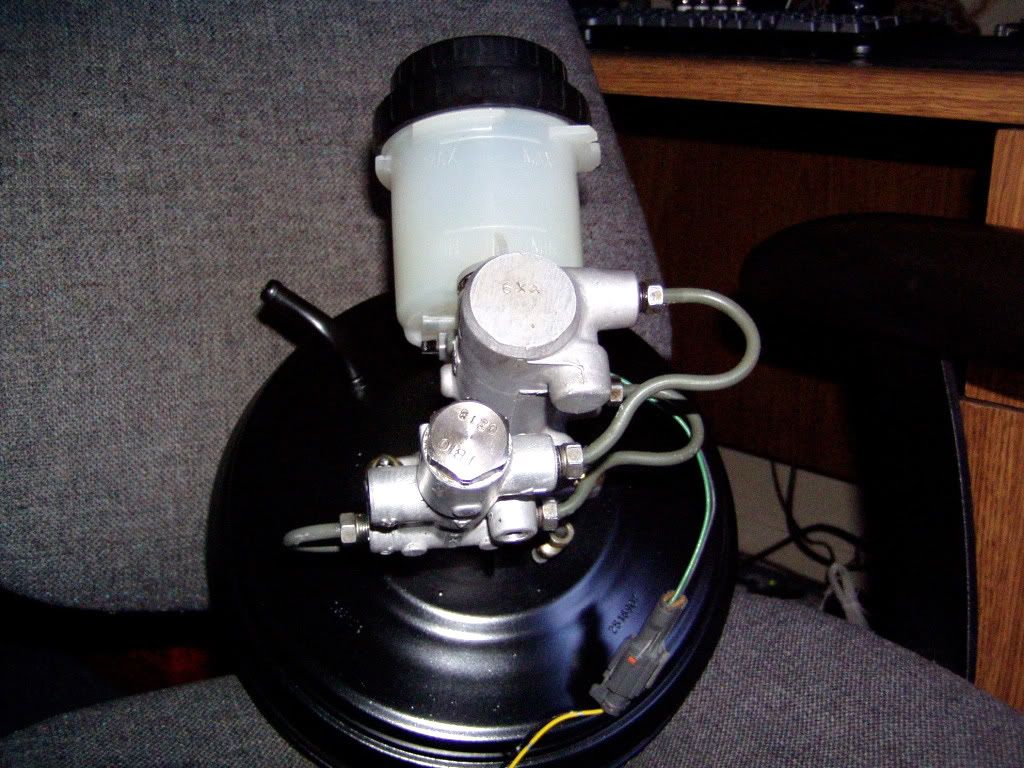
Shown in the third pic is the reversed vacuum line nipple, in the greater scheme of things not all that big a deal, but worth noting.
Also semi-visible is the difference in outlet ports, again, pretty easy to overcome (especially if you've been hoarding brake lines/fittings like I have).
Neither the extra depth of the booster ( see pic 2) nor the extra height of the reservoir (pic 3) should pose any problems for a stock car.
Did yours not come with the prop valve and it's bracket?
Neither are particularly useful, just curious.
A quick comment about the clevis...because of our "racing" aluminum pedal assemblies, the RX has by far the widest clevis of any car I've seen in yard.
It's a blessing that the input shaft of the 929 booster is the same thread as the RX and the clevis will simply screw on. This is not the case with some of the other boosters I have and makes for one more step to deal with.
Lives on the Forum
Joined: Sep 2003
Posts: 5,707
Likes: 6
From: BC, Canada
That's all that it came with, minus the banjo fittting which I hadn't figured out that I needed. I bought it from the Mazda dealer as I had a bunch of other stuff to get from them anyway.
If you are able to perform your own picking at the yard, the 929 w/ABS not only has that banjo on the MC but 3 identical banjos on the top of the ABS unit...which I snagged, naturally.
The ABS also has a couple of short, interestingly configured hardlines that are worth nabbing as well.
My 929 combo is all set up and ready to install- made a new bracket to mount the prop valve and installed the Montero double banjo on the front port. Painted the booster, cleaned the MC and reservoir.
Opened the hood of my car, stared at the current brake set up, stared at the 929 unit...and decided not to bother.
I already have the bigger double diaphragm booster and a 1 1/16" MC and it's all plumbed in and working fine.
Can't really see how the 929 could be any better (although I'm sure it's better than the stock combo).
Think I'm just going to call it quits and sell off the 929 set up.
So Black, it's up to you to tell us how you like this one...
Lives on the Forum
Joined: Sep 2003
Posts: 5,707
Likes: 6
From: BC, Canada
I should have all the parts I need to put the car back together by the weekend (doing more than just the brake work), so hopefully by next week I'll be able to report back on how it feels.
The siren call was too much to resist...I decided to try the 929 setup myself.
It wasn't the MC or the booster that intrigued me, it was the proportioning valve that it had.
On the two output ports were large hex extensions that the lines screw into...I'd seen similar looking parts on a few MCs but didn't pay much attention (and didn't know their function).
Did some research and found that they're residual pressure valves, meant to retain a minimum pressure in the lines to increase the pedal firmness. They are commonly seen on cars where the MC is lower than the calipers (think floor mount pedal assembly) and gravity would cause the fluid to drain back to the MC.
I thought it was odd that the 929 would use them since the MC wasn't low and was curious how they worked. Both Wilwood and Tilton sell these valves and I read all the install PDFs to see if they were position sensitive and saw nothing to indicate they were. I investigated this because I wanted to mount the prop valve horizontally below the MC to make a cleaner install.
I also decided not to push my luck with an unknown bias curve, so I swapped the spring from a spare RX valve into the 929 valve- they are physically almost identical (the 929 part has two mounting holes instead of one), hoping to keep the front/rear bias consistent with my previous experiments. Kind of waiting on Black91n/a's results with the aftermarket adjustable bias valve before spending the money on one.
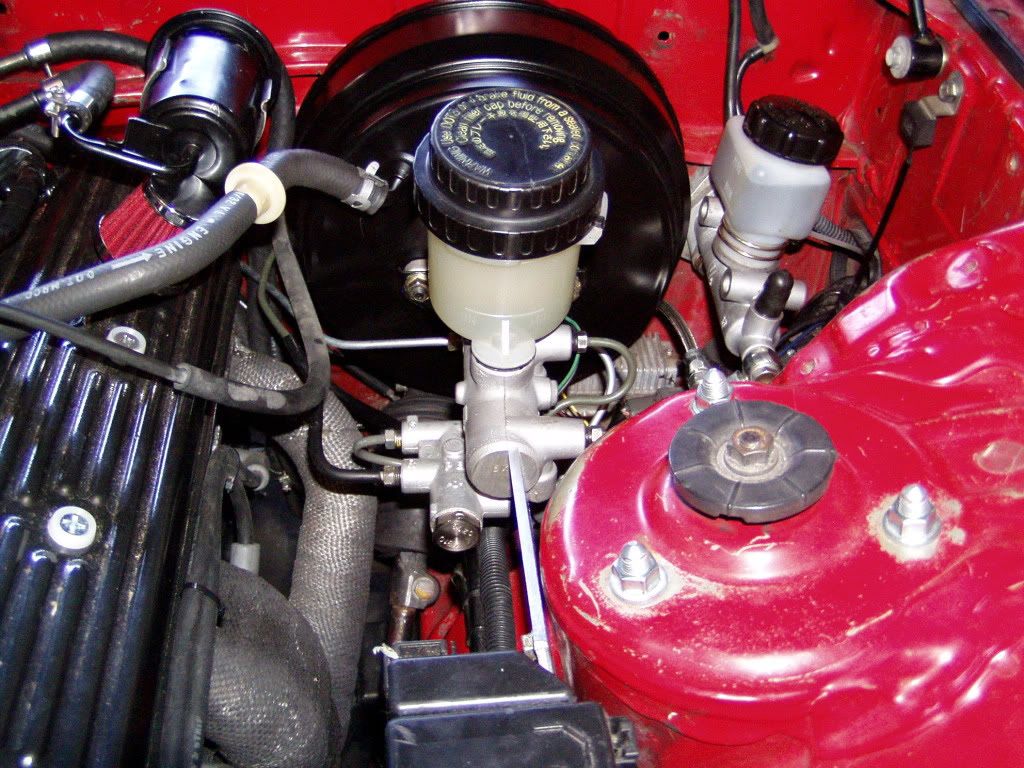
It was pretty simple to plumb the MC/prop valve to achieve the layout I wanted, here's how it looks installed...
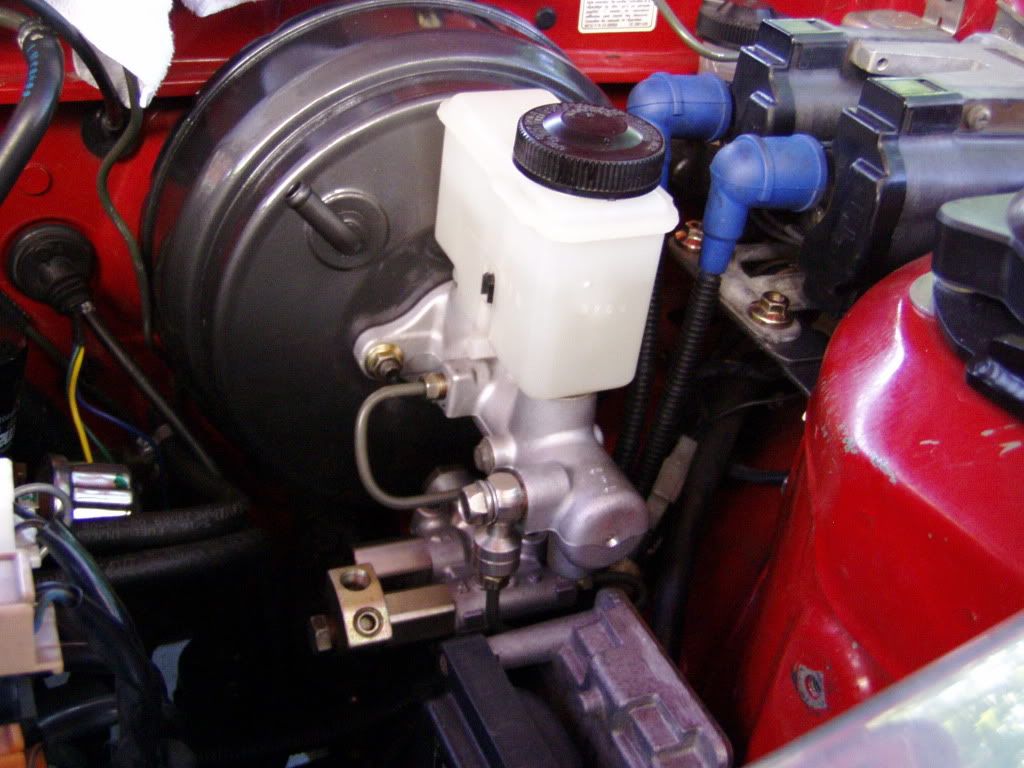
Note the Mitsubishi Montero twin banjo fitted to the front circuit outlet port (ignore the plug in one hole, it was later removed)...this not only gave me the two ports I needed but also meant that both front calipers would enjoy the benefits (presumed, at this point) of the residual pressure valve.
Also note the layout of the vacuum line nipple.
I had originally planned on modifying the firewall hardline to better fit this layout but I had a hose with integrated check valve that was useable, so I delayed the modification till I decided it would be permanent.
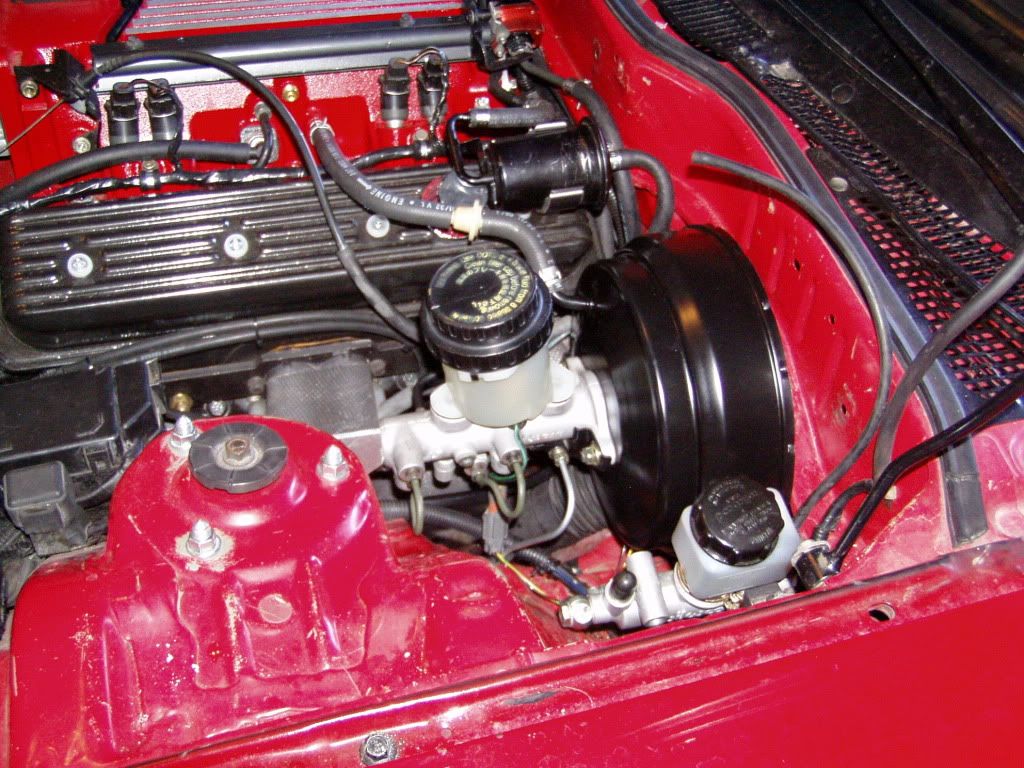
I remade the front brake circuit hardlines to better fit this new arrangement...
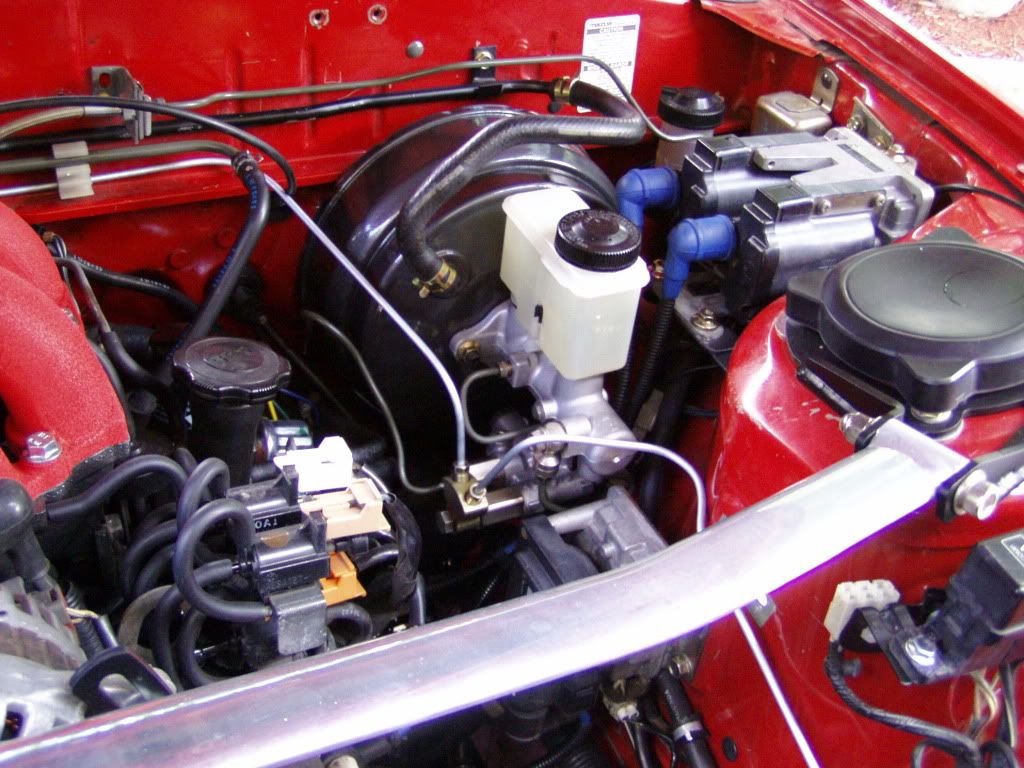
...which eliminated the braided steel softlines and several connection points.
I've actually come to enjoy the challenge of fabbing nice looking hardlines...it's not as easy as it looks but done correctly, makes a big difference in the engine bay appearance.
I keep meaning to redo the line for the rear circuit but am waiting till I finalize the booster/MC to do so.
I've also considered investing in a pro-quality flaring tool so I can make lines from bulk hardline and quit depending on generic pre-made lines but that will have to wait. Besides, for a part like the front passenger side hardline it's actually simpler to bend and use two pieces with a splice connector than attempt to weasel one piece into position around all of the engine bay components. Try removing the stock line with the engine installed and you'll see what I mean.
I had a dinner engagement last night so I ran out of time to bleed the system, that's on the agenda for this morning.
Should be interesting to see how this works out.
It wasn't the MC or the booster that intrigued me, it was the proportioning valve that it had.
On the two output ports were large hex extensions that the lines screw into...I'd seen similar looking parts on a few MCs but didn't pay much attention (and didn't know their function).
Did some research and found that they're residual pressure valves, meant to retain a minimum pressure in the lines to increase the pedal firmness. They are commonly seen on cars where the MC is lower than the calipers (think floor mount pedal assembly) and gravity would cause the fluid to drain back to the MC.
I thought it was odd that the 929 would use them since the MC wasn't low and was curious how they worked. Both Wilwood and Tilton sell these valves and I read all the install PDFs to see if they were position sensitive and saw nothing to indicate they were. I investigated this because I wanted to mount the prop valve horizontally below the MC to make a cleaner install.
I also decided not to push my luck with an unknown bias curve, so I swapped the spring from a spare RX valve into the 929 valve- they are physically almost identical (the 929 part has two mounting holes instead of one), hoping to keep the front/rear bias consistent with my previous experiments. Kind of waiting on Black91n/a's results with the aftermarket adjustable bias valve before spending the money on one.
It was pretty simple to plumb the MC/prop valve to achieve the layout I wanted, here's how it looks installed...
Note the Mitsubishi Montero twin banjo fitted to the front circuit outlet port (ignore the plug in one hole, it was later removed)...this not only gave me the two ports I needed but also meant that both front calipers would enjoy the benefits (presumed, at this point) of the residual pressure valve.
Also note the layout of the vacuum line nipple.
I had originally planned on modifying the firewall hardline to better fit this layout but I had a hose with integrated check valve that was useable, so I delayed the modification till I decided it would be permanent.
I remade the front brake circuit hardlines to better fit this new arrangement...
...which eliminated the braided steel softlines and several connection points.
I've actually come to enjoy the challenge of fabbing nice looking hardlines...it's not as easy as it looks but done correctly, makes a big difference in the engine bay appearance.
I keep meaning to redo the line for the rear circuit but am waiting till I finalize the booster/MC to do so.
I've also considered investing in a pro-quality flaring tool so I can make lines from bulk hardline and quit depending on generic pre-made lines but that will have to wait. Besides, for a part like the front passenger side hardline it's actually simpler to bend and use two pieces with a splice connector than attempt to weasel one piece into position around all of the engine bay components. Try removing the stock line with the engine installed and you'll see what I mean.
I had a dinner engagement last night so I ran out of time to bleed the system, that's on the agenda for this morning.
Should be interesting to see how this works out.
System is bled...finally.
For the first time during this long journey I had to bench bleed the MC, I couldn't get anything to happen on the rear circuit.
Made up a quickie bleed kit from a spare chunk of hardline and a few inches of soft tube, gave it a few quick pumps and was good to go.
Took a short test drive through the neighborhood to confirm that I actually had brakes- always a good thing to check- and am ready for a real run.
The pedal feels quite different...very short throw- by far, the shortest yet- and very firm.
Oddly, for as stiff as the pedal feels, it's quite easy to modulate.
At first I was concerned that I'd installed an "ON/OFF", all or nothing type of system but that doesn't seem to be the case. Some seat time will give me a better idea.
Now I need to get a longer drive in to get some heat in the system and see how she responds.
I guess my main concern is that the brakes will drag- after all, the residual pressure valves are supposed to make the brakes drag a little, just not enough to hurt.
In theory, at least.
We'll see.
Senior Member
Joined: Feb 2008
Posts: 309
Likes: 0
From: South Florida
Well my 929 booster and MC are in the car and I've hooked up the front lines (came from a 1992 929 with ABS if anyone wants to know). Because I'm ditching the stock proportioning valve and going with one that's adjustable from the driver's seat, I've got some more plumbing changes to make for the rear lines, and I've got to wait on some fittings for that. Because of that it'll be a while before I can report back on how it feels. I mounted a tee for the front lines on the proportining valve bracket (same tee as on the rear axle). I trimmed the bracket so that it's only held on by the one nut, which I'm hoping will be alright, as the reservoir gets in the way of it reaching the far nut. The 929 reservoir looks bigger than the FC reservoir (seems appropriate, bigger MC needs more fluid) and the connection on my sensor was different, so I swapped in the FC sensor, it fits right in. The clevis definitely needs to be swapped since it's narrower than the FC one.
I took some side by side pictures of it and my stock MC/booster, I'll post them up later.
I took some side by side pictures of it and my stock MC/booster, I'll post them up later.
I'm sure he'll chime in when ready but I'll bet he's using either a Wilwood or Tilton unit.
The Wilwood is the cheapest and most common, it's rebadged and sold by many "speed" companies.
As far as I'm concerned, the downside to the Wilwood (and it's clones) is that it is tapped for a 1/8 NPT and supplied with an adaptor for -3AN tube nuts. This means your stock line won't fit and so far I've been unable to find a 1/8 NPT male to 10mm x 1 female fitting, so a custom line would have to fabbed up.
The Tilton comes with the correct metric port but is almost twice as expensive- best price I've found is $90.
I took a longer drive...or, to be more accurate, I attempted to.
Brakes began dragging severely within 10 miles, so bad that I had to stop and let them free up several times as I limped home.
Giant PITA, believe me.
During the long limp home I decided that the problem had to lie with the residual pressure valves...maybe suitable calipers have some sort of adaptation to accommodate the extra line pressure or something, I don't really know.
This left me in somewhat of a pickle as the new brake lines were perfectly fit to the prop valve with the residual valves in place, losing those valves would mean all new brake lines (again!).
In a fit of desperation I decided to attempt gutting the residual valves and using them as spacers only, thus preserving the current layout.
I chucked one up in the lathe and turned down the end, which appeared to be folded over to retain the innards.
This proved true and a spring and valve assembly popped right out leaving an empty hex piece that wouldn't affect the line pressure at all.
Reassembled and rebled the system.
First test ride...OK.
Second- longer- test ride- OK.
I think it's going to be fine but I'll not be convinced till she's been run longer.
Pedal travel increased about 1/2" (now totals about 1") and the ultra firm feel has disappeared...this combo- the 929 MC/booster + RX7 prop valve- is just about equal to the last few setups I've tried.
Definitely better than stock.
I guess my last option before stopping will be the adjustable valve that Black91n/a is going to try so I, like everyone else, will just have to wait and see what he thinks.
Lives on the Forum
Joined: Sep 2003
Posts: 5,707
Likes: 6
From: BC, Canada
I ended up getting a Wilwood lever type valve from Summit Racing and some 1/8" NPT to M10x1 inverted flare adapters from Flyin' Miata: http://www.flyinmiata.com/index.php?...umber=14-76255
I managed to brake one of those 1/8 to M10 $11 fittings and had to drill it out to extract it from the bias valve, but managed to save the valve (probably my fault, I think I tightened it up too much). So now I'll be using inch size flare nuts with the Wilwood supplied adapters, if I can get some today, being a holiday and all. I've got the lines run to where the valve is going to be, right beside the shifter on the passenger side of the tunnel. I managed to use a single piece of line from the MC to the valve and then another single piece from the valve to the tee at the back (requires transmission and exhaust removal). I did it that way to eliminate the joint where the stock prop valve was and to eliminate the need for another couple joints to splice in lines to and from the stock line to the rear. I also re-made the front left hardline to make it reach the tee I added where the stock prop valve once lived. It's a bit tricky feeding the lines in through and around everything, but it's doable. A note to those who think they might try it, make a template out of a short piece of line for the section going up and around the tunnel, then copy it onto the finished piece, that way there's much less risk of screwing up a large piece of line. Also, make sure to secure the line to the chassis and use gromets where the line goes through the tunnel.
Lots of racers have done what I'm doing, that is taking out the stock valve and adding in an adjustable one, so it's nothing new really. I'll report back as soon as I've gotten a chance to drive it, but there's still quite a bit of work left to do on it, and I don't want to put the transmission back in until I've had a chance to bleed and pressure test the system.
Why the lever instead of the infinitely adjustable screw type?
The convenience factor?
Well, I found a new thing that it's possible to screw up.
A longer test ride this AM locked up the brakes again.
As I sat by the side of the road I tried to think of what could be the cause...I'd eliminated the residual pressure valves, so that couldn't be it and the MC and booster had been removed as a complete unit from the donor car, so I doubted that booster to MC pushrod was misadjusted.
The only adjustable thing left was the pedal to booster pushrod and that had been set to the same length as all the other installs but it was the only logical option left short of deciding that the booster was faulty.
Unfortunately, I had no tools with me- ever the optimist!- so the only thing I could do was pull the vac line from the booster and release the assist.
This immediately freed the brakes.
I managed to make it home, although not having the vacuum assist working meant that I essentially had no brakes.
Let the car cool down and checked the brake pedal free play.
None.
Loosened up the adjusting rod till there was about 1/8" play before I could feel the rod engage with whatever it is it does in there and drove for a while to heat up the brakes.
Stopped, and checked freeplay, which had decreased.
Without adjusting anything I drove some more.
Brakes didn't drag so I increased speed and made a few harder stops (I'm in a giant Costco parking lot which has become my personal test area).
This time when I stopped I adjusted all but a RCH of the freeplay out, figuring that the system had heated up to it's normal temp.
More test runs/stops and all is still good.
Out onto the highway and several stops from higher speed and she's still fine.
So, I may have figured it out.
Now I'm sorry that I sacrificed the residual pressure valves to my misdiagnosis but that's the way it goes when you fumble around in unknown territory.
If I spot another 929 in the junkyard I'll pull the prop valve and maybe try it again.
Maybe.
Anyway, the moral of the story is don't assume anything on your adjustments.
Start loose and fine tune till you're right.
I hope I can remember my own advice...
Lives on the Forum
Joined: Sep 2003
Posts: 5,707
Likes: 6
From: BC, Canada
I may decide to go with a **** later on, or if I'm feeling really ambitious, I may try to make a lever arrangement with more levels of adjustment, focused more around the range that I need. I don't really need it to be as adjustable as it is now, since I'll really only ever set it to two or three settings, so it'd be nice to have, say 10 settings in that narrow range to get the best of both worlds.
Lives on the Forum
Joined: Sep 2003
Posts: 5,707
Likes: 6
From: BC, Canada
I'll post up some pictures later, but for now I'll be concentrating on getting the transmission back in and generally getting it back together. It won't help that I'll be busy the next 3 weekends either, so it may take a while.
Lives on the Forum
Joined: Sep 2003
Posts: 5,707
Likes: 6
From: BC, Canada
I would assume so, since I can lock up the rears for sure, even with race tires. The brake booster/master cylinder change is a mod for feel ONLY. It has nothing to do with adding braking force or anything along those lines. The different proportioning valve in my case is because on track the car will lock the rears before the fronts, which is bad.
I would assume so, since I can lock up the rears for sure, even with race tires. The brake booster/master cylinder change is a mod for feel ONLY. It has nothing to do with adding braking force or anything along those lines. The different proportioning valve in my case is because on track the car will lock the rears before the fronts, which is bad.
Lives on the Forum
Joined: Sep 2003
Posts: 5,707
Likes: 6
From: BC, Canada
I haven't had a chance to get the car back together yet as I've been busy and I managed to sprain my ankle playing rugby. The race tires in question were Hankook Z211, hard compound, 225/50/15.
Back from the dead, seven months later...because I never stopped working on this project (just stopped writing about it).
Two major news items to impart...
-No matter what your brake system is now (assuming basic functionality, natch), the easiest and by far best bang fer the buck mod you could do is adding a master cylinder brace.
I had been aware of the concept for a while (see Black91n/a's excellent writeup here) but it wasn't till I was working on the project car (FD) that I saw how dramatically the firewall and booster can flex if left unbraced.
I immediately made one (albeit simpler than Black's) for my dd FC.
Seriously, this is one mod that will produce an immediate and easily perceptible result...your pedal feel/modulation will improve.
Note: All photos are of the FD but the concept and execution are functionally identical. This is also true for the MC/booster info to follow...)
My braces are just simple truncated triangles cut from 3/16" aluminum plate.
They mount just as Black91's do and the ends were filed/sanded to butt flush against the MC end.
When installed, this flat plate brace does not hit the MC dead in the middle- it's offset by @1/8".
Since these were prototypes I figured I'd deal with that later, I was more interested in the results and hoped this offset wouldn't matter.
In practice, it does not.
I could (and probably will) tart the design up and make it fit perfectly but the simple easy design works just fine.
You should try it.
-I have continued my pursuit of suitable swap candidates for our cars.
My FC currently sports the booster/MC from an Acura Integra (1" bore diameter, twin diaphragm booster) which in my opinion works just as well as the 929 parts
(to be fair, I never tried the 929 setup with the brace, so results aren't directly comparable).
Always in the back of my mind was the 1 1/16" Subie MC and the inconsistent results I'd gotten both times I'd tried it.
While researching the Honda parts I came upon a thread where the Integra guys were upgrading their systems to a different model booster and describing dramatic improvements.
I took this with several grains of salt but it did get me thinking.
Prior to this I'd never given any thought to the possibility that boosters were "tuneable" for feel and pretty much figured that one similarly sized booster was the same as any other.
If this wasn't true, perhaps my large Subie MC needed the matching Subaru booster to work as intended.
Now, there's a reason I had never tried this.
Subaru builds their chassis around the brake booster.
Swear to god, it's ridiculous how tight the confines around the booster are, it took me nearly an hour to weasel it out without scarring it up (the donor car was a 1997 Subaru Legacy 2.5l GT and the engine bay was empty).
With a matching booster and MC finally in hand, I prepped for install into the 3rd gen (which, bear in mind, has a nearly identical brake system to the FC). One nice thing about this Subaru booster is that the input shaft is 10mm, so the Mazda clevis will screw right on- Honda and Toyota use 8mm which requires modifying your stock clevis.
This is it plumbed to fit our custom hardlines...
And installed into the FD...
The brace is also visible in these shots...
The setup is superb.
A worthy upgrade from the 929/Integra brakes, IMO (I'm now hunting one for my FC).
Pedal is firm, responsive and surprisingly easy to modulate.
I had been afraid of ON/OFF brakes with this much larger MC but that is not the case.
Paired with the brace, I don't see how you could do much better with stock calipers/rotors.
When I do find a candidtae for my FC, I'll also be trying the 929 proportioning valve with residual pressure valves.
Dunno how that will work but it's the last variation I can think to try.