
The Holy Grail (Part Deux)

From the 2nd gen. sticky:
https://www.rx7club.com/2nd-generation-specific-1986-1992-17/frequently-asked-questions-2nd-generation-rx-7-faq-fc-494667/
" GS = Sporty Model (in CAN)
GT = Sporty Model with Turbo
GT Limited = fully loaded every option turbo model.
GTU = Sporty model in 88, base model in 89-90 (in USA)
GTUs = Sporty model in 89-90 (in USA)
GX = Luxury Coupe model (in CAN)
GXL = Top line Luxury non turbo model "
I am indeed wrong about there not being a GTU from 89-91. I mistakenly thought they were similar, but considered "Base". I hate misinformation in the forum, so I had to point this out.
Back on topic:
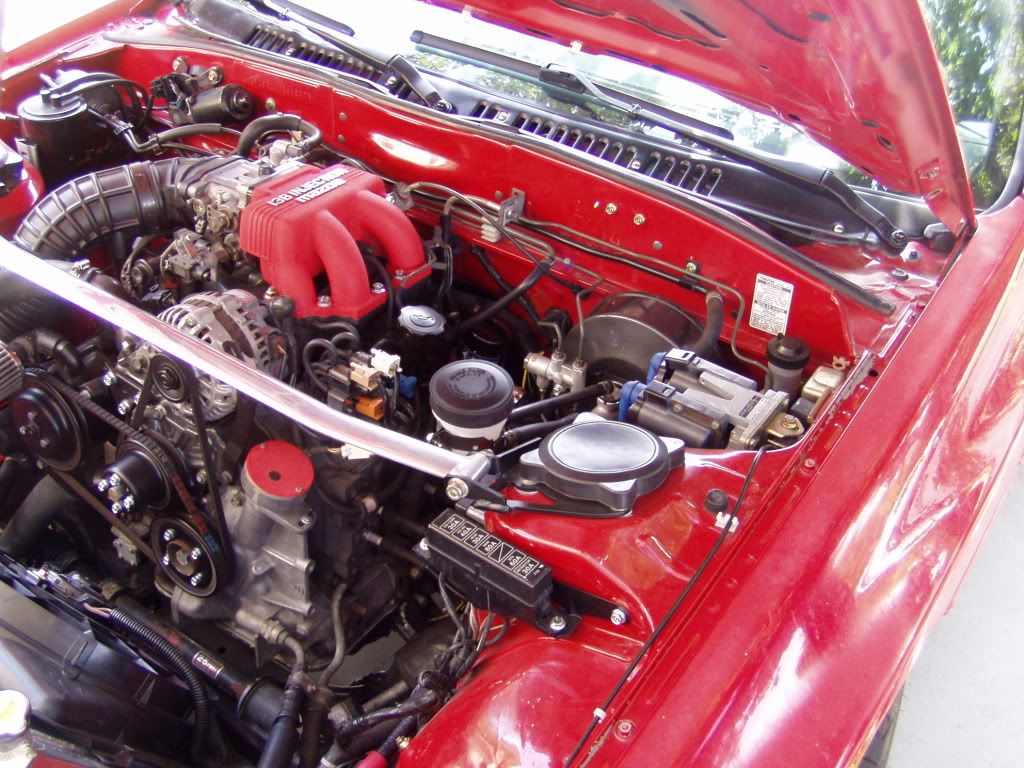
So (OP), you have the single piston Mazda booster, mounted to the Subaru Master and Toyota 3-way junction/union?
https://www.rx7club.com/2nd-generation-specific-1986-1992-17/frequently-asked-questions-2nd-generation-rx-7-faq-fc-494667/
" GS = Sporty Model (in CAN)
GT = Sporty Model with Turbo
GT Limited = fully loaded every option turbo model.
GTU = Sporty model in 88, base model in 89-90 (in USA)
GTUs = Sporty model in 89-90 (in USA)
GX = Luxury Coupe model (in CAN)
GXL = Top line Luxury non turbo model "
I am indeed wrong about there not being a GTU from 89-91. I mistakenly thought they were similar, but considered "Base". I hate misinformation in the forum, so I had to point this out.
Back on topic:
So (OP), you have the single piston Mazda booster, mounted to the Subaru Master and Toyota 3-way junction/union?
The junction block is only there to substitute for the missing front port (the Mazda MC has two ports for the front, the Subie unit only one).
After the junction block the lines are exactly as stock and the proportioning valve is in place.
Even this is somewhat muddled since they make no distinction between NA's with 4-pistons and those without...Mazda says the boosters are sized for either NA or Turbo models, so I can only assume that a 4-pistoned NA got the larger MC and booster while the Turbo got the larger MC but the smaller booster.
Confusing, no?
Anyway, I took the car over to my local rotary specialists and we power bled the brakes (just as a precaution) and both the mechanics drove the car and absolutely loved the brake feel.
I must say I'm warming up to them myself but that didn't stop me (pun intended) from hitting the junkyard again and picking up two more MCs...a 15/16" remote reservoir Mitsubishi unit ( 15/16" is the same size as the larger Mazda RX cylinder) and another Subaru part, this one 1".
So I now have the full range of sizes...everything from 7/8" to 1 1/16" in 1/16" increments.
If my ambition holds out I plan on swapping them in and seeing whether sheer size matters most or whether there's a sweet spot somewhere in between.
If nothing else, by the time I'm done I'll be an expert installing master cylinders.

This may not help clarify things, but from the attached page in the FSM for 89-91 S5s, it seems to clearly specify that both Type A (single-piston front brake NA cars) and Type B (Sport suspension NA cars, with 4-piston front brakes) had the same brake booster and MC, not the larger diameter MC and dual-diaphragm booster of the turbo cars. So an NA with the sport suspension is not going to donate a larger diameter MC, at least not from an S5.
My guess is a 15/16" or 1" might hit a nice sweet spot between travel and force - interested to know your results regardless.
My guess is a 15/16" or 1" might hit a nice sweet spot between travel and force - interested to know your results regardless.
With about 100 miles on this new setup, my opinion is somewhat mixed.
On the one hand, the brake feel is very "race car like" (or at least as I imagine a real race car might feel) with short, firm pedal travel.
Initial application is linear and smooth but then there is a short interval where the car almost feels like it's coasting, followed by a harder bite as the pedal bottoms out. A conscious increase in pressure is needed to get beyond this "coast" phase.
On the street, 99% of your braking is going to fall into the first part of the brake travel, so this MC would seem just fine.
I'm sure that a few weeks of driving and I'd adapt to this arrangement and be completely comfortable.
Then again, I was completely comfortable with the stock brakes, so basically, this just says more about our (my) adaptability than the inherent goodness of the swap.
It occurs to me that from a scientific method of testing, I did this all wrong.
I moved from one extreme (the smallest stock MC) to the other ( the relatively giant 1 1/16" unit).
Although it did serve to confirm the hydraulic theory- i.e., the larger the MC, the shorter the travel but the greater the input effort- the change in feel is almost too great to compare logically.
All I can say is it's really different, not whether it's better or not.
And "better" is a very subjective concept absent any repeatable, quantifiable data -which is probably best obtained at a track of some sort.
Next I think I'll try the 15/16" Mitsubishi unit...primarily because of the aesthetic appeal of the remote reservoir.
I've picked up some different fittings which should simplify and neaten up the brake lines...we'll see how it goes.


Joined: Dec 2006
Posts: 2,859
Likes: 13
From: Sterling Heights, MI
Good stuff  I'm looking forward to seeing your results with the different MCs. I'm definitely considering going this route whenever I get around to the 5-lug swap on my base model.
I vote to add this thread to the archive once it runs it's course.
I vote to add this thread to the archive once it runs it's course.

This may not help clarify things, but from the attached page in the FSM for 89-91 S5s, it seems to clearly specify that both Type A (single-piston front brake NA cars) and Type B (Sport suspension NA cars, with 4-piston front brakes) had the same brake booster and MC, not the larger diameter MC and dual-diaphragm booster of the turbo cars. So an NA with the sport suspension is not going to donate a larger diameter MC, at least not from an S5.
My guess is a 15/16" or 1" might hit a nice sweet spot between travel and force - interested to know your results regardless.
My guess is a 15/16" or 1" might hit a nice sweet spot between travel and force - interested to know your results regardless.
OK, new MC installed.
I was inspecting/cleaning my two remaining cylinders and decided to use the 1" Subaru one first.
It turned out to be the most user-friendly of the three I'm trying.
This unit has four ports- 2 each for the front and rear circuits.
This config eliminates the need for the junction block for the front lines (since it has the same number of ports as stock) and requires only blocking one of the unneeded rear ports.
It also uses the exact same gaskets for the reservoir as the Mistsubishi remote reservoir unit I wanted to use, so I was able to meld the two and have the Subie 1" cylinder mated to the remote rez.
Me likey.
Here's what it looks like...
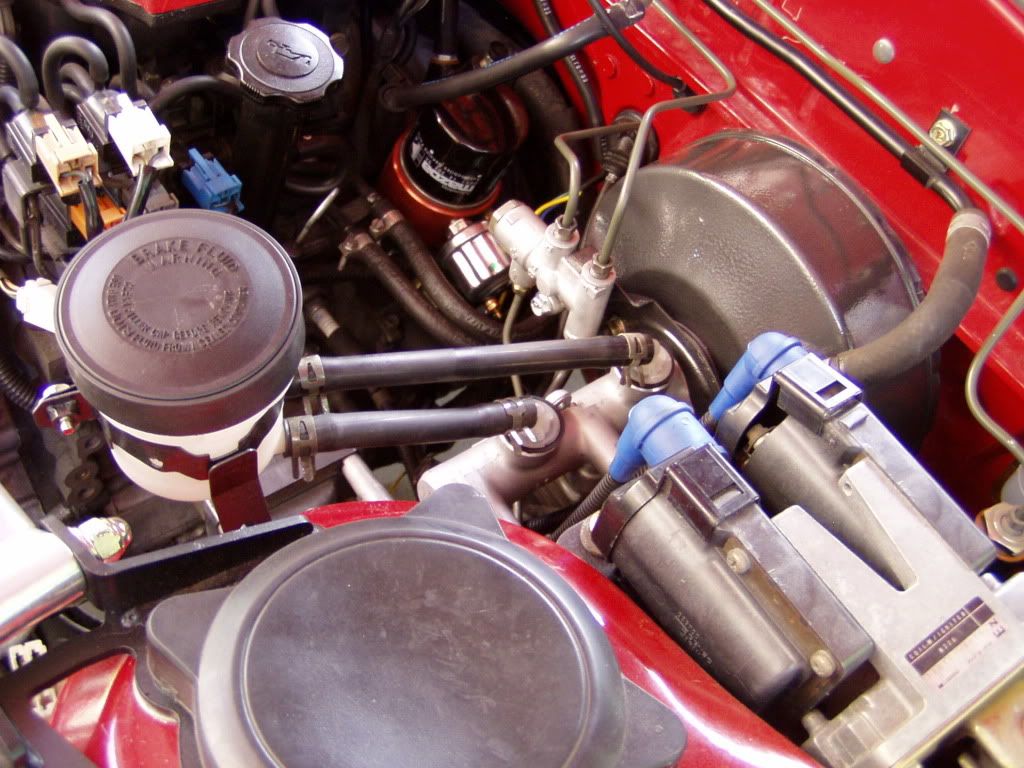
I'm hoping this will be the keeper...initial impressions are very favorable.
Pedal throw is very similar to the 1 1/16" cylinder I just removed but effort is noticeably lighter. The dead spot/coasting sensation seems to have disappeared and brake force feels very linear and progressive.
I need to take an extended drive and get more seat (foot?) time with this setup before making any more comments.
Will let you know.
I was inspecting/cleaning my two remaining cylinders and decided to use the 1" Subaru one first.
It turned out to be the most user-friendly of the three I'm trying.
This unit has four ports- 2 each for the front and rear circuits.
This config eliminates the need for the junction block for the front lines (since it has the same number of ports as stock) and requires only blocking one of the unneeded rear ports.
It also uses the exact same gaskets for the reservoir as the Mistsubishi remote reservoir unit I wanted to use, so I was able to meld the two and have the Subie 1" cylinder mated to the remote rez.
Me likey.
Here's what it looks like...
I'm hoping this will be the keeper...initial impressions are very favorable.
Pedal throw is very similar to the 1 1/16" cylinder I just removed but effort is noticeably lighter. The dead spot/coasting sensation seems to have disappeared and brake force feels very linear and progressive.
I need to take an extended drive and get more seat (foot?) time with this setup before making any more comments.
Will let you know.
The 1" master cylinder is The One (suck it, Neo!).
Put 120 miles on it yesterday evening...mixed city and mountain driving.
Part way through the drive I realized that I wasn't aware of the brakes at all, it felt so natural and normal.
For a street car mod this is the definition of success, works perfectly but doesn't call attention to itself.
Some advice for those who may attempt this...
-The only critical adjustment necessary when swapping out cylinders is the fit of the booster pushrod to the MC piston.
Basically, you want zero- or just a RCH- of clearance when the two are mated...less than that and your brakes are dragging.
Mazda recommends their SST ("Special Service Tool") for this adjustment or you can just use calipers and do some simple math to arrive at the distance that the booster pushrod must protrude.
Since I was working with multiple cylinders, this was getting tedious and I wanted a simpler method.
What I finally came up with was this...
I took a scrap piece of 1" by 1/8" aluminum, about 6" long, and drilled two holes that matched the flange of the master cylinder. Centered between these two holes, I drilled a 1/4" hole.
With the MC removed from the donor car's booster, this piece could be slipped over the cylinder mounting studs and the booster rod poked out of the center hole. Used calipers to measure how far out it came from the surface of the aluminum strip and used a Sharpie to mark this distance on the cylinder itself.
Back on my booster, slip the piece over my studs and adjust the activating rod to the same distance...bang, done!
-Now, about this adjustable booster rod...
The stock Mazda piece is about twice as long as the ones from the Subies I was picking from.
Originally, I just lathed down the Mazda piece to suit (IIRC, I had to take off about .275") but it later occurred to me that it would be simpler to just nab the Subaru rod end, which is much shorter, and use that.
The pieces from the Subaru and the Mitsubishi boosters will both interchange with the stock Mazda booster part...I suspect that they are all getting their boosters from the same manufacturer.
All three rod ends I pulled feature that weird hard to turn thread- looks more like a crude spiral than normal threads- and will interchange freely.
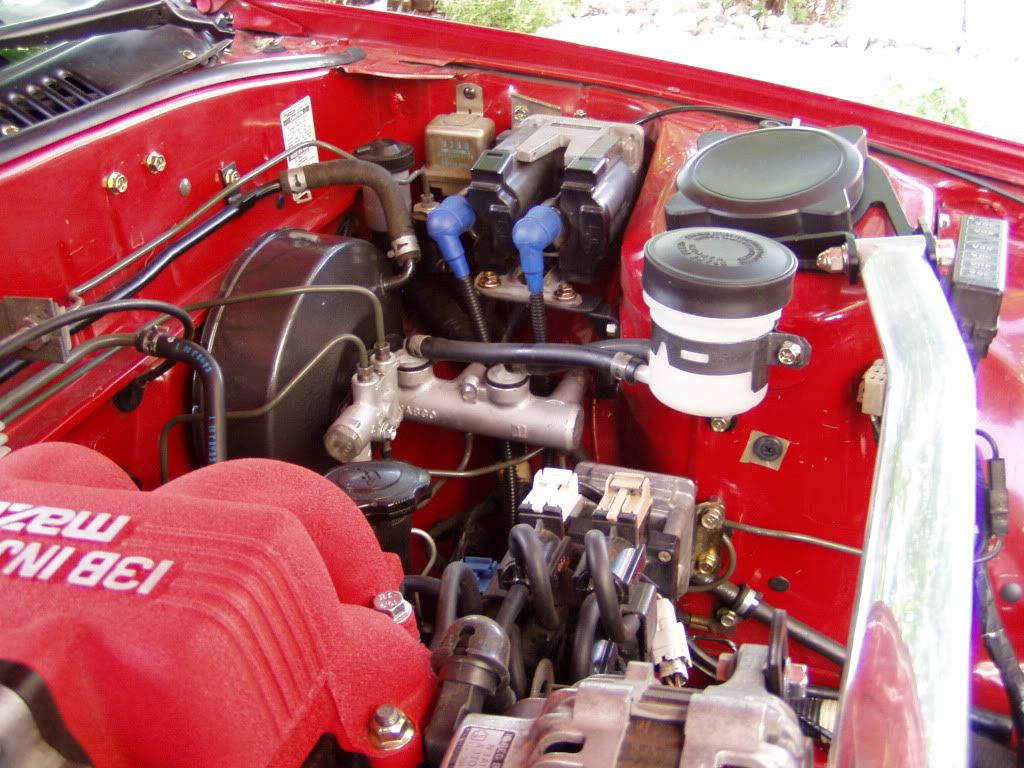
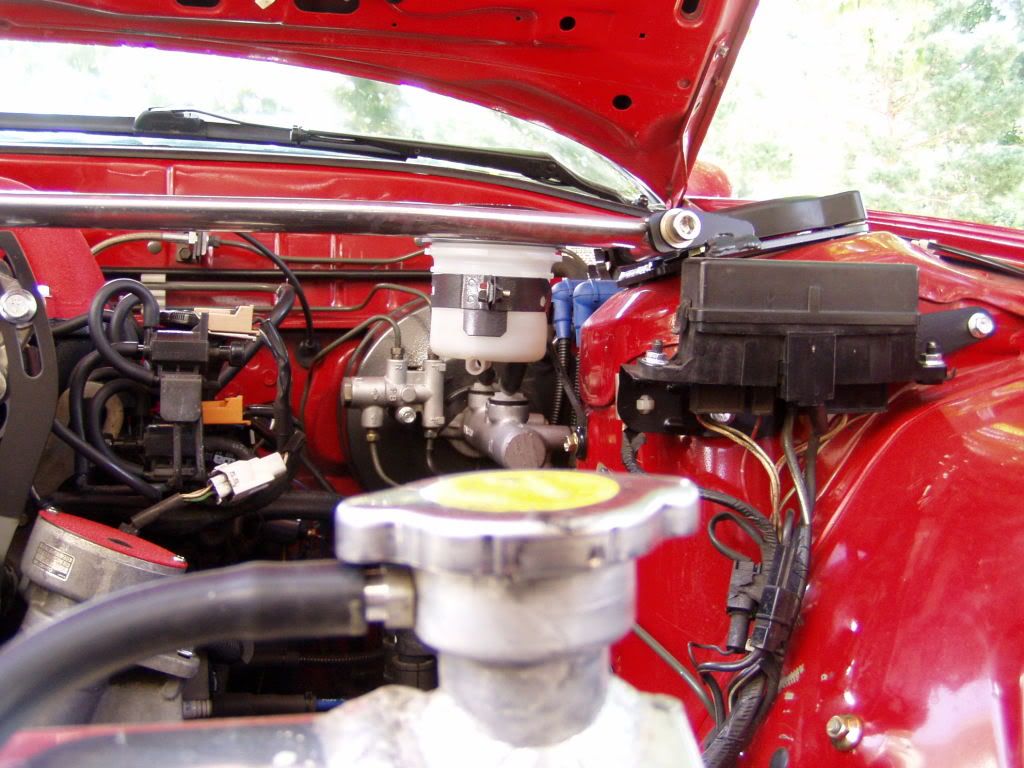
-All the Subarus I looked at ( and ultimately raped) angle the booster/MC on the firewall and have tilted reservoirs to compensate.
When mounted on the RX, the cylinder will sit level and the reservoir will now be tilted nose down.
This isn't a functional problem (although I thought it looked funky, hence the remote Mitsubishi rez) but you do have to be careful when bleeding...the rear MC port will run dry before the front will.
Just pay attention.
Now that I know that Subaru and Mitsubishi share Nabco master cylinders I'll look for some suitable reservoirs that sit correctly and fit right on the cylinder.
Not everyone has the room I do on the shock tower to fit the DSM unit and the integrated cylinder/reservoir would look more OEM anyway.
Finally, a general note.
Make sure you take down the year, make and model of the donor car so you can get a rebuild kit should it become necessary. You'll be at the mercy of counter drones at the parts store and all they know is year/make/model...anything else and they go into shutdown mode.
Good luck.
Put 120 miles on it yesterday evening...mixed city and mountain driving.
Part way through the drive I realized that I wasn't aware of the brakes at all, it felt so natural and normal.
For a street car mod this is the definition of success, works perfectly but doesn't call attention to itself.
Some advice for those who may attempt this...
-The only critical adjustment necessary when swapping out cylinders is the fit of the booster pushrod to the MC piston.
Basically, you want zero- or just a RCH- of clearance when the two are mated...less than that and your brakes are dragging.
Mazda recommends their SST ("Special Service Tool") for this adjustment or you can just use calipers and do some simple math to arrive at the distance that the booster pushrod must protrude.
Since I was working with multiple cylinders, this was getting tedious and I wanted a simpler method.
What I finally came up with was this...
I took a scrap piece of 1" by 1/8" aluminum, about 6" long, and drilled two holes that matched the flange of the master cylinder. Centered between these two holes, I drilled a 1/4" hole.
With the MC removed from the donor car's booster, this piece could be slipped over the cylinder mounting studs and the booster rod poked out of the center hole. Used calipers to measure how far out it came from the surface of the aluminum strip and used a Sharpie to mark this distance on the cylinder itself.
Back on my booster, slip the piece over my studs and adjust the activating rod to the same distance...bang, done!
-Now, about this adjustable booster rod...
The stock Mazda piece is about twice as long as the ones from the Subies I was picking from.
Originally, I just lathed down the Mazda piece to suit (IIRC, I had to take off about .275") but it later occurred to me that it would be simpler to just nab the Subaru rod end, which is much shorter, and use that.
The pieces from the Subaru and the Mitsubishi boosters will both interchange with the stock Mazda booster part...I suspect that they are all getting their boosters from the same manufacturer.
All three rod ends I pulled feature that weird hard to turn thread- looks more like a crude spiral than normal threads- and will interchange freely.
-All the Subarus I looked at ( and ultimately raped) angle the booster/MC on the firewall and have tilted reservoirs to compensate.
When mounted on the RX, the cylinder will sit level and the reservoir will now be tilted nose down.
This isn't a functional problem (although I thought it looked funky, hence the remote Mitsubishi rez) but you do have to be careful when bleeding...the rear MC port will run dry before the front will.
Just pay attention.
Now that I know that Subaru and Mitsubishi share Nabco master cylinders I'll look for some suitable reservoirs that sit correctly and fit right on the cylinder.
Not everyone has the room I do on the shock tower to fit the DSM unit and the integrated cylinder/reservoir would look more OEM anyway.
Finally, a general note.
Make sure you take down the year, make and model of the donor car so you can get a rebuild kit should it become necessary. You'll be at the mercy of counter drones at the parts store and all they know is year/make/model...anything else and they go into shutdown mode.
Good luck.
Thanks, but it only looks easy in the pictures.
I don't show this stuff as it comes out of the junkyard...who'd want to see pics of greasy, crummy looking junk?
Not to mention all the hours just poring over cars looking for that one lit bit to finish it off...
Anyway...
Moving the coil is a piece 'o cake.
There are two unused (at least in my car they were) 8mm capture nuts on the strut tower that are so close to the spacing on the coil pack bracket it was a siren call I couldn't resist.
I ran a slightly larger drill through the coil bracket holes and it lined up perfectly.
I needed some spacers to raise the coils up off the sheetmetal by about 1/2" so the DS brake line could run underneath...Ace Hardware Racing had just the thing(s).
The wiring was just deloomed down to where that leg joins the main harness, then rewrapped separately. This gives plenty of length to reach the new location.
CarQuest sells sparkplug wire terminals and boots- four terminals and four boots were $6- so the wires can be shortened to fit.
If you don't want to shorten the stock wires, Magnacore will make custom wires to your specs.
Alternatively- and what I did at first- you could snag some short plug wires off a donor car in the junkyard (I found several perfect length wires on Volvos) and save your stock ones in case you want to switch back. This mod, like most of my projects, is completely reversible.
Obviously there is no performance advantage but I always hated the way the wires draped all over the fender and were so bloody long- this was a purely aesthetic project and as such, I consider it a success.

Although this thread has been dormant for a few days, I have not, and there is a bit of news to report.
First, I couldn't be happier with the feel of the brakes now that the 1" MC is installed.
The shorter pedal throw and firm, progressive input is a world of difference compared to the stock setup.
Now, about the Subaru master cylinder...
Careful readers will remember that the unit I used (and called "the most user- friendly of them all) actually has four ports- two for the front and two for the rear circuits.
The two front circuit ports are perfectly placed for our stock line/proportioning valve set up but we only need one port for the rear brakes.
I kind of glossed over this and said I just "plugged" the unneeded outlet but in fact, it's kind of a problem.
Lacking a proper M10 x 1.0 plug- go ahead, try to find one- I finally used a 1/8NPT plug, slathered in sealant. It's worked fine, no leaks or anything but it's "ghetto-rig" nature bothered me and I decided to pursue a more professional solution.
Well, as "professional" as you can get in a junkyard anyway.
Many master cylinders have castings that include unused ports but they are not drilled/tapped, so finding a plug was proving to be frustratingly fruitless.
I finally woke up and realized that many of the ABS control units I'd been raping for brake lines- they are a rich source of short lines and I've left my stock setup untouched so far- seemed to have all sorts of plugs to block blind manufacturing holes.
Unfortunately, my junkyard toolbox doesn't have a wide selection of Allen keys so following my epiphany I was unable to confirm what I'm almost certain to be true.
Going back today- better prepared tool-wise- to harvest some plugs and see.
My original reason for subjecting myself to the the hot, dusty hell that the junkyard can be in summertime, was the search for a "on-cylinder" reservoir that was better than the angled Subie unit.
The remote Mitsubishi rez is fine, but an integrated rez would be even better.
An interesting sidenote...I can now recognize a car's manufacturer with just a quick glace at the master cylinder reservoir.
This ability will never get me laid and is therefore just another useless bit of trivia clogging up my memory. Thought I'd share.
/sidenote.
Anyhoo...
My search so far has been limited to easily accessible parts- cars with the engine already pulled or at least the intake gone... modern cars tend to bury components under tons of crap and I'm semi-lazy.
Since I was unable to find what I want easily, the quest had to be widened.
One car I'd passed by several times due to front end damage (and a jammed hood) was an early nineties (1992, as it turns out) Infinity Q45 and desperation finally forced me to jimmy the hood and look.
Bummer, dude...reservoir didn't look suitable.
But, something caught my eye and I looked more closely.
What an oddball MC casting...something's going on here, so I started to investigate.
Sumbitch, could it be?
It was so intriguing I couldn't resist, I unbolted it and took it home.
Keep in mind that I'm only paying $10 for these cylinders, so I can afford to indulge myself a little.
Cleaned it up and went on the interwebs to see what I could find out.
Turns out I was right.
Here's a pic, can you spot the weirdness?
(I've already configured this for install, so ignore the tubing...)
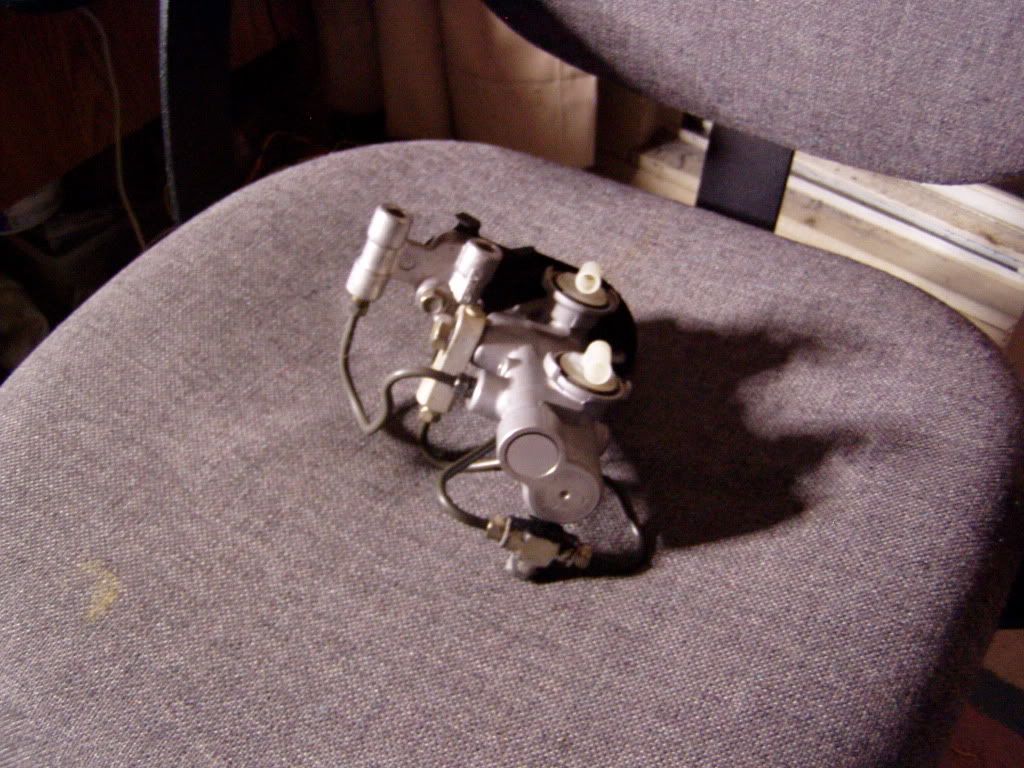
It's a 1" bore, so that's good but it was the hump on the side that really intrigued me- I could only think of one explanation and that turned out to be true... this MC has integrated the proportioning valve into the master cylinder casting.
World shaking, right?
OK, maybe not so much.
Interesting though.
I'm going to try it.
As pictured, the cylinder is festooned with the tubing and connections necessary to adapt to the RX stock brake lines, but this is only temporary till I see if it works.
If it proves suitable, I'll go ahead and make the changes to the car necessary to streamline the install.
The front DS line can be tweaked to reach (although I plan on simply replacing it with a custom piece) as can the rear line.
The PS front line will either need an extension or replacement with a longer part.
I'll need to find a fitting for the front line outlet to accommodate two lines...I have some ideas.
What's the point, you ask.
Well, this would really simplify the area around the master cylinder...not a big deal in the greater scheme of things but a nice detail nonetheless.
Yeah, I'm weird like that.
I'm going to install it this morning, we'll see how it goes.
First, I couldn't be happier with the feel of the brakes now that the 1" MC is installed.
The shorter pedal throw and firm, progressive input is a world of difference compared to the stock setup.
Now, about the Subaru master cylinder...
Careful readers will remember that the unit I used (and called "the most user- friendly of them all) actually has four ports- two for the front and two for the rear circuits.
The two front circuit ports are perfectly placed for our stock line/proportioning valve set up but we only need one port for the rear brakes.
I kind of glossed over this and said I just "plugged" the unneeded outlet but in fact, it's kind of a problem.
Lacking a proper M10 x 1.0 plug- go ahead, try to find one- I finally used a 1/8NPT plug, slathered in sealant. It's worked fine, no leaks or anything but it's "ghetto-rig" nature bothered me and I decided to pursue a more professional solution.
Well, as "professional" as you can get in a junkyard anyway.
Many master cylinders have castings that include unused ports but they are not drilled/tapped, so finding a plug was proving to be frustratingly fruitless.
I finally woke up and realized that many of the ABS control units I'd been raping for brake lines- they are a rich source of short lines and I've left my stock setup untouched so far- seemed to have all sorts of plugs to block blind manufacturing holes.
Unfortunately, my junkyard toolbox doesn't have a wide selection of Allen keys so following my epiphany I was unable to confirm what I'm almost certain to be true.
Going back today- better prepared tool-wise- to harvest some plugs and see.
My original reason for subjecting myself to the the hot, dusty hell that the junkyard can be in summertime, was the search for a "on-cylinder" reservoir that was better than the angled Subie unit.
The remote Mitsubishi rez is fine, but an integrated rez would be even better.
An interesting sidenote...I can now recognize a car's manufacturer with just a quick glace at the master cylinder reservoir.
This ability will never get me laid and is therefore just another useless bit of trivia clogging up my memory. Thought I'd share.
/sidenote.
Anyhoo...
My search so far has been limited to easily accessible parts- cars with the engine already pulled or at least the intake gone... modern cars tend to bury components under tons of crap and I'm semi-lazy.
Since I was unable to find what I want easily, the quest had to be widened.
One car I'd passed by several times due to front end damage (and a jammed hood) was an early nineties (1992, as it turns out) Infinity Q45 and desperation finally forced me to jimmy the hood and look.
Bummer, dude...reservoir didn't look suitable.
But, something caught my eye and I looked more closely.
What an oddball MC casting...something's going on here, so I started to investigate.
Sumbitch, could it be?
It was so intriguing I couldn't resist, I unbolted it and took it home.
Keep in mind that I'm only paying $10 for these cylinders, so I can afford to indulge myself a little.
Cleaned it up and went on the interwebs to see what I could find out.
Turns out I was right.
Here's a pic, can you spot the weirdness?
(I've already configured this for install, so ignore the tubing...)
It's a 1" bore, so that's good but it was the hump on the side that really intrigued me- I could only think of one explanation and that turned out to be true... this MC has integrated the proportioning valve into the master cylinder casting.
World shaking, right?
OK, maybe not so much.
Interesting though.
I'm going to try it.
As pictured, the cylinder is festooned with the tubing and connections necessary to adapt to the RX stock brake lines, but this is only temporary till I see if it works.
If it proves suitable, I'll go ahead and make the changes to the car necessary to streamline the install.
The front DS line can be tweaked to reach (although I plan on simply replacing it with a custom piece) as can the rear line.
The PS front line will either need an extension or replacement with a longer part.
I'll need to find a fitting for the front line outlet to accommodate two lines...I have some ideas.
What's the point, you ask.
Well, this would really simplify the area around the master cylinder...not a big deal in the greater scheme of things but a nice detail nonetheless.
Yeah, I'm weird like that.
I'm going to install it this morning, we'll see how it goes.
Well, normally I don't go through too much but lately I've been swimming in it.
Probably five cans in the past few weeks.
At least my system is nice and flushed...
I got a good deal on some Wilwood 570 fluid, so that's what I've been using.
Normally I don't much care...I flush the system twice a year and it's only a daily driver so brake fluid isn't stressed too much.
Probably five cans in the past few weeks.
At least my system is nice and flushed...
I got a good deal on some Wilwood 570 fluid, so that's what I've been using.
Normally I don't much care...I flush the system twice a year and it's only a daily driver so brake fluid isn't stressed too much.

Lacking a proper M10 x 1.0 plug- go ahead, try to find one- I finally used a 1/8NPT plug, slathered in sealant. It's worked fine, no leaks or anything but it's "ghetto-rig" nature bothered me and I decided to pursue a more professional solution.
Well, as "professional" as you can get in a junkyard anyway.
Well, as "professional" as you can get in a junkyard anyway.
The donor was a 93+ 626/mx6/Probe Base 4cyl, Manual, Non-ABS car (15/16"). There was a port on the bottom that needed plugging, but the person I learned of the swap from just cut down a 10mmx1.0 bolt to be short enough, and cinched it down with a copper washer. I did the same thing and it has worked for 4 years so far; through a few track days in scorching heat and 70k miles of daily driving.
Fast forward to the RX7 and I figured this same MC might be able to work on my 'vert. The mounting is the same, and if the similarities hold true, it should bolt on with only the front brake line tee required. As soon as I acquire a brake tee I'll finally get around to installing it.
Also, as a conversation diversion, I was thinking about getting a hold of a Millenia booster to go along with a Millenia MC...
My search for a matching booster/MC has so far been fruitless.
Either the booster's studs are not properly spaced or they're not long enough to clear our double firewall.
The Infinity MC w/ integrated proportioning valve is in.
Installing this unit brought me to a previously uncrossed border, a border I decided to erase because I thought the results would be worth it.
I started replacing my stock hardlines and now even going back to the original setup (which I have no intention of doing) will be a "custom install".
I had no intention originally of doing this...as my picture of the unit shows, I had it configured with the usual clusterfuck of tubes, banjos and tees to adapt to the stock lines.
This time though I had leaks everywhere, no idea why.
I finally managed to tighten them all away but grew frustrated in the process- after all, I had just removed a fully functional, subjectively superior setup for what basically boiled down to aesthetics, and with all the adaptors it looked just as cluttered as stock.
So I paid a visit to my favorite hard core race shop (Triple R, in Denver) to see what could be had.
Naturally, they had almost exactly the fitting I had dreamed of...a double ended banjo which would allow both front brake lines to tee off the single port on the master cylinder.
Clean and simple, this part made possible the streamlined, uncluttered final look that originally attracted me to the Infinity part.
Why this "look" became so suddenly important, I can't say...it just did.
"Almost exactly" the right fitting in that it took a 37� AN flare instead of our stock hardline's double DIN flare.
No adaptor was available and AN flaring tools are a bit thin on the ground these days.
They offered to cut and flare my stock tubes if I removed them and brought them in.
"On no" thought I, "I want to be able to revert to stock", so I decided to purchase new generic lines instead and Triple R cut off one end, installed the AN fittings and flared them for me.
For free.
They really are nice guys.
Thanks, Randy.
So I head home- somewhat poorer as the banjo fitting was $29 by itself and the hardlines were $12- thinking I would easily have this done in a few hours.
HA!
Just try removing the passenger side brake line in a fully assembled engine bay without destroying it.
So I started unbolting stuff.
Then more stuff.
Got it 80% of the way free and finally just bent it to get the exit clearance I needed.
This should have told me something...but of course, it didn't.
I'll cut this short.
Making new hardlines is easy.
Making new hardlines that follow the factory pattern and have the crisp, clean runs and bends is well nigh impossible unless the engine bay is bare.
It seems obvious to me now that the factory installs the brake lines in the chassis before almost everything else and under those conditions, this would have been pretty simple.
So anyway, the lines are in, I learned a lot and am determined that my second effort will be better ( and yes, I am going to redo them).
No leaks...small comfort, but I'm taking what I can get.
So, how does this MC feel?
I can't tell.
I've been through so many setups in the past few days that making a comparison is almost impossible.
Pedal throw is about the same as the normal 1" Subaru MC with the Mazda proportioning valve but the feel is a bit spongier, I think.
It's possible there is still air in the cylinder, tomorrow I'm going to Nissan and seeing if this MC requires any special bleeding procedures.
At the very least, I'll take her by the shop and get the system power bled again.
Then I have a decision to make.
If I decide to keep this setup, I'm redoing the hardlines and simplifying the system with some custom made braided steel lines.
So much for cheap, quick and dirty junkyard experimentation.
If I go back to the previous setup, I still have to remake the hardlines but no pricey soft lines will be necessary.
What a dilemma.
For anyone still following this thread, my recommendation right now is the 4 port 1" Subaru MC.
It's absurdly simple to adapt and has great feel.
Or you could follow me down the rabbit hole and see what happens.
I'll post some pics when I finalize the install.


I took the car to the shop this morning and power bled the brakes.
There was air...lots of it.
I had a real "Doh!" moment and realized how stupid I've been doing all this brake work without speedbleeders...what the hell was I thinking?
Went on a quest for some- Car Quest could get the 7mm's for the rear but did not list the 8mm's for the front.
Continued the search and ended up at a shop called OnTrack, another race shop.
They could get me the fronts.
I was a happy boy.
As I paid for the bleeders, I glanced at the side wall behind the counter and another bit of serendipity struck.
They had a large selection of Russell braided steel brake lines and fittings and there, right before my eyes, was a set of lines with one -3 AN female end and a 10mm banjo on the other.
15" long...price was $20 apiece.
Oh ****, in for a penny, in for a pound.
Got home, scrounged through my (now) vast selection of brake fittings and fabbed up what you see in the pictures. Redid the hardlines to fit the new configuration.
Brakes are great.
Tomorrow, after the front bleeders come in, I'll install 'em and then call this finished.
It's been interesting.