
Headunit and 3 gauge center dash mod

Thread Starter
Joined: Nov 2006
Posts: 2,406
Likes: 2
From: Indiana
Headunit and 3 gauge center dash mod
I never liked how low DIN gauge panels sat on the center dash. So while moving all my parts from the old turbo vert to the soon to be turbo vert I decided to make some changes.
After pulling out the OEM headunit I saw that the mounting brackets are screwed onto the OEM headunit. That seemed like an awesome and easy starting point. I mounted my Eclipse HU onto the OEM bracket but on the lowest DIN spot. It worked alright, but the HU sat way too far forward for my taste. Measuring showed that it extended about 20mm out from the center dash cover. It also sat a little too low. I was concerned the little plastic outer trim for the Eclipse wouldn't fit.
So, I measured 5mm up and 20mm back and drilled and dremeled new screw holes. The height was right on, but the HU sat too far back and sunken in. So I dremeled each hole into a slot so I could adjust depth for the HU. IIRC the most forward the modded hole would allow is 10mm. So with the slot I made I can mount the HU anywhere from 10-20mm forward/back.
Here is how it mounts after moving it up 5mm and creating the slot.

Here are the brackets mounted just as they should be...only with my HU. BTW the black wire coming down is my common ground for the headunit and antenna relay. Once the gauges are installed I'll ground them all from one common ground. It grounds to the shifter top bracket. I took the top driver side bolt out, then slid the ring terminal under the bracket and bolted it back down.

One side with the slot. Again 5mm up and 20-10mm forward and back

Not a very good pic of the opposite side. That side does not mount as well because a tab on the OEM bracket created a large opening. Once its all done I'll use a longer screw with a washer on it so that it mounts better.

I measured the inside of the center dash cover and cut a cardboard template. The vertical lines on either side of the DIN opening are where the sheet metal will bend. I'll create a few more screw holes and use plastic bushings to secure the front panel to the OEM bracket.

Trace the DIN opening onto the metal panel and cut and grind it down.

Marked center for height and width and drew the gauge openings.

The panel DIN fitted to the HU

Template mounted. Glad I did that before cutting the gauge holes. The template is a couple mm off-center to the passenger side.

That's all I have so far. I'm off all weekend with a bad toe and neck so hopefully I'll finish this little project by Monday. Once the metal front panel is done I'll cover it in black vinyl of some sort or possibly have it powder coated black (if I catch the powder coater before they do my engine parts)
After pulling out the OEM headunit I saw that the mounting brackets are screwed onto the OEM headunit. That seemed like an awesome and easy starting point. I mounted my Eclipse HU onto the OEM bracket but on the lowest DIN spot. It worked alright, but the HU sat way too far forward for my taste. Measuring showed that it extended about 20mm out from the center dash cover. It also sat a little too low. I was concerned the little plastic outer trim for the Eclipse wouldn't fit.
So, I measured 5mm up and 20mm back and drilled and dremeled new screw holes. The height was right on, but the HU sat too far back and sunken in. So I dremeled each hole into a slot so I could adjust depth for the HU. IIRC the most forward the modded hole would allow is 10mm. So with the slot I made I can mount the HU anywhere from 10-20mm forward/back.
Here is how it mounts after moving it up 5mm and creating the slot.
Here are the brackets mounted just as they should be...only with my HU. BTW the black wire coming down is my common ground for the headunit and antenna relay. Once the gauges are installed I'll ground them all from one common ground. It grounds to the shifter top bracket. I took the top driver side bolt out, then slid the ring terminal under the bracket and bolted it back down.
One side with the slot. Again 5mm up and 20-10mm forward and back
Not a very good pic of the opposite side. That side does not mount as well because a tab on the OEM bracket created a large opening. Once its all done I'll use a longer screw with a washer on it so that it mounts better.
I measured the inside of the center dash cover and cut a cardboard template. The vertical lines on either side of the DIN opening are where the sheet metal will bend. I'll create a few more screw holes and use plastic bushings to secure the front panel to the OEM bracket.
Trace the DIN opening onto the metal panel and cut and grind it down.
Marked center for height and width and drew the gauge openings.
The panel DIN fitted to the HU
Template mounted. Glad I did that before cutting the gauge holes. The template is a couple mm off-center to the passenger side.
That's all I have so far. I'm off all weekend with a bad toe and neck so hopefully I'll finish this little project by Monday. Once the metal front panel is done I'll cover it in black vinyl of some sort or possibly have it powder coated black (if I catch the powder coater before they do my engine parts)
Looks good so far. These kind of small projects can be fun. I made a custom holder for a GPS unit to make use of the unused bay under my stereo: https://www.rx7club.com/interior-exterior-audio-26/fc-garmin-gps-mounting-solution-858962/. I painted the bare metal with some semi-gloss black paint after taking these pictures.
Thread Starter
Joined: Nov 2006
Posts: 2,406
Likes: 2
From: Indiana
^Nice, I like your mod! And it gave me an idea on how to modify another mod idea.
For a long time I've been considering modding my ashtray into a cell phone charging station. I don't smoke and it's unused space. I'd love to loose my cig lighter charger. What has always held me back is that my cell phone changes every couple years and there isn't a standard on ports for the chargers. I'd have to fiberglass a new station every time I changed phones.
I like your idea of bringing the plug through the DIN cover. I'm thinking I could do the same thing with my charger plug and leave enough cable for the phone to sit in the ashtray opening. I'd mod the ashtray opening into some sort of generalized cell holder. Or simply bring the cable through the ashtray opening and leave enough cable tucked under the ashtray to plug in.
I thought about doing something similar to my ashtray to turn it into an Ipod dock, but never got around to it. I ended up just running the cable from behind the ashtray so I can stick it on the passenger seat or inside the center console.
Thread Starter
Joined: Nov 2006
Posts: 2,406
Likes: 2
From: Indiana
I got very little done today. Apparently being prescribed Lortabs is not conducive to getting much done. Well that and company is in town that I haven't seen in 20yrs. So I was having drinks on top of the Lortabs...which made me very sleepy and not all that comfy using a jigsaw or dremel :P
However, I found some black brushed aluminum left over from cutting a window in my computer case. I forgot I had it. I may start over with the brushed black. Problem is that I can't bend the black aluminum without chipping the paint off. I could make it a three piece with welded on tabs. A friend has welding equipment, I'm gonna swing by his place tomorrow and see if he'd spot weld it for me.
However, I found some black brushed aluminum left over from cutting a window in my computer case. I forgot I had it. I may start over with the brushed black. Problem is that I can't bend the black aluminum without chipping the paint off. I could make it a three piece with welded on tabs. A friend has welding equipment, I'm gonna swing by his place tomorrow and see if he'd spot weld it for me.
Thread Starter
Joined: Nov 2006
Posts: 2,406
Likes: 2
From: Indiana
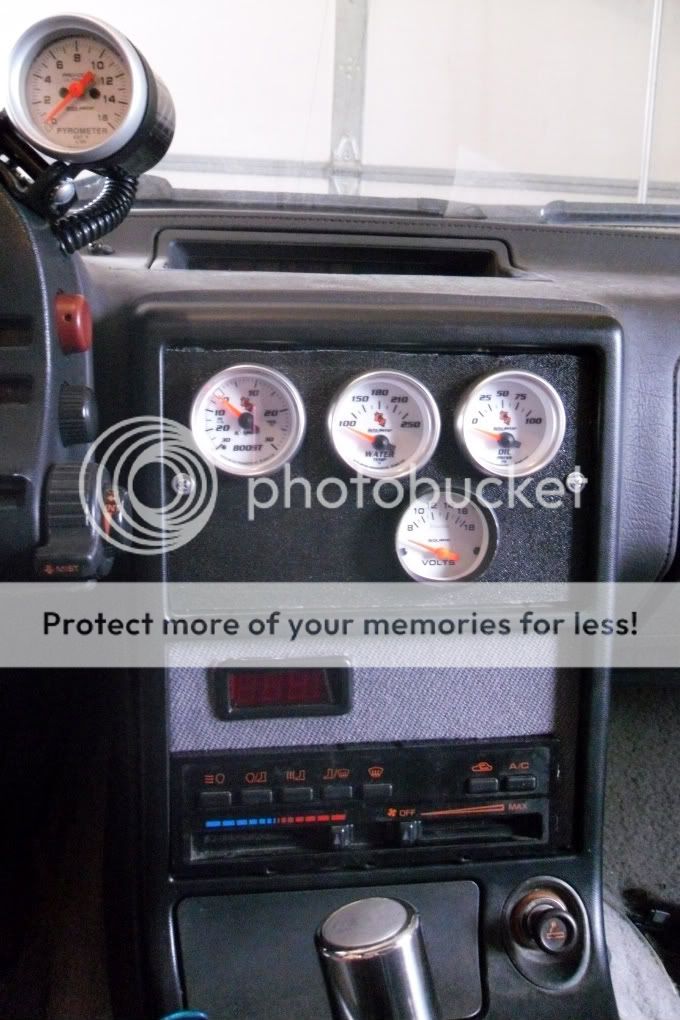
Finally got around to doing more with this. I started over with the black aluminum panel. I did it double DIN and that made it so much easier.
A little tape to help protect the surface and keep it pretty. It's also very useful cause I had a surface to write on and make notes.

The notches up top are for the screws on the bracket. I used a 2" hole cutter drill bit thingie. The middle one skipped and cut into the panel. It's not terribly noticeable once it's in the car. I'll probably just touch it up with some flat black paint.

One important thing...if I had made the outer gauges any further out the mounting bracket would not have fit. What I did for spacing them...well beyond simply measuring was this. I mounted the bracket and mounted the center dash molding and traced the edges so I knew what area I had to work with. I did it because the gauge panel does not sit quite even on the headunit bracket. If I measured end to end of the gauge panel the holes would not have been centered once it was in the car.

There it is mounted. I still need to touch up the scrapes and actually wire in gauges...but that can wait till I'm installing the rebuilt engine.

A little tape to help protect the surface and keep it pretty. It's also very useful cause I had a surface to write on and make notes.
The notches up top are for the screws on the bracket. I used a 2" hole cutter drill bit thingie. The middle one skipped and cut into the panel. It's not terribly noticeable once it's in the car. I'll probably just touch it up with some flat black paint.
One important thing...if I had made the outer gauges any further out the mounting bracket would not have fit. What I did for spacing them...well beyond simply measuring was this. I mounted the bracket and mounted the center dash molding and traced the edges so I knew what area I had to work with. I did it because the gauge panel does not sit quite even on the headunit bracket. If I measured end to end of the gauge panel the holes would not have been centered once it was in the car.
There it is mounted. I still need to touch up the scrapes and actually wire in gauges...but that can wait till I'm installing the rebuilt engine.
Trending Topics


Great work.
Not hijacking your thread just throwing ideas out there.
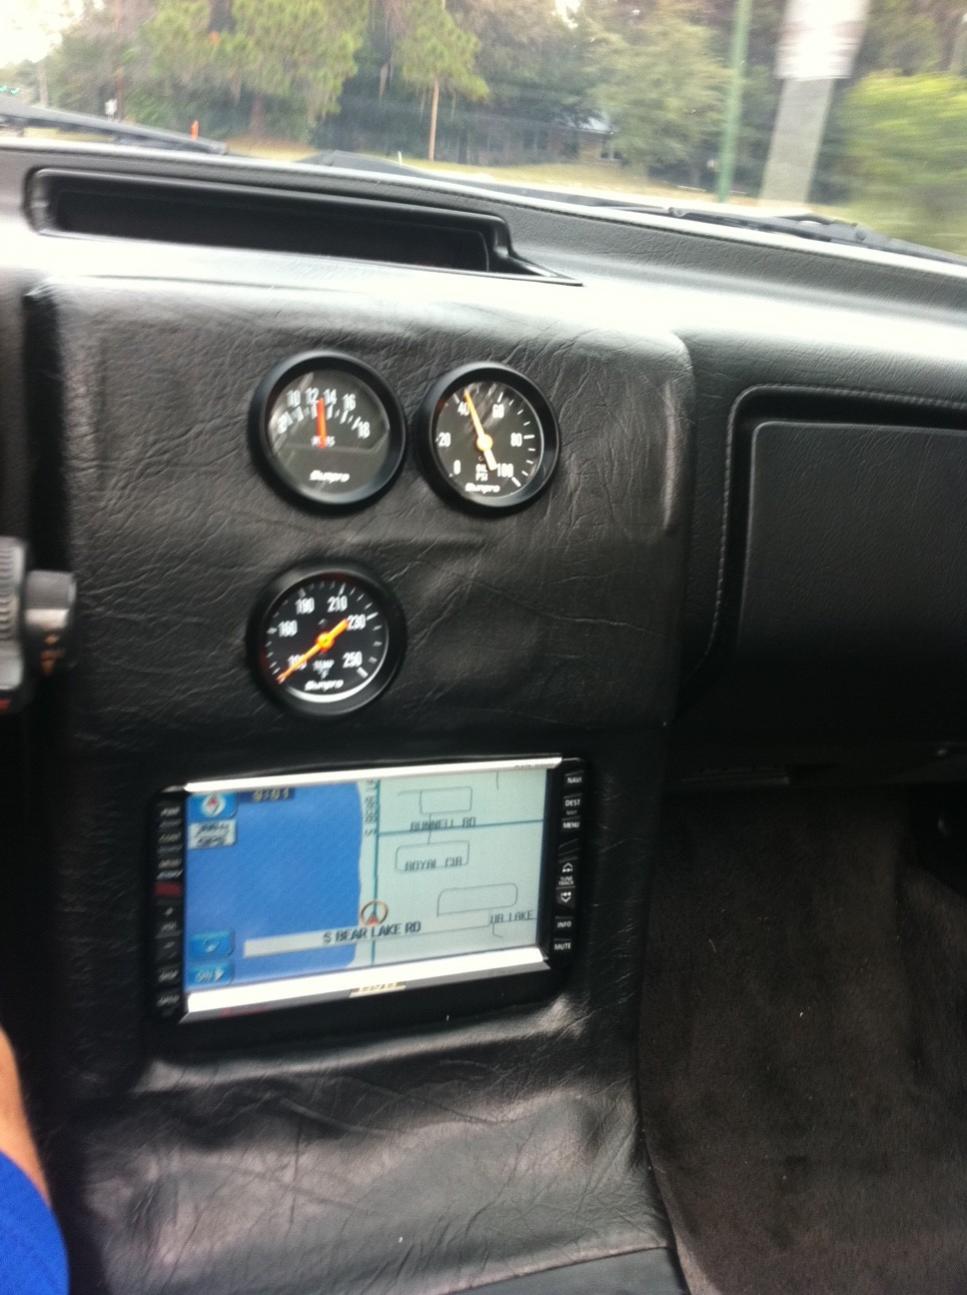
Personally I've made a surround for my TII and incorporated my wideband into it, but I used particle board, and upholstered over it, as I don't like the look of bare metal in the interior. Hardest part as you know is making brackets up and getting it all to fit right.
found a pic, I'm talking about the bottom surround, I am redoing the top gauge panel the same way when I get time. Wish I had room for a headunit.
Not hijacking your thread just throwing ideas out there.
Personally I've made a surround for my TII and incorporated my wideband into it, but I used particle board, and upholstered over it, as I don't like the look of bare metal in the interior. Hardest part as you know is making brackets up and getting it all to fit right.
found a pic, I'm talking about the bottom surround, I am redoing the top gauge panel the same way when I get time. Wish I had room for a headunit.
Thread Starter
Joined: Nov 2006
Posts: 2,406
Likes: 2
From: Indiana
^ Why not move the volt meter down to the wideband panel, looks like you'd have a DIN slot and could put in a stereo. Though I think I'd rather have vents for heat and a/c!!
Car is not a daily, so doesn't bother me having the center vents blocked.
Thread Starter
Joined: Nov 2006
Posts: 2,406
Likes: 2
From: Indiana
^ I figured your's wasn't a daily driver.
One problem with my setup happened a lil while ago. It's either heat related from all the spaghetti wiring not allowing the HU to breath or simply the HU giving out.
I was out running errands and my HU got buggy on me. It spontaneously started scanning through my CD track and wouldn't stop. I got it to stop by advancing to the next track. But then the HU became slow in responding. It took a couple hits of the eject button to get the CD to come out. When I put it back in it was fine for a bit, then started scanning again. This time I couldn't skip to the next track, I couldn't eject the CD. All I could do was control volume and change to radio. All the other buttons were unresponsive. Even the power button.
I got home turned power off on the car and of course that powered off the HU. But when I turned the key the HU was back to power on and unresponsive. I had a screwdriver in the car and pulled the HU out and unplugged everything. The back heatsink on the HU seemed hotter than it should be but not scorching. It didn't smell like burned circuits. I've fried a few amps in my days...I know that smell well. I plugged everything back in and powered it on while NOT in center dash and everything was working fine. One thing I did notice is that there might be a loose crimp cause if I moved the ziptied wiring around I'd hear some interference in the speakers.
It's either that all the wiring isn't allowing the HU to breath and overheating it. That was a concern of mine going into the mod. I've got the antenna relay in with all the other wiring. I can always move that to under the dash somewhere. I was actually planning on moving the relay once I wired in the gauges. One cool thing is the Eclipse heatsink is machined for a small fan. It's not on my HU but it wouldn't be hard to measure and put one on there. I'd simply wire it for always on/off with the HU.
If it's not heat related then the poor thing is simply giving out. Eclipse don't exactly have a great reputation when it comes to them breaking.
Not a big thing if it's ironic timing on the HU breaking. I've been planning to replace it with a Nakamichi. Naks have a reputation for breaking, just like Eclipse....but they have amber illumination that is dead on with FC illumination. Too boot they look very OEM and that's a great theft deterrent. I've never owned a Nak, but I sold them many years ago and they sound amazing. Definitely an audiophile brand.


Thread
Thread Starter
Forum
Replies
Last Post
dludden
1st Generation Specific (1979-1985)
1
Aug 26, 2015 11:25 AM