
fixing plastic interior tabs


Thread Starter
Joined: Jan 2007
Posts: 1,000
Likes: 0
From: st. louis
fixing plastic interior tabs
I managed to brake off the last remaining tab on the underside of the dash where the gauge bezzel attaches to the dash. Unfortunately, i have no clue where the broken piece has fallen to. What methods have you tried/used to repair or replace broken or missing plastic tabs? Some of the plastic on my dash is just so brittle that you have to be super careful not to break anything.
thanks
lc
thanks
lc
Senior Member
Joined: Aug 2009
Posts: 479
Likes: 0
From: Los Angeles
I bet my 86's tabs are more brittle than yours...
I have found no reliable way to fix those tabs. What I did instead was put three long screws through the bottom center of the bezel straight back into three holes I drilled into the dash plastic. I used washers under the screw heads, and painted them black. After you put the steering wheel garnish back in, no one can see them.
Be careful not to cinch them up to tight or you will crack the bezel.


if the plastic is part of the actual trim piece, you need a new trim piece unfortunately. I have already replaced my steering column surround with a new OEM one.
if you have broken plastic fasteners/clips, you can get those from Mazda. there is a page in the parts fiche that shows all the parts numbers and locations, but I admit the diagrams aren't the best
if you have broken plastic fasteners/clips, you can get those from Mazda. there is a page in the parts fiche that shows all the parts numbers and locations, but I admit the diagrams aren't the best
I think the toughest thing to deal with is the breakage of the white tabs that locate the instrument panel bezel. These tabs are part of the larger dashboard molding and replacing that part would require replacement of the dashboard. I put one back on last year with a lot of two-part epoxy and so far it is holding, but I expect it will eventually crack again.
I've had limited success repairing broken trim pieces by using a two-part epoxy and reinforcing the joint with other material from behind. I've used masonite scraps to rebuild my S4 radio/center console bezel and also the passenger side speaker/kick panel (hiding the masonite on the back sides of the panels). I also just experimented with bonding a piece of aluminum beverage can to the inside of one of the rear speaker grille covers; mine is cracked at the screw holes like 90% of them are. So far these repairs are holding pretty well. I'd like to try some better plastic adhesives and would love to hear what others are using.
Overall though, I'd agree that trying to just glue the broken tabs or other trim pieces back together almost never works without adding some reinforcing material.
Joined: Feb 2001
Posts: 29,798
Likes: 128
From: London, Ontario, Canada
Been there, done that.
Get some 1/8" aluminum and bend it slightly. Roughen up the surface of the dash and the aluminum. Trim off any remaining bits of the plastic tabs. Now epoxy the aluminum in place. Drill and tap for your favourite screw thread in the appropriate place...
I think I have a picture:
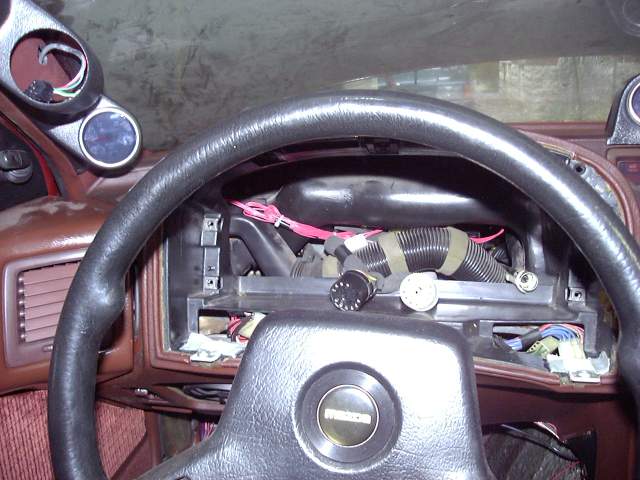
You can sort of see the aluminum tabs. I used a bit of cloth soaked with epoxy to reinforce the joint.
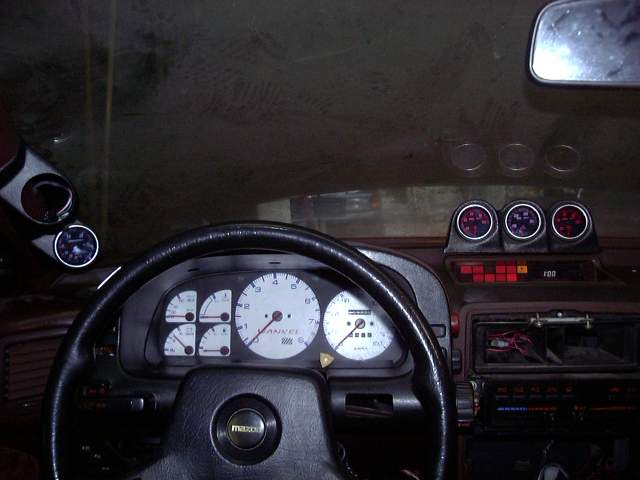
Here is the cluster back in place.
Get some 1/8" aluminum and bend it slightly. Roughen up the surface of the dash and the aluminum. Trim off any remaining bits of the plastic tabs. Now epoxy the aluminum in place. Drill and tap for your favourite screw thread in the appropriate place...
I think I have a picture:
You can sort of see the aluminum tabs. I used a bit of cloth soaked with epoxy to reinforce the joint.
Here is the cluster back in place.

Thread
Thread Starter
Forum
Replies
Last Post
Heedlessone
Group Buy & Product Dev. FD RX-7
288
Sep 16, 2018 07:22 PM
Jose A.
3rd Generation Specific (1993-2002)
19
Aug 27, 2015 11:41 PM