
Cleaning the rotors

Thread Starter
Mountain Rotary Mod
Joined: Nov 2003
Posts: 2,411
Likes: 0
From: Freaking Poland!!
Cleaning the rotors
I'm trying to figure out how to clean the rotors (well the one rotor worth saving and cleaning) and thought i'd make a thread on what you rebuild guys have used to clean them. Specifically, what did you use to clean the surfaces to get the carbon build up off and what did you use to clean the seal grooves (if anything)?
Any and all advice is welcomed.
Any and all advice is welcomed.
Locust of the apocalypse
Joined: Apr 2003
Posts: 2,553
Likes: 2
From: Directly above the center of the earth (York, PA)
I take the rotor and stick it overnight in the old partswasher bin.....
THEN... i use old side seals to scrape the side seal groves, the bottom piece of a 3-piece apex seal to clean the apex seal groves, and i have a cheap assed flat bladed screwdriver that i use to clean the oil seal groves.
Be carefull that you are only taking the carbon out of hte apex seal, corner seal and side seal groves, you don't want to take any metal off, just the carbon.
I use a brass brush on the surfaces and the compression divots.
I also use a couple of old dentist picks to get ito places and pick the chunks out.
I clean the whole thing as best i can, then soak it overnight, then clean it again. and repeat as necessary untill its perfectly clean... ALL THE CARBON MUST BE OUT OF THE GROOVES.
I replace the bearings after all the cleaning is done so that I'm not exposing new bearings to parts washer solvents and dirt.
Joined: Feb 2001
Posts: 29,798
Likes: 128
From: London, Ontario, Canada
Oven cleaner quickly dissolves the carbon, but DO NOT get it on the bearings if you plan to reuse them. A stiff wire brush is good for this. I then use carb cleaner and old apex/side seals to scrape the grooves. I don't like to dunk the whole rotor in degreaser, because it can mess up the coatings (after a while, it stripps the cadmium plating).
Originally Posted by YearsOfDecay
I take the rotor and stick it overnight in the old partswasher bin.....
THEN... i use old side seals to scrape the side seal groves, the bottom piece of a 3-piece apex seal to clean the apex seal groves, and i have a cheap assed flat bladed screwdriver that i use to clean the oil seal groves.
Be carefull that you are only taking the carbon out of hte apex seal, corner seal and side seal groves, you don't want to take any metal off, just the carbon.
I use a brass brush on the surfaces and the compression divots.
I also use a couple of old dentist picks to get ito places and pick the chunks out.
I clean the whole thing as best i can, then soak it overnight, then clean it again. and repeat as necessary untill its perfectly clean... ALL THE CARBON MUST BE OUT OF THE GROOVES.
I replace the bearings after all the cleaning is done so that I'm not exposing new bearings to parts washer solvents and dirt.
THEN... i use old side seals to scrape the side seal groves, the bottom piece of a 3-piece apex seal to clean the apex seal groves, and i have a cheap assed flat bladed screwdriver that i use to clean the oil seal groves.
Be carefull that you are only taking the carbon out of hte apex seal, corner seal and side seal groves, you don't want to take any metal off, just the carbon.
I use a brass brush on the surfaces and the compression divots.
I also use a couple of old dentist picks to get ito places and pick the chunks out.
I clean the whole thing as best i can, then soak it overnight, then clean it again. and repeat as necessary untill its perfectly clean... ALL THE CARBON MUST BE OUT OF THE GROOVES.
I replace the bearings after all the cleaning is done so that I'm not exposing new bearings to parts washer solvents and dirt.
this is exactly what i do.
Locust of the apocalypse
Joined: Apr 2003
Posts: 2,553
Likes: 2
From: Directly above the center of the earth (York, PA)
Originally Posted by Parastie
Unfortunately, i do not have access to a parts cleaner so i'll probably go with Aaron's way. 
They sell buckes of parts cleaner at autozone... the famous Bruce "T" video shows him haning the rotors on a coathanger and dunking them in the bucket overnight (this is good cause then they aint sitting in the sludge at the bottom of the parts washer either!!!)
Thread Starter
Mountain Rotary Mod
Joined: Nov 2003
Posts: 2,411
Likes: 0
From: Freaking Poland!!
I'll pick up some different cleaners on my way home from work today and see how it goes. The oven cleaner seems like a really good idea, but i thought you had to have heat for that to work?
Also, out of my general stupidity, the rotors themselves don't have bearings right? You are just talking about the bearings on the Iron housings right?
Also, out of my general stupidity, the rotors themselves don't have bearings right? You are just talking about the bearings on the Iron housings right?
Trending Topics

Rotary Enthusiast
Joined: May 2004
Posts: 1,325
Likes: 0
From: SoCal
Before and afters of mine...
I did it like everyone has said pretty much.
Let it soak in a gallon of Simple Green for about a day and a half, kinda used just my hands at that point to push off the bigger chunks of carbon (you can see mine had an unusually large amount of carbon buildup) then soaked it overnight again... then for the next few days I would on and off work on cleaning it, leaving it submerged in the SG when I wasn't so it wouldn't rust... I think SG is the only cleaner that won't damage the bearings leaving it in for a while like that... it doesn't really get metal, just the carbon.
To finish them so I wouldn't have to soak them forever until I am ready to put the engine together, I cleaned them up real good then sprayed (more washed them off with) Windex then used compressed air to blow it real dry. So far worked ok... except I got lazy on the 2nd one and a tiny bit of rust showed up. =/ It's raining in LA lately so it's not exactly the best weather to be doing this in. =(
Anyway good luck... I'm working on my housings and irons now... well... I will be... I'm finishing up the oil pump cover. That damn thing has too many grooves! And I can't pull out the pin that the driving gear (held on by two clips) sits on... stupid Atkins' video says "Just pull the pin out this way!" but doesn't show it... suuuure, just pull it out! And to top it off, nothing I've tried is very good at removing the gasket remains left on it... they're REALLY on there... I've managed to scrape metal off trying to get the gasket to come off. =/
After I finish that though, I'm probably going to paint it... so I need it to be really clean. I hope this crap holds paint... cast aluminum doesn't look like the most solid-surfaced material.
Soon as I move onto the housings and get those clean I'll FINALLY be ready to paint everything... after which it'll be assembly time.
EDIT: Hah forgot the pics. Here they are... notice the rust in the oil ring groove.. don't do that.
--Gary
Last edited by Bob_The_Normal; Oct 27, 2004 at 04:35 PM.

Lives on the Forum
Joined: Feb 2004
Posts: 5,721
Likes: 3
From: Coldspring TX
I just scrape the grooves clean with whatever tooling fits right, using some acetone to soften everything up before scraping, then hit the faces/bathtubs with the 3M scotchbrite gasket remover pads on a pneumatic die grinder. No soaking, no fuss
Originally Posted by Parastie
I'll pick up some different cleaners on my way home from work today and see how it goes. The oven cleaner seems like a really good idea, but i thought you had to have heat for that to work?
Also, out of my general stupidity, the rotors themselves don't have bearings right? You are just talking about the bearings on the Iron housings right?
Also, out of my general stupidity, the rotors themselves don't have bearings right? You are just talking about the bearings on the Iron housings right?
Parastie:
if you happen to have any old side seals, and apex seals, this really really helps with the groovs they fit in, it is amayzing how much carbon is built up in the side seal groves and the apex groovs.
also, is the picture in your avatar as good blown up as it is small?
Thread Starter
Mountain Rotary Mod
Joined: Nov 2003
Posts: 2,411
Likes: 0
From: Freaking Poland!!
Originally Posted by Aaron Cake
The rotors have bearings, as do the stationary gears. Um, I have a pic somewhere....
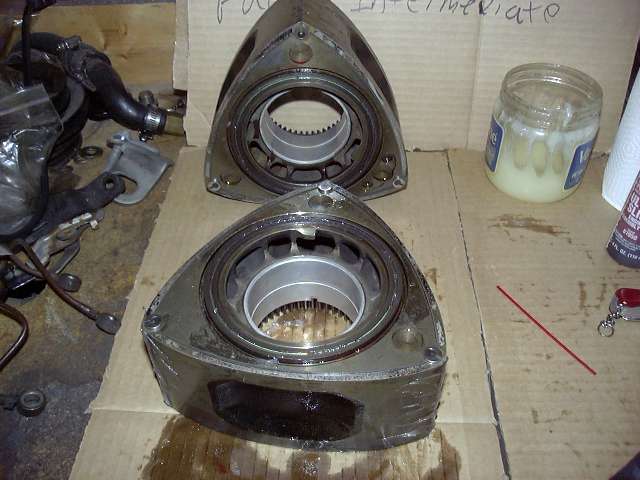
The shiney silver parts are the new bearings.
The shiney silver parts are the new bearings.
Also: Yes the pic is great, but i've lost the larger picture. I've posted it somewhere....
Joined: Feb 2001
Posts: 29,798
Likes: 128
From: London, Ontario, Canada
Press. I use the large flywheel nut socket as an arbor to press out the old bearing as it's the perfect size. I then lay a flat piece of metal stock over the new bearing to get it started, then press it flush with the old bearing.
You don't need to replace these bearings unless you have a reason to. Measure, check the clearances.
You don't need to replace these bearings unless you have a reason to. Measure, check the clearances.
Thread Starter
Mountain Rotary Mod
Joined: Nov 2003
Posts: 2,411
Likes: 0
From: Freaking Poland!!
Originally Posted by Aaron Cake
Press. I use the large flywheel nut socket as an arbor to press out the old bearing as it's the perfect size. I then lay a flat piece of metal stock over the new bearing to get it started, then press it flush with the old bearing.
You don't need to replace these bearings unless you have a reason to. Measure, check the clearances.
You don't need to replace these bearings unless you have a reason to. Measure, check the clearances.
Edit: i probably won't replace the one good one i have, it looks to be in excellent shape, just need to clean it. My plan is to do this to the dead one for experience, same with removing the exhaust insert out of the dead rotor housing.
casio isn't here.
Joined: Sep 2002
Posts: 3,332
Likes: 0
From: Greenpoint, Brooklyn
Originally Posted by Parastie
So uh...how do you get the old ones out?

Thread
Thread Starter
Forum
Replies
Last Post
cdn
2nd Generation Specific (1986-1992)
14
Sep 10, 2015 06:23 AM
cdn
2nd Generation Non-Technical and pictures
0
Aug 11, 2015 08:59 PM