
Bee*R rev limiter installation for s4 TII

Thread Starter
Senior Member
Joined: May 2008
Posts: 344
Likes: 2
From: Alameda
Bee*R rev limiter installation for s4 TII
13btran's Bee*R Rev limiter write up for the s4 TII
Alright, So I finally got around to it and i'm posting my write up on how to install the Bee*R Rev limiter
for our s4 turbo's. Hopefully after this thread there will be no more frustrating members making threads
on how to install the Bee*R because I know I had a hell of a time trying to get this little thing to work
and even then it wasn't working right. I'm not sure if its the same way to install it for s5's but I know
for sure this is how to install it for s4 TII. I know I'm going to leave something out, So if theres a step
I missed and you guys need help on it just send me a PM or post a reply and I'll get back to it. Here
we go:
You will need:
The Bee*R rev limiter
Gauge wire ( if you want to ground the 2nd rev limiter to the e-brake)
Wire cutter/splicer
Electrical tape
A whole lot of patience
1st step : You're going to have to do work on the ECU, So it'll be wise of you to remove your
passenger seat. Lets start by removing the 4 14mm bolts connecting the seat to the car. After you've
done that, remove the passenger side kick panel, I believe its 2 pins. Then you'll need a phillips
screw driver to remove the side plastic strip that has "Mazda" engraved on it, this will allow you to
move the carpet backwards making it a less pain in the *** to work on the ECU itself.
2nd step : Now you should see a tidy little box after you bend your carpet back. If I remember
correctly, there are 6 10mm bolts that holds a plate over the ECU itself to protect any rough
passenger you might ever have that starts the punching and the kicking because you're boosting
too hard. After you're done with the 6 (5?) 10mm bolts you'll see the ECU.
3rd step : To be on the safe side before I get sued for this, disconnect your battery. Then,
disconnect the 3 adapters that are connected to the ECU. I will name these 3 adapters as follows.
The fat one, the middle sized one, and the little one. If you can't distinguish what i'm talking about after
you look at the adapters, just stop here. You won't get the rest.
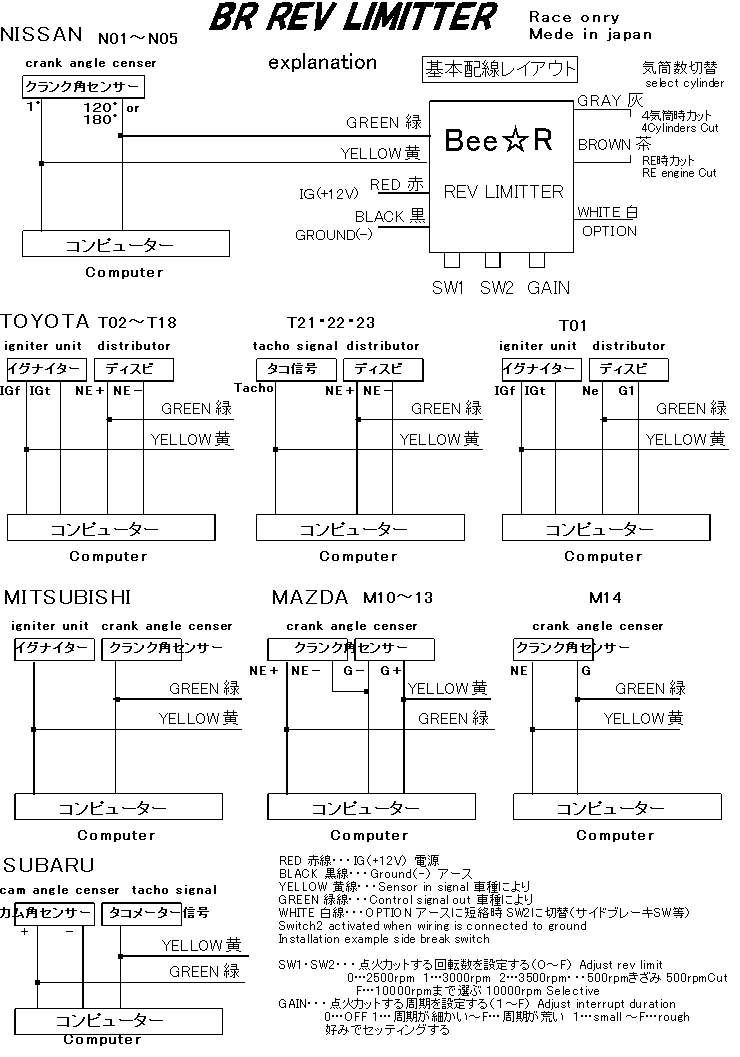
Step 4 : Lets take a look at your Bee*R. Theres 4 wires that come from the box. a red wire,
a green wire, a white wire, a black wire and a yellow wire. The red wire is for power, green is for signal.
White is optional, if you want a 2nd rev limiter to use as launch control / 2 step then you will
not want to forget hooking this wire up. You will also need to buy gauge wire if you want this
connected, its not long enough to reach the e-brake by itself. The black wire is of course the ground
wire and the yellow wire is for RPM signal. Lets hook up the red wire first. Depending on how the wire
looks already you might want to splice it to give yourself a little more room to do the tapping but, its
all up to you. The red wire connects to the IG power wire. Which for S4 (N333) ECU is here.

Step 5 : The green wire is what usually stumps people while installing this. You tap the green wire
from your Bee*R to the Crank Angle Sensor G [1]. Its the 5th wire over if you start from the left
when you look at the "fat" adapter. If you are still clueless, here is a picture.

Step 6 : The white wire is optional but you'll probably want to install it. Hooking up the white wire
will allow you to have a 2nd rev limiter which means you can either set it up as a toy,
or a 2 step launch control. I take advantage of both. You start by splicing your gauge wire, then
depending on how much space you have to work with the white wire on the Bee*R just tap it, and
tape it. Run the white wire through the side through your cd player / heater to the e-brake. Theres a
little metal piece that sticks out near the e-brake which you can just ground it to. You might have to
removed your center console or whatever gets in the way. I remember removing close to everything
in the middle.
Step 7 : The yellow wire taps into the RPM signal. The RPM signal wire is the bottom left wire
on the "fat" adapter. Do what you gotta do to your wires, tap it, and tape it back. Here is a picture
to give you a better idea of which wire it is.
Step 7 : The black wire can be tapped to any ground. I tapped this ground wire to 3G of the s4 TII
FSM which is located on the 2nd wire of the left when you look at the "little" adapter. Here is a
picture aiding you if you have a more visual brain.
Step 8 : There are 3 little wire loops connected to the opposite side of all the wires. Theres a brown
one, a grey one, and a white one. If you follow the instruction on Bee*R's website, it wants you to
cut the brown wire for rotary. The problem is if you cut the brown wire you will not be able to rev
past 5k regardless of how high you turn the limiter ****. So instead of cutting the brown wire, cut
the grey wire which is intended for a 4 cylinder vehicle. From what I've heard a 4 cylinder has something
similiar to our rotaries when it comes to the rotation cycle or what not. Anyways, If you cut the grey
wire it'll work like a charm, trust me.
Step 9 : Put back everything the same way you took it out, sit back, have a beer, and enjoy.
I'm sure theres something I left out, so if you have any questions I'll try my best to help out. If theres
something you would like to add on to this write up, let me know i'll include it. I want to take this time
to thank my cousin (plainandsimpo) for helping me out with installing this, we spent hours stumped on
trying to find out what wire to tap the ignition (green) wire to. He played a big part on figuring
out how to install this damn thing, so props to him aswell. Have fun guys.
Alright, So I finally got around to it and i'm posting my write up on how to install the Bee*R Rev limiter
for our s4 turbo's. Hopefully after this thread there will be no more frustrating members making threads
on how to install the Bee*R because I know I had a hell of a time trying to get this little thing to work
and even then it wasn't working right. I'm not sure if its the same way to install it for s5's but I know
for sure this is how to install it for s4 TII. I know I'm going to leave something out, So if theres a step
I missed and you guys need help on it just send me a PM or post a reply and I'll get back to it. Here
we go:
You will need:
The Bee*R rev limiter
Gauge wire ( if you want to ground the 2nd rev limiter to the e-brake)
Wire cutter/splicer
Electrical tape
A whole lot of patience
1st step : You're going to have to do work on the ECU, So it'll be wise of you to remove your
passenger seat. Lets start by removing the 4 14mm bolts connecting the seat to the car. After you've
done that, remove the passenger side kick panel, I believe its 2 pins. Then you'll need a phillips
screw driver to remove the side plastic strip that has "Mazda" engraved on it, this will allow you to
move the carpet backwards making it a less pain in the *** to work on the ECU itself.
2nd step : Now you should see a tidy little box after you bend your carpet back. If I remember
correctly, there are 6 10mm bolts that holds a plate over the ECU itself to protect any rough
passenger you might ever have that starts the punching and the kicking because you're boosting
too hard. After you're done with the 6 (5?) 10mm bolts you'll see the ECU.
3rd step : To be on the safe side before I get sued for this, disconnect your battery. Then,
disconnect the 3 adapters that are connected to the ECU. I will name these 3 adapters as follows.
The fat one, the middle sized one, and the little one. If you can't distinguish what i'm talking about after
you look at the adapters, just stop here. You won't get the rest.
Step 4 : Lets take a look at your Bee*R. Theres 4 wires that come from the box. a red wire,
a green wire, a white wire, a black wire and a yellow wire. The red wire is for power, green is for signal.
White is optional, if you want a 2nd rev limiter to use as launch control / 2 step then you will
not want to forget hooking this wire up. You will also need to buy gauge wire if you want this
connected, its not long enough to reach the e-brake by itself. The black wire is of course the ground
wire and the yellow wire is for RPM signal. Lets hook up the red wire first. Depending on how the wire
looks already you might want to splice it to give yourself a little more room to do the tapping but, its
all up to you. The red wire connects to the IG power wire. Which for S4 (N333) ECU is here.
Step 5 : The green wire is what usually stumps people while installing this. You tap the green wire
from your Bee*R to the Crank Angle Sensor G [1]. Its the 5th wire over if you start from the left
when you look at the "fat" adapter. If you are still clueless, here is a picture.
Step 6 : The white wire is optional but you'll probably want to install it. Hooking up the white wire
will allow you to have a 2nd rev limiter which means you can either set it up as a toy,
or a 2 step launch control. I take advantage of both. You start by splicing your gauge wire, then
depending on how much space you have to work with the white wire on the Bee*R just tap it, and
tape it. Run the white wire through the side through your cd player / heater to the e-brake. Theres a
little metal piece that sticks out near the e-brake which you can just ground it to. You might have to
removed your center console or whatever gets in the way. I remember removing close to everything
in the middle.
Step 7 : The yellow wire taps into the RPM signal. The RPM signal wire is the bottom left wire
on the "fat" adapter. Do what you gotta do to your wires, tap it, and tape it back. Here is a picture
to give you a better idea of which wire it is.
Step 7 : The black wire can be tapped to any ground. I tapped this ground wire to 3G of the s4 TII
FSM which is located on the 2nd wire of the left when you look at the "little" adapter. Here is a
picture aiding you if you have a more visual brain.
Step 8 : There are 3 little wire loops connected to the opposite side of all the wires. Theres a brown
one, a grey one, and a white one. If you follow the instruction on Bee*R's website, it wants you to
cut the brown wire for rotary. The problem is if you cut the brown wire you will not be able to rev
past 5k regardless of how high you turn the limiter ****. So instead of cutting the brown wire, cut
the grey wire which is intended for a 4 cylinder vehicle. From what I've heard a 4 cylinder has something
similiar to our rotaries when it comes to the rotation cycle or what not. Anyways, If you cut the grey
wire it'll work like a charm, trust me.
Step 9 : Put back everything the same way you took it out, sit back, have a beer, and enjoy.
I'm sure theres something I left out, so if you have any questions I'll try my best to help out. If theres
something you would like to add on to this write up, let me know i'll include it. I want to take this time
to thank my cousin (plainandsimpo) for helping me out with installing this, we spent hours stumped on
trying to find out what wire to tap the ignition (green) wire to. He played a big part on figuring
out how to install this damn thing, so props to him aswell. Have fun guys.
so by modifying the crank angle sensor wire it's shutting off both leading and trailing? and what about the injectors? aren't they based off your crank angle sensor as well?
also, you talk about splicing into wires. is the Bee-R like a SAFC where you bring 3 or 4 signals in, modify them, and send 3 or 4 wires back out to the ecu via a different set of wires? without pictures to confirm i'm a little lost. other then that i enjoyed your write up. simple and to the point.
also, you talk about splicing into wires. is the Bee-R like a SAFC where you bring 3 or 4 signals in, modify them, and send 3 or 4 wires back out to the ecu via a different set of wires? without pictures to confirm i'm a little lost. other then that i enjoyed your write up. simple and to the point.
Thread Starter
Senior Member
Joined: May 2008
Posts: 344
Likes: 2
From: Alameda
installation is some what similar to installing the safc. I don't think its effecting the injectors at all because on my wideband it says i'm still running rich when its cutting the spark.. i could be wrong though.

Trending Topics


Joined: Sep 2005
Posts: 25,581
Likes: 136
From: Smiths Falls.(near Ottawa!.Mapquest IT!)


splice the green to pin 3E which is the NE+
The black wire to pin 3C is just a sensor ground for the ecu, you can ground the black wire to anywhere there is a ground.
Full Member
Joined: Dec 2007
Posts: 106
Likes: 0
From: north jersey
mine is bangin between 5k to 6k and non of the controls on the bee r wrks at all


With rev limiters that cut only spark, it doesnt do anything bad to the engine. When it cuts spark, the unburned fuel gets expelled out the exhaust ports, and when hit against the hot exhaust air that was already in the turbine of the turbo, it ignites and expands which spins the turbine wheel thus building boost at idle during the rev launching.
if you are thinking that it might be bad because of the sound from the popping when rev launching. Thats just the sound waves from the unburned fuel igniting inside the turbine. The turbo is really the only thing that will go bad first from excessive 2 stepping.
Now, rev limiting or rev launching with just fuel cut. To me thats bad, thats just more chances of getting detonation.
Somebody can correct me if I am wrong
Anyway soft revlim wont do **** for my 2 step. Have the answer to direct CAS wiring?

Full Member
Joined: Jun 2011
Posts: 246
Likes: 0
From: NJ
I dont know how much truth is in that.
With rev limiters that cut only spark, it doesnt do anything bad to the engine. When it cuts spark, the unburned fuel gets expelled out the exhaust ports, and when hit against the hot exhaust air that was already in the turbine of the turbo, it ignites and expands which spins the turbine wheel thus building boost at idle during the rev launching.
if you are thinking that it might be bad because of the sound from the popping when rev launching. Thats just the sound waves from the unburned fuel igniting inside the turbine. The turbo is really the only thing that will go bad first from excessive 2 stepping.
Now, rev limiting or rev launching with just fuel cut. To me thats bad, thats just more chances of getting detonation.
Somebody can correct me if I am wrong
What do you mean by direct CAS wiring?