
91 Vert -- Painting in progress Crystal White -- Lots of pictures

Thread Starter
Rotary Enthusiast
Joined: Aug 2002
Posts: 1,273
Likes: 0
From: Kansas
Originally Posted by vaughnc
Nice. How does this compare to "paintable rubber undercoating" (weight, water resistance, wear/tear) which is fairly cheap? That stuff can take up 3-7 days before you can paint on it.
Thread Starter
Rotary Enthusiast
Joined: Aug 2002
Posts: 1,273
Likes: 0
From: Kansas
Originally Posted by fullcircle
awsome. Youve convinced me todo the same to my interior....probably lighter and more sound proof than carpet anyway....and my carpet is nasty
And I should mention, I AM still putting my sound deadener & carpet on top of this in the interior. I don't like the appearance of this stuff enough to use it for my floor alone. My goal is to make this a relatively quiet and environmentally protected vert.

Jesus is the Messiah
Joined: May 2003
Posts: 4,848
Likes: 0
From: Silver Spring, MD
Thats really sweet. thanks for the pics 
I have always wanted to do this, not so much for painting, but I wanted to weld up all that metal thats only held together by (sometimes very crappy) spot welds.
I have always wanted to do this, not so much for painting, but I wanted to weld up all that metal thats only held together by (sometimes very crappy) spot welds.
Thread Starter
Rotary Enthusiast
Joined: Aug 2002
Posts: 1,273
Likes: 0
From: Kansas
Originally Posted by Tofuball
Thats really sweet. thanks for the pics
I have always wanted to do this, not so much for painting, but I wanted to weld up all that metal thats only held together by (sometimes very crappy) spot welds.
I have always wanted to do this, not so much for painting, but I wanted to weld up all that metal thats only held together by (sometimes very crappy) spot welds.
Thanks for the comments and compliments thus far.

Banned. I got OWNED!!!
Joined: Nov 2002
Posts: 312
Likes: 0
From: San Jose, CA
I would have powder coated it since it was STRIPPED down like that.....looks good........i believe powder coating is much better protection against rocks and such on the road........anyone care to explain any cons?

Full Member
Joined: May 2005
Posts: 52
Likes: 0
From: Cortland OH
 i dont want to see the oven that can fit an RX7 in it... nor would i want to see the bill, your cost would be unreal, as i personaly know someone that powder coats for extra cash to put in his car
Last edited by REnoob; Aug 18, 2005 at 05:31 PM.
Yes, that is my name.
Joined: Nov 2004
Posts: 519
Likes: 0
From: Santa Cruz Mtns
Man, thatlooks awesome! I want to do that to my parts car body, then swap everything over!
Madrx7racer; AFAIK, you have to bake on a powdercoat, so you'd have to find a place with an oven big enough to fit the chassis!
Madrx7racer; AFAIK, you have to bake on a powdercoat, so you'd have to find a place with an oven big enough to fit the chassis!
Rotary Apprentice
Joined: Jan 2005
Posts: 2,181
Likes: 0
From: USA
Originally Posted by Tofuball
Thats really sweet. thanks for the pics
I have always wanted to do this, not so much for painting, but I wanted to weld up all that metal thats only held together by (sometimes very crappy) spot welds.
I have always wanted to do this, not so much for painting, but I wanted to weld up all that metal thats only held together by (sometimes very crappy) spot welds.
Also, that vert is SWEET, i really like the way its being completely rebuilt.
Thread Starter
Rotary Enthusiast
Joined: Aug 2002
Posts: 1,273
Likes: 0
From: Kansas
Originally Posted by NOPR
you wouldn't want to weld on a rotisserie, you would want the car with the full suspension on the ground how it will be when its driving.
Also, that vert is SWEET, i really like the way its being completely rebuilt.
Also, that vert is SWEET, i really like the way its being completely rebuilt.
I thought about putting the foam into the various spots in the chassis, but from what I've read, that's also better done w/ the car on the ground. And actually I see no labor advantage of doing that right now on the rotisserie anyway. I think everything that I'd want to foam-fill is accessible just as easily either way.
And as far as powdercoating -- you can cure it w/ infrared lamps, so you wouldn't HAVE to have a huge oven. But still would be a big pain though and I highly doubt worth the cost/effort.
Thread Starter
Rotary Enthusiast
Joined: Aug 2002
Posts: 1,273
Likes: 0
From: Kansas
Originally Posted by JamesBong
Man, thatlooks awesome! I want to do that to my parts car body, then swap everything over!
I've got a lot of work ahead of me as I'm also doing an RE swap on the whole thing. All-in-all, I think it will be well worth it and I'll probably be into it for a lot less than one might imagine.
Again, thanks for the comments and compliments. Happy to answer any questions you have -- in the mean time I need to start moving parts.
I'll keep updating this thread as I make noticable or significant advances. 
BOOSTED Vert
Joined: Sep 2002
Posts: 2,307
Likes: 0
From: Miami
Originally Posted by NOPR
you wouldn't want to weld on a rotisserie, you would want the car with the full suspension on the ground how it will be when its driving.
Also, that vert is SWEET, i really like the way its being completely rebuilt.
Also, that vert is SWEET, i really like the way its being completely rebuilt.
http://www.rally.subaru.com/rally/se...rt=1&imageId=0
They seem to have good success with welding on a rotisserie. Its also alot easier to get to.
Originally Posted by Madrx7racer
I would have powder coated it since it was STRIPPED down like that.....looks good........i believe powder coating is much better protection against rocks and such on the road........anyone care to explain any cons?
Rotary Apprentice
Joined: Jan 2005
Posts: 2,181
Likes: 0
From: USA
Originally Posted by MARTIN
http://www.rally.subaru.com/rally/se...rt=1&imageId=0
They seem to have good success with welding on a rotisserie. Its also alot easier to get to.
They seem to have good success with welding on a rotisserie. Its also alot easier to get to.

BOOSTED Vert
Joined: Sep 2002
Posts: 2,307
Likes: 0
From: Miami
Originally Posted by NOPR
I'm really glad you posted that because I find that extremely interesting. I guess SUBARU probably knows more about cars than me, but I've always heard that you only want to reinforce welds with the full suspension in place and the car on level ground so you can weld the car how it will sit, which makes sense because if its stretched out at all from being upside down or whatever, you wouldn't want to reinforce it in that stretched out position... but I dont know that's weird. Maybe someone smarter will come correct me.
Thread Starter
Rotary Enthusiast
Joined: Aug 2002
Posts: 1,273
Likes: 0
From: Kansas
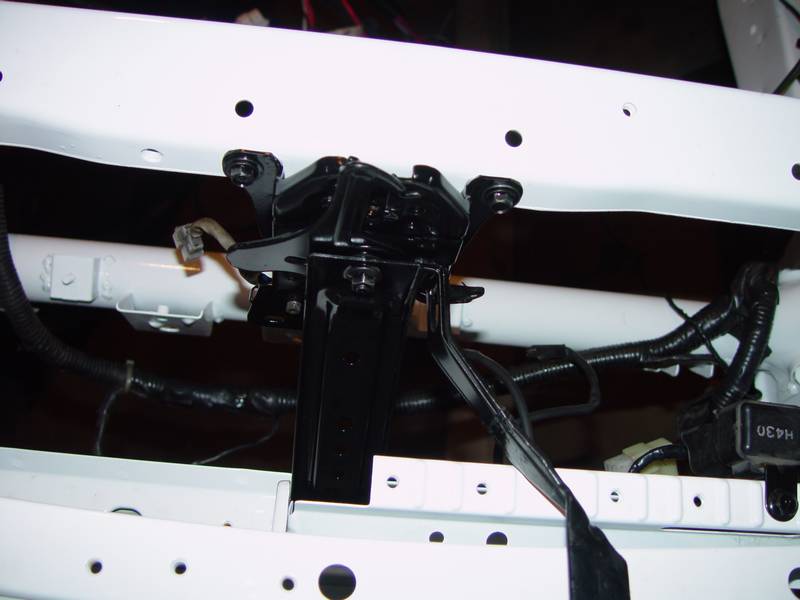
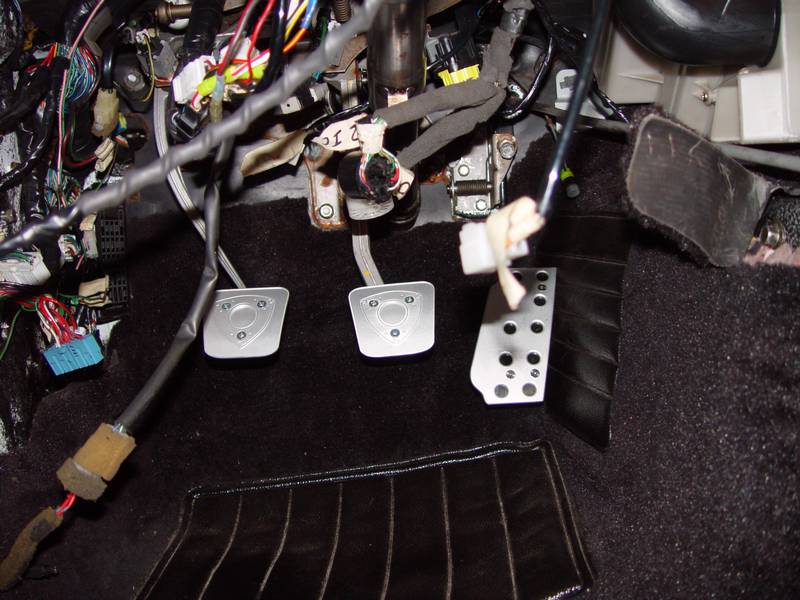
Pedal assemblies also installed -- Autovation set is visible in prior pictures, but here is a better shot:
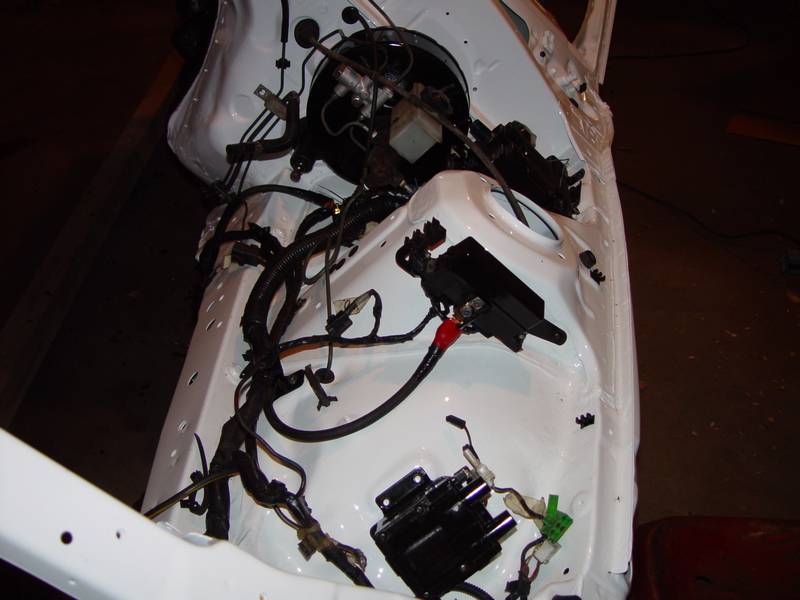
ECU shot (LT8 behind the panel)
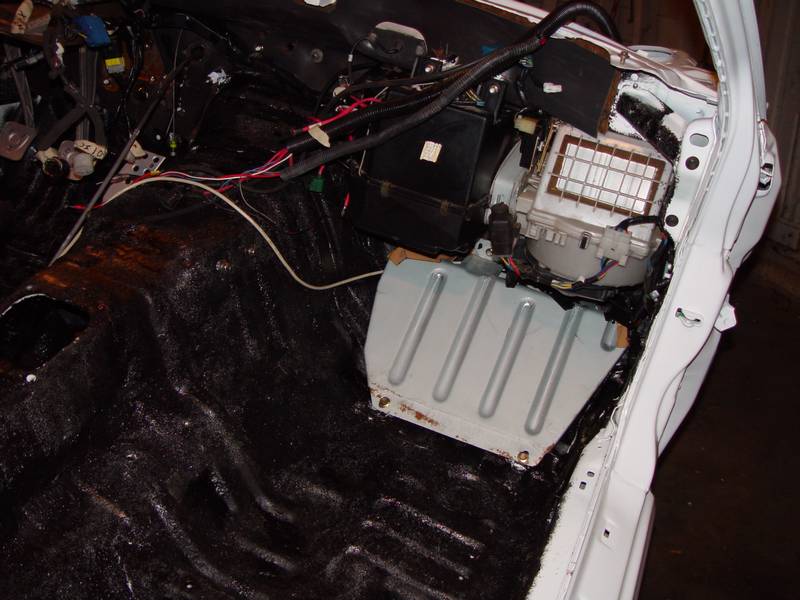
Also some more interior assembly shots for dash components (probably some duplication)
ECU shot (LT8 behind the panel)
Also some more interior assembly shots for dash components (probably some duplication)
Thread Starter
Rotary Enthusiast
Joined: Aug 2002
Posts: 1,273
Likes: 0
From: Kansas
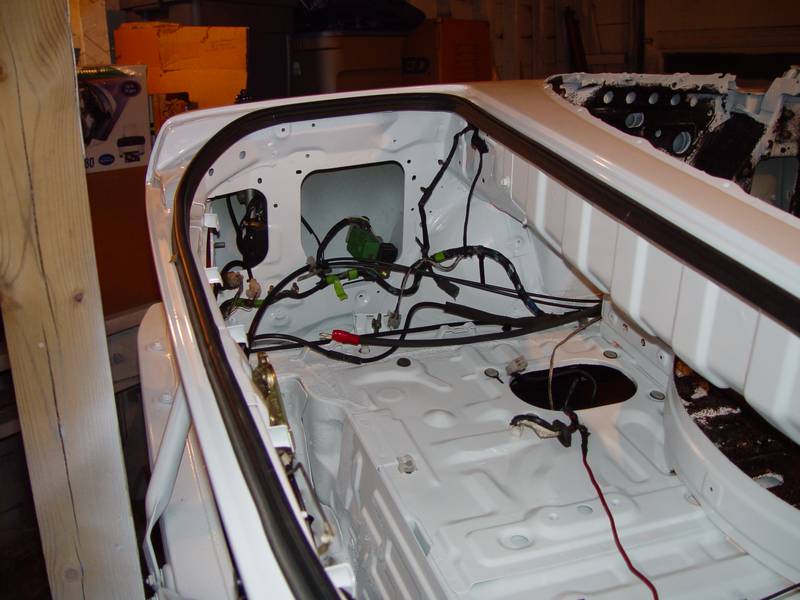
Some rearward interior shots showing rear speakers in and sound dampening material:
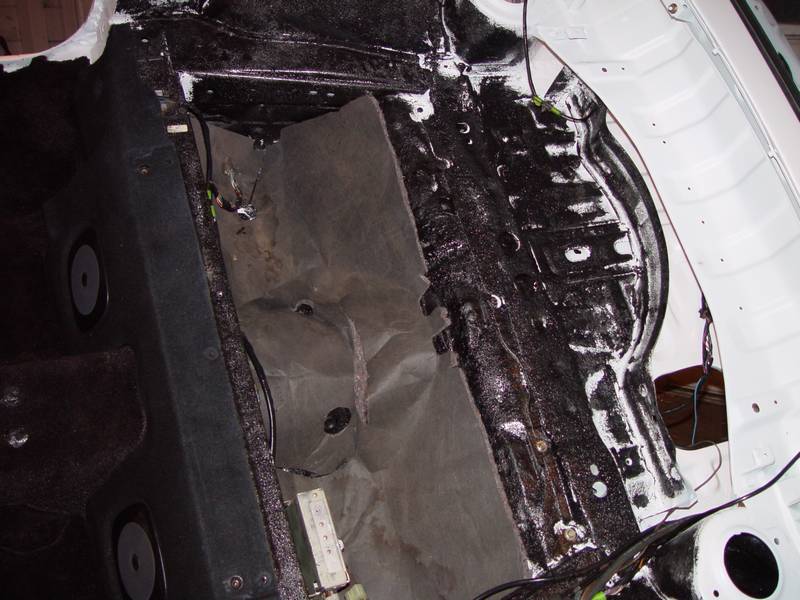
And a trunk shot w/ the weatherstripping in, rear harness, antenna, trunk lid latch, etc.
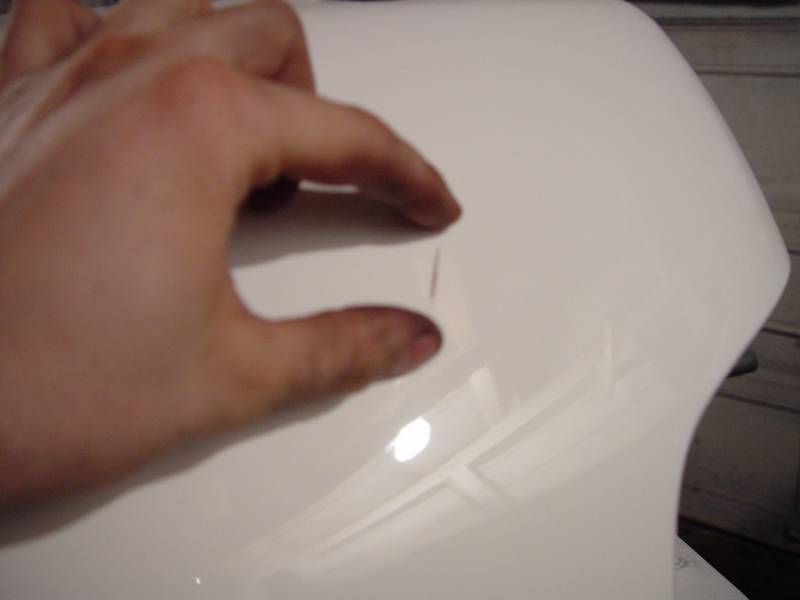
And the heartbreaker... a scratch on my new paint!!! AGGGH!
And a trunk shot w/ the weatherstripping in, rear harness, antenna, trunk lid latch, etc.
And the heartbreaker... a scratch on my new paint!!! AGGGH!

Rotary Enthusiast
Joined: Sep 2005
Posts: 831
Likes: 2
From: orlando
WOW !!! Im really impressed by the quality buildups Ive been seeing lately!!. It seems RX tuners are paying s much detail as the pros and are putting forth quality cars. keep up the good work. BTW did you put in the bolts b 4 spraying the bedliner matierial on the inside or did you tap and die them back out or ? . just curious. looks sweet - Erik
Thread Starter
Rotary Enthusiast
Joined: Aug 2002
Posts: 1,273
Likes: 0
From: Kansas
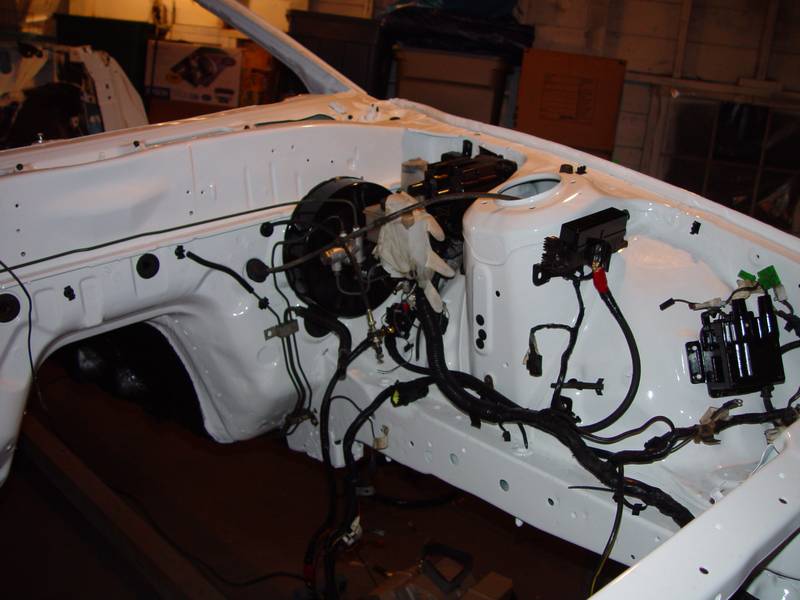
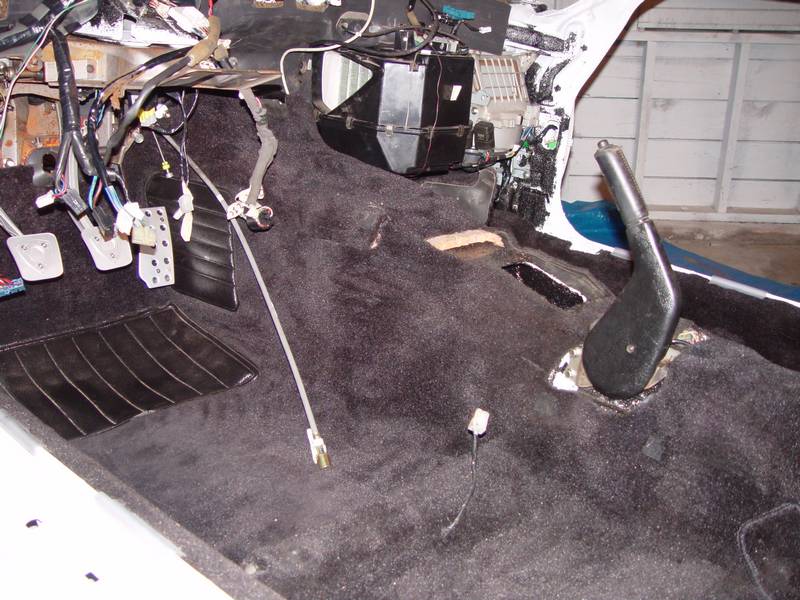
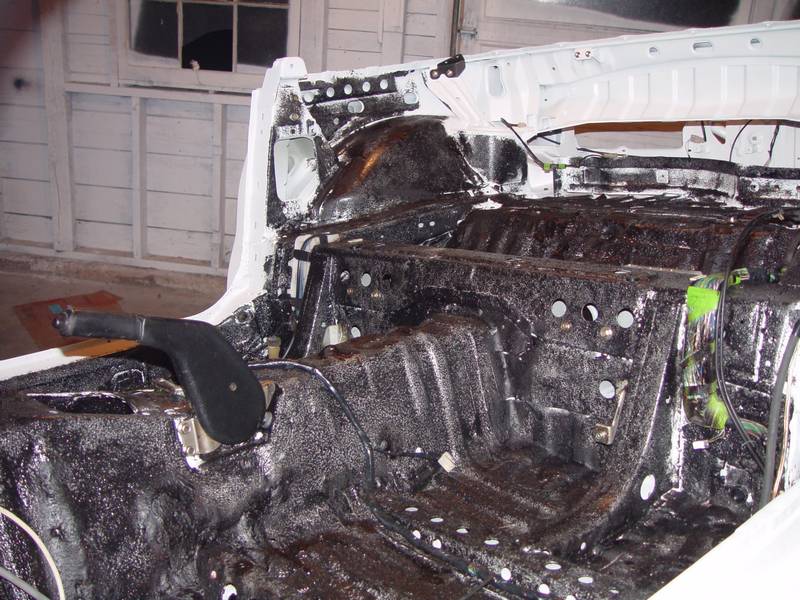
Okay, so if you've made it this far you'll see that I'm starting to put the thing back together now. The car is still on a rotisserie so it's still a breeze to work on. Can't reach something? Just flip it over until it's within my easy reach.
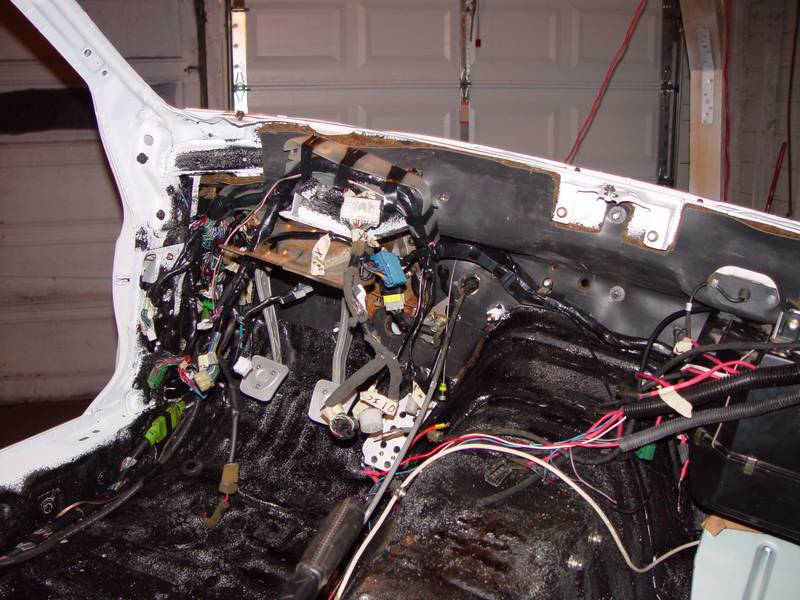
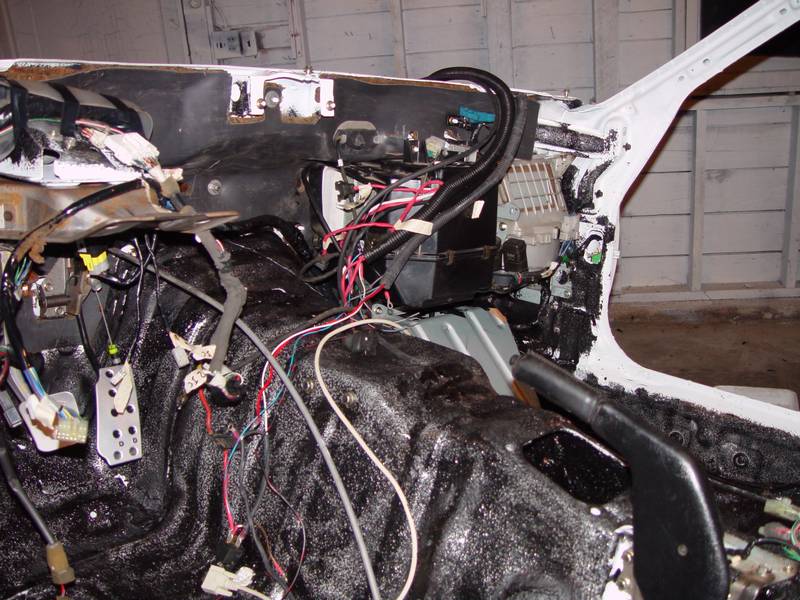
I started w/ running the various wiring harnesses. Takes a little time and part of my problem is remembering where all those little wiring holders plug into the various holes in the body. Probably won't figure all of them out, but as long as they're secure, I don't really care. Also started putting in a few of the components in the engine bay like master cylinder, clutch cylinder, fuse box, etc. This was a fairly time-consuming & tedious process because everything had to be cleaned and I went ahead and painted a lot of those items too. All the little brackets, plastic fuse (and relay) covers, etc. etc. Lots of little pieces -- everything got a good coat of hi-temp gloss black.
The master cylinder has to be installed w/ the clutch/brake pedal assembly in the interior (which I put new Autovation pedals on). So that went on at the same time (and went ahead and put the gas pedal on too) Btw, I love those Autovation pedals -- worth the cost IMO as they look hundreds of times better than stock crap rubber.
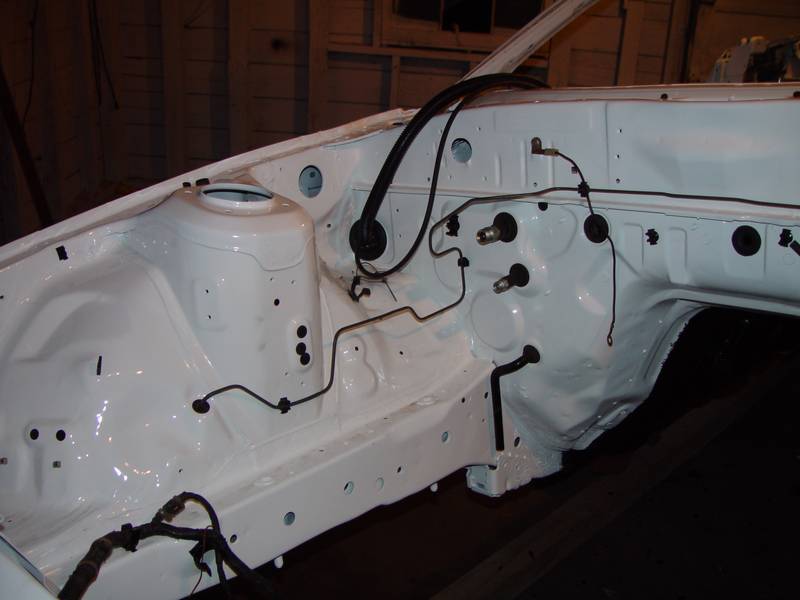
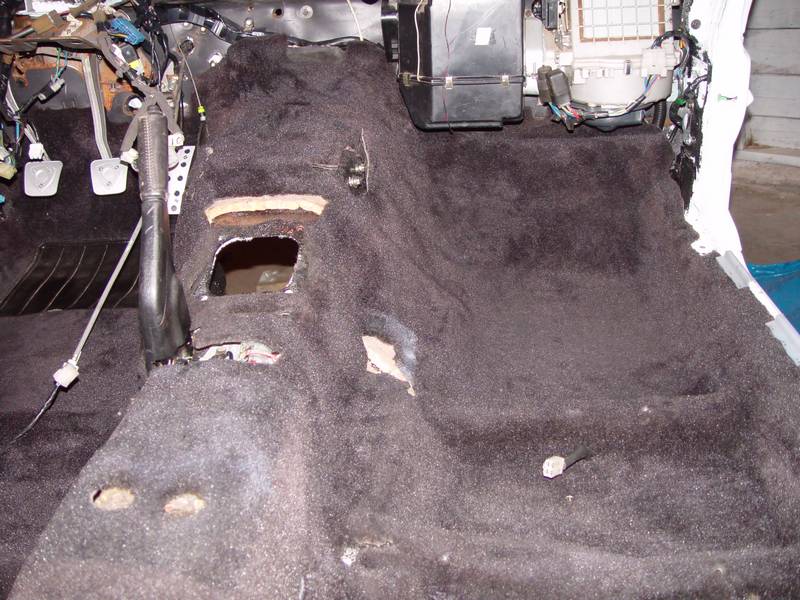
I spent a good day finding all of the body holes that were left after I put all of the normal body plugs in. If you've ever looked close on the interior, there are a lot of little holes covered w/ what appears to be tape. All of those were completely open on this car since it had been blasted -- so I went and bought a bunch of plastic panel fasteners to press (tightly) into all those holes. Then I went back and cut off the excess of those fasteners from the bottom and sprayed the canned undercoating on the tops and bottoms of the fasteners for a good weathertight seal. After all of that, I started putting in some of the dash components and then quickly remembered that I needed to put the carpet in first. So took those back out and then spent some time remembering where all of the stock sound dampening fiber went. When I free up some more 'hobby money', I'll invest in some better sound deadener and put all of that down under the carpet & fiber -- but that's at a later date.
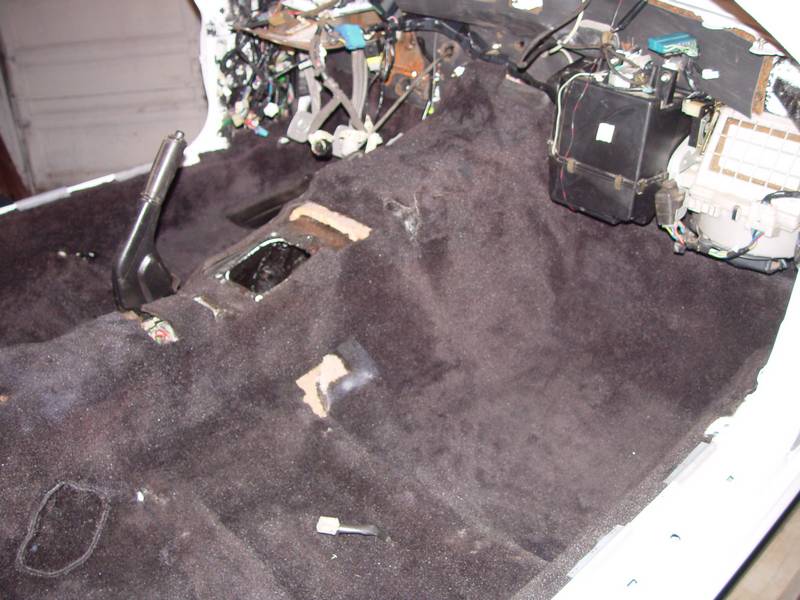
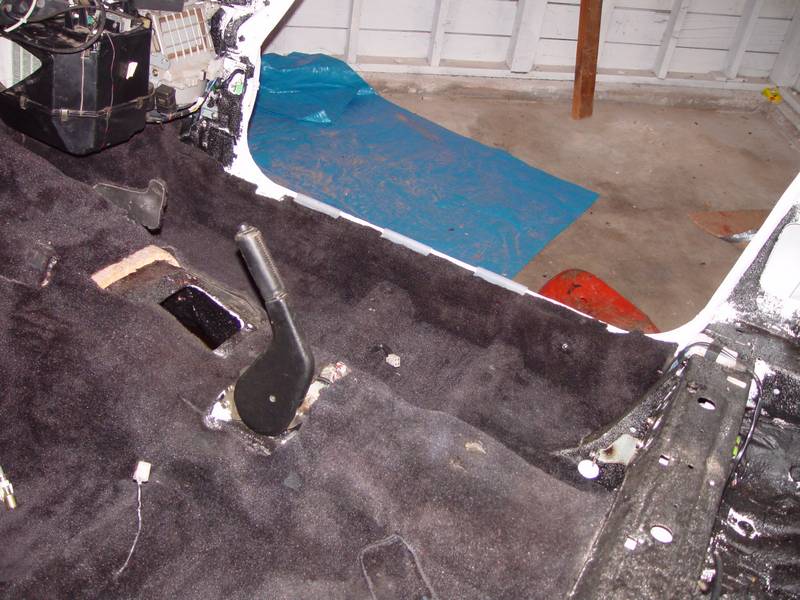
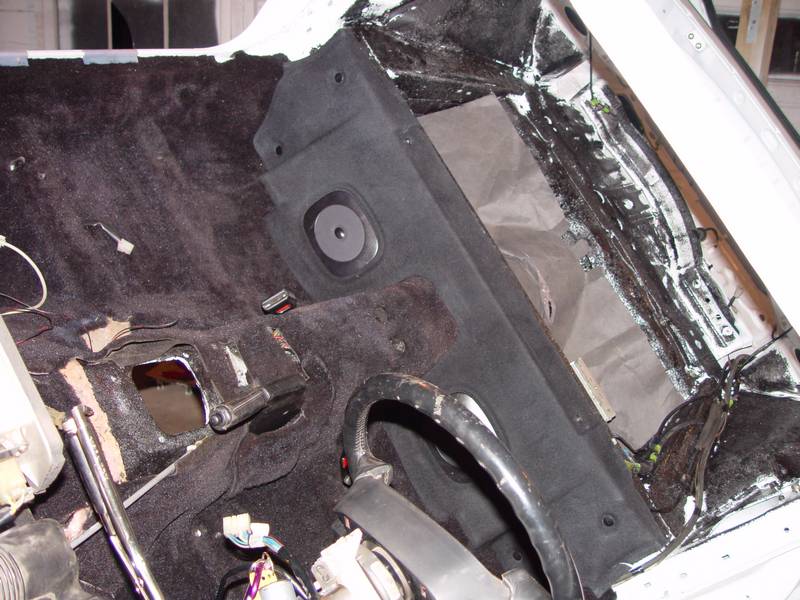
I then installed the carpet -- which by the way had to have at least 5 pounds of dirt in it. I literally spent at least an hour blowing dirt out of the carpet with a compressor. The whole time I felt like I was standing in a blast cabinet. I couldn't believe how much dirt was coming out and honestly, I finally gave up and just put it in dirt and all. Someday I'll go to a car wash and give it a few bucks worth of vacuuming. By the way, this carpet was originally blue and I've dyed it black with RIT dye and a kiddie pool. I've been pretty pleased w/ the results so far. I'm anxious to see how it holds up w/ regular traffic.
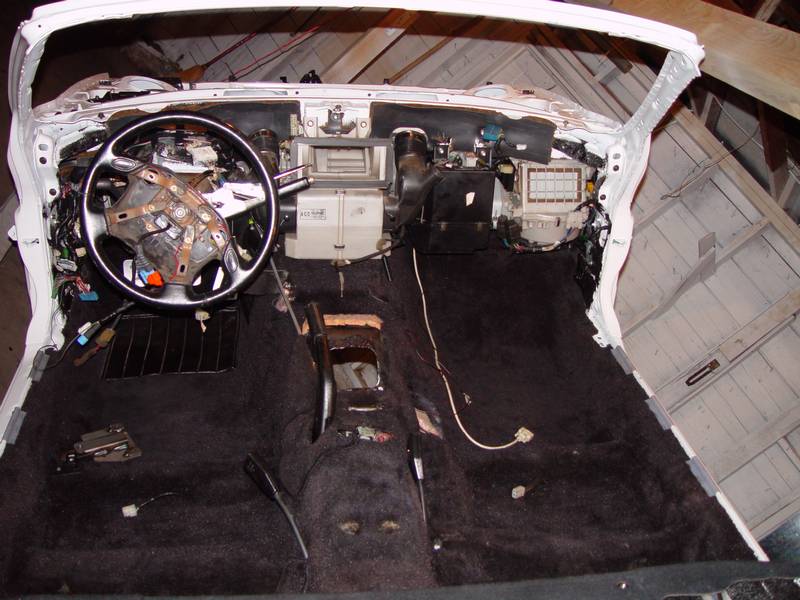
After the carpet, I put the dash components back in as you can see. Installed my Microtech LT8 and put the ECU panel over the top of that. Put the steering column back in (will replace the ugly wheel at some point).
Heartbreaker -- when I was taking the car (and rotisserie) off of the trailer, we had a small mishap and I scratched my left rear quarter panel. You know that sickening feeling of the first scratch on new paint. Ohwell, had to happen sooner or later (just was hoping for the later). Jeez, I didn't even get the car on the road yet.
Next steps: Go ahead and put the dash in. Probably will stop in the interior at that point and focus on getting the suspension components in place. I will probably take the car off of the rotisserie when I'm ready to bolt the suspension to it. Not real sure how I'm going to do that. Guess I'll have to get about 8 guys over to my house for that process. I can't remember if I already posted this or not, but I also noticed during this long process that the 'vert top motor mounts have been removed from the body as well as the brace that the spare bolts to and some body panel brackets. I don't have extras of those, so it looks like I'll remove them from my donor car (after some detailed measuring & marking) and re-weld them to my new ride. A little frustrated by that, but it's not a show stopper right now, so I'm saving that for a day when I'm highly motivated to get it finished.
Anyway, I'm tired of typing for the moment, so I'll stop here and review. Open to comments, suggestions, questions smart *** comments, etc.
Thanks for taking the time to look!
I started w/ running the various wiring harnesses. Takes a little time and part of my problem is remembering where all those little wiring holders plug into the various holes in the body. Probably won't figure all of them out, but as long as they're secure, I don't really care. Also started putting in a few of the components in the engine bay like master cylinder, clutch cylinder, fuse box, etc. This was a fairly time-consuming & tedious process because everything had to be cleaned and I went ahead and painted a lot of those items too. All the little brackets, plastic fuse (and relay) covers, etc. etc. Lots of little pieces -- everything got a good coat of hi-temp gloss black.
The master cylinder has to be installed w/ the clutch/brake pedal assembly in the interior (which I put new Autovation pedals on). So that went on at the same time (and went ahead and put the gas pedal on too) Btw, I love those Autovation pedals -- worth the cost IMO as they look hundreds of times better than stock crap rubber.
I spent a good day finding all of the body holes that were left after I put all of the normal body plugs in. If you've ever looked close on the interior, there are a lot of little holes covered w/ what appears to be tape. All of those were completely open on this car since it had been blasted -- so I went and bought a bunch of plastic panel fasteners to press (tightly) into all those holes. Then I went back and cut off the excess of those fasteners from the bottom and sprayed the canned undercoating on the tops and bottoms of the fasteners for a good weathertight seal. After all of that, I started putting in some of the dash components and then quickly remembered that I needed to put the carpet in first. So took those back out and then spent some time remembering where all of the stock sound dampening fiber went. When I free up some more 'hobby money', I'll invest in some better sound deadener and put all of that down under the carpet & fiber -- but that's at a later date.
I then installed the carpet -- which by the way had to have at least 5 pounds of dirt in it. I literally spent at least an hour blowing dirt out of the carpet with a compressor. The whole time I felt like I was standing in a blast cabinet. I couldn't believe how much dirt was coming out and honestly, I finally gave up and just put it in dirt and all. Someday I'll go to a car wash and give it a few bucks worth of vacuuming. By the way, this carpet was originally blue and I've dyed it black with RIT dye and a kiddie pool. I've been pretty pleased w/ the results so far. I'm anxious to see how it holds up w/ regular traffic.
After the carpet, I put the dash components back in as you can see. Installed my Microtech LT8 and put the ECU panel over the top of that. Put the steering column back in (will replace the ugly wheel at some point).
Heartbreaker -- when I was taking the car (and rotisserie) off of the trailer, we had a small mishap and I scratched my left rear quarter panel. You know that sickening feeling of the first scratch on new paint. Ohwell, had to happen sooner or later (just was hoping for the later). Jeez, I didn't even get the car on the road yet.
Next steps: Go ahead and put the dash in. Probably will stop in the interior at that point and focus on getting the suspension components in place. I will probably take the car off of the rotisserie when I'm ready to bolt the suspension to it. Not real sure how I'm going to do that. Guess I'll have to get about 8 guys over to my house for that process. I can't remember if I already posted this or not, but I also noticed during this long process that the 'vert top motor mounts have been removed from the body as well as the brace that the spare bolts to and some body panel brackets. I don't have extras of those, so it looks like I'll remove them from my donor car (after some detailed measuring & marking) and re-weld them to my new ride. A little frustrated by that, but it's not a show stopper right now, so I'm saving that for a day when I'm highly motivated to get it finished.
Anyway, I'm tired of typing for the moment, so I'll stop here and review. Open to comments, suggestions, questions smart *** comments, etc.
Thanks for taking the time to look!
Thread Starter
Rotary Enthusiast
Joined: Aug 2002
Posts: 1,273
Likes: 0
From: Kansas
Originally Posted by RXn407
BTW did you put in the bolts b 4 spraying the bedliner matierial on the inside or did you tap and die them back out or ? . just curious.
.
Lean Mean Speed Thingie
Joined: Mar 2002
Posts: 1,102
Likes: 0
From: Moscow, ID
very impressive, you're gonna have to let us know how much you paid for that...just break it to us gently! Interiors are a breeze to work on when you have a vert...keep us updated, I love seeing these builds.