
86 TII swap won't start, but really wants to.

Thread Starter
OasisAvatar
Joined: Dec 2004
Posts: 480
Likes: 5
From: Florida
I've started checking some things.
My BAC has been deleted. The hose coming off the air intake pipe is blocked off and there are nipples on the two smaller tubes on the tmic.
The TIC is all hooked up, reusing all the NA stuff I could. I'm using the TII MAF.
Stock BOV is secure.
Break booster line is connected (though needs to be on better and could probably use a clamp).

Satch: Yeah, you're right. Though the wire wasn't cut in half, I know I should probably use a butt connector with heat shrink. Really I need to solder it together, but I don't have any experience doing it. I could buy the supplies and practice I suppose.
Hailers: This process of elimination is exactly what I need from someone who knows way more than myself. Thank you. I'll try these / track these down tomorrow.
Thank you both for keeping an eye on my thread. I REALLY appreciate it.
Hailers: This process of elimination is exactly what I need from someone who knows way more than myself. Thank you. I'll try these / track these down tomorrow.
Thank you both for keeping an eye on my thread. I REALLY appreciate it.
Use the link I supplied the other day and browse through pgs. 31-33. Pin 2A,2E,and 2J are all related to the AFM although your somewhat limited to what you can measure since you are not able to idle your car.
Thread Starter
OasisAvatar
Joined: Dec 2004
Posts: 480
Likes: 5
From: Florida
Right. Thanks, I've got a downloaded version of the fsm. So you want me to test what the vdc's are at on and cranking then? BRB.
Okay tested them.
ON/CRANK
2A = 4.97/5.01
2E=4.03/3.09
2J=2.92/3.04
Tomorrow I think I'll take a set of 180 degree pictures of my engine bay. Could help.
Okay tested them.
ON/CRANK
2A = 4.97/5.01
2E=4.03/3.09
2J=2.92/3.04
Tomorrow I think I'll take a set of 180 degree pictures of my engine bay. Could help.
As far as measuring the AFM, at the plug of the actual AFM the diagram from the FSM is from looking into the plug where the top has two nubs and bottom has three thus the far left is Fc followed by E1 then E2 followed by Vref then E2 then Vs and lastly on the far right there is THAA. If you measure the first two on the far left which would be Fc and E1 the ohm reading should read infinity (figure 8 on its side) and so on. You could also measure Fc and E1 with the flapper fully closed (infinity again) or fully opened (0 ohms) and so on.
Correct and I'm not sure what type of multimeter you have so if you set it to 1k ohms then 200-600 ohms will show up as .2 to .6
EDIT: No key in the ignition!!!!!!!!!!!!!!!!!!!!!!!! and put the two leads of the multimeter together first to ohm it out and check to see if it goes to zero. If it doesn't then use the adjustment **** to zero it out.
Thread Starter
OasisAvatar
Joined: Dec 2004
Posts: 480
Likes: 5
From: Florida
I've got a cheapy  I think I'm about ready for bed, so I'll try and test it tomorrow. I wantto drive my car! I want boost! Lol. Thanks satch

I've been testing the vdc's by setting it to 20 on DCV.
I think I'm about ready for bed, so I'll try and test it tomorrow. I wantto drive my car! I want boost! Lol. Thanks satch I've been testing the vdc's by setting it to 20 on DCV.
Sure, and it's kind of strange that when you sleep your car runs like a champ.
I forgot to illustrate one thing in the wee hours of the morning and that is when you remove the connection from the AFM you measure the ohms/resistance of the terminals within the AFM itself and "not" the connector/plug. Also, since the connector is removed it wouldn't matter if the key was on but it's not needed any way in this instance. Hope that clears things up in case it wasn't understood.
Thread Starter
OasisAvatar
Joined: Dec 2004
Posts: 480
Likes: 5
From: Florida
Okay so here are the pics of my engine bay. Please look for anything squirrely. Thanks. I'm posting them as links to save space.
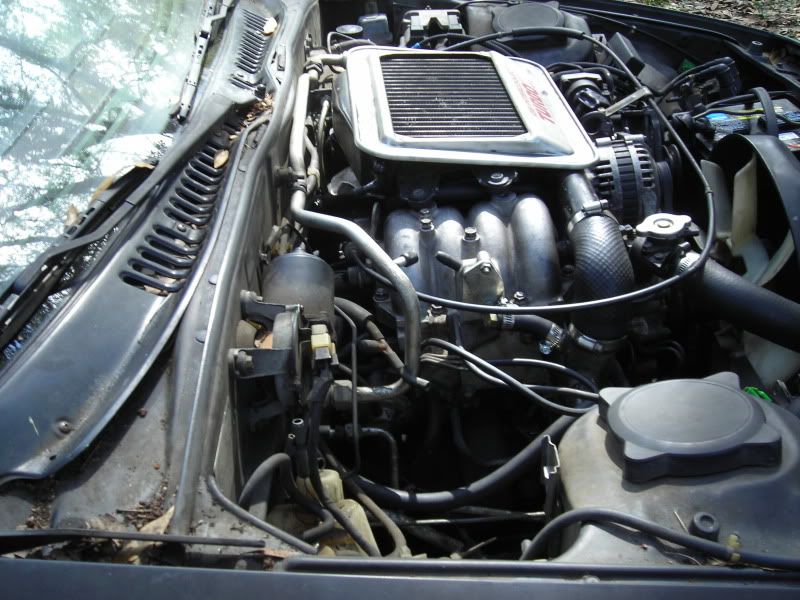
http://i3.photobucket.com/albums/y71...7/DSCN2050.jpg
http://i3.photobucket.com/albums/y71...7/DSCN2051.jpg
http://i3.photobucket.com/albums/y71...7/DSCN2052.jpg
http://i3.photobucket.com/albums/y71...7/DSCN2053.jpg
http://i3.photobucket.com/albums/y71...7/DSCN2054.jpg
http://i3.photobucket.com/albums/y71...7/DSCN2055.jpg
http://i3.photobucket.com/albums/y71...7/DSCN2056.jpg
http://i3.photobucket.com/albums/y71...7/DSCN2057.jpg
http://i3.photobucket.com/albums/y71...7/DSCN2058.jpg
http://i3.photobucket.com/albums/y71...7/DSCN2059.jpg
Lol, I actually had a dream that I removed the boost pressure sensor and my car fired right up! *sigh*
Some of your clamps look "suspect." The factory originals were not the best when new and after years of wear and tear they need to be replaced. Probably something you don't want to hear but "T bolt" clamps (best to install using a ratchet as opposed to a screwdriver) are the best and they are a bit pricey but they will do the job. If all your testing proves fruitless regarding spark, fuel and sensors then you need to remove the AFM and insert a cap in the intake which has a valve which would allow you to pump air into the vacuum system of the engine to check for vacuum leaks. You could gear it up so you could use a bicycle pump or a pump used to inflate a football/basketball to keep it simple. Spraying soapy water would also help with this kind of test while listening for an air leak might do the job in itself.
Thread Starter
OasisAvatar
Joined: Dec 2004
Posts: 480
Likes: 5
From: Florida
I'm going to replace the fuses in egi box. the 3 30A and the 40A look iffy. And I'm going to get a fresh set of spark plugs. I pulled a top and bottom and they both had some oil on them and smelled like gas. BRB.
Before replacing the fuses try some of the methods which Hailers suggested in proving whether the fuses are good or not for it's quick and simple. Chance are very high they are fine but it's worth the look. Also, the thing about fuses is either they fuse or they don't and there really isn't a middle road.
Thread Starter
OasisAvatar
Joined: Dec 2004
Posts: 480
Likes: 5
From: Florida
The damnedest thing happened. When I was jerking and shaking the tmic to get it out of the rubber hoses, the metal from the tmic touched the metal of the support bracket (that was previously pinching the power wire to a injector) and it sparked, sizzled and smoked! Just from metal to metal contact. I tested it a few times to make sure I knew what was happening and it was repeatable, and sure enough, smoke. I disconnected the power to the battery and took everything off to take the uim off. Took it off and looked for more wires that could have been touching it, but didn't find anything obvious. I couldn't solder for the life of me so I butt connected the injector wire together and taped a few others where the oooooold wire insulation had cracked and broken to expose a little bit of the actual wire.
In the process, unfotunately, I broke off one of the metal tabs on the little plug on the far right of the uim, on a short metal pipe connected to the (throttlebody?), air intake temp sensor maybe?
Anyway, while I had the uim off I took some pictures:
http://i3.photobucket.com/albums/y71...7/DSCN2069.jpg
http://i3.photobucket.com/albums/y71...7/DSCN2068.jpg
I tried to start it after everything was together (with the connector connected to only one of the two tabs, the broken tabbed sensor thing), with no change. Then I disconnected the boost pressure sensor, tried to start it and didn't start.
Also, that bolt missing on the block off plate looks like the bolt head may have broken off.
Later, I'm going to put a fuel cut off switch in. The spark plugs smelled majorly of gas and were wet, so I'm assuming its flooded to boot.
I didn't replace any fuses, they looked a little corroded but still had a bridge.
I haven't gotten to the MAF or tried more of Hailers' suggestions yet.
How the hell do you get the CAS off?

HAILERS
Joined: May 2001
Posts: 20,563
Likes: 27
From: FORT WORTH, TEXAS,USA
Yeah. Don't mess with the CAS in the new engine at all. Just remove the old CAS by removing the single fastener that holds it in place and then pull up and out. Might have to wiggle it back and forth while pulling straight out.
Then attach that old CAS to the harness that the new CAS is attached to. Do not move the new CAS at all, just disconnect its plug from the harness and connect the old CAS to it. Then put the key to ON (not to start) and go back to the CAS and spin its bottom gear with you fingers. Spark should occur and clicking of the fuel injectors should occur. You don't have to spin it very fast at all. Just a simple flip of the fingers.
Then attach that old CAS to the harness that the new CAS is attached to. Do not move the new CAS at all, just disconnect its plug from the harness and connect the old CAS to it. Then put the key to ON (not to start) and go back to the CAS and spin its bottom gear with you fingers. Spark should occur and clicking of the fuel injectors should occur. You don't have to spin it very fast at all. Just a simple flip of the fingers.
Thread Starter
OasisAvatar
Joined: Dec 2004
Posts: 480
Likes: 5
From: Florida
Okay..... so I took the CAS off the old NA engine and hooked it up to the connector on my car. I'm not exactly sure what was supposed to happen.. I had the key to ON, and I guess I moved or wiggled the CAS and there was a huge POP like my car backfired (or someone with a big bag blew air into it and popped it)... I either blew a big fuse or the CAS ignited fuel. I turn the car to off, and then back to on and spun the bottom of the CAS and different speeds and directions and nothing happened. I didn't hear anything, no clicking from a spark plugs or injectors (not that I know what I'm listening for.)
I guess I'll install my fuel cut off switch and maybe try and trace my harness to see if I can find any exposed wires that may have caused that spark and smoke from the tmic touching the bracket I mentioned earlier.
Hailers? Satch?
I guess I'll install my fuel cut off switch and maybe try and trace my harness to see if I can find any exposed wires that may have caused that spark and smoke from the tmic touching the bracket I mentioned earlier.
Hailers? Satch?
per noted by "Hailers"
""If the Main Relay pulls in you know the Engine fuse is good. IF you pull any of the elect plugs off the various solenoids on the left side of the engine and you have batt pwer on the Black/White wire of any of those connectors, then the EGI COMP fuse is good (plus it agains confirms the main relay is good and the engine fuse is good). If you pull the small plug off the ECU and the Black/White wire has batt power, then the EGI INJ fuse is good.
If you connect a spare CAS to the harness on the engine and spin its bottom gear with your fingers with key ON, you should hear the sparkplugs sparking and the primary fuel injectors clicking proving the ECU and CAS and wiring are good.
IF you spin the engine over with the starter and see the tach needle make small bumps as the engine spins....that more than less proves all the above are good.
You've lost spark sometime since you first had the engine actually startup. Why you don't have spark now is a good question. No spark is usually a blown engine fuse or one of the EGI fuses gone bad. ""
You also have become quite familiar with the ECU plugs over the course of the past week. In plug #3, the smallest one, there are 4 wires with the main color green. One is solid while the rest have a stripe. These are related to your injectors. With the key to on they should have close to 12volts to them. Checking them as well as the ones not already checked would be insightful. You already checked 3A-starter switch, but check 3A(ground), 3C 3E 3F and 3H(injectors 12 volts), 3G-another ground, 3I (main relay 12 volts). Doing this diagnotic test as well as applying the same approach to plug#1 and #2 will help narrow down your problem. And as silly as it sounds has it ever crossed your mind that your fuel filter is clogged. It sure would make things simplified if that was the route cause of your problem. It's probably not but everything needs to be considered however small.
HAILERS
Joined: May 2001
Posts: 20,563
Likes: 27
From: FORT WORTH, TEXAS,USA
Okay..... so I took the CAS off the old NA engine and hooked it up to the connector on my car. I'm not exactly sure what was supposed to happen.. I had the key to ON, and I guess I moved or wiggled the CAS and there was a huge POP like my car backfired (or someone with a big bag blew air into it and popped it)... ************************************************** *********************
The backfire was caused by the rotor of the CAS moving just enough to output a signal to the ECU and the ECU sent a signal to the lead coil to fire. It fired and the sparkplug caused the fuel to go BANG and cause a backfire.
The gear on the CAS only has to be rotated at a low speed. Like say three times a second or if you want fifty times a second. If the key is ON, then you should HEAR the sparkplugs popping/crackling as the CAS if rotated. If you hear it, that means the ECU and CAS and coil assy are doing just fine and the problem is not electrical in nature.
To hear the spark better, key to ON.....pull one of the lead sparkplug wires out of the lead coil assy so that it just rests at the edge of where the wire goes into the coil assy....then just spin the CAS bottom gear a few times. IF alls well, you will hear and SEE spark at the coil assy where the wire is just at the bore of the coil assy.
Three fuse are required. ENGINE fuse in the interior..........EGI fuses in the engine bay.
All your doing is spinning the CAS to simulate the starter turning over the engine, BUT your not dragging the battery down when doing it this way and the voltage to all elements is at its maximum (starter not dragging voltage down) plus the neighbors are not troubled by the constant cranking of the engine at 1 am in the morning.
Since you heard the backfire, I assume a bit that you do have spark. But do what I suggested and spin the CAS with key ON and the lead sparkplug wire just at the edge of its bore in the lead coil assy. Should see multiple sparks as you rotate the bottom gear on the CAS.
Thread Starter
OasisAvatar
Joined: Dec 2004
Posts: 480
Likes: 5
From: Florida
Thanks satch.
I tested the 3rd plug at ON, they are: 3A 0.02, 3B 0.03, 3C 11.57, 3D 0.02, 3E 11.56, 3F 11.56, 3G 0.01, 3H 11.56, 3I 11.40, 3J 11.56
I'll test all of 1 and 2 also in a few.
With the CAS, I didn't mean I held it and wiggled it, I ment, when I turned the car to on, I moved it to pick it up and before I got to turn it, the POP happened (I'm assuming the bottom gear moved/turned slightly.)