
interest in fc swaybar relocation kit?

Thread Starter
Joined: Aug 2002
Posts: 3,099
Likes: 4
From: Richland, WA
interest in fc swaybar relocation kit?
hey guys im getting ready to relocate my stock swaybar forward 2 inches to make room for the 20B oilpan. I am just too cheap to pay a bunch of money for a swaybar that isnt really much better than the original.
I designed some custom parts to make this a bolt together deal, just wondering if anyone else would be interested in a kit if i were to make extras. All parts will be waterjet cut, except possibly one set of mounting holes might be hand drilled, i'll have to talk to the guy that runs the jet before i know.
I figure I could do it for around $100 shipped if anyone was interested. I should have my car put together with one sometime next week so I can post up some pics and also let you know how it feels driving....
pat


Thread Starter
Joined: Aug 2002
Posts: 3,099
Likes: 4
From: Richland, WA
i guess it depends on where your radiator and oil cooler are mounted, but my radiator is only a couple inches in front of the motor, so i dont think many people would have a problem. im gonna go cut the parts tomorrow, i'll post pics soon as i get them.
Thread Starter
Joined: Aug 2002
Posts: 3,099
Likes: 4
From: Richland, WA
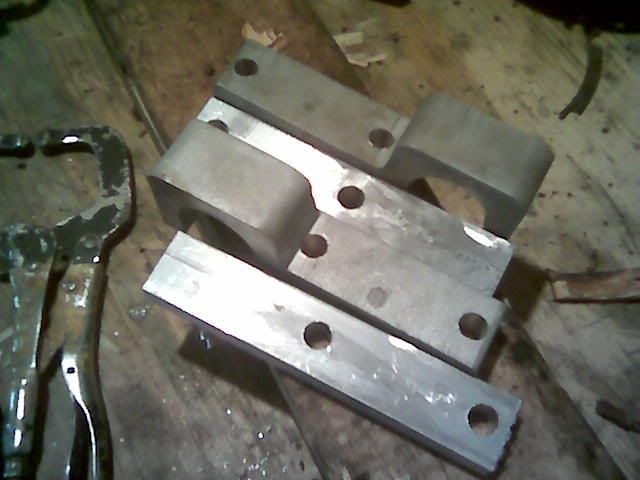
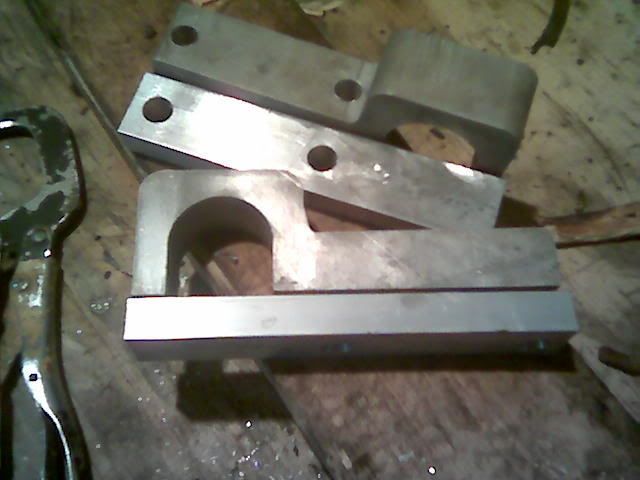
here are some pics, i know they are terrible quality, but its the best i can do right now. these are cut parts, but not quite finished, the upper mounts will be drilled for mounting holes, and the steel part of the lower mount will be painted.
The 3 parts include:
upper mount (the big aluminum ones) replaces the stock upper mount that has the u shaped bushing in it. uses the stock bushing, and moves the bar 2" forward
lower mount (steel squarish pieces) these provide a mounting location for the stock lower mount that originally bolts to the lower control arm. they space it 2 inches forward from the original location.
lower spacer (rectangular aluminum piece) these space the lower mount up high enough to clear the flange on the control arm.
here are the pics:


I doubt i will be able to finish these tonight, and for sure wont be able to put it together, but hopefully it will be on the car in the next couple days, and I can post back with results. If i do sell these, price will be $110 shipped, for what is pictured (with the missing holes drilled, of course), plus all bolts required. The aluminum parts will come as they are, the steel ones I will spray with primer, but you'll have to paint them.
The 3 parts include:
upper mount (the big aluminum ones) replaces the stock upper mount that has the u shaped bushing in it. uses the stock bushing, and moves the bar 2" forward
lower mount (steel squarish pieces) these provide a mounting location for the stock lower mount that originally bolts to the lower control arm. they space it 2 inches forward from the original location.
lower spacer (rectangular aluminum piece) these space the lower mount up high enough to clear the flange on the control arm.
here are the pics:
I doubt i will be able to finish these tonight, and for sure wont be able to put it together, but hopefully it will be on the car in the next couple days, and I can post back with results. If i do sell these, price will be $110 shipped, for what is pictured (with the missing holes drilled, of course), plus all bolts required. The aluminum parts will come as they are, the steel ones I will spray with primer, but you'll have to paint them.

Trending Topics

Thread Starter
Joined: Aug 2002
Posts: 3,099
Likes: 4
From: Richland, WA
just got back from vacation.
i will fix the pics, btu it might be a little while before i have any on car pics, i switched cars for the winter. i still expect to have the swaybar all mounted up within a week or two tho, so i'll keep you posted.
i will fix the pics, btu it might be a little while before i have any on car pics, i switched cars for the winter. i still expect to have the swaybar all mounted up within a week or two tho, so i'll keep you posted.
Patman, could this all be done if you used the awr racing anti-sway bar? I am not even sure if this would work, but it might be something worth looking into.

FRONT SPEEDWAY STYLE SWAY BAR - COMPLETE
Complete front sway bar assembly utilizing speedway style bars and AWR designed mounting system. P/N 01-401 CLASS EP
FRONT SPEEDWAY STYLE SWAY BAR - COMPLETE
Complete front sway bar assembly utilizing speedway style bars and AWR designed mounting system. P/N 01-401 CLASS EP
Last edited by j200pruf; Jan 7, 2007 at 02:01 PM.
Thread Starter
Joined: Aug 2002
Posts: 3,099
Likes: 4
From: Richland, WA
if you bought that bar, you wouldnt need my kit. the point of this is to allow the use of the stock bar for those who cant afford the expense of an aftermarket setup.
for those who were interested, I will be going to dads thursday and bringing my car back with me, so I will get pics asap
pat
for those who were interested, I will be going to dads thursday and bringing my car back with me, so I will get pics asap
pat
Thread Starter
Joined: Aug 2002
Posts: 3,099
Likes: 4
From: Richland, WA
here should be a link to the original pics, let me know if they work or not.
http://new.photos.yahoo.com/pwildfir...60762377614446
http://new.photos.yahoo.com/pwildfir...60762377614446
Thread Starter
Joined: Aug 2002
Posts: 3,099
Likes: 4
From: Richland, WA
****! damn yahoo photos. if my roommate will clean my damn garage already, i'll finish this up and get it all mounted tomorrow, then i will repost the pics on here.
Thread Starter
Joined: Aug 2002
Posts: 3,099
Likes: 4
From: Richland, WA
link should work now.
i got sidetracked fixing a rear diff mount, but as soon as i get that put back on, i will take some pics of the finished kit and some installed pics.
pat
i got sidetracked fixing a rear diff mount, but as soon as i get that put back on, i will take some pics of the finished kit and some installed pics.
pat
Thread Starter
Joined: Aug 2002
Posts: 3,099
Likes: 4
From: Richland, WA
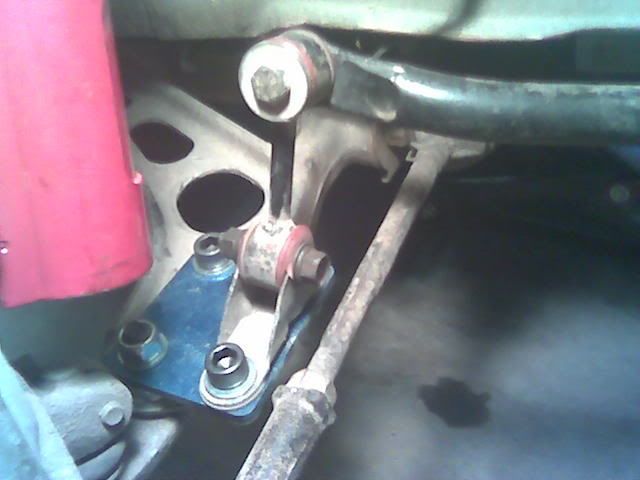
mounted the bar today. had to make some more parts to clear the little lip on the frame, but its on there. i have to get some bolts in the morning for the a-arm mounts, then it will be completely installed. unfortunately i rolled my feders last week, so I cant drive till i get the lips all primed and repainted....
pics: sorry had to use the cellphone camera again. last pic shows the swaybar/oilpan clearance.


pat
pics: sorry had to use the cellphone camera again. last pic shows the swaybar/oilpan clearance.
pat
Thread Starter
Joined: Aug 2002
Posts: 3,099
Likes: 4
From: Richland, WA
update: weather sucks!
its almost warm and dry enough for me to take her out and see how much it helped. hopefully one day next week if it doesnt snow again.
pat
its almost warm and dry enough for me to take her out and see how much it helped. hopefully one day next week if it doesnt snow again.
pat

Thread Starter
Joined: Aug 2002
Posts: 3,099
Likes: 4
From: Richland, WA
well, i got it all installed finally today. unfortunately, who knows when i will get to drive it now, we got 6 inches of snow this morning, and still falling. Damn icy arctic hell out there... I'll post up a bunch of pics after a while, fit was just about perfect.
pat
pat
Thread Starter
Joined: Aug 2002
Posts: 3,099
Likes: 4
From: Richland, WA
PICS!
(sorry everything is so dirty, too damn cold to wash the car.)
hardware:

another view of the bar mount

before starting:

mounting plate installed:
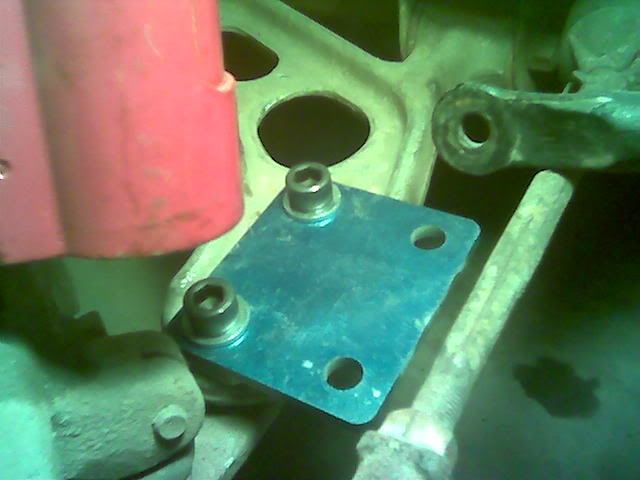
whole mount installed:

right side finished:
left side finished:

check out my wheel spacers i made:


why i cant go test it:


pat
(sorry everything is so dirty, too damn cold to wash the car.)
hardware:
another view of the bar mount
before starting:
mounting plate installed:
whole mount installed:
right side finished:
left side finished:
check out my wheel spacers i made:
why i cant go test it:
pat