
A first look at the production FD/20B conversion kit

Thread Starter
Collections Hold
iTrader: (5)
Joined: Mar 2003
Posts: 1,987
Likes: 3
From: Pataskala, Ohio
Originally Posted by iceblue
I will when I can. I am busy machining the NA turbo ones for S4-5 engines right now. Do you have any more of yours? Or are you only running the ITB setup you showed?


Thread Starter
Collections Hold
iTrader: (5)
Joined: Mar 2003
Posts: 1,987
Likes: 3
From: Pataskala, Ohio
Originally Posted by DHeart197
GtoRx7,
Whats the weight balance with your kit?
Whats the weight balance with your kit?
Thread Starter
Collections Hold
iTrader: (5)
Joined: Mar 2003
Posts: 1,987
Likes: 3
From: Pataskala, Ohio
Originally Posted by ptrhahn
GtoRX7,
have you ever gotten the butterfly-actuated p-ports working on your N/A 20B?
have you ever gotten the butterfly-actuated p-ports working on your N/A 20B?
Thread Starter
Collections Hold
iTrader: (5)
Joined: Mar 2003
Posts: 1,987
Likes: 3
From: Pataskala, Ohio
Pictures of the modified oil pan for this kit conversion.
Here are the pics of the modified pan. Note the area clearanced for the subframe, and new, relocated oil drain plug.
Sorry, I forgot to ask a few questions in my PM so I figured I'd ask them here.
1- Will this conversion kit work with a 20B running stock twin turbos?
2- Is the ONLY modification required to make in the intake clear, cutting the LIM? If so, do you have exact numbers or would it be better to test fit the engine and then decide?
3- I noticed you mentioned that in order to make this work you will have to use the FD power steering bracket, and a few other FD components. The question I have is will this kit still work if I plan on removing the powersteering altogether?
Thanks again,
Rizwan
Not trying to put words in anyone's mouth, just trying to help out. I've talked a good deal with GTORX7 and have gone through pretty much all the same crap you are right now.
I ended up with this kit, and I am glad I did.
1) Yes, he has a kit that will allow you to run stock turbos, just specify it before he starts building. The only real difference, I believe, is simply allowing for the rear oil return line for the turbos to reach the block easily.
2) Sort of. . .in lowering the UIM via cutting the LIM, you necessarily lower the intake elbow as well, right where your PS pump goes. However, if you're not using PS, which you don't have to with this kit, this won't be an issue. You will probably have to relocate the alternator, but i'm not sure. Lastly, you will have to modify the oil fill neck, which is MUCH easier than the LIM, so it should in no way be a camel-back-breaking straw.
3) No, although I'd keep the PS, but that's just my opinion, there are many others who disagree. I guess it depends on what you're trying to do with the car.
If you have any questions concerning this kit, I'd be glad to answer them, if you can't tell already, i'm quite happy with it. My setup is C171 block with GT42R, PS in tact with FD everything per this kits instructions.
hope that helps
ryan
Thanks Ryan! That was actually very helpful. I'll be PM'ing you shortly regarding a few more questions. I PM'd GTORX7, but I'm guessing he's a little busy. I'm in no hurry though so I'll continue gathering information until then.
 !
!
Originally Posted by andyfc3s
none
Originally Posted by GtoRx7
I have had many ask for photos of my conversion kit that is offered. I have been side tracked, but finally I have taken the photos of the kit as a whole. Realize that some items are fully made, and Four parts (two pictured) are sent in by the customer, modified, and sent back.
These parts are not pictured, but included in the cost of the kit-
-20B oil pan, sent in/ modified
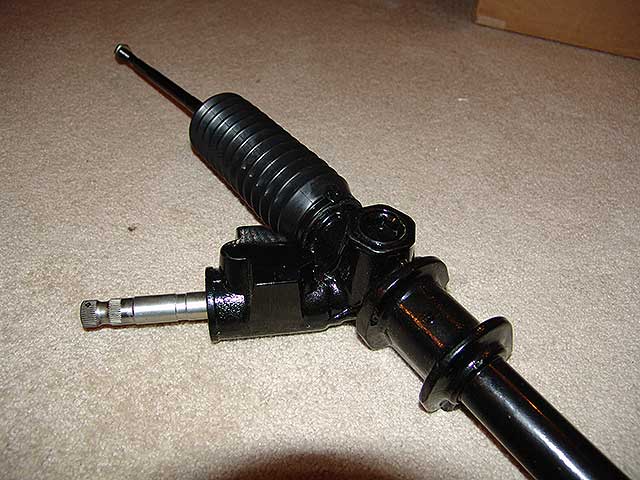
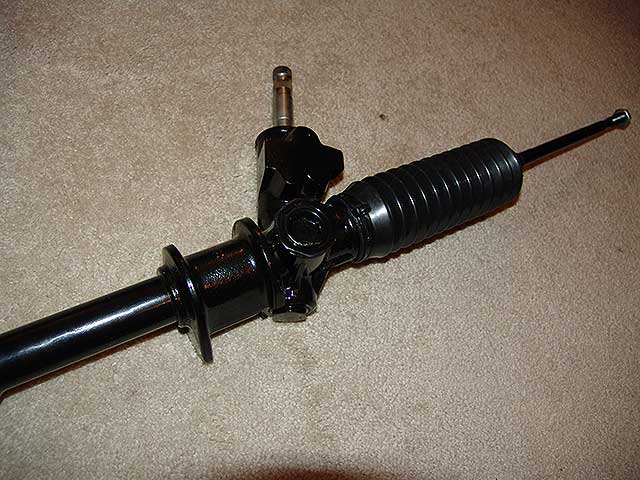
-FD steering rack, sent in/ modified
- P/S and A/C bracket, sent in/modified (pictured)
- Alternator tensioner bracket, sent in/ modified (pictured)
Parts that are made in house, and pictured-
-Two custom steel plate motor mounts
-Two poly bushing mounts
- (6) Machined spacers for the motor mounts
-Machined water pump outlet
- Machined Idler tensioner, spacer
- Ball bearing Idler pulley
- Full hardware, grade 8 bolts, stainless lock nuts
Cost varies with options selected by purchaser, as follows-
Full conversion, MIG welded steel motor mounts- $1,570.00
Full conversion, TIG welded steel motor mounts- $1,670.00
Optional color anodizing of aluminum parts- + $150.00
This conversion kit is different from a subframe kit, as it retains your full factory subframe. It will keep the steering rack in its perfect, original place. The transmission remains unmoved. And lastly, the 20B can be installed without a Fd rear plate, or other tricks. Two downsides to this kit- Stock intake will have to be modified lower! You will loose the A/C compressor, this maybe will change in the future, as more development is done.
These parts are not pictured, but included in the cost of the kit-
-20B oil pan, sent in/ modified
-FD steering rack, sent in/ modified
- P/S and A/C bracket, sent in/modified (pictured)
- Alternator tensioner bracket, sent in/ modified (pictured)
Parts that are made in house, and pictured-
-Two custom steel plate motor mounts
-Two poly bushing mounts
- (6) Machined spacers for the motor mounts
-Machined water pump outlet
- Machined Idler tensioner, spacer
- Ball bearing Idler pulley
- Full hardware, grade 8 bolts, stainless lock nuts
Cost varies with options selected by purchaser, as follows-
Full conversion, MIG welded steel motor mounts- $1,570.00
Full conversion, TIG welded steel motor mounts- $1,670.00
Optional color anodizing of aluminum parts- + $150.00
This conversion kit is different from a subframe kit, as it retains your full factory subframe. It will keep the steering rack in its perfect, original place. The transmission remains unmoved. And lastly, the 20B can be installed without a Fd rear plate, or other tricks. Two downsides to this kit- Stock intake will have to be modified lower! You will loose the A/C compressor, this maybe will change in the future, as more development is done.
Here you go Glass
direct link here:
https://www.rx7club.com/showpost.php...4&postcount=10
Originally Posted by GtoRx7
OH yeah, the motor is using a entirely stock oil pan, not a cut in it, just relocated the oil drain, barely cut the stock subframe for a little clearance. Using a FD S6 front cover, no factory 20b CAS!! Just drilled some holes for the front cover in the oil pan, took 5-minutes. Had to cut off the top pressure feed on the steering rack, relocated it to the side, allowed much lower mounting. relocated the alternator to where the a/c was. that was it, no bump steer, ( Very important in a drift/ road race car) all factory placement. Am I the first?? who knows.
https://www.rx7club.com/showpost.php...4&postcount=10
Originally Posted by gracer7-rx7
Go read his original thread. I think there were some pics there. I believe that there is still some work/modifications necessary on the rack for clearance purposes. I'm sure GTO will clarify.
Cheers
Cheers
Thread Starter
Collections Hold
iTrader: (5)
Joined: Mar 2003
Posts: 1,987
Likes: 3
From: Pataskala, Ohio
Originally Posted by the_glass_man
What kind of modification do you have to do to the steering rack?
Originally Posted by gracer7-rx7
Go read his original thread. I think there were some pics there. I believe that there is still some work/modifications necessary on the rack for clearance purposes. I'm sure GTO will clarify.
Cheers
Cheers
ALSO- On my prototype kit, I "notched" the back of the subframe. But now, I simply modify the oil pan to clear the stock subframe. This makes for one very very clean install!!
Originally Posted by the_glass_man
Thanks. I wonder if my Maval Gear converted manual rack would require such modification?
Originally Posted by GtoRx7
That all depends, if you have a power steering rack that has been converted, hopfully it still has the pressure fittings. The reason being is you can then have a reservoir holding the p.s fluid and looped from inlet to outlet. If they did it like this, then yes you will have to modify it still. If they just capped off everything, and welded shut the fittings, then the seals might blow out on the rack, or cause extra hard steering.
As can be seen from this thread.
Thread Starter
Collections Hold
iTrader: (5)
Joined: Mar 2003
Posts: 1,987
Likes: 3
From: Pataskala, Ohio
Originally Posted by the_glass_man
Thanks for your quick replay. Maval removes all the fittings, welds the quil shaft, fills in the fitting holes and powder coats the rest of the rack.
As can be seen from this thread.
As can be seen from this thread.

Full Member
Joined: May 2004
Posts: 66
Likes: 0
From: vegas duh
Im glad you decedid to come out with this and hope it goes well.....You think withh all these people talking about doing and are doing these projects with a 20b, that the rx7 shops, one of them or all of them would develop a drop in kit and motor or something, everyone is so worried about making fast money instead of grad. or a residual income not a one time wam bam thank you mam I rapped you thing.........
just my 2 cents but I think your setup is going to do good
just my 2 cents but I think your setup is going to do good