
TurboII swap Project: Complete vehicle reqwiring part 1: chassis

Thread Starter
Joined: Jan 2002
Posts: 2,397
Likes: 1
From: Mound, MN
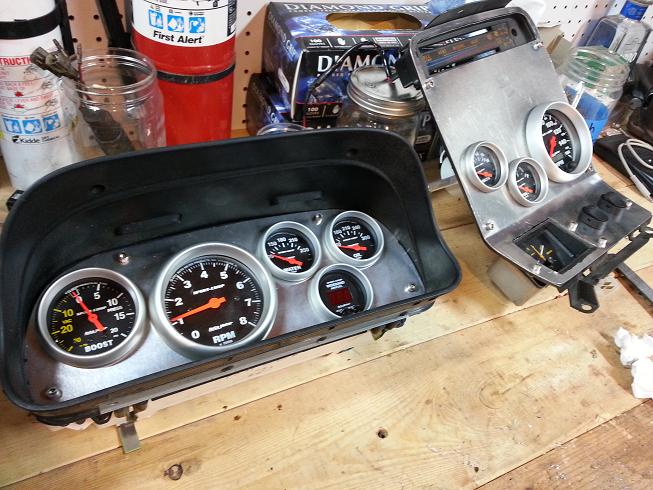
Got the console more or less finished today; still need to wire it same as cluster. Definitely a tougher job than the cluster, the clock and HVAC control cutouts proved difficult. Overall I'm happy with it. Only miss is that speedo had a bigger surround than the tach, which I used for mock up. Not a big deal, it fit, but its close to the Fuel gauge.
The grain is different between the two, but Ill be pulling all this apart to wet sand it. Still need to redo the shifter part, but should be nothing compared to these two.
The grain is different between the two, but Ill be pulling all this apart to wet sand it. Still need to redo the shifter part, but should be nothing compared to these two.
Thread Starter
Joined: Jan 2002
Posts: 2,397
Likes: 1
From: Mound, MN
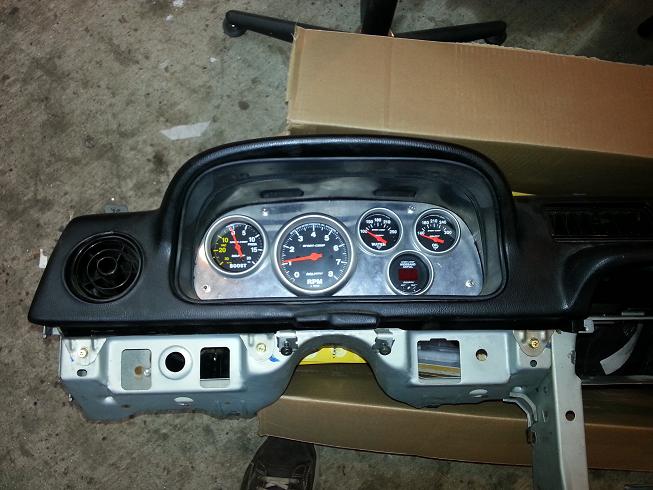
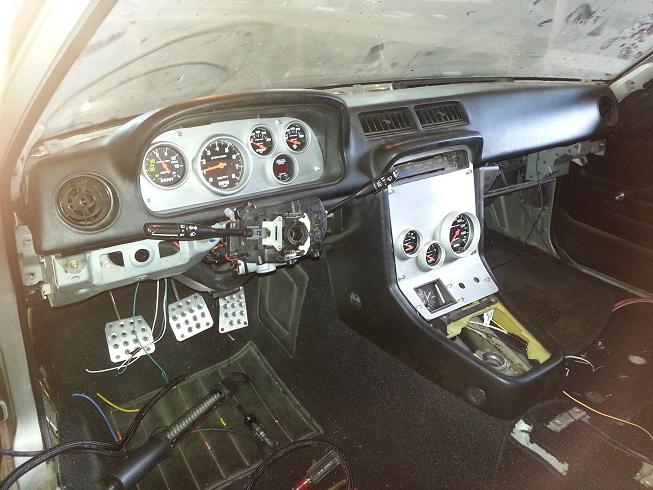
Figured I'd throw them in the dash for a quick check. Not perfect, but nothing 10 min of trimming plastic cant solve. I also plan on applying aluminum panels to the two switch areas on either side of the column, although I don't have anything to put there.
Thread Starter
Joined: Jan 2002
Posts: 2,397
Likes: 1
From: Mound, MN
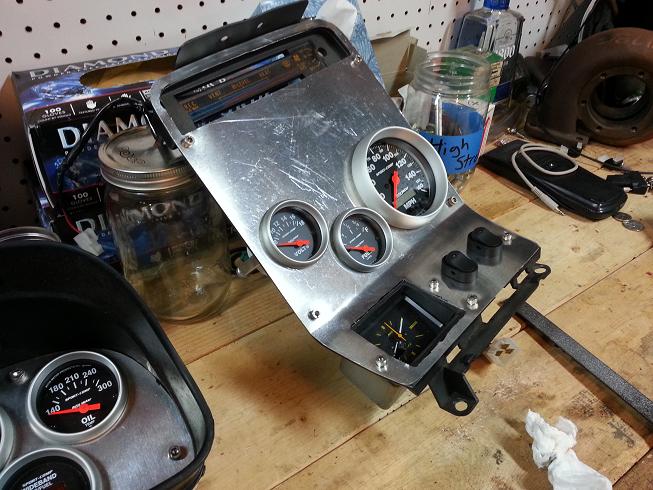
Got the gauges finished; Disassembled both parts and wet sanded them for a even, smooth look. Metal finish turned out good, but time will tell if it holds, already got fingerprints. Got both wired up as well. In retrospect, I would have wired the clock into this harness to simplify things and maybe spare a connector, but oh well.
Still need to do some slight reorganizing of the dash harness; need to run lamp circuits to the cowl, run the oil temp line back up to the cluster and hook up the wideband circuits. The fuel and temp gauges are wired for a dedicated ground to chassis, and the wideband will have a dedicated ground to B-. I also decided to move the two switches to the dash plate right of the column. I will replaced them with USB ports for the haltech and radio. Also possibly an Aux in for the radio and a plug for the laptop power, depends if I can find bulkhead fittings I like.
Still need to do some slight reorganizing of the dash harness; need to run lamp circuits to the cowl, run the oil temp line back up to the cluster and hook up the wideband circuits. The fuel and temp gauges are wired for a dedicated ground to chassis, and the wideband will have a dedicated ground to B-. I also decided to move the two switches to the dash plate right of the column. I will replaced them with USB ports for the haltech and radio. Also possibly an Aux in for the radio and a plug for the laptop power, depends if I can find bulkhead fittings I like.
Thread Starter
Joined: Jan 2002
Posts: 2,397
Likes: 1
From: Mound, MN
Got a break on the weather for the weekend, which was nice cuz last weekend it was storms that knocked out power for the weekend. Managed to squeeze in a few hours on the car between cleaning debris and dealing with insurance and such. A tree fell on the garage, but luckily caused minimal damage.
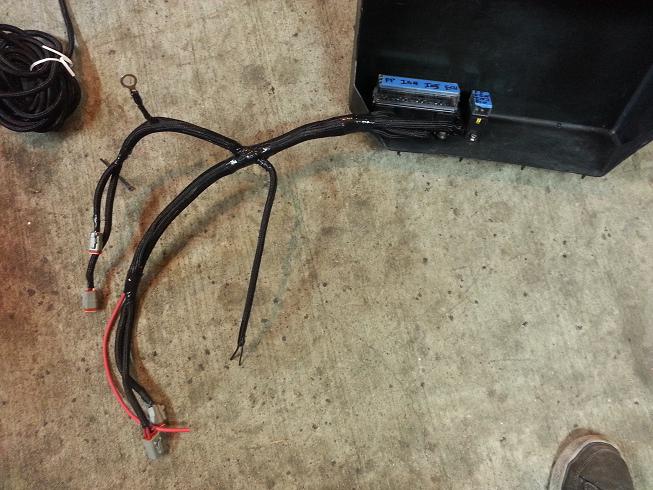
Finished grouping and then for the most part looming and covering it as well. Things came together very quickly and I was happy with the turnout. I decided to redo my wiring on the multifunction switch. After running it initially, I later figured out that the mazda connectors take a pretty standard female spade terminal, and I could have just crimped it easily compared to soldering in part of the old harness.
Probably a solid 6 hours wasted there, but whatever, at least 50% of engineering is figuring out ways that dont work.
Heres some shots of the grouped and then covered harness, the lighting was hell, forgive me.
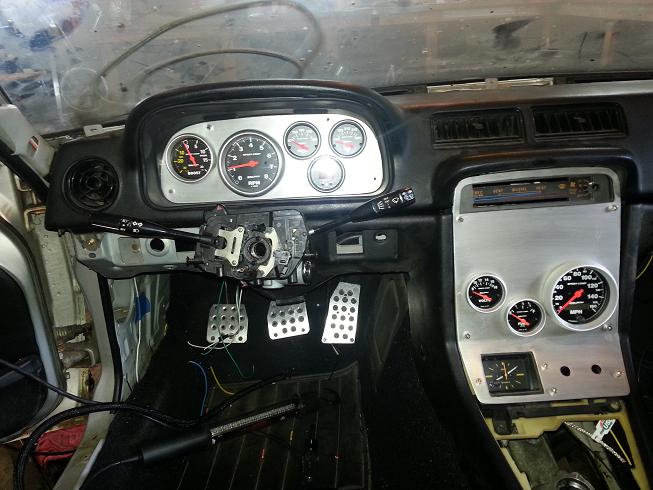
ALso then reinstalled the dash and newly finished clusters. Everything dropped in like butter and Im very happy. Looks awesome as well. This is very loose fit; I had to install it to finish routing on a few specific circuits. Nothing is even screwed in, its just sitting together. Hopefully this cool weather holds a few more days and I can make some progress. I got to make sure everything is cool before the steering gear goes back in. Next couple things I got to run are: the battery cables, power feed to the fuse block, alt cable and exciter and the throttle cable and boost gauge reference.
Finished grouping and then for the most part looming and covering it as well. Things came together very quickly and I was happy with the turnout. I decided to redo my wiring on the multifunction switch. After running it initially, I later figured out that the mazda connectors take a pretty standard female spade terminal, and I could have just crimped it easily compared to soldering in part of the old harness.
Probably a solid 6 hours wasted there, but whatever, at least 50% of engineering is figuring out ways that dont work.
Heres some shots of the grouped and then covered harness, the lighting was hell, forgive me.
ALso then reinstalled the dash and newly finished clusters. Everything dropped in like butter and Im very happy. Looks awesome as well. This is very loose fit; I had to install it to finish routing on a few specific circuits. Nothing is even screwed in, its just sitting together. Hopefully this cool weather holds a few more days and I can make some progress. I got to make sure everything is cool before the steering gear goes back in. Next couple things I got to run are: the battery cables, power feed to the fuse block, alt cable and exciter and the throttle cable and boost gauge reference.
Thread Starter
Joined: Jan 2002
Posts: 2,397
Likes: 1
From: Mound, MN
The weather has not been my friend these past months. For Late august and early September, we have had record heat here in Minnesota. The heat index was 100+ again today, when it should be a comfortable 70-75.
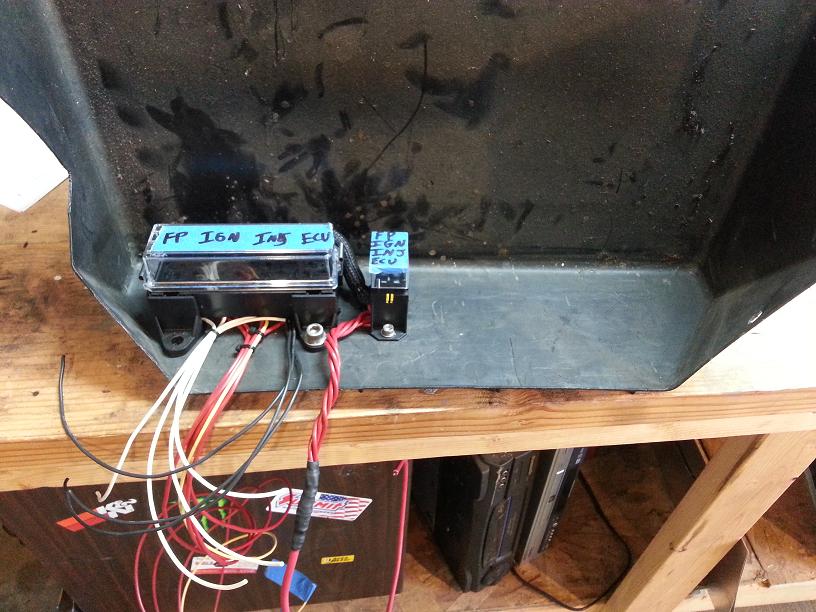
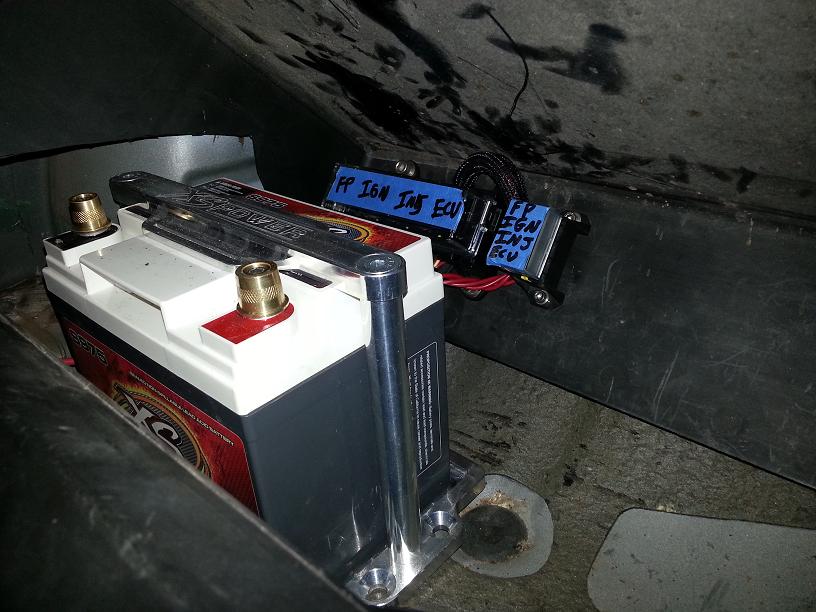
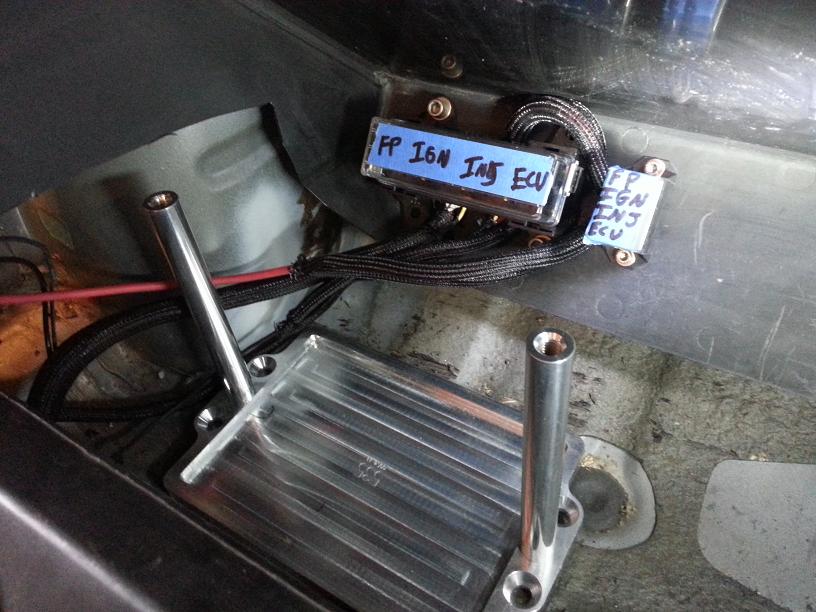
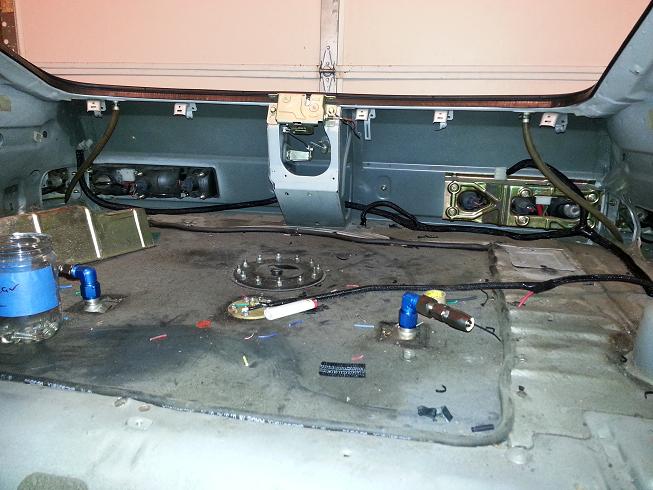
But there have been a few mixed in there, and I got a wee bit more wiring done over the last weeks. I got the battery mount positioned and got the rear fuse and relay blocks setup and wired. Dedicated direct power for ECM, INJ, IGN and Fuel pump. 14ga on all, except the fuel pump which is 12A. Still need to finish the chassis sections of it, but it can be disconnected and removed completely in 5 min if necessary.
I read a lot of good reviews on the XS Power Battery I chose. It was a good size, and came with a specific Billet mount. The quality of the battery and mount seamed excellent, but I soon realize that a Post Type Battery terminal could come in contact with the billet mount and short hardcore. So I am now forced to run an eyelet type. Not the end of the world, but not what I wanted either.
Anyways, heres some pics. Im getting real close to being done with the electrical, then its gaskets, fluids and a first start.


Thread Starter
Joined: Jan 2002
Posts: 2,397
Likes: 1
From: Mound, MN
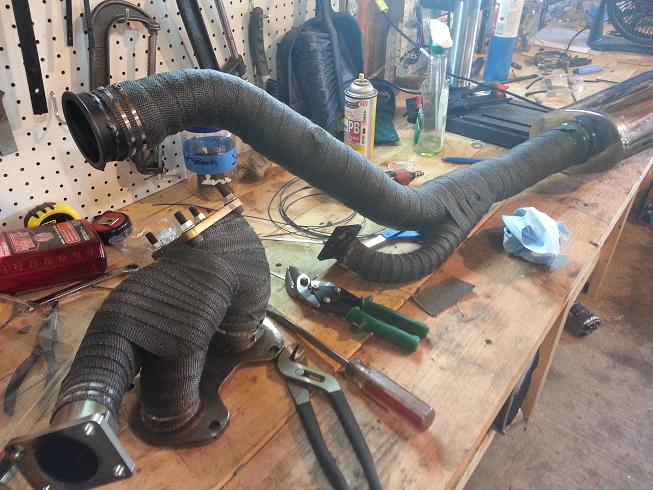
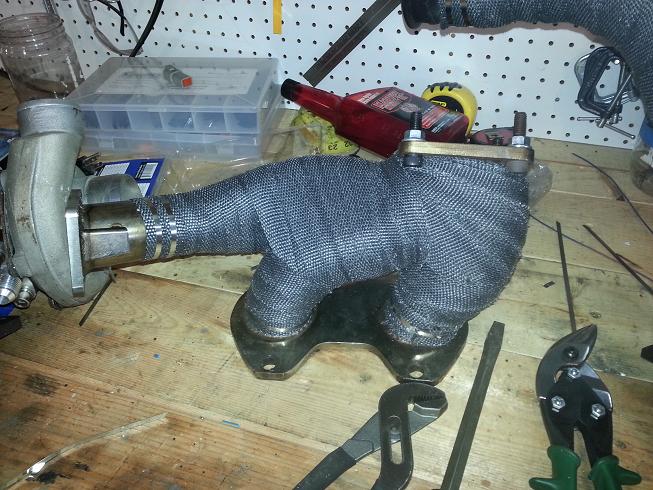
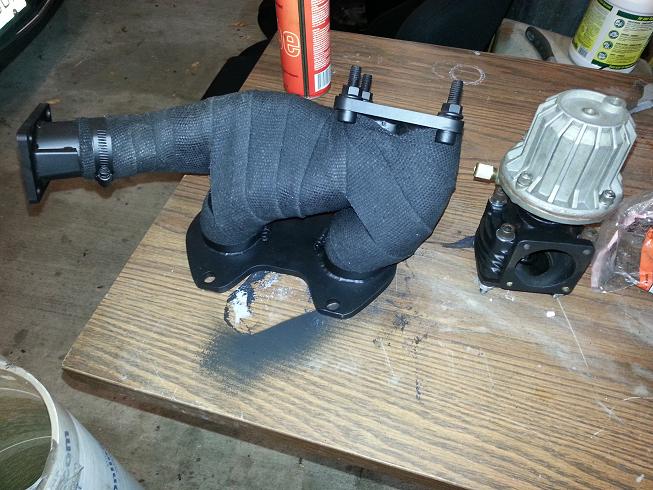
its a 3rd Gen Ebay manifold, I do not remember the brand. It had to be moderately reworked.
The turbo flange was cut off and re-welded, and the bolt holes on the engine flange had to be reamed out a bit.
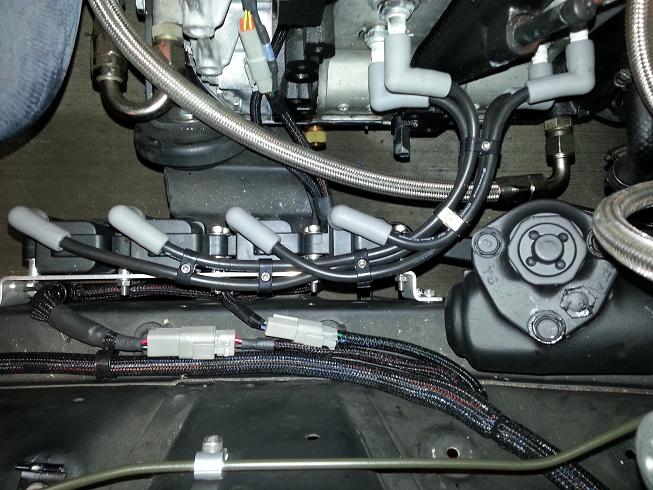
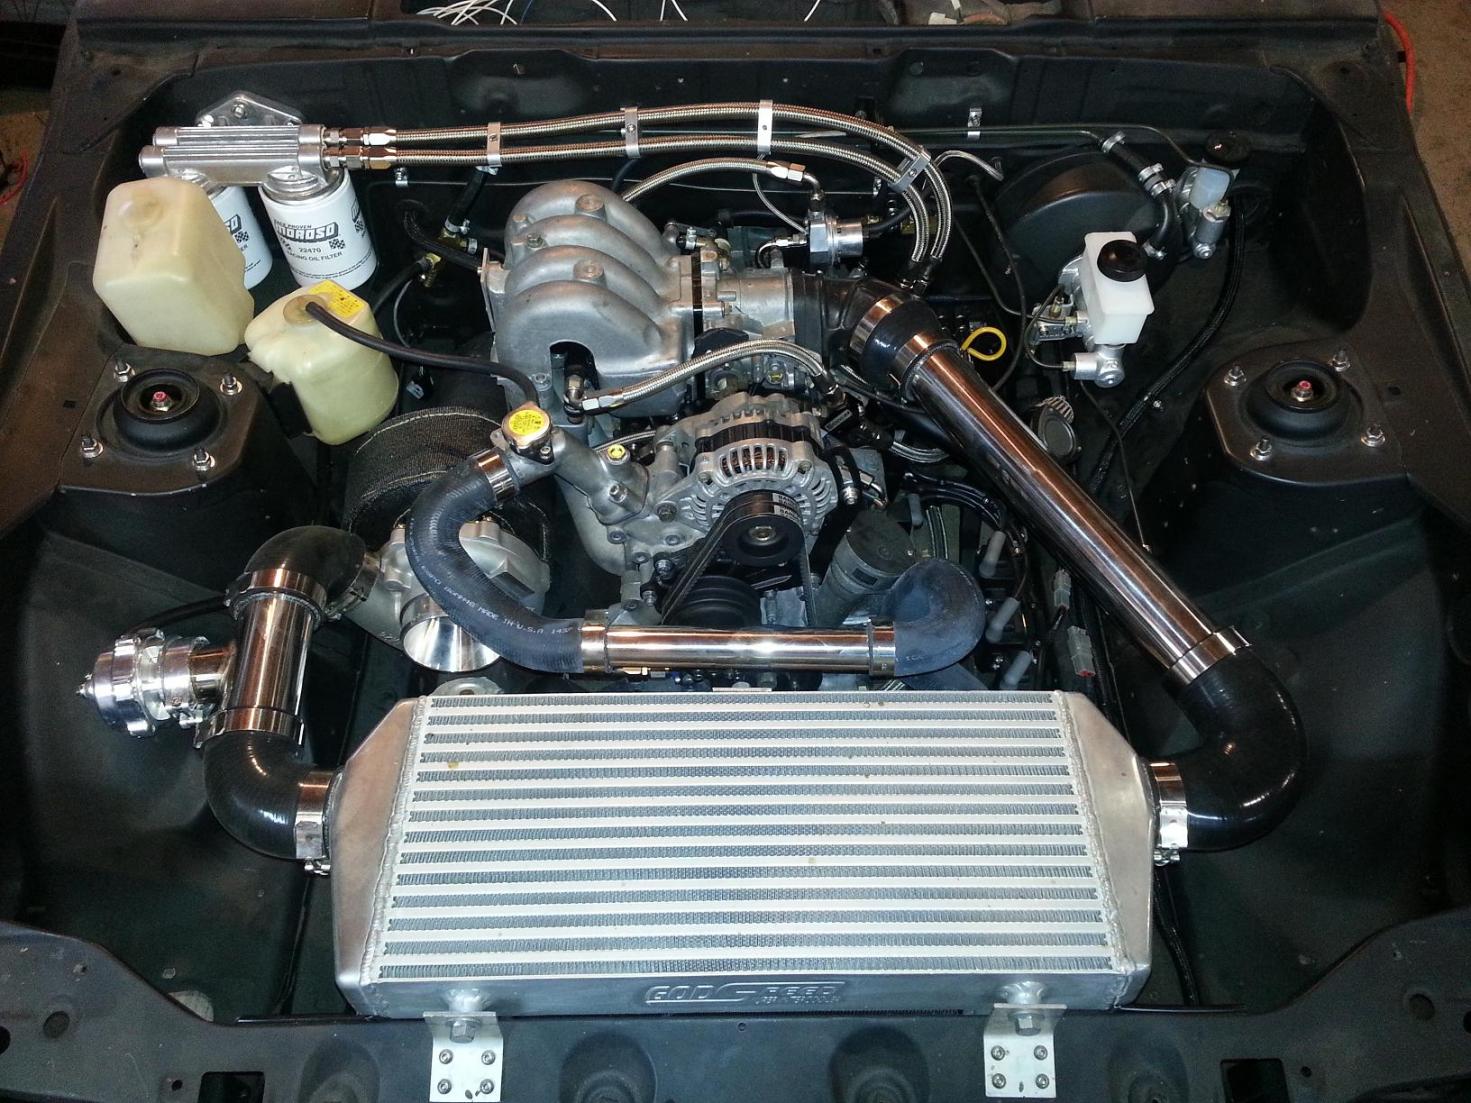
Heres a shot of the engine bay right before I started wiring the car. Turbo has old compressor on it, it has been upgraded to a T04S compressor.
The turbo flange was cut off and re-welded, and the bolt holes on the engine flange had to be reamed out a bit.
Heres a shot of the engine bay right before I started wiring the car. Turbo has old compressor on it, it has been upgraded to a T04S compressor.
Thread Starter
Joined: Jan 2002
Posts: 2,397
Likes: 1
From: Mound, MN
got a couple summit racing boxes.
Summit Cloth Sport seats. My shoulders are a bit wide for them, but they'll do for $150. I didn't buy Recaros here, but they seam very solid. I just dropped them in for a pic, Ill do some details on their install. THe drivers looks straightforward, but the pass is going to be tricky, it might sit higher.
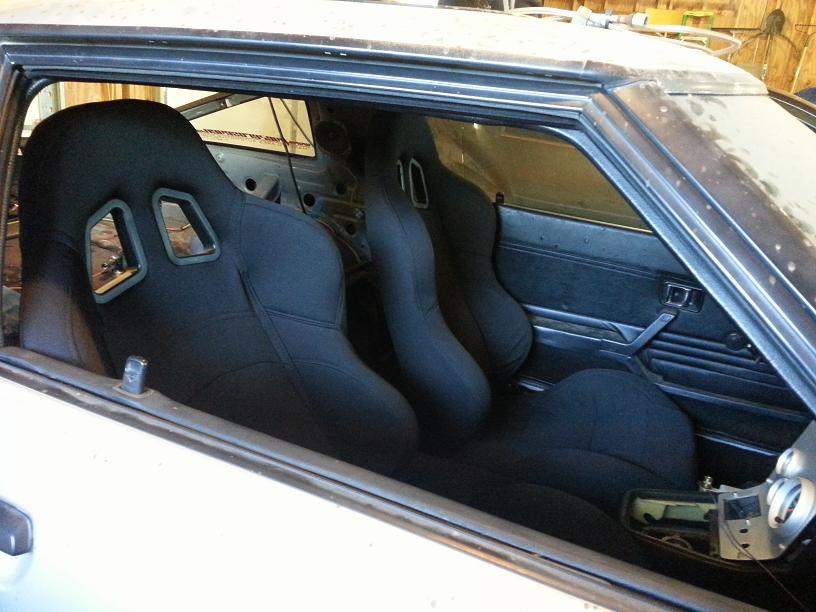
Summit Cloth Sport seats. My shoulders are a bit wide for them, but they'll do for $150. I didn't buy Recaros here, but they seam very solid. I just dropped them in for a pic, Ill do some details on their install. THe drivers looks straightforward, but the pass is going to be tricky, it might sit higher.
Thread Starter
Joined: Jan 2002
Posts: 2,397
Likes: 1
From: Mound, MN
Getting closer. Hopefully the weather can hold out. Still waiting to get my Turbocharger back.
Finished the remaining rear circuitry. This included the rear lights, the license bulbs, and the removable rear fuse/relay center for major circuits not covered in the chassis kit.
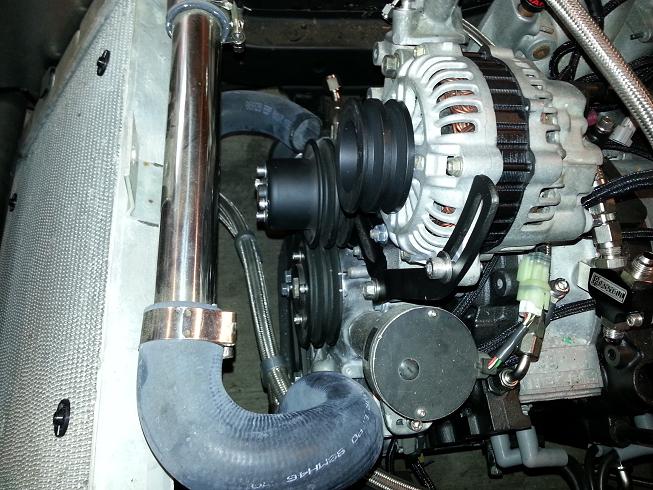
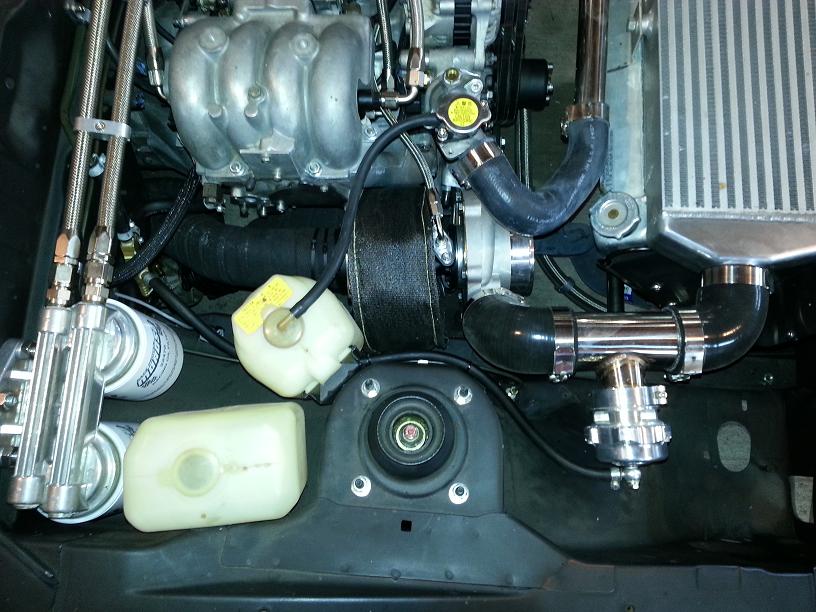
Also got the water pump housing and such finish assembled with gaskets. And mounted the cleaned up alt with new double pulley. Unfortunately the OEM belts I bought from Mazdatrix are too small. I believe I ordered S5 belt. Would the S4 water-pump assm be screwing this up??
Also got the fan mounted and wired.

Finally I got the ignition cables assm and loomed. Was a real bitch to get everything straight and clean. Im very happy how it turned out. THis is summit racing brand 8.5 cable (msd clone) and 90 end (also msd clone). Summit brand stuff is always great. $70 (+$30 for crimper) and 2hrs time. And I got 35 ft of leftover cable that I have no use for.
Finished the remaining rear circuitry. This included the rear lights, the license bulbs, and the removable rear fuse/relay center for major circuits not covered in the chassis kit.
Also got the water pump housing and such finish assembled with gaskets. And mounted the cleaned up alt with new double pulley. Unfortunately the OEM belts I bought from Mazdatrix are too small. I believe I ordered S5 belt. Would the S4 water-pump assm be screwing this up??
Also got the fan mounted and wired.
Finally I got the ignition cables assm and loomed. Was a real bitch to get everything straight and clean. Im very happy how it turned out. THis is summit racing brand 8.5 cable (msd clone) and 90 end (also msd clone). Summit brand stuff is always great. $70 (+$30 for crimper) and 2hrs time. And I got 35 ft of leftover cable that I have no use for.
Thread Starter
Joined: Jan 2002
Posts: 2,397
Likes: 1
From: Mound, MN
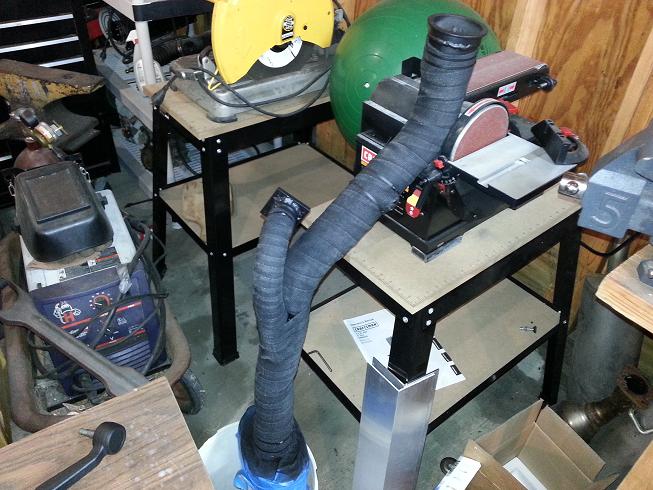
In addition, I also rewrapped the manifold, rebuilt the wastegate and coated everything in black. Also painted the filled and fit for a filter, pcv plan is a road draft of some kind at this point.
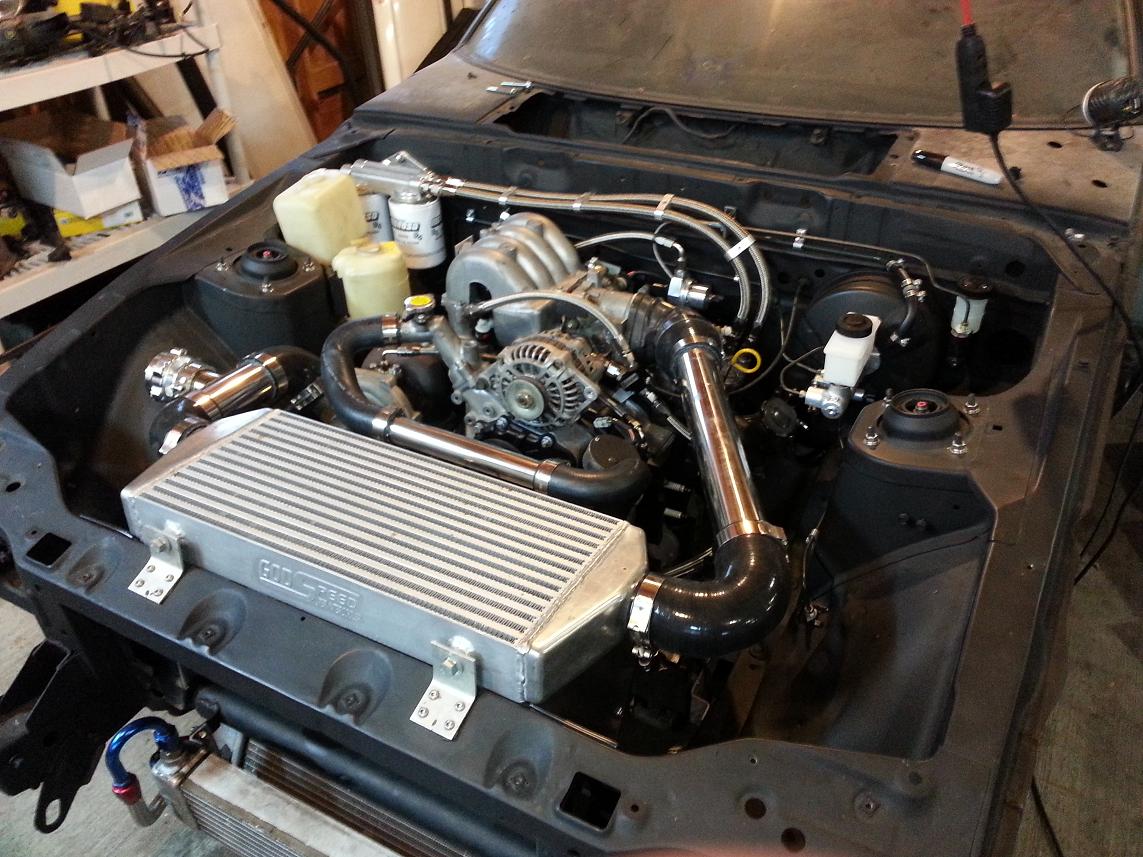
Just waiting for the turbo to come back from being upgraded to a 60-1 compressor. Cant wait to see the engine bay all together again, its sooooo close!!!
Just waiting for the turbo to come back from being upgraded to a 60-1 compressor. Cant wait to see the engine bay all together again, its sooooo close!!!
Thread Starter
Joined: Jan 2002
Posts: 2,397
Likes: 1
From: Mound, MN
just a teaser, Ill have a decent update on Sunday night, then its probably done for the Winter.
Just got the turbo back. It was Rebuilt by James of Turbocharged.com. highly recommended for workmanship and pricing.
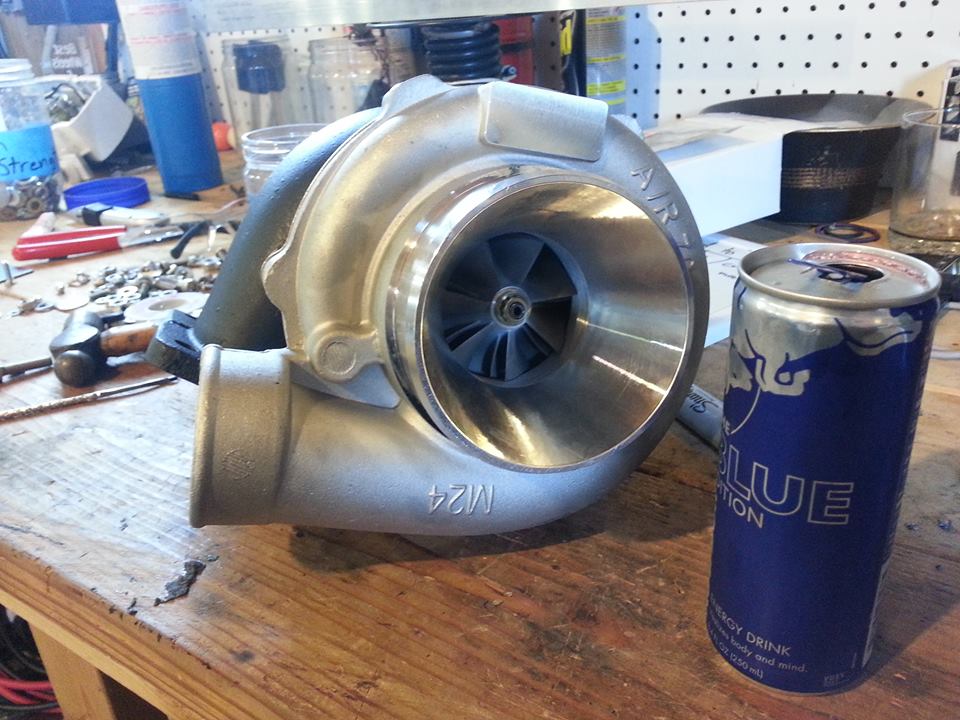
Just got the turbo back. It was Rebuilt by James of Turbocharged.com. highly recommended for workmanship and pricing.
Thread Starter
Joined: Jan 2002
Posts: 2,397
Likes: 1
From: Mound, MN
well I didnt get as much done as planned this weekend. Having a 3 month old can do that. Was missing a pair ofmanifold O-rings at 5:15 after the parts and hardware stores have closed on a Sunday. Put a stop to all sorts of plans (mounting turbo and exhaust). But the Engine bay should be completely finished by end of week, if the weather holds out.
Thread Starter
Joined: Jan 2002
Posts: 2,397
Likes: 1
From: Mound, MN
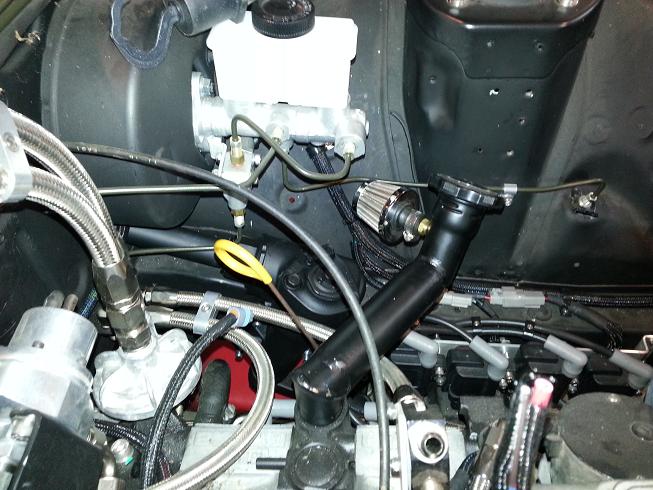
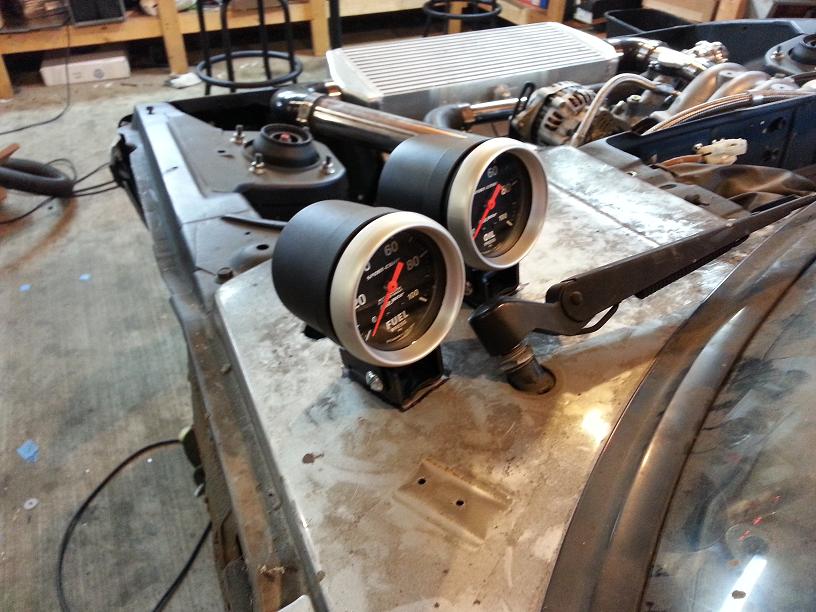
Got the engine bay all but finished tonight. Only things left are boost controller (simple manual) and 4an lines for the two gauges on the cowl. Also still working on air filter setup. Unfortunatly may need to pull the radiator, but that is not difficult the way I set it up.

Joined: Aug 2011
Posts: 3,078
Likes: 42
From: Cambridge, Minnesota
Just so you know, not gay  or anything, but you do awesomely clean work! I greatly appreciate the detail and pictures you have put into this thread, gives me some great ideas for my next one. Keep up the good work!
or anything, but you do awesomely clean work! I greatly appreciate the detail and pictures you have put into this thread, gives me some great ideas for my next one. Keep up the good work!
Great stuff here. Although I'm not re-doing all my stock harness, I'm doing much of the same w/r/t aftermarket ECU wiring. After seeing the mesh covering on the wiring, I'm going to go with that too. I debated whether to do it, but after seeing yours, looks like a good plan.
Joined: Aug 2011
Posts: 3,078
Likes: 42
From: Cambridge, Minnesota
got a couple summit racing boxes.
Summit Cloth Sport seats. My shoulders are a bit wide for them, but they'll do for $150. I didn't buy Recaros here, but they seam very solid. I just dropped them in for a pic, Ill do some details on their install. THe drivers looks straightforward, but the pass is going to be tricky, it might sit higher.
Summit Cloth Sport seats. My shoulders are a bit wide for them, but they'll do for $150. I didn't buy Recaros here, but they seam very solid. I just dropped them in for a pic, Ill do some details on their install. THe drivers looks straightforward, but the pass is going to be tricky, it might sit higher.
Thread Starter
Joined: Jan 2002
Posts: 2,397
Likes: 1
From: Mound, MN
I havent really started on that yet but I can give you a few details. First of all, these are not comparable to Corboue or Recaro, they are not as sturdy at all, but solid enough for the price.
The summit seat sliders and the factory seat sliders are the exact same width apart, at least on the drivers side. If I were to use the new seat sliders, then on Drivers side its just a matter of bending a simple bracket out of mild steel, and bolting them together.
The pass is a compltely different story. The trans tunnel is wider/taller on pass side to clear the exhaust (3 foot long converter) and the seat track is custom fit. Im thinking it may be possible to bolt the factory seat sliders onto the new summit sport seats and then they should bolt right in.
Problem is, my original seat tracks (which I kept when I tossed the old seats) are in really rough shape and Im not sure I can refurbish them
This will be a project for first thing in the Springtime.

Thread Starter
Joined: Jan 2002
Posts: 2,397
Likes: 1
From: Mound, MN
Had a 50 Degree day, but only time spent in the Garage was to clean things up, then It might be a week or two before its warm again.
But here are some teaser pics of things to come.
LED headlights and driving lights. J.W. Speaker Model 90 high and low lamps and 6150 black driving lights (high is the one that looks like a regular projector). Super high light output, cutting edge reflection and all 6 lamps together pull less than 5amps.
Plus a set of Alluminum 3in stroke linear motors for headlight activation. These turned out bigger than expected and will be tricky to make work, but they look cool enough to be worth it.
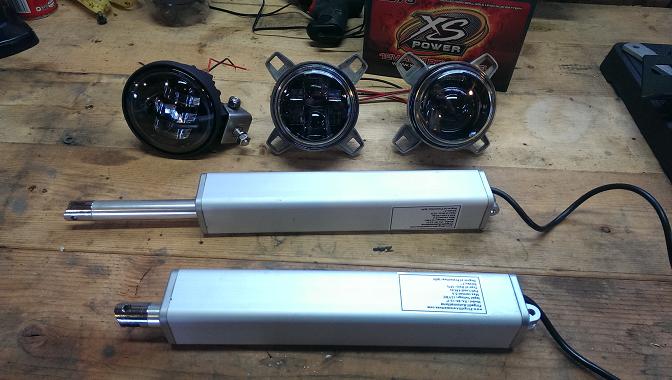
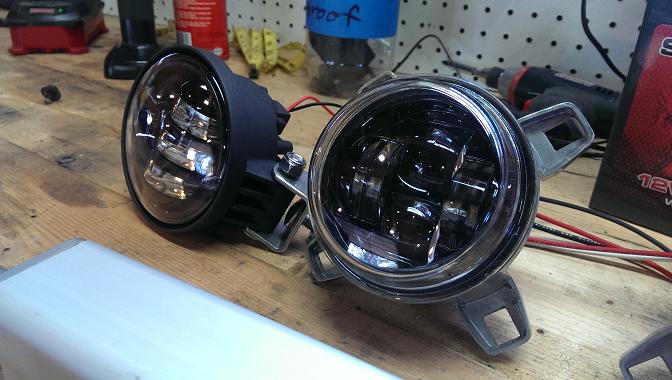