
Special tool needed to remove wires from fuseblock?

Thread Starter
Onward thru the fog!
Joined: Feb 2006
Posts: 317
Likes: 1
From: On the couch
Special tool needed to remove wires from fuseblock?
1983 RX-7
I want to replace the main fuse block/ fuse box under the dash. (I found another one already at a junk yard.)
I lowered the box...2 screws...but HOW do I remove the wires from the back of the plastic box? I hate to just rip them out because I want to reuse the wires. The connectors have small tabs on each side and so I believe there must be a small tool to push in to compress/release the tabs...true? I tried small knife, screwdriver, no luck.
Any help is appreciated.
Thanks,
DD
Hmm. Small tweezers for computers worked for me. Borrowed them from my brother who does computer work. See if you can find those, I got a ton of stuff de-pinned in no time with that.
Junior Member
Joined: Nov 2007
Posts: 22
Likes: 0
From: USA
There are special tool for this, I don't know what it is called, but my guess is that it is some type of "extractor tool".
If you do it right, there is probably a small tab that must be depressed to remove it, this would be located someplace on the electrical contact point on the back of the fuse box and us sort of small. Once removed it should be slightly bent back so it snaps back into place. An Eyeglasses flathead screwdriver always came in handy for this type of connector since they are very small.
Hope this helps....
Wrkn Toyota, Rootn Wankel
Joined: Sep 2007
Posts: 1,642
Likes: 1
From: "Haystack" Hayward, CA
Yeah, you want to use a "terminal extractor tool" which is designed for taking terminals out of connectors...
If you're really gentle though, a flat head eyeglass repair screw driver works great.
If you're really gentle though, a flat head eyeglass repair screw driver works great.
Thread Starter
Onward thru the fog!
Joined: Feb 2006
Posts: 317
Likes: 1
From: On the couch
Fuse Box connectors removal tool
Thanks for the tips.
I used a combination of eyeglass screwdriver and dremmeled tweezer to get the wires out of the donor fuse box...but couldn't find a "proper" tool anywhere...and I knew there had to be an easier way. I just couldn't give up until I made a tool.
[Note: there is a danger of bending the tabs in too much and breaking them off when you try to bend them back. This hazard is eliminated with the following tool.]
This will be done so rarely and it may not help anyone but I took pix just in case.
IMPORTANT: Disconnect the battery!
(Remove the fuses from the front. Mark what goes where if you don't have a diagram, and take pictures if necessary.)
The fuse box, in the back, has wires that are crimped into a connector. And each connector may actually fill one or more slots. Each connector has two "tabs" that are bent slightly outward to hold the connector in place.
You need to squeeze (or bend) the "tabs" on each connector from the front of the fuse box, and pull the connector (with wire attached) from the back. (Actually, if you make the tool perfect, when you push it in the front, the connector gets pushed out the back automatically.)
OK...here's the tool:
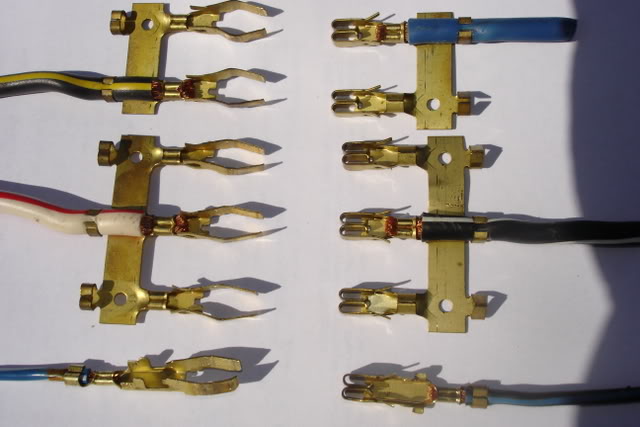
I took donor connectors and straightened the "two bent centers" outward for each connector. That leaves a slight "hook" at the very tips which also need to be straightened. You end up with what looks like tweezers.
Pic 1
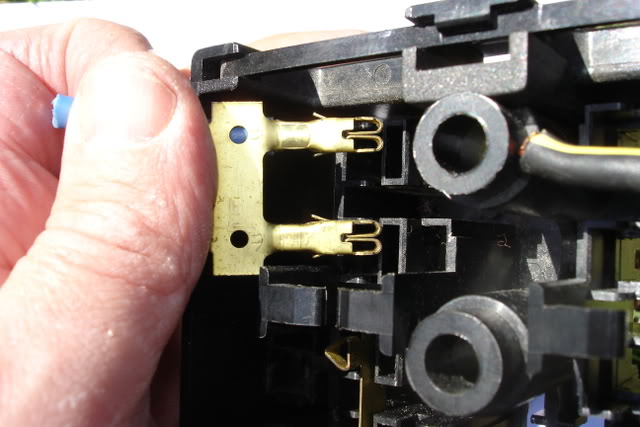
On the left are the homemeade "tweezers" and on the right are the connectors that insert into the back of the fuse box.
Pic 2
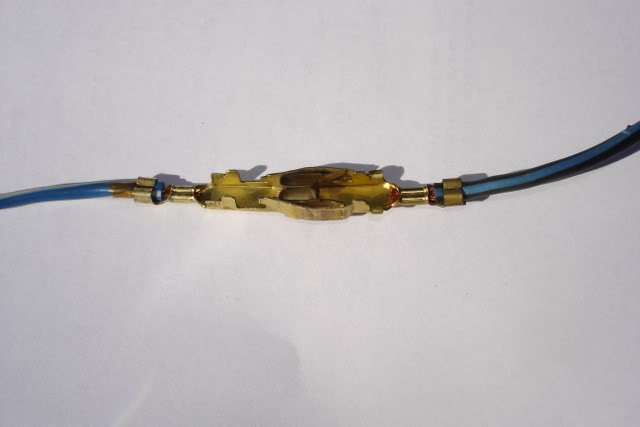
Pic 2 shows how the tweezer, when inserted from the front on each side of the connector, will squeeze the tabs just enough (because of the thickness of the metal as you push it into the slot in the fuse box) and pop the connector out the back. Of course, all this happens IN the fuse box but this is what it would look like.
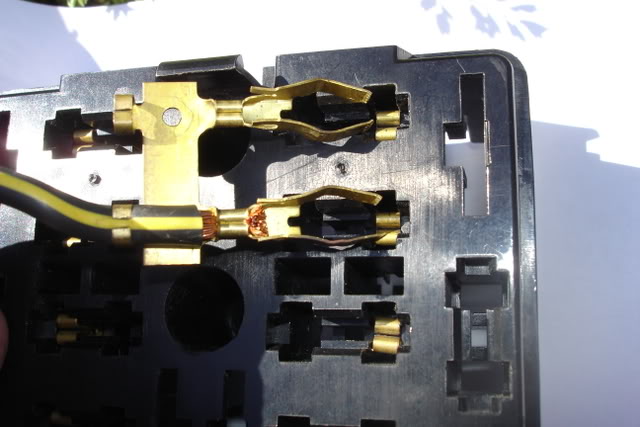
Pic 3 shows where you insert the tweezers from the front and Pic 4 shows it inserted into the slots. You have to look in the BACK to determine if it is a 1, 2, 3, or 4 piece connector. Look at Pic 1 again to see what I mean. Oh, and obviously, for a 4 piece connector you can use a "single" tweezer with a "triple" tweezer...or make a 4 piece removal tool too.
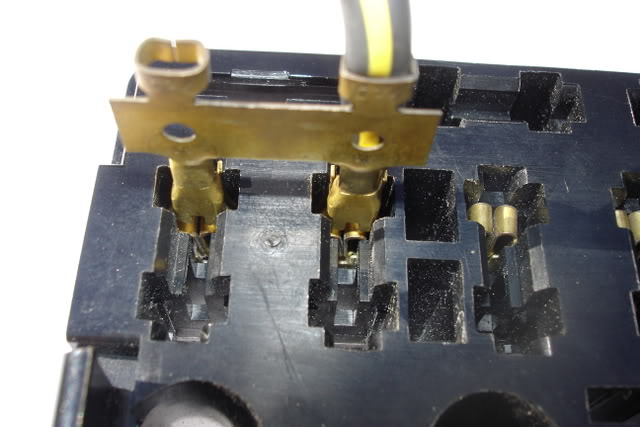
And the last pic shows a "Double" being pushed out the back. See how the tabs are still perfect and ready to be inserted into your new fuse box. Uh, and the wire wouldn't have been cut...this is only a demo.
This may seem like a lot of work to make these goofy tools but "next time" I'll be ready.
I used a combination of eyeglass screwdriver and dremmeled tweezer to get the wires out of the donor fuse box...but couldn't find a "proper" tool anywhere...and I knew there had to be an easier way. I just couldn't give up until I made a tool.
[Note: there is a danger of bending the tabs in too much and breaking them off when you try to bend them back. This hazard is eliminated with the following tool.]
This will be done so rarely and it may not help anyone but I took pix just in case.
IMPORTANT: Disconnect the battery!
(Remove the fuses from the front. Mark what goes where if you don't have a diagram, and take pictures if necessary.)
The fuse box, in the back, has wires that are crimped into a connector. And each connector may actually fill one or more slots. Each connector has two "tabs" that are bent slightly outward to hold the connector in place.
You need to squeeze (or bend) the "tabs" on each connector from the front of the fuse box, and pull the connector (with wire attached) from the back. (Actually, if you make the tool perfect, when you push it in the front, the connector gets pushed out the back automatically.)
OK...here's the tool:
I took donor connectors and straightened the "two bent centers" outward for each connector. That leaves a slight "hook" at the very tips which also need to be straightened. You end up with what looks like tweezers.
Pic 1
On the left are the homemeade "tweezers" and on the right are the connectors that insert into the back of the fuse box.
Pic 2
Pic 2 shows how the tweezer, when inserted from the front on each side of the connector, will squeeze the tabs just enough (because of the thickness of the metal as you push it into the slot in the fuse box) and pop the connector out the back. Of course, all this happens IN the fuse box but this is what it would look like.
Pic 3 shows where you insert the tweezers from the front and Pic 4 shows it inserted into the slots. You have to look in the BACK to determine if it is a 1, 2, 3, or 4 piece connector. Look at Pic 1 again to see what I mean. Oh, and obviously, for a 4 piece connector you can use a "single" tweezer with a "triple" tweezer...or make a 4 piece removal tool too.
And the last pic shows a "Double" being pushed out the back. See how the tabs are still perfect and ready to be inserted into your new fuse box. Uh, and the wire wouldn't have been cut...this is only a demo.
This may seem like a lot of work to make these goofy tools but "next time" I'll be ready.
I just squeezed mine together and pushed them out but your way is safer I did bend a couple of mine and had to bend them back. Luckily none broke, but I too had a spare box. lol!

Thread
Thread Starter
Forum
Replies
Last Post
KAL797
Test Area 51
0
Aug 11, 2015 03:47 PM