
Smog pump disassembly - anyone have how-to info?

Thread Starter
Joined: Jun 2008
Posts: 8,376
Likes: 30
From: Chino Hills, CA
Smog pump disassembly - anyone have how-to info?
I'm interested in disassembling my smog pump to refinish it & check out the inside condition... but for some reason I'm having great difficulty getting the rear cover off. I really don't want to break it as I need it back together again very soon.
Anyone ever successfully torn one down? Got pix/advice?
Anyone ever successfully torn one down? Got pix/advice?
take the 4 12mm bolts off the back and you will need a flat screwdriver and a hammer to tap the back cover off. work from one side to the other and back and forth until it starts to come off the locating studs. eventually the back cover will slide off with the main shaft that runs down the center of the rotor assembly.
from there it gets tricky to fully disassemble and that is as far as i have gone. in order to fully disassemble it you need to press the front hub off and then press the shaft out of the front bearing in the assembly. you will likely need unavailable special tools to reassemble it so that is why i never went any further. at this stage you can see everything and clean/regrease the internals anyways, only reason to go further would be to rebuild it but there is no service kit for them anyways.
do not put any oil on the rotor/vanes or friction surface, it will just cause the vanes to wear rapidly. it is meant to run dry so cleaning the surfaces is about all you can do.
Last edited by RotaryEvolution; Apr 26, 2012 at 11:23 AM.


You mean the Air pump? The back is dowel'd in two places I believe. Those are probably what is making it stubborn. Yes, it comes apart pretty straight foward. A good dead blow may help pursuade it. It's like an air tool motor inside, a drum w/vanes rotating inside the housing. The pulley drives the drum which spin the vanes which pumps the air through. I don't think some light lubrication hurts, but the main concern is that you don't pump oil or combustable lube into a hot exhaust flow I believe.
oil collects dirt, the vanes are a phenolic material which is basically a rigid plastic. lubrication may help it pump more air by filling the gaps but the dirt it will collect will wear the vanes faster. air tools generally don't see tens of thousands of hours or constant duty and their efficiency is important to how well they function, a smog pump doesn't have to be greatly efficient but it does have to last a very long time.
i've also heard it's a pain in the *** to remove the bits of plastic vanes from the LIM if the pump does fail, better safe than sorry.
i've also heard it's a pain in the *** to remove the bits of plastic vanes from the LIM if the pump does fail, better safe than sorry.
Last edited by RotaryEvolution; Apr 26, 2012 at 12:16 PM.
Thread Starter
Joined: Jun 2008
Posts: 8,376
Likes: 30
From: Chino Hills, CA
OK, thanks gents; I think that will get me home. I was concerned that the two dowel-looking arrangements might in fact be rivets or otherwise swaged so that they wouldn't come out - - or would only come out but not go in.
Being able to remove the cast-iron back will let me more easily refinish it separately from the aluminum housing. I don't think I'll need to undo the front shaft.
Being able to remove the cast-iron back will let me more easily refinish it separately from the aluminum housing. I don't think I'll need to undo the front shaft.

Joined: Mar 2001
Posts: 31,857
Likes: 3,243
From: https://www2.mazda.com/en/100th/
this is true, lots of little hard to get crevasses in the ACV for vane parts to get stuck in. some of these go to the intake manifold too, so you can have giant internal vacuum leaks, which are hard to find!
Trending Topics
I took the back of mine off, polished it the pump, and then clear powder coated it. Be careful with the back piece monting point for the long bolt. It's easy to brakeoff. I would also not disassemble the viens.


Thread Starter
Joined: Jun 2008
Posts: 8,376
Likes: 30
From: Chino Hills, CA
Nicely done, K.C.REPU! What tools did you use to smooth the exterior prior to polishing?
I doubt I can replicate that level of perfection, but I'm a big believer that if I must have smog parts, said smog parts shall be shiny.
Too late.. but they don't seem to pose too much a challenge to reassembly.
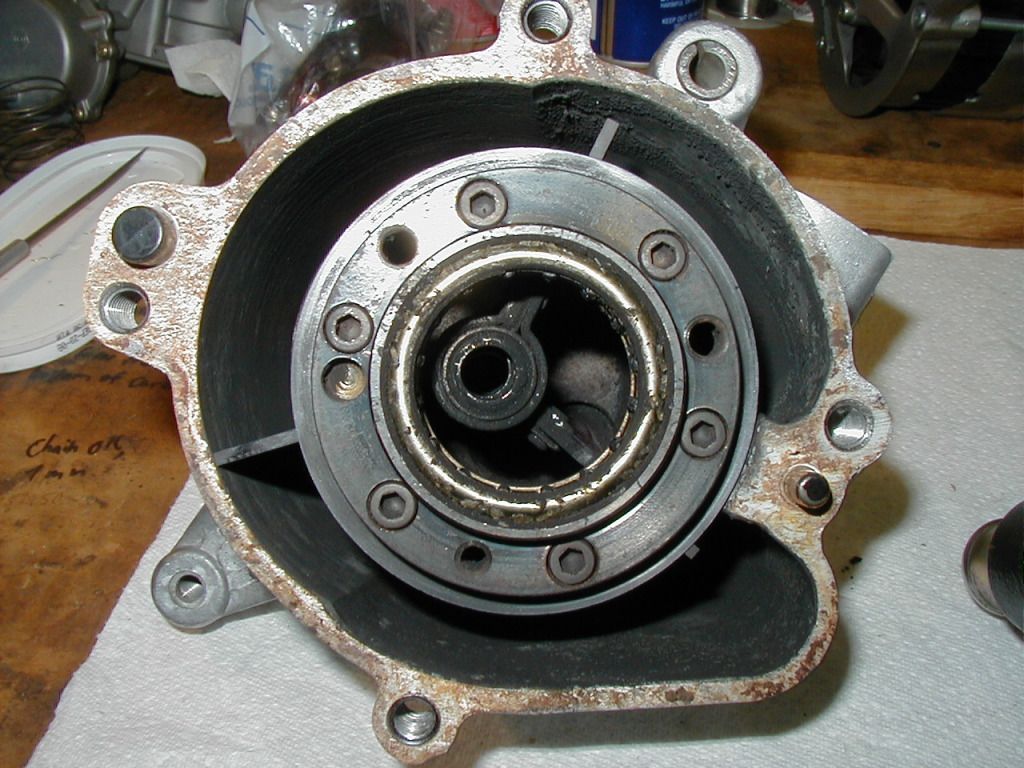
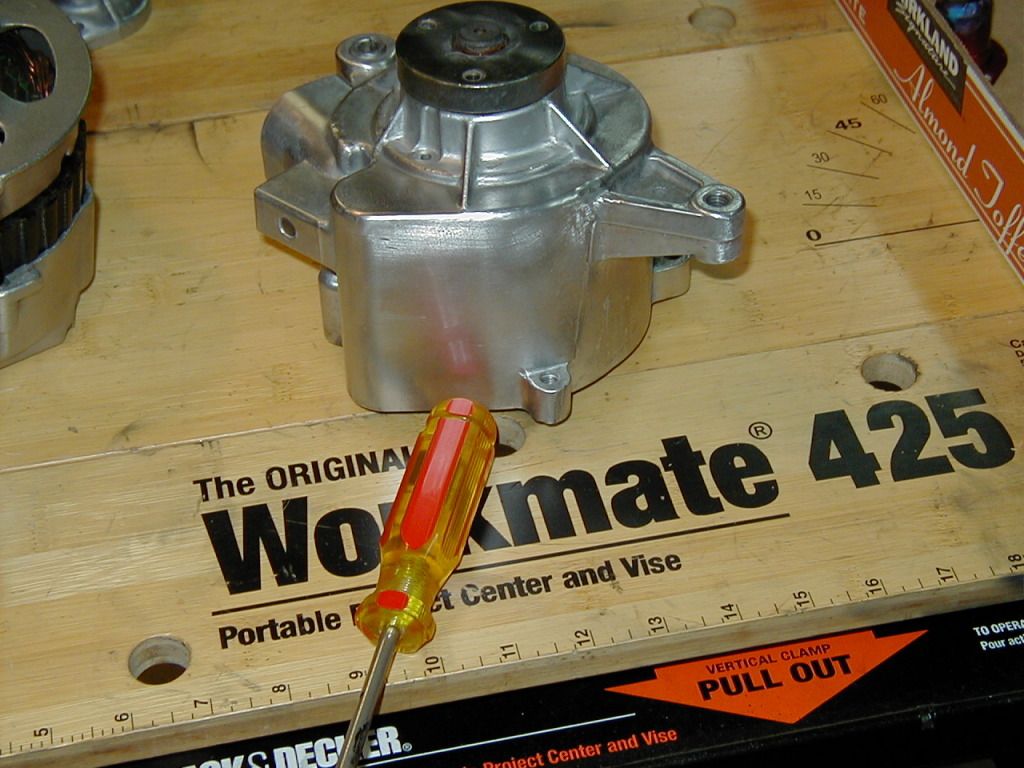
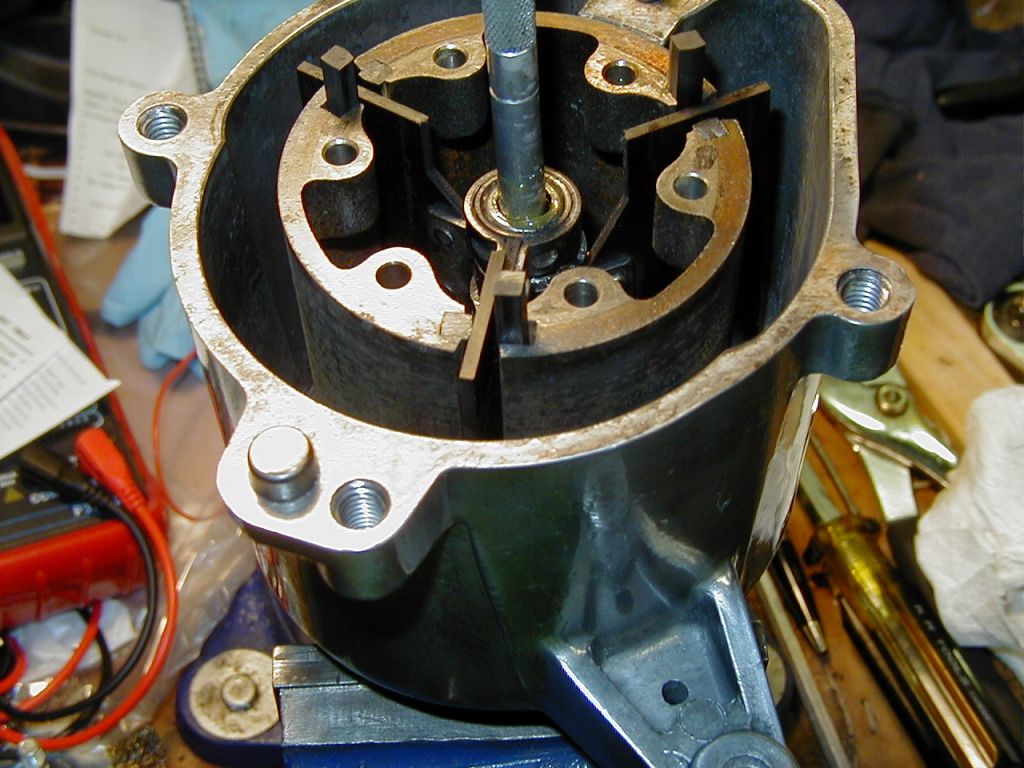
SECRETS OF THE AIR PUMP INTERIOR REVEALED!
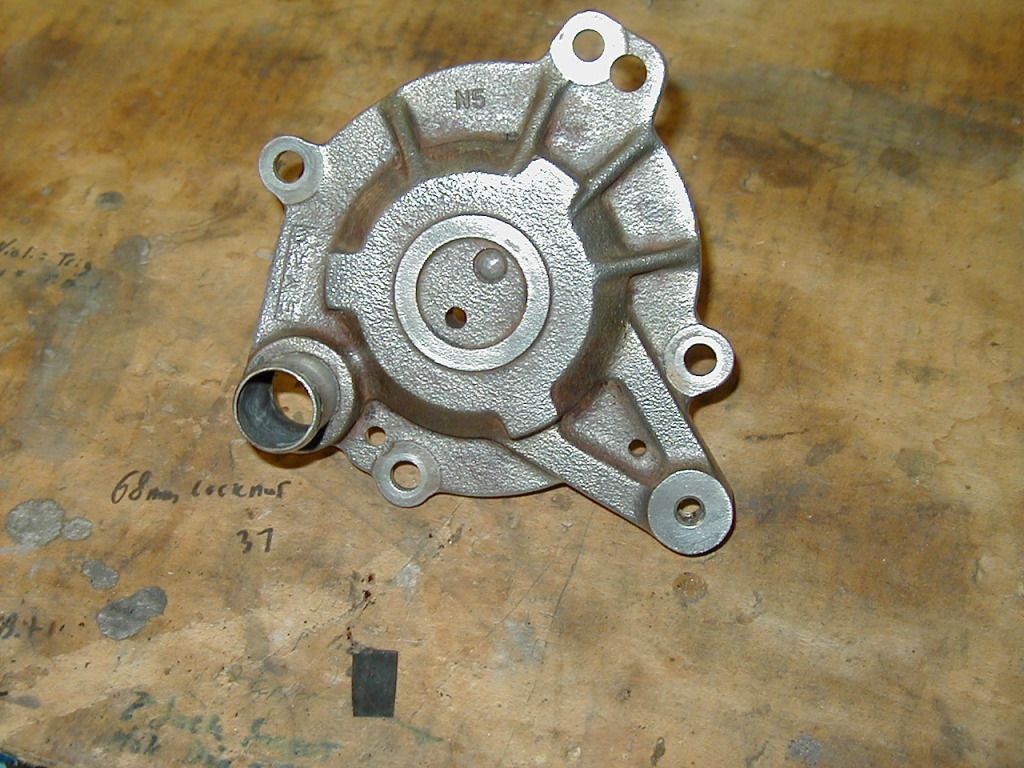
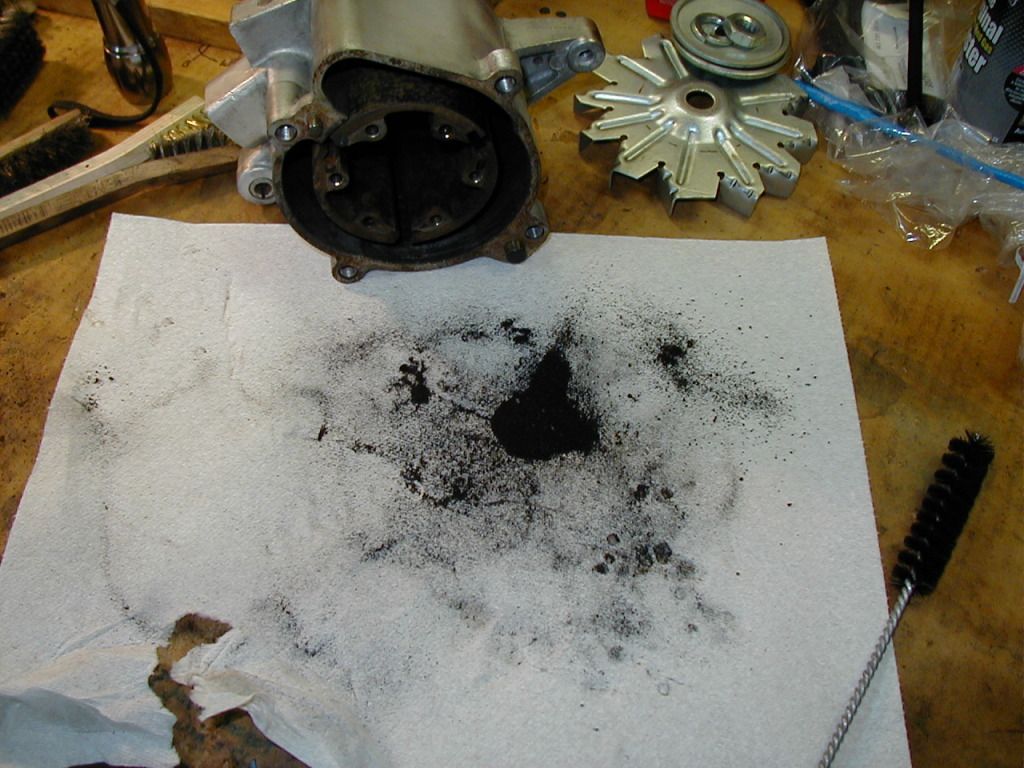
Front section after opening. Grotty!
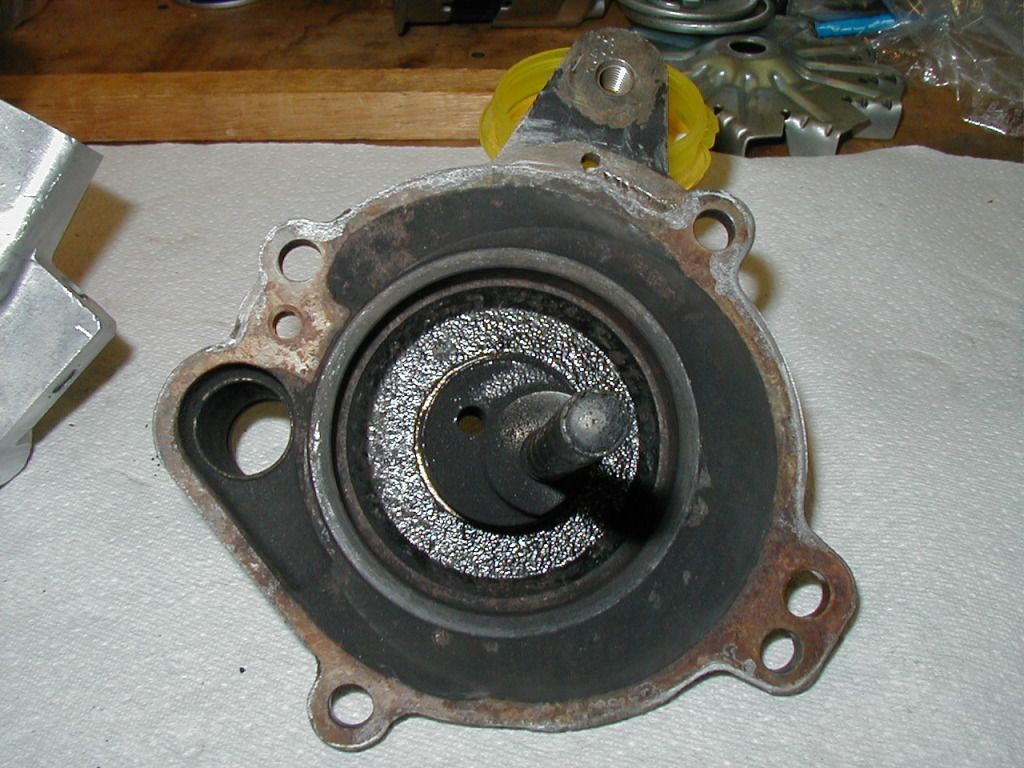
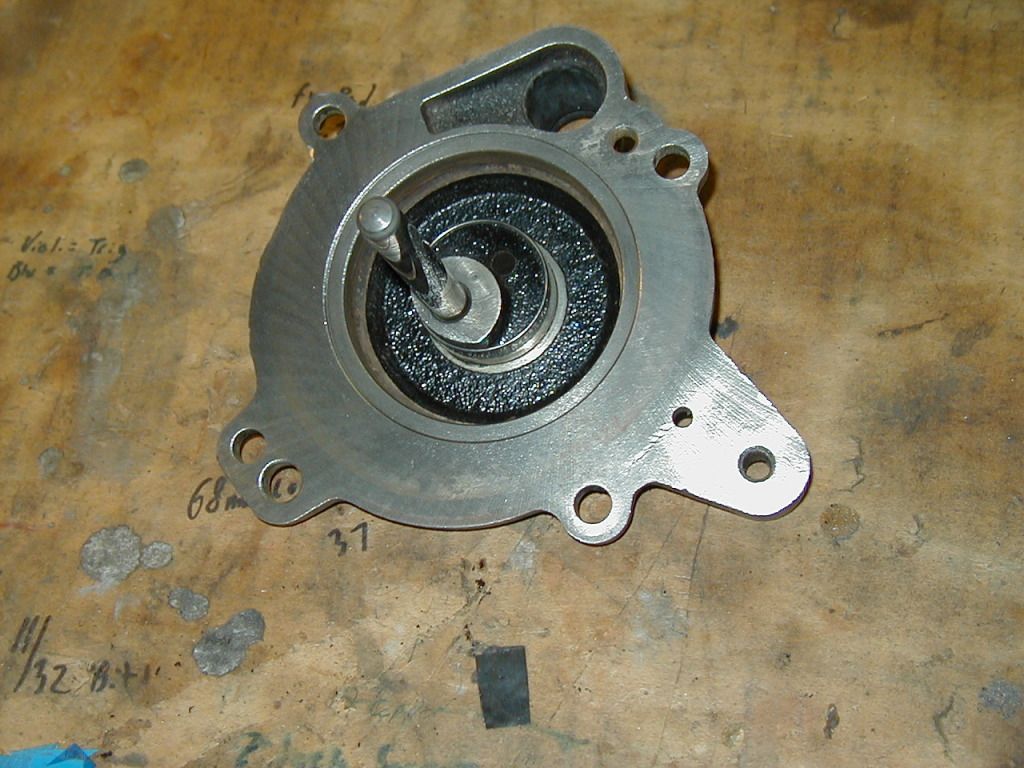
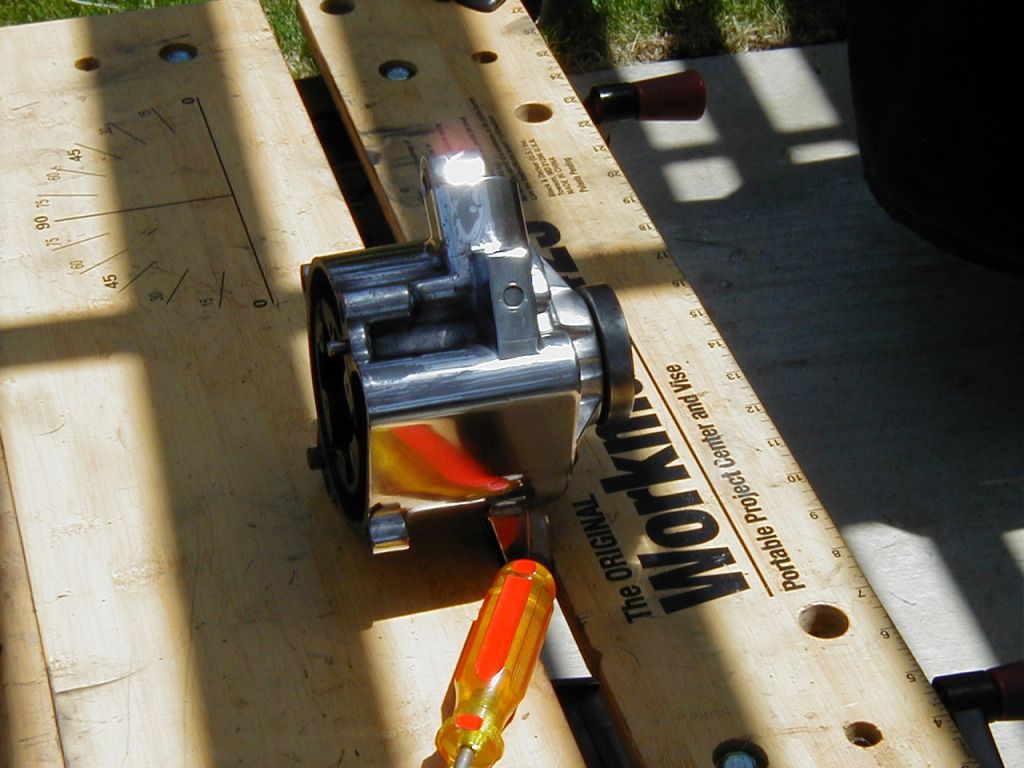
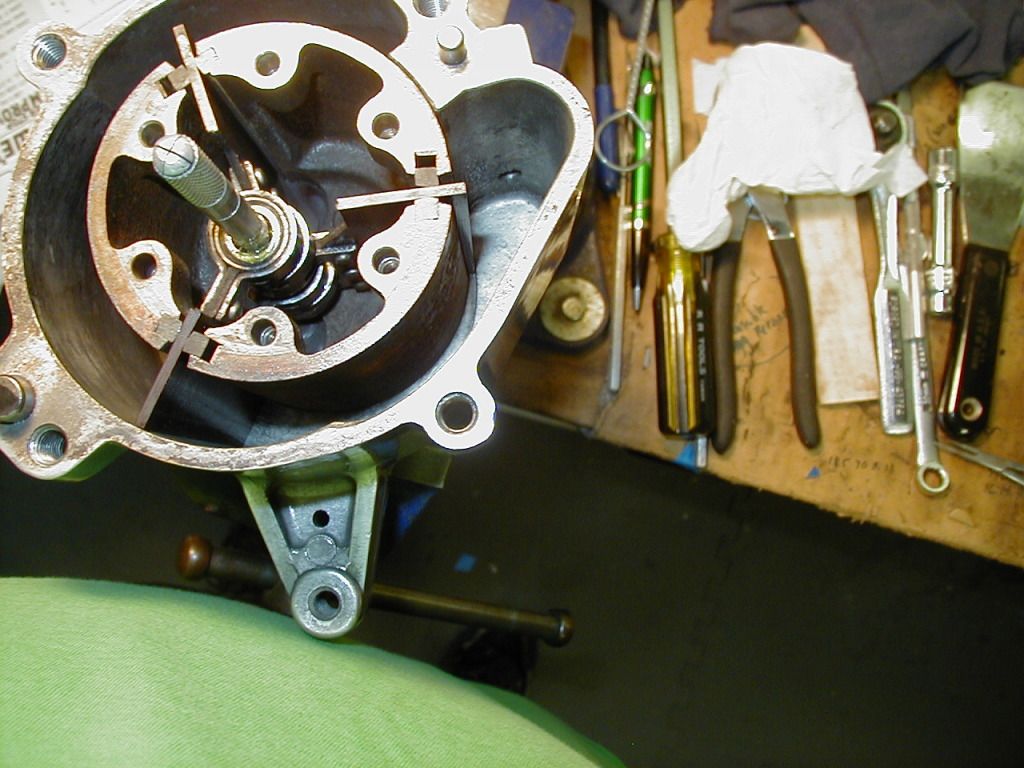
Rear cover. Long shaft runs thru center of vane bearings.
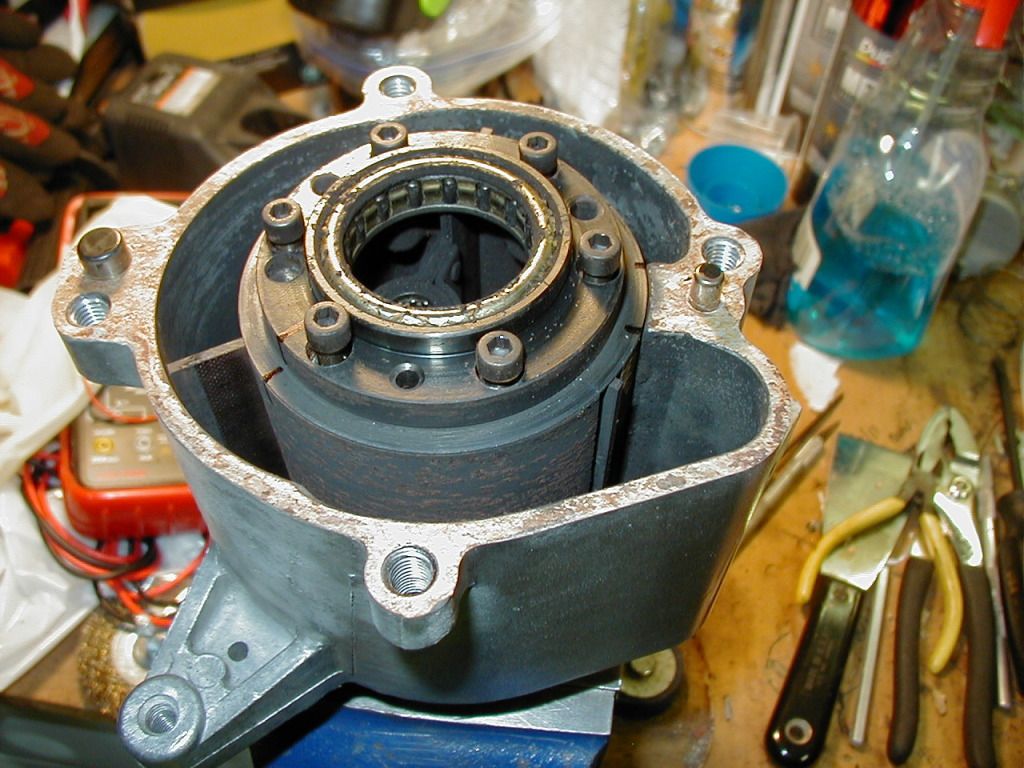
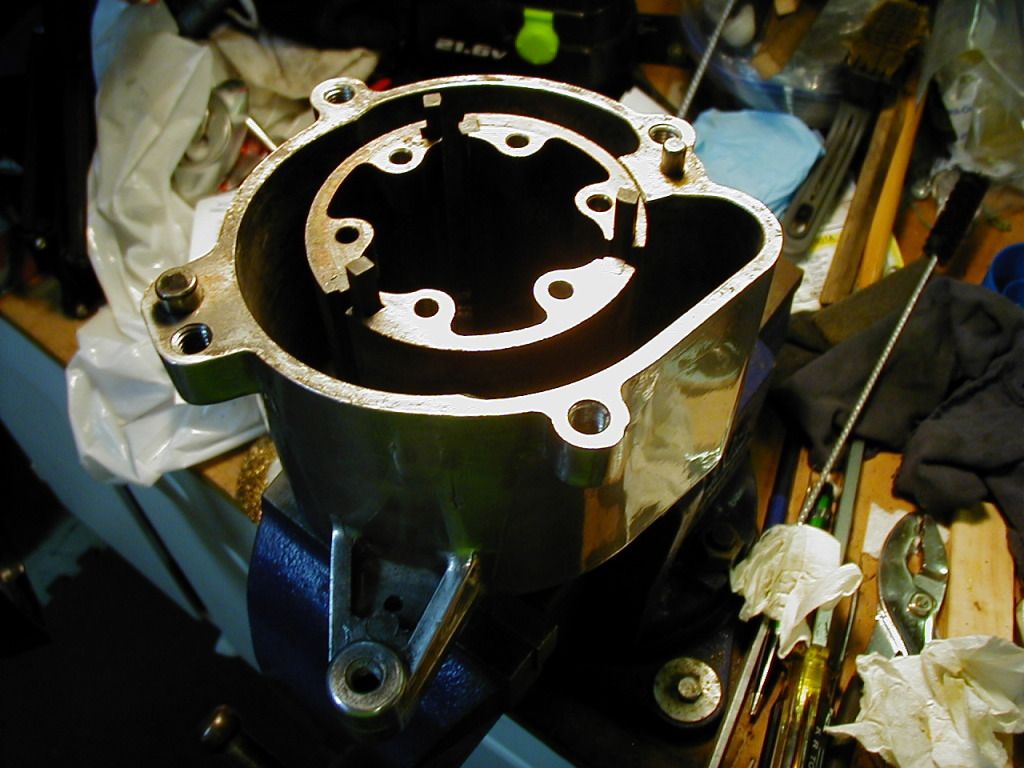
Vane barrel cap/bearing assembly is held on by 6 shouldered cap screws.
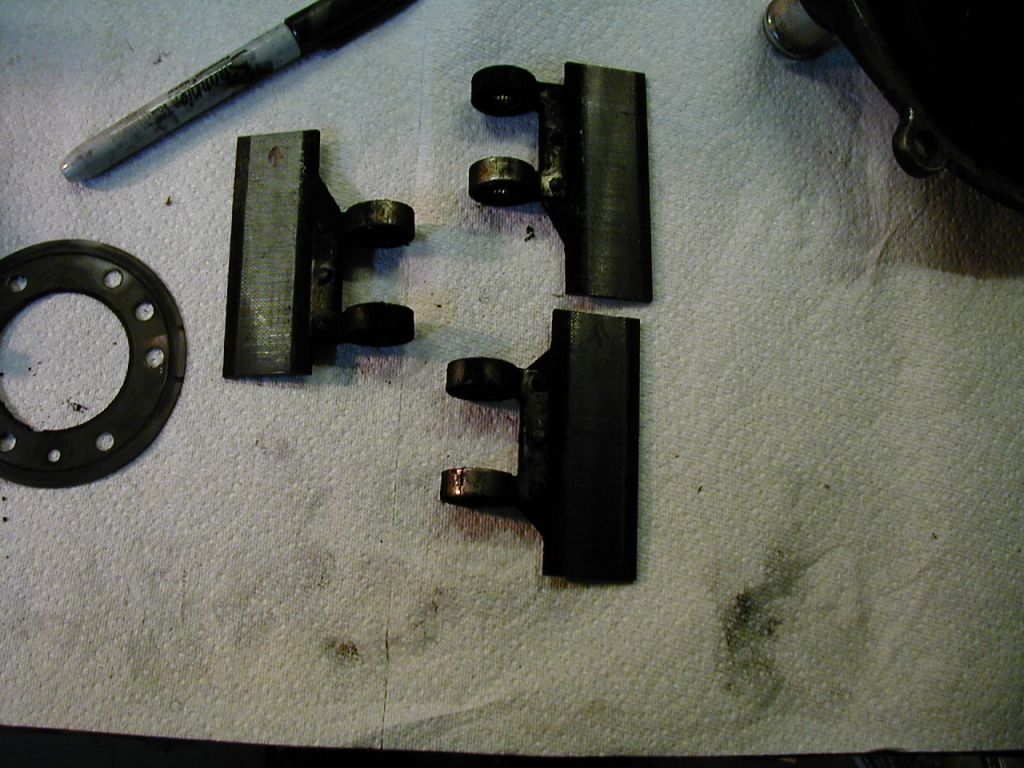
Vanes are stacked in specific order; I labelled 'top,' 'middle,' 'bottom' for reassembly, & tagged their slots in the barrel.
Vanes after removal, in original order.
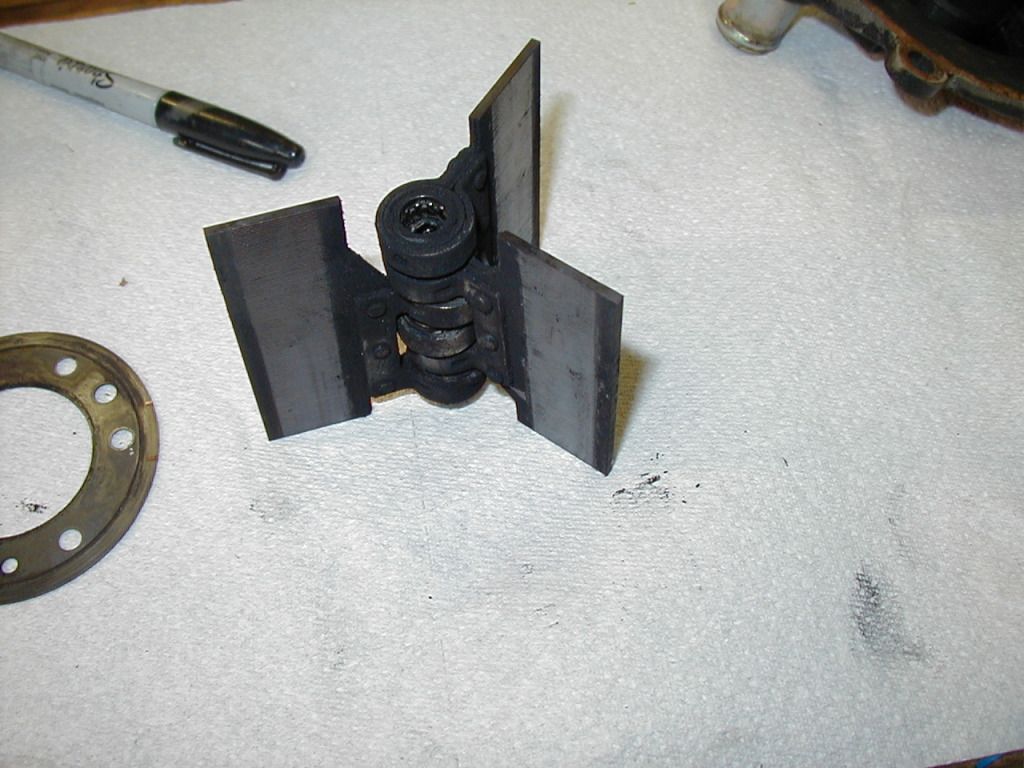
& separated.
Vane bearings likewise very grotty. Clenaing and regreasing this thing might save a HP or two.
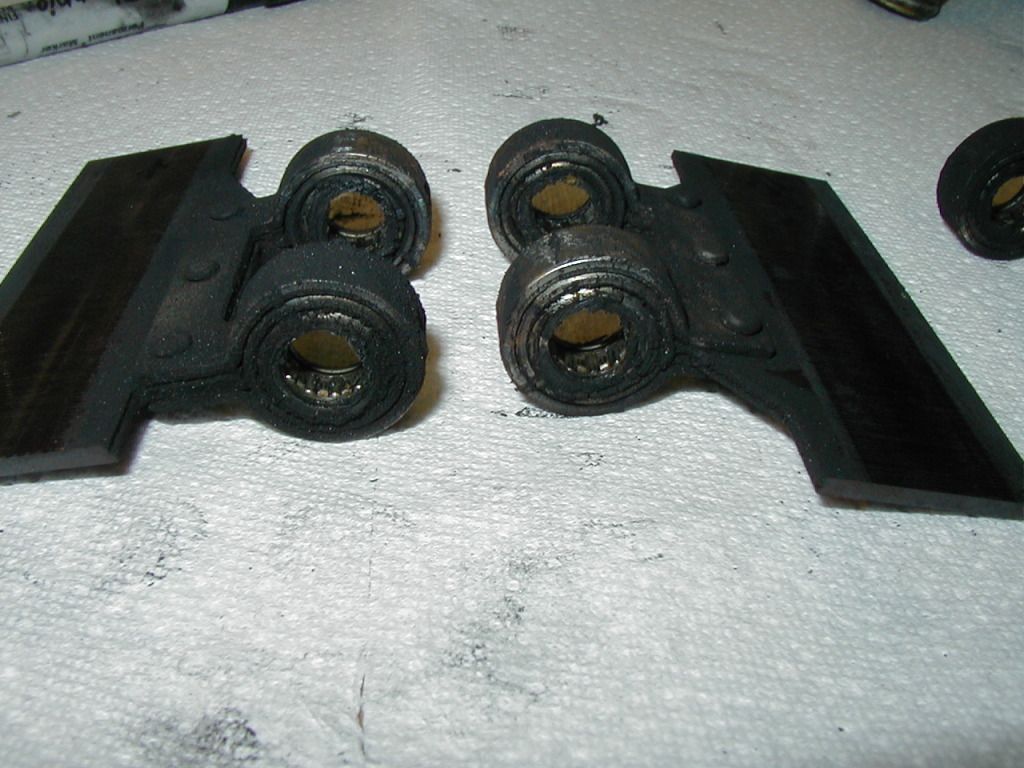
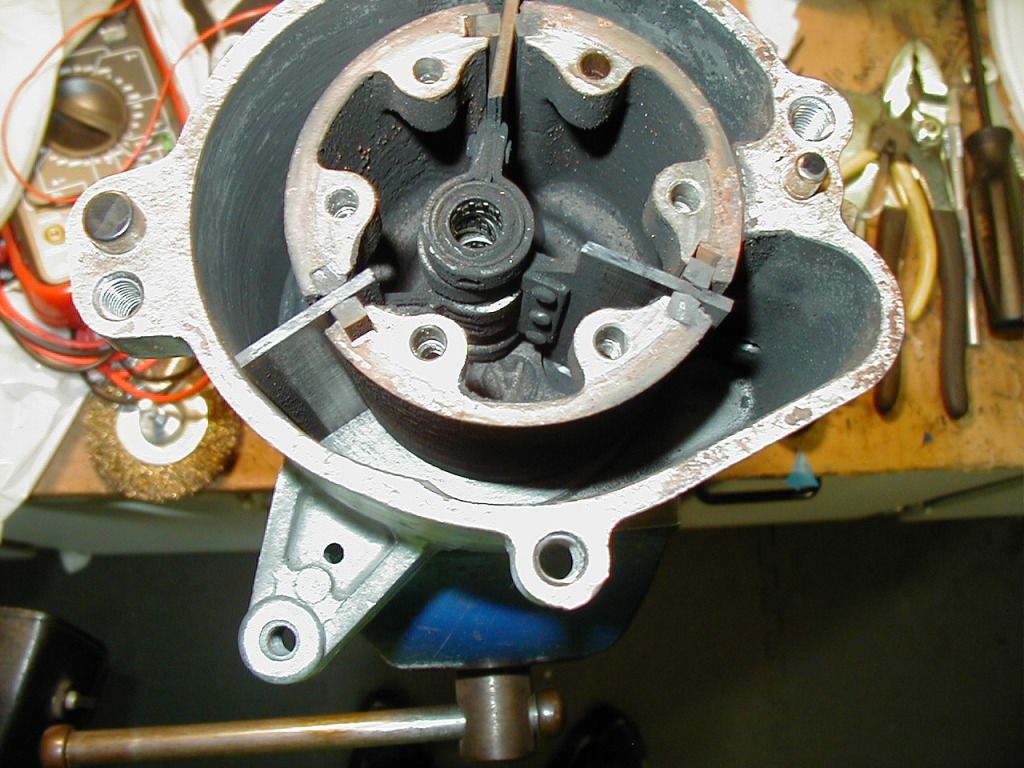
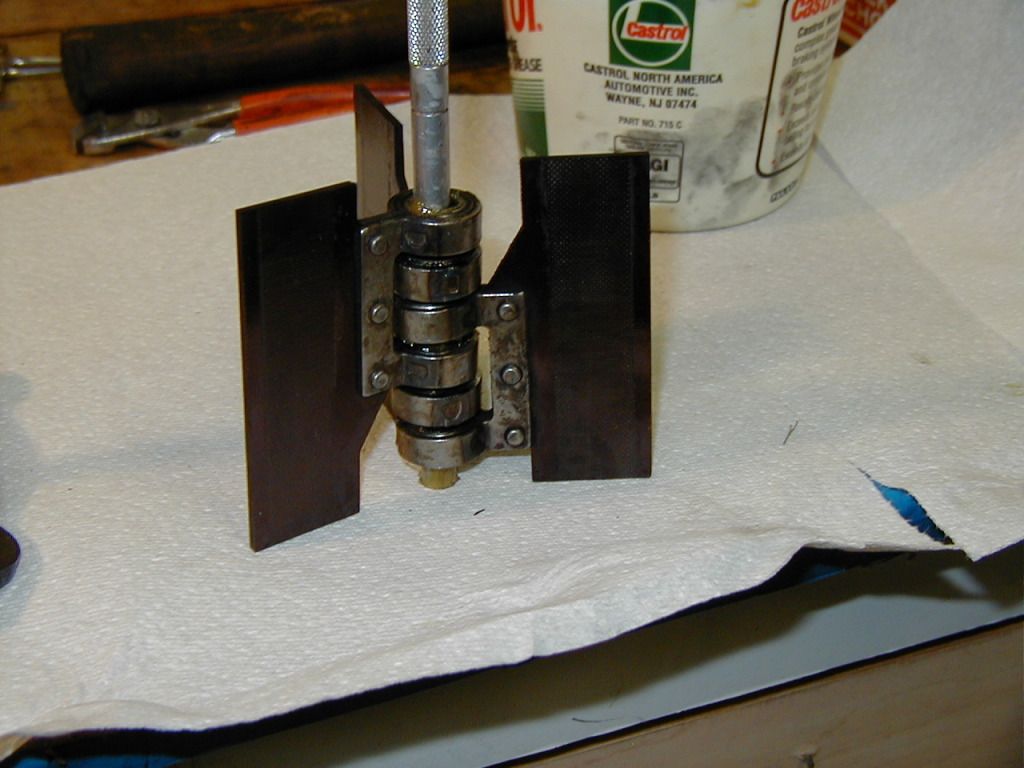
Vanes are sealed with two long carbon(?) seals each; one fixed, one on an 'apex' spring. Unlike rotor apex seals, these are set with the ends against the housing, the middle against the floating seal.

Next up, cleaning:
I doubt I can replicate that level of perfection, but I'm a big believer that if I must have smog parts, said smog parts shall be shiny.
I would also not disassemble the viens.
SECRETS OF THE AIR PUMP INTERIOR REVEALED!
Front section after opening. Grotty!
Rear cover. Long shaft runs thru center of vane bearings.
Vane barrel cap/bearing assembly is held on by 6 shouldered cap screws.
Vanes are stacked in specific order; I labelled 'top,' 'middle,' 'bottom' for reassembly, & tagged their slots in the barrel.
Vanes after removal, in original order.
& separated.
Vane bearings likewise very grotty. Clenaing and regreasing this thing might save a HP or two.
Vanes are sealed with two long carbon(?) seals each; one fixed, one on an 'apex' spring. Unlike rotor apex seals, these are set with the ends against the housing, the middle against the floating seal.
Next up, cleaning:
Thread Starter
Joined: Jun 2008
Posts: 8,376
Likes: 30
From: Chino Hills, CA
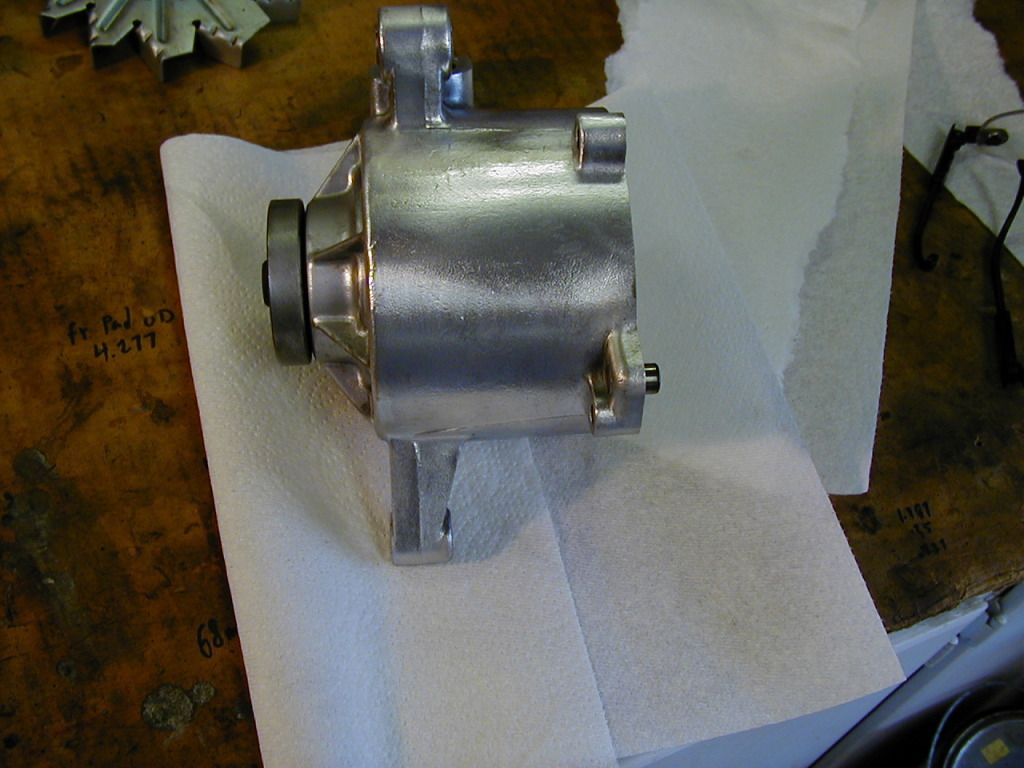
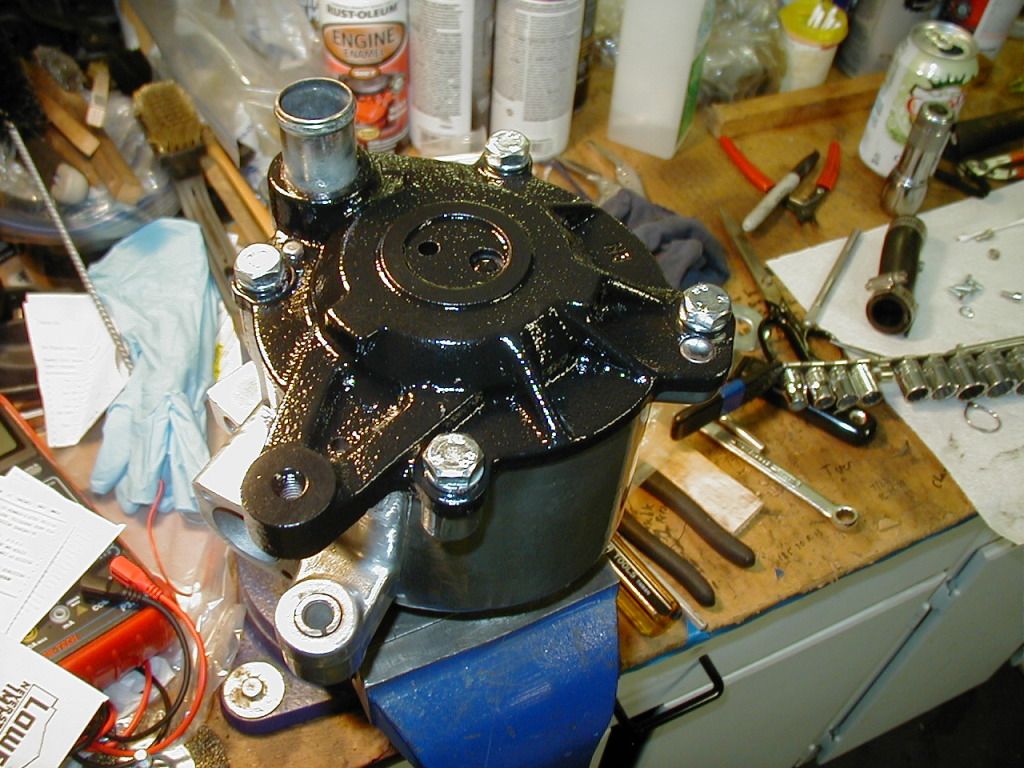
Rear cast-iron housing after paint stripping and wire brushing:
Cleaning the front assembly interior poses a challenge; without the ability to disassemble the pressed-together shaft and exterior flange, there's no way to re-grease the front bearing, so use of solvents would be a bad idea. I'm going to restrict myself to brushes and compressed air.
After just a few minutes with hand brushes, this pile of grot fell out.
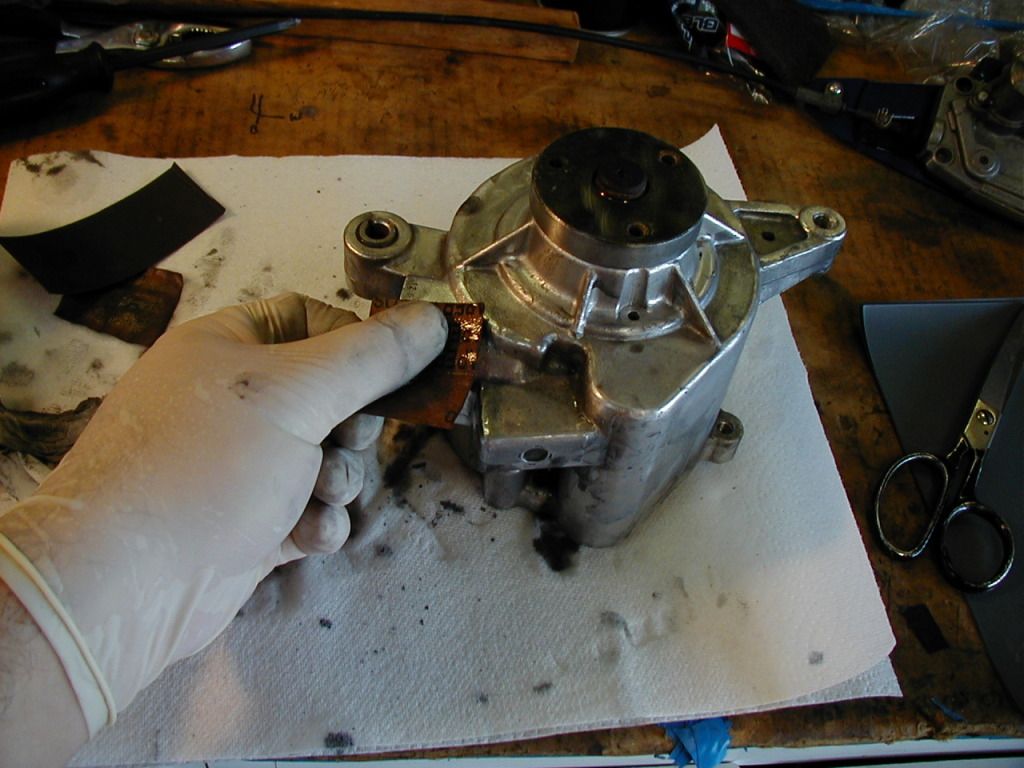
The vanes, being Bakelite riveted to steel bearing carriers, can safely be cleaned with brake cleaner or acetone. Purging all the old crud from the (welded in) bearings will allow for re-greasing and much easier rotation.
The removable seals and their springs can be wiped down with acetone (dries quickly and won't degrade the carbon if only quickly exposed). The fixed seals will have to get by with a light q-tipping.
That's where I stopped last night. More to come.
Cleaning the front assembly interior poses a challenge; without the ability to disassemble the pressed-together shaft and exterior flange, there's no way to re-grease the front bearing, so use of solvents would be a bad idea. I'm going to restrict myself to brushes and compressed air.
After just a few minutes with hand brushes, this pile of grot fell out.
The vanes, being Bakelite riveted to steel bearing carriers, can safely be cleaned with brake cleaner or acetone. Purging all the old crud from the (welded in) bearings will allow for re-greasing and much easier rotation.
The removable seals and their springs can be wiped down with acetone (dries quickly and won't degrade the carbon if only quickly exposed). The fixed seals will have to get by with a light q-tipping.
That's where I stopped last night. More to come.
I started with 400 wet/dry sand paper and then used a sewn buffing wheel on a bench grinder. I did the altenator the same way. I have about 200 hours in it and don't think I'll polish anything again. Way to much work. Next one I do will be powder coated. I do my own powder coating so it's not a big deal.
With all the prep and painting you do, I'd check out powder coating. I have a blast cabinet, Eastwood hotcoat gun, and a home oven. Wife let me build a 60x40 metal barn so I have plenty of room. If you want anything powder coated just send it to me. I'd do it for free (just pay shipping).


With all the prep and painting you do, I'd check out powder coating. I have a blast cabinet, Eastwood hotcoat gun, and a home oven. Wife let me build a 60x40 metal barn so I have plenty of room. If you want anything powder coated just send it to me. I'd do it for free (just pay shipping).
[QUOTE=KansasCityREPU;11070528] I have about 200 hours in it and don't think I'll polish anything again. Way to much work.QUOTE]
And then you have to maintain it against oxidation over time. When possibile, this is where just chroming is easier to me. Cost's more but your (my) time is worth something too and it stays nicer, longer.
Nice shop. Add a TV, fridg and bed and you'd never have to leave! The newer car "skates" that have a built in pumps are nice. If you ever want to upgrade, bewarned though, they don't work that well on smaller 13 inch tires. they are made for more modern sizes and don't provide enough lift for the smaller ones. I had to modify mine. Kind of a hassle but not as much as sending the damm things back. They're a bit big and cumbersome.
Thread Starter
Joined: Jun 2008
Posts: 8,376
Likes: 30
From: Chino Hills, CA
So, your shop is roughly the same square footage as my entire house... I am quite envious. And I really appreciate your powder-coating offer. If I ever do the polished manifold I've been contemplating (have a spare one) I will take you up on that!
That's a later-gen alt, is it not? They start off with a much less pebbly finish to begin with - - die cast rather than the sand-cast SA alt - - but that's still beautiful work, there.
Polishing is a lot of work. I just want to do it 'once'.
Chrome; I like chrome, but yeah it's pricey to have done, and aluminum has to be plated up with copper first, to boot.
Had I unlimited funds, I would strongly consider getting my backup air cleaner chromed. A chromed stock air cleaner with mazda-blue lettering would look awesome, but they are a biatch to strip, so I can imagine the bill for chroming would be eye-opening.
I had my heater and brake booster hardlines chromed for this build; that's enough for now.
Thread Starter
Joined: Jun 2008
Posts: 8,376
Likes: 30
From: Chino Hills, CA
Front housing after wire brushing:
My, this really is a pain in the ***... not to mention getting the ol' carpal tunnel very angry...
I don't have 200 hours to sink into my air pump (not even 20), so here's as 'sanded' as it's gonna get:
Tomorrow, it meets the buffing wheel.
My, this really is a pain in the ***... not to mention getting the ol' carpal tunnel very angry...
I don't have 200 hours to sink into my air pump (not even 20), so here's as 'sanded' as it's gonna get:
Tomorrow, it meets the buffing wheel.

forget the sandpaper, get the proper polishing compound and a good buffer with wheel. a good amount of push on a buffer with some nuts will polish even cast aluminum without an ounce of prep work.
wear a mask though, you will look like you came out of a coal mine after just a few minutes..
wear a mask though, you will look like you came out of a coal mine after just a few minutes..
The stuff the buffing wheel puts off is so bad, it would get in my eyes. It's the lint from the wheel. You'll end up with black colored eyes. Also, do it outside when possible. I have a heavy duty bench grinder and one side has an extra long shaft.
Thread Starter
Joined: Jun 2008
Posts: 8,376
Likes: 30
From: Chino Hills, CA
I used a high-temp clearcoat on it; as low as it is on the engine (& being close to the TR), it'll get oxidized up pretty fast otherwise.
It will cut the gloss a tiny bit, but it will stay glossy longer. Stuff takes about a week to fully harden, but is good to +500f after hardening. Used the same paint on my housings, front cover, & trans. Still look pretty bright after the clear. Just not quite as 'specular.'
It will cut the gloss a tiny bit, but it will stay glossy longer. Stuff takes about a week to fully harden, but is good to +500f after hardening. Used the same paint on my housings, front cover, & trans. Still look pretty bright after the clear. Just not quite as 'specular.'
Looks good DD. You'll need a plexi glass bonnet next to show off that jewel of an engine bay!
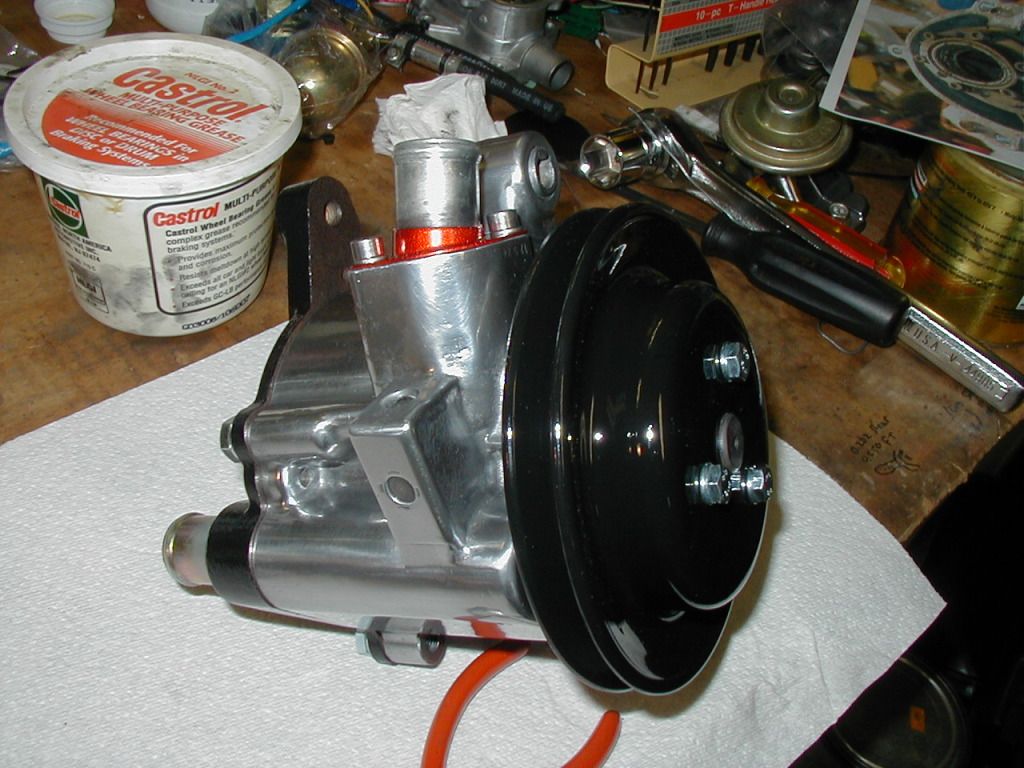
As an alternative to the full show polish approach another option is more of an OEM look. Here's one I did as a spare.
As an alternative to the full show polish approach another option is more of an OEM look. Here's one I did as a spare.
Thread Starter
Joined: Jun 2008
Posts: 8,376
Likes: 30
From: Chino Hills, CA
Very Nice; that's more or less how I did mine last time (though my original end cover was black, and the sticker was a bit different). You made it truly look brand new!
Thread Starter
Joined: Jun 2008
Posts: 8,376
Likes: 30
From: Chino Hills, CA
Final Chapter: Reassembly
Most important note; the rotating assembly is balanced, so the end cap and vanes need to go back in their original orientations. There's a sequence of holes between the bolt holes on the end cap, and one is smaller than the rest. It can be used as an index marker if you noted where on the assembly it was before you took everything apart.
Lock the front hub (not the housing) in a vise. Test-fit the seals to make sure the slots are all cleaned out properly. The seals have an orientation to them; the narrow edge of the working face goes outward.
After packing the bearings with grease, stack your vanes in proper sequence. There is an UP and DOWN orientation to every vane; if upside down, they'll protrude slightly when you put them in the hub. Use a suitable tool to line them up and keep them together; I used an Xacto knife handle.
Drop the vanes in the proper slots, and then slide the seals in beside them, without the springs. Leave the seals up a bit to make installing springs easier.
Install the springs behind the seals, tips away from the seals, and slide them all down flush.

Move your temporary axle off-center to match the axle location on the rear cover; when lined up right, all the vane tips will be inside the circular recess in the bottom of the front housing.
If the vanes are set properly, they will all be flush to the top of the hub.

Install the slip spacer, with the holes in the right orientation to match the holes on the end cap. Pack the end cap bearing with grease, and install it with the shoulder screws. I put a paper-thin layer of silicone around the rear mating surface, just to keep water out.

It takes some finessing to get the end cover axle to drop down through all the bearings, but it's not that big a deal. Use the cover bolts to evenly draw the cover down over the dowel pins.
Bolt on the pulley and the air inlet, and you're done.
Most important note; the rotating assembly is balanced, so the end cap and vanes need to go back in their original orientations. There's a sequence of holes between the bolt holes on the end cap, and one is smaller than the rest. It can be used as an index marker if you noted where on the assembly it was before you took everything apart.
Lock the front hub (not the housing) in a vise. Test-fit the seals to make sure the slots are all cleaned out properly. The seals have an orientation to them; the narrow edge of the working face goes outward.
After packing the bearings with grease, stack your vanes in proper sequence. There is an UP and DOWN orientation to every vane; if upside down, they'll protrude slightly when you put them in the hub. Use a suitable tool to line them up and keep them together; I used an Xacto knife handle.
Drop the vanes in the proper slots, and then slide the seals in beside them, without the springs. Leave the seals up a bit to make installing springs easier.
Install the springs behind the seals, tips away from the seals, and slide them all down flush.
Move your temporary axle off-center to match the axle location on the rear cover; when lined up right, all the vane tips will be inside the circular recess in the bottom of the front housing.
If the vanes are set properly, they will all be flush to the top of the hub.
Install the slip spacer, with the holes in the right orientation to match the holes on the end cap. Pack the end cap bearing with grease, and install it with the shoulder screws. I put a paper-thin layer of silicone around the rear mating surface, just to keep water out.
It takes some finessing to get the end cover axle to drop down through all the bearings, but it's not that big a deal. Use the cover bolts to evenly draw the cover down over the dowel pins.
Bolt on the pulley and the air inlet, and you're done.

Thread
Thread Starter
Forum
Replies
Last Post
trickster
2nd Generation Specific (1986-1992)
25
Jul 1, 2023 04:40 PM