Semi-Locked distributor how-to (for boost)
 01-15-15, 03:13 PM
#1
Semi-Locked distributor how-to (for boost)
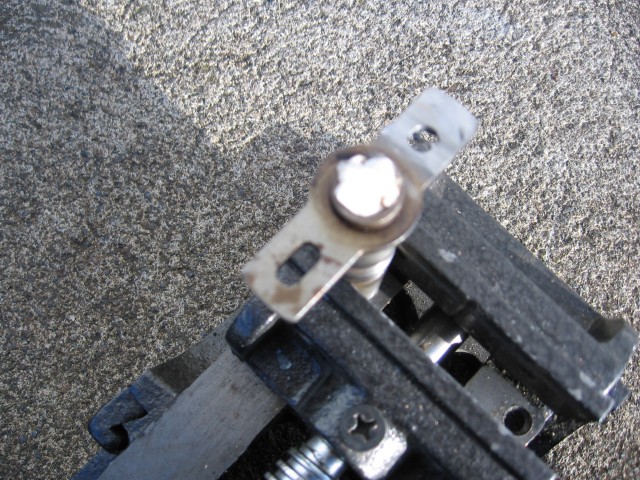
During dissassembly. Loosen the screw at the top first, while it's still in the engine. Makes your life easier.

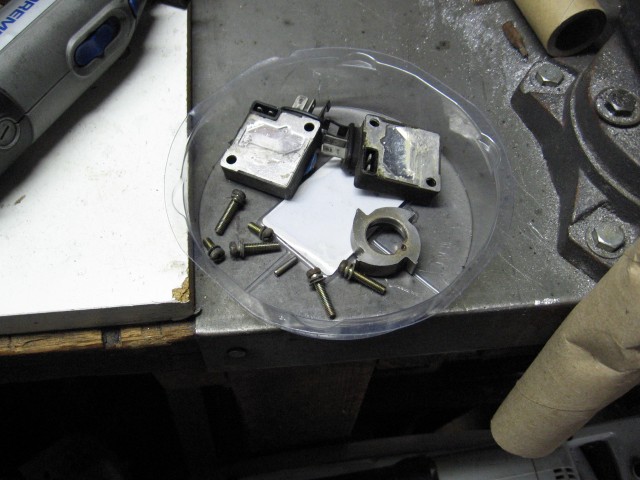
It's good to have a container for parts.
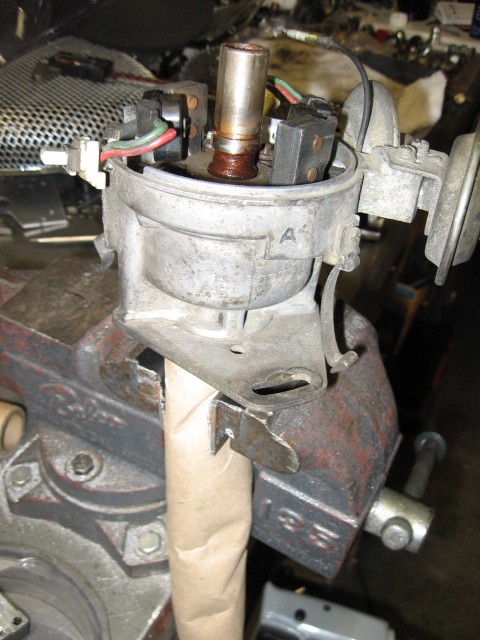
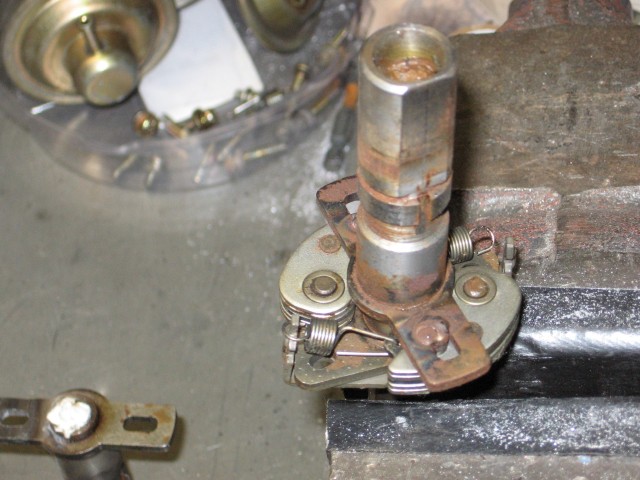
How I keep it protected in a vice. Cushioned jaws and a paper towel tube.
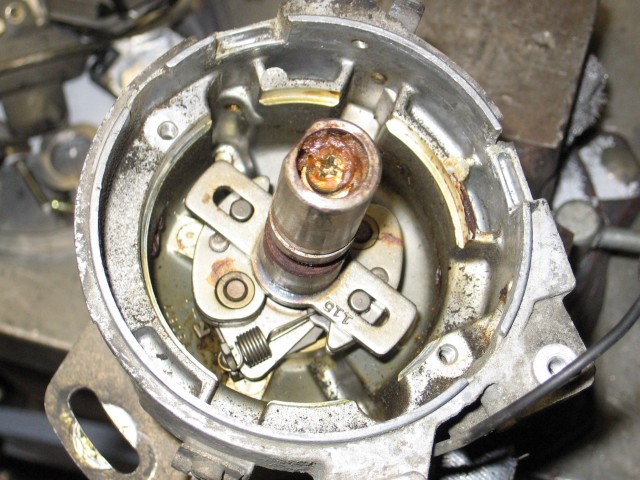
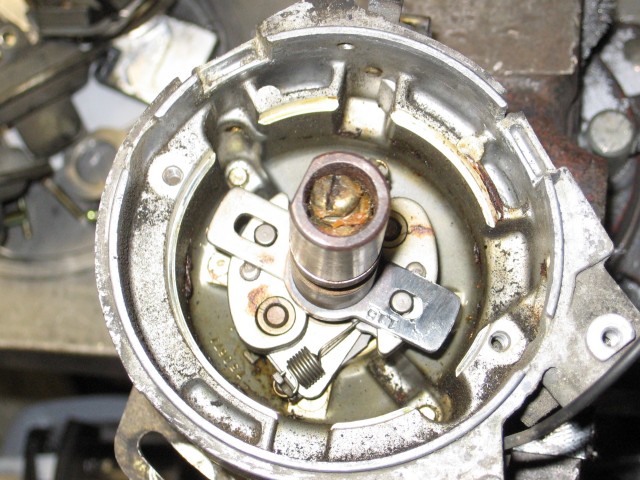
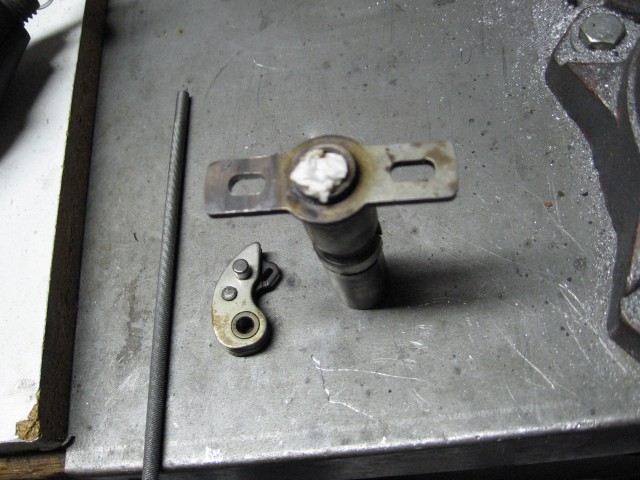
There's the 115 shaft. Upper screw is loosened beforehand but the grease will hold it in so I leave it there during the work. This shaft is ready to come out.
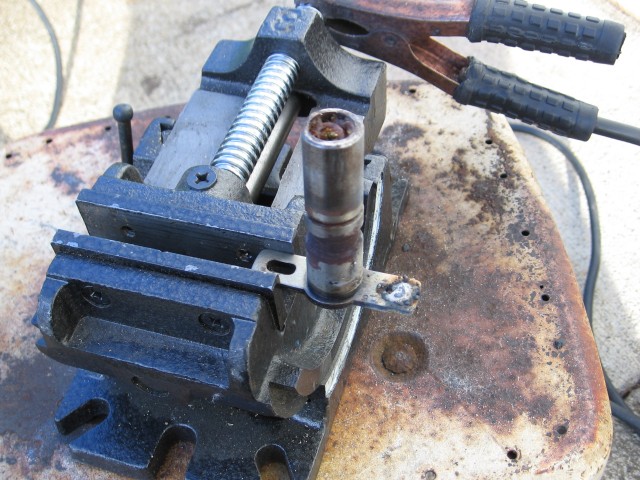
Welded shaft slot in the process of filing. You need to be careful here. Not too wide or too narrow, or too long. Looking for just 10 degrees on this one.
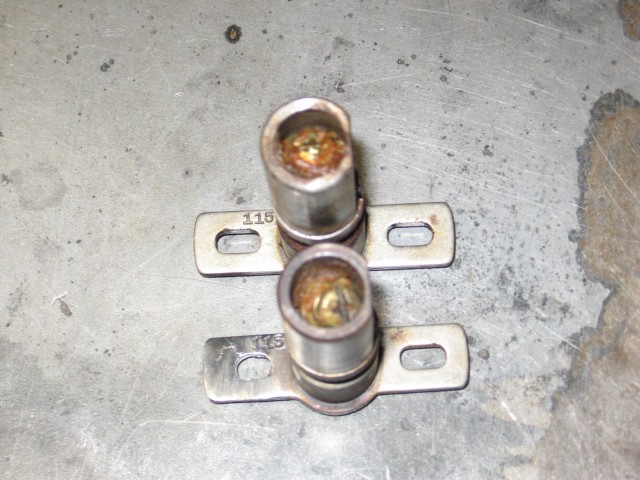
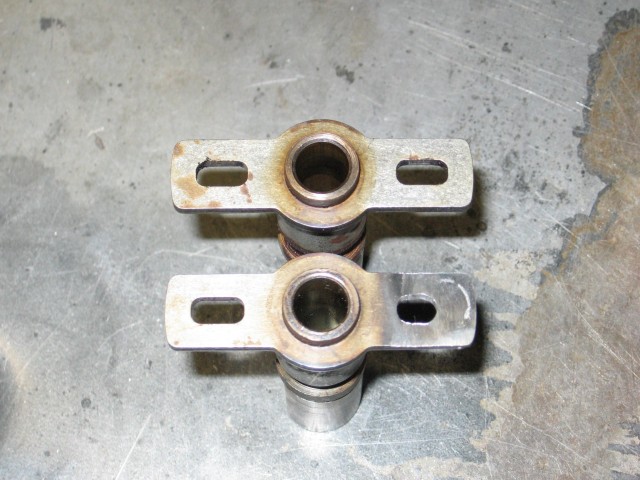
The above is just a comparison shot. Any 115 shaft can swap into any other dizzy with a 115 shaft. That would be all N201 and N231 part numbers or '81-'82 and '83 respectively. The later N249 ('84-'85) has a different shaft with a different number, and a slightly longer straight slot. Sorry, no pics.
It's good to have a container for parts.
How I keep it protected in a vice. Cushioned jaws and a paper towel tube.
There's the 115 shaft. Upper screw is loosened beforehand but the grease will hold it in so I leave it there during the work. This shaft is ready to come out.
Welded shaft slot in the process of filing. You need to be careful here. Not too wide or too narrow, or too long. Looking for just 10 degrees on this one.
The above is just a comparison shot. Any 115 shaft can swap into any other dizzy with a 115 shaft. That would be all N201 and N231 part numbers or '81-'82 and '83 respectively. The later N249 ('84-'85) has a different shaft with a different number, and a slightly longer straight slot. Sorry, no pics.
 01-15-15, 03:28 PM
#2
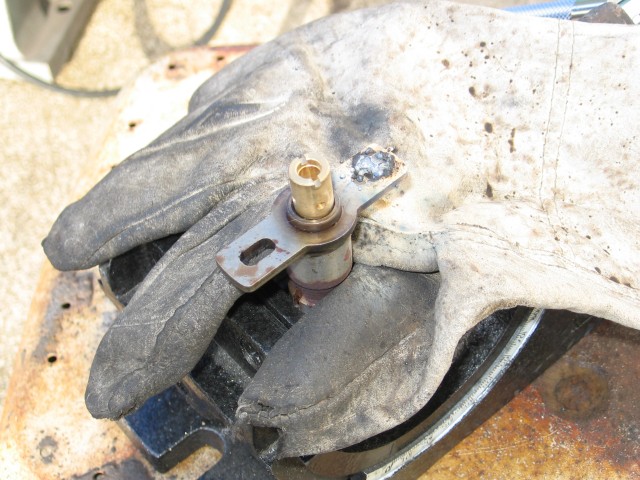
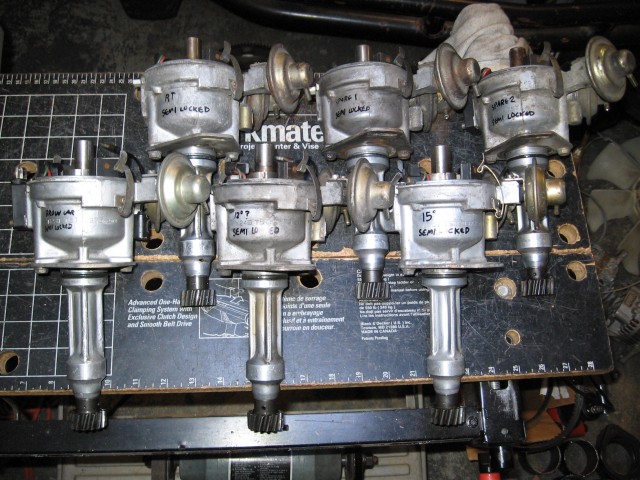
Getting there.
Reassembly in reverse order. Grease the moving parts and make sure the shaft advances properly, then springs back easily.
Here's that one I removed earlier, set up for welding.
Gotta do both sides to build up enough steel.
And you gotta grind it flat and remove any slag or "weld *****" as my welder likes to make, which stick to any exposed metal.
Sorry about the focus. Not much detal to see. The slot now needs some lovin' with a file.
01-15-15, 03:40 PM
#3
I did some math and determined what it would take to get to 15 degrees on this one. Why? Because just limiting myself to 10 degrees might be a little conservative. Especially when I add an intercooler. Or I might just plunk this one in the engine that's getting a Camden. Either way, I already have one that's at around 12 degrees while all the rest are at 10 degrees. Why not try 15? It took a little more effort (more time spent filing the slot to get it to the right length) but it should work out ok. The measurements make sense in any case.
And now for a previous owner's fully locked job. I took this out of a dizzy and just had to get a picture. Pretty funny. The dizzy now has the 15 degree shaft in it.

And there's six completed semi-locked dizzies for blow through turbo applications.
And now for a previous owner's fully locked job. I took this out of a dizzy and just had to get a picture.
Pretty funny. The dizzy now has the 15 degree shaft in it. And there's six completed semi-locked dizzies for blow through turbo applications.
01-15-15, 04:00 PM
#4
So then what about the math? Kind of important if you are debating whether to fully lock or semi lock. I know this info can be helpful. Heck I didn't even start from scratch. I got a semi-locked or rather "limited advance" dizzy in a pile of parts, which was the inspiration for this thread.
Measure one of the stock length slots. If it's a 115 shaft, I've seen 9.9mm to 9.8mm. Let's use 9.8 as seen in this thread.
Next we measure the advance weight's pin that slides in the slot. I saw 5.00mm.
Then we do some math.
9.8 - 5.0 = 4.8
That's just 4.8mm of total travel for a stock dizzy which translates to 20 degrees of eccentric shaft advance as seen with a timing light on the main drive pulley.
To get 10 degrees, you cut 4.8 in half to get 2.4mm.
7.4 - 5.0 = 2.4
So I would fill the slot with weld and file until it got to 7.4mm
2.4mm translates to 10 degrees of eccentric shaft advance as seen with a timing light on the main drive pulley.
By the way, feel free to double check my math, ok? I mean heck it's your dizzy and you probably only have one so you don't want to ruin it. Of course you can always weld more steel in and try again.
Now that we know the formula, I calculated 15 degrees would need a slot length exactly between stock and my 10 degree mod. So I arrived at 3.6mm. It's really basic math here. This meant the slot needed to be 8.6mm long.
8.6 - 5.0 = 3.6
So I filed on the slot until I got to 8.6mm.
And now that the dizzy is back together and I can rotate the upper shaft while holding the lower drive gear steady, it does move noticeably more than the 10 degree jobs but not quite as far as a stocker. So I think I did ok.
Anyone else going to attempt a semi locked dizzy? It really is the best choice. Easier starts, better idle quality, better driveability and it's no more or less reliable than a stock dizzy, assuming you did the mod correctly. And it needs a lube job after all these years anyway. Go for it!
Trending Topics
01-18-15, 11:10 AM
#8
Moderator
iTrader: (3)
Join Date: Mar 2001
Location: https://www2.mazda.com/en/100th/
Posts: 30,826
Received 2,594 Likes
on
1,842 Posts
Anyone else going to attempt a semi locked dizzy? It really is the best choice. Easier starts, better idle quality, better driveability and it's no more or less reliable than a stock dizzy, assuming you did the mod correctly. And it needs a lube job after all these years anyway. Go for it!
01-26-15, 07:44 PM
#9
talking head
i have been doing the regraph semi lock for years, recently put up a refreshed post to restore the pics here-
AusRotary.com ? View topic - how to lock a dizzy
PS
if you pull ( or push ) on the spring post you can alter the rate of mech advance V rpm
over here our late dizzy is marked with 155 , and relates to 31 degrees of total mech advance at the crank
the vac pots are also marked 17 T and 10 L [ double the numbers for crank degrees ]
while earlier s2 dizzy pots are usually 7.5 L and 12.5 T and have 14 ( 28 crank ) marked on the mech advance
and the book i have is for the initial rx7, and shows the advance as 12.5 mech ( 25 at crank ) and the leading is 7.5 ( 15 at crank ) and 15L ( 30 at crank )
01-27-15, 01:06 PM
#11
Moderator
iTrader: (3)
Join Date: Mar 2001
Location: https://www2.mazda.com/en/100th/
Posts: 30,826
Received 2,594 Likes
on
1,842 Posts
i have been doing the regraph semi lock for years, recently put up a refreshed post to restore the pics here-
AusRotary.com ? View topic - how to lock a dizzy
PS
if you pull ( or push ) on the spring post you can alter the rate of mech advance V rpm
over here our late dizzy is marked with 155 , and relates to 31 degrees of total mech advance at the crank
the vac pots are also marked 17 T and 10 L [ double the numbers for crank degrees ]
while earlier s2 dizzy pots are usually 7.5 L and 12.5 T and have 14 ( 28 crank ) marked on the mech advance
and the book i have is for the initial rx7, and shows the advance as 12.5 mech ( 25 at crank ) and the leading is 7.5 ( 15 at crank ) and 15L ( 30 at crank )
AusRotary.com ? View topic - how to lock a dizzy
PS
if you pull ( or push ) on the spring post you can alter the rate of mech advance V rpm
over here our late dizzy is marked with 155 , and relates to 31 degrees of total mech advance at the crank
the vac pots are also marked 17 T and 10 L [ double the numbers for crank degrees ]
while earlier s2 dizzy pots are usually 7.5 L and 12.5 T and have 14 ( 28 crank ) marked on the mech advance
and the book i have is for the initial rx7, and shows the advance as 12.5 mech ( 25 at crank ) and the leading is 7.5 ( 15 at crank ) and 15L ( 30 at crank )
the distributors are all stamped with a 4 digit part number, that tells you what it came in. the part number directly references the parts catalogs, so you can look them up in the parts catalog
the GSL-SE is an N304. the 12A's have an N2xx number, N201 is like an 81, and N249 is a late one. an 88xx or 89xx is probably a 79-80 part.
02-03-15, 08:31 AM
#13
Lolicon*** of RX-7 World
you the man Jeff thanks for posting helped clear up how I was gonna do the timing after rebuild and break-in.
I have devised such a cleaver turbo set up I must put it on paper
I have devised such a cleaver turbo set up I must put it on paper
02-21-15, 12:35 PM
#14
Moderator
iTrader: (3)
Join Date: Mar 2001
Location: https://www2.mazda.com/en/100th/
Posts: 30,826
Received 2,594 Likes
on
1,842 Posts
just to add, the parts catalog says
N225 is the 12A 6 port (others ball without!)
and N245 is the 12A turbo (others bo)
N225 is the 12A 6 port (others ball without!)
and N245 is the 12A turbo (others bo)
02-21-15, 01:02 PM
#15
Ah, I should have included the N225. I have one of those 6 port 12As and the part number was stamped on the waterpump too.
Ever notice the 83-85 rotors share the N225 part number? Yep, those rotors began life in the 6 port 12A. The front CW has a 45 degree bevel to clear the lump in the aux port casting on the front iron. It shoudl also be forwards compatible with GSL-SE and RE-SI front irons. Or an S4 NA if you're brave.
Ever notice the 83-85 rotors share the N225 part number? Yep, those rotors began life in the 6 port 12A. The front CW has a 45 degree bevel to clear the lump in the aux port casting on the front iron. It shoudl also be forwards compatible with GSL-SE and RE-SI front irons. Or an S4 NA if you're brave.
01-28-17, 06:41 PM
#16
Ah, I should have included the N225. I have one of those 6 port 12As and the part number was stamped on the waterpump too.
Ever notice the 83-85 rotors share the N225 part number? Yep, those rotors began life in the 6 port 12A. The front CW has a 45 degree bevel to clear the lump in the aux port casting on the front iron. It shoudl also be forwards compatible with GSL-SE and RE-SI front irons. Or an S4 NA if you're brave.
Ever notice the 83-85 rotors share the N225 part number? Yep, those rotors began life in the 6 port 12A. The front CW has a 45 degree bevel to clear the lump in the aux port casting on the front iron. It shoudl also be forwards compatible with GSL-SE and RE-SI front irons. Or an S4 NA if you're brave.
Last edited by project 88 gxl; 01-28-17 at 06:45 PM.
04-26-21, 04:15 PM
#17
New to the Club!

Join Date: Apr 2021
Location: Chicago
Posts: 1
Likes: 0
Received 0 Likes
on
0 Posts
need help
hello Jeff I have a 13B Street Port engine would like to know if using SMI lock ignition will work on the car and do you sell them or modify them =Jeff20B;11856408]During dissassembly. Loosen the screw at the top first, while it's still in the engine. Makes your life easier.
It's good to have a container for parts.
How I keep it protected in a vice. Cushioned jaws and a paper towel tube.
There's the 115 shaft. Upper screw is loosened beforehand but the grease will hold it in so I leave it there during the work. This shaft is ready to come out.
Welded shaft slot in the process of filing. You need to be careful here. Not too wide or too narrow, or too long. Looking for just 10 degrees on this one.
The above is just a comparison shot. Any 115 shaft can swap into any other dizzy with a 115 shaft. That would be all N201 and N231 part numbers or '81-'82 and '83 respectively. The later N249 ('84-'85) has a different shaft with a different number, and a slightly longer straight slot. Sorry, no pics.[/QUOTE]

Thread
Thread Starter
Forum
Replies
Last Post
Shainiac
Single Turbo RX-7's
12
07-17-19 02:20 PM
Jeff20B
1st Generation Specific (1979-1985)
73
09-16-18 07:16 PM