
S model project

Thread Starter
Joined: Aug 2001
Posts: 15,725
Likes: 91
From: Near Seattle
Turns out the shift return spring was not in correctly so I had to remove the steel cover plate, remove blah blah blah and study the pictures on Mazdatrixes website. I finally figured out how to install the spring on the powdered metal block thing and got it back on the shaft. The tranny is now finally ready to be installed. Yeesh.
And now for something more enjoyable. Looks like I have access to a HD disc in 225mm so I'll try it. RB light steel flywheel (early style) and a street strip 215mm pressure plate. Will I like the grabbiness of the HD disc?

I should probably talk about the engine. It is an Atkins rebuilt 4 port 13B with Y side plates, GSL-SE rotor housings, street port job of unknown size, S4 NA rotating assembly with 2mm apex seals, shimmed ROPR, serpentine pulley kit, S4 NA waterpump.

It's on the stand for some work to replace a faulty leaking front cover gasket. It shrank. Seems somebody knew that the gaskets were no good so in an attempt to keep it from shrinking or whatever, he dimpled the upper arc of the front cover mating surface. It still failed as the gasket broke up and oil would spew up and out, leaking all over the place. A word to the wise is to use genuine Mazda gaskets, but I digress.
Hmm, all this engine needs to make it SC compatible is an oil return fitting drilled and tapped into the front cover. Hmm...
And now for something more enjoyable. Looks like I have access to a HD disc in 225mm so I'll try it. RB light steel flywheel (early style) and a street strip 215mm pressure plate. Will I like the grabbiness of the HD disc?
I should probably talk about the engine. It is an Atkins rebuilt 4 port 13B with Y side plates, GSL-SE rotor housings, street port job of unknown size, S4 NA rotating assembly with 2mm apex seals, shimmed ROPR, serpentine pulley kit, S4 NA waterpump.
It's on the stand for some work to replace a faulty leaking front cover gasket. It shrank. Seems somebody knew that the gaskets were no good so in an attempt to keep it from shrinking or whatever, he dimpled the upper arc of the front cover mating surface. It still failed as the gasket broke up and oil would spew up and out, leaking all over the place. A word to the wise is to use genuine Mazda gaskets, but I digress.
Hmm, all this engine needs to make it SC compatible is an oil return fitting drilled and tapped into the front cover. Hmm...
Thread Starter
Joined: Aug 2001
Posts: 15,725
Likes: 91
From: Near Seattle
Not everything. The S model is, for now. It will teach me how to drive with some considerable power before the 20B goes in. I think with a goal of 300HP and 200 torque from an NA 20B, I won't need to boost it.


Thread Starter
Joined: Aug 2001
Posts: 15,725
Likes: 91
From: Near Seattle
Yes, it was used. You can tell by the blue paint. 
boyee, this has been an ongoing side project for me. It didn't really take much cash to get it up and running the first time as I had spares of pretty much everything it needed. What I didn't have, I borrowed. As for now, a similar situation has risen allowing me access to a ported 13B, a supercharger, the same RB dual pipe center section but this time a 13B header for it, and a GSL-SE gas tank that just need some derusting work. I'll install a high volume Carter fuel pump, front mount oil cooler and a borrowed short style 3 core radiator. The SC even came with a boost guage so I'll stick that somewhere visible.
I got the tranny in between rainstorms yesterday. I'll drop the engine in today if I can. Just gotta grind the edge away from one of the motor mounts to fit the RB 13B-into-12A-chassis front mount bar.
Last edited by Jeff20B; Apr 22, 2008 at 12:16 PM.
Thread Starter
Joined: Aug 2001
Posts: 15,725
Likes: 91
From: Near Seattle
I got it in and the RB exhaust system. Fits perfectly.
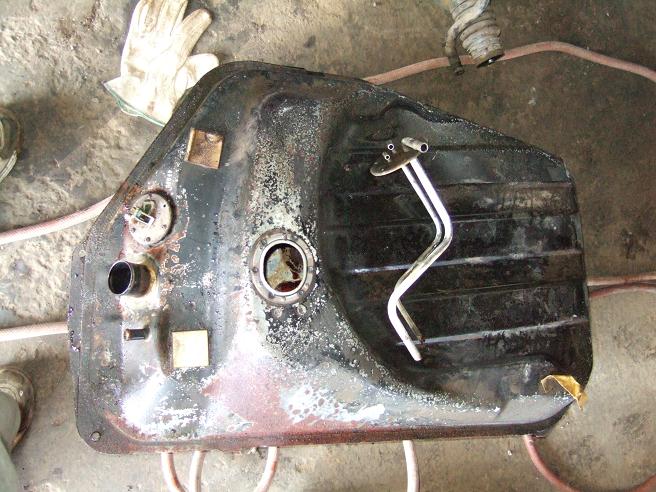
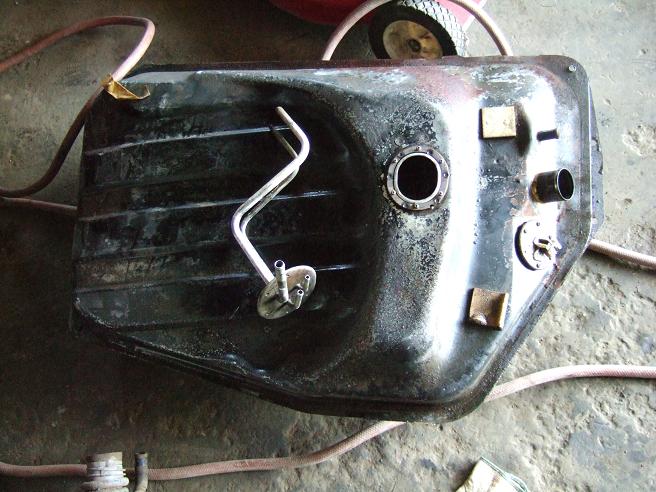
Looks like the tank is extremely rusted inside with half dollar sized chunks rattling around in there.
Looks like the tank is extremely rusted inside with half dollar sized chunks rattling around in there.
Thread Starter
Joined: Aug 2001
Posts: 15,725
Likes: 91
From: Near Seattle
I went to change the steering wheel and found out that the little plastic rivits are broken which allows the steering shaft to telescope down a bit. I know these cars have a collapsible steering shaft and I may have broken the plastic things when I removed the stock steering wheel.
I first tried pulling manually. No go. Then I got out the big harmonic balancer puller and hooked it around the plastic rim of the steering wheel hub. The column cover was already out of the way so I had plenty of room to work. As I tightened, the plastic started to deform so I had the bright idea to use a light weight sheet metal hammer. I figured it wouldn't collapse the shaft. I guess I was wrong, but I eventually got the wheel off. It was on there way tighter than it should have been. Plus it looks like the PO had to use a puller as well because there was a slightly smashed down section on the stud from what else but a puller. Hmm. At least my puller had a nice point which nestled perfectly in the divot on the stud.
The other wheel I wanted to use looks to only fit when the shaft is in its collapsed state. It apparently doesn't have the lip (extra length) that FB steering wheels must have in order to properly cancel turns signals and make contact with the horn spring loaded deally. If the shaft is down, this new wheel works fine.
Yeah, no thanks. Looks like I'll have to go back to the stock S model steering wheel, not that there's anything wrong it it, other than it's kinda big and is kinda in the way. I'll try the aftermarket wheel on the REPU next because it came out of one years ago and should fit correctly. I wonder why Mazda made this subtle change.
As for fixing the steering shaft, I'll install the plastic column covers and figure out where the steering wheel should be height-wise. Then measure 7.5" to 8" up from the floor, drill a 3/8 or 1/2" hole in the outer column sleeve and drill a smaller hole in the collapsible part of the steering shaft where both pieces slide over each other, then either use an aluminum rivit (if I can locate a rivit gun and at least one rivit) or a cotter pin if I have the space to install one and bend the end pieces over, or press in a roll pin if I can do it with no support on the back side (doubtful), or cut some small threads in it and install a small machine screw ranging from as large as a 10mm head bolt with 6mm x 1.0 thread (like a long oil pan bolt to give you an idea) and grind the head down to half height or as small as a J-109 ignitor screw if I have the right tap for it. All these ideas, aside from the ignitor screw, were found using the search button and some time reading.

I need a new user title
Joined: Oct 2005
Posts: 2,646
Likes: 1
From: Yaizu, Japan
Interesting that the aftermarket steering wheel didn't work. Mine, which also came off of an REPU as you know, worked perfectly once I swapped the connectors around for the horn button (I don't know whether they were correct for the REPU it used to be in since its horn didn't work).
Thread Starter
Joined: Aug 2001
Posts: 15,725
Likes: 91
From: Near Seattle
It fits perfectly in the REPU and the horn even works. While I was in there, I had a chance to fix the wiper switch too. A wire had fatigued off. Now to tighten the steering box...
While I was in there, I had a chance to fix the wiper switch too. A wire had fatigued off. Now to tighten the steering box...
Thread Starter
Joined: Aug 2001
Posts: 15,725
Likes: 91
From: Near Seattle
The steering wheel no longer telescopes!
I ended up drilling a 1/8" hole first and then drilled a 3/8" hole in the outer column after cutting some starter threads. I cut threads for a 4mm x .7 screw that came from an old air control and check valve (ACV). I used the steering wheel lock in th eingition switch to holed the wheel steady. It turns out I drilled through the corner of the shaft instead of the flat part. The screw head slightly rubs the edges of the 3/8" hole because they're a little gnarly and I can't really reach anything up inside to debur it. It very slightly rubs only when the screw had passes the drilled edge. It's otherwise smooth so I expect it will self-clearance in time.
Next on the list is a dead pedal. The S model didn't originally come with one.
Thread Starter
Joined: Aug 2001
Posts: 15,725
Likes: 91
From: Near Seattle
What's this? A new mirror?

Not really. Looks more like a gas tank to me. This GSL-SE tank came from rxforspeed.
I can't say enough good things about this guy!
Broken screw.
No big deal.

'cause I've got thee know how

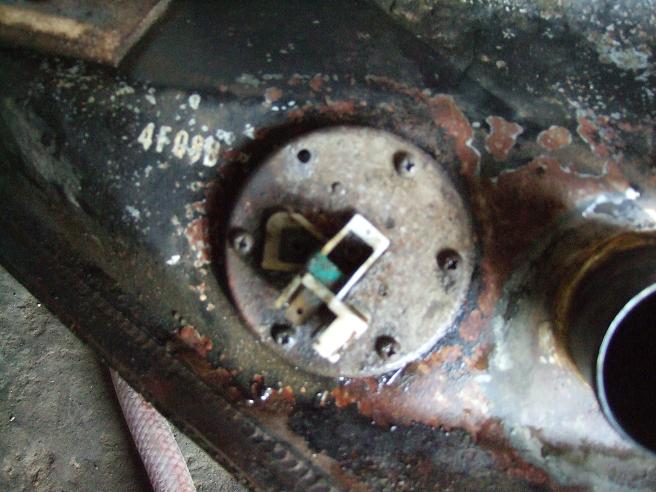
I took the screen off the rusty one and cleaned it using compressed air. Cleaned up really well. It's installed on the other pickup tube.

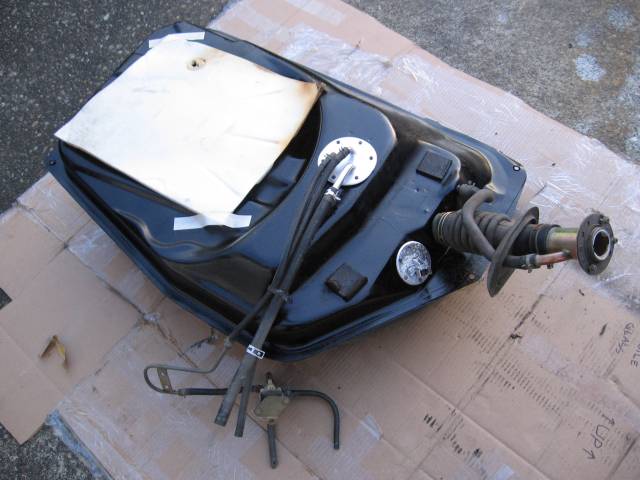
And now it can go in the car.
Not really. Looks more like a gas tank to me. This GSL-SE tank came from rxforspeed.
I can't say enough good things about this guy!
Broken screw.
No big deal.
'cause I've got thee know how
I took the screen off the rusty one and cleaned it using compressed air. Cleaned up really well. It's installed on the other pickup tube.
And now it can go in the car.
Thread Starter
Joined: Aug 2001
Posts: 15,725
Likes: 91
From: Near Seattle
John, do you have a -8 pulley? What flywheel?
Mine has a -7 pulley and it takes too long to boost. It needs a -8. Also the light steel flywheel (13 pounds) feels sorta heavy. I'd prefer aluminum (8 pounds) or equivilant (8 pound super light steel) with an SC in a 1st gen. 215mm SS pressure plates seem to have enough grip.
The exhaust leaks are coming from the old gaskets I used on the center section. I've got new ones so I'll throw them in when I get a chance. The Edelbrock leaks fuel which I think it because the Holley pressure reg is a pile of crap, or maybe I just need to open it up and debur it. 6psi regardless of where it's set? Lame.
I took it for a test drive with hyper4mance2k and he thinks it has some decent power. This is a guy who drives a 48 IDA so thanks for the compliment! I, however, would like more power; like tire twisting torque at any RPM.
My friend's 5" setup comes close. It has break-'em-loose-in-gear ability with a -10 pulley and aluminum flywheel, but his also runs out of breath at 6k or so where mine will pull up to at least 7k with less heat... and, of course, less chance to detonate. Mine doesn't really need high octane gas, but it's got 9.4 rotors so maybe I should switch to it.
I want to swap to a -8 pulley and drop this SC into the REPU with a non ported 13B for better torque and towing ability. Its 9.2 rotors probably will allow me to get low octane gas, too. The 9.4 engine can stay in the S model with an NA Edelbrock or a jetted Hitachi with a throttle bracket to allow the stock FB throttle and choke cables to work. It depends on which ever runs better. This will tide me over until the 20B gets rebuilt. Yep, I've had a taste and now I'm power hungry.
I have a -7 and a stock flywheel.
I was able to spin the tires in 1st and 2nd and realy chirp 3rd until I went and played with the carb settings now its breaking up in the upper rpms.
I was able to spin the tires in 1st and 2nd and realy chirp 3rd until I went and played with the carb settings now its breaking up in the upper rpms.
Thread Starter
Joined: Aug 2001
Posts: 15,725
Likes: 91
From: Near Seattle
A -7 is probably fine for you since you have a bridgeport (more power potential at higher RPMs where the bridge comes alive). The -7 is ok on my current engine because it's streetported, but I could get away with a -8 if I wanted to. I know for sure that a -8 would be correct on a stock port.
on my -7 I am not making as much boost as Gary gets on his 13b i pretty much peak out a 9 psi and I am pretty sure gary gets up to 13 I was thiking a -8 might be in my future as well at least just to try it out. Now that I have the S/C rebuilt I want to try the -10 on there again even just for one fun run. But I have to woit until the carb is better
It's on the stand for some work to replace a faulty leaking front cover gasket. It shrank. Seems somebody knew that the gaskets were no good so in an attempt to keep it from shrinking or whatever, he dimpled the upper arc of the front cover mating surface. It still failed as the gasket broke up and oil would spew up and out, leaking all over the place. A word to the wise is to use genuine Mazda gaskets, but I digress.
Hmm, all this engine needs to make it SC compatible is an oil return fitting drilled and tapped into the front cover. Hmm...
Hmm, all this engine needs to make it SC compatible is an oil return fitting drilled and tapped into the front cover. Hmm...