Rusty's Rusty Water Pump stuck


Thread Starter
Rotary Enthusiast
Joined: Dec 2007
Posts: 1,079
Likes: 0
From: Texas
Rusty's Rusty Water Pump stuck
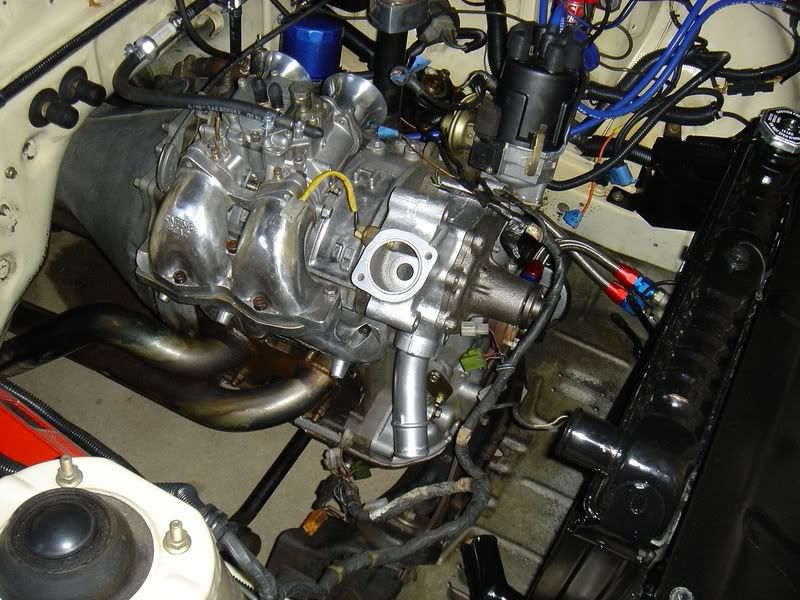
Halp the waterpump is stuck. I tried to pry it off and hammered it a bit with big *** screwdriver. But I want to be gentle as not to break something like the omp lines. Tips on how to get this rusted biotch off?

spray some wd-40 into the bolt holes then hit it witha rubber mallett like it owes you money. hit the snout of the water pump, under the pulley. it's away from the omp lines enough that if you're a good shot you wont break your already brittle and in need o replacement OMP lines. it'll submit.
hey vashner your just going to have to remove the omp and make some more room...tap or hammer the back of the water pump with a rubber mallet and go to town on it...Even my none rusty waterpumps that use silicone are a bitch to take off from time to time...And being that that the studs are rusty as well does not help the whole process so it makes everything just a little harder
Everyone is wrong. You have to remove the main drive pulley. Four 10mm bolts. Then, if you want to, pull off the MOP lines from the MOP itself or unhook them from the carb, pry open the sheet metal clip and rotate them down out of the way. The waterpump will slide right off the four studs.
Trending Topics
The pulley or the hub? I've found it's necessary to remove the pulley. Plus this guy's setup appears to have an accessory pulley. His pulley must come off if he is to make any progress. 
advanced novice
Joined: Aug 2006
Posts: 1,073
Likes: 1
From: clarksville tn
you sure you didn't miss the bolt right under the pulley below the weep hole its hard to see and even harder to get to. and what part of the pump are you prying on your not trying to take the whole unit out are you. just take off the front part. leave the housing attached otherwise you will have to take the studs out if you want to leave the main drive pulley on. just my 2 cents though I've only had to mess with this thing 4 times in the past 2 weeks
advanced novice
Joined: Aug 2006
Posts: 1,073
Likes: 1
From: clarksville tn
if he has the same accessory pulley i have he wont be able to just take the 4 bolts off of it the accessory portion will be attached to the big bolt in the e-shaft. and the involves oil coming out of the engine if you do that
Thread Starter
Rotary Enthusiast
Joined: Dec 2007
Posts: 1,079
Likes: 0
From: Texas
Yes I got that lower nut with an open wrench.
So I should drain the oil first? The AC pulley is for the Sanden SD508 based system. Which I don't plan on hooking back up anytime soon.
Well i'll just put the clutch in just to be sure i'll chop a tree branch or something.
.
So I should drain the oil first? The AC pulley is for the Sanden SD508 based system. Which I don't plan on hooking back up anytime soon.
Well i'll just put the clutch in just to be sure i'll chop a tree branch or something.
.
Rotary Freak
Joined: Sep 2002
Posts: 2,815
Likes: 0
From: SF BayArea
If the aluminum pump housing is corroded onto the steel mounting bolts and studs, you can try "Liquid wrench" which has a mild acid solution. That may help, if it sits for awhile.
For this kind of hammering and bashing I like to use a bronze mallet because it has a nice soft-blow hammer effect. Or you can even use a real soft-blow hammer which has loose leadshot inside the head to provide good follow-thru on the blow.
But usually the prognosis is not good with steel-aluminum corrosion.
Use anti-seize when re-assembling things. You can get a lifetime supply for about $4.
Everyone is wrong. You have to remove the main drive pulley. Four 10mm bolts. Then, if you want to, pull off the MOP lines from the MOP itself or unhook them from the carb, pry open the sheet metal clip and rotate them down out of the way. The waterpump will slide right off the four studs.
 i didn't even see he still had the main drive pulley on...**** my bad
**** man my bad i didn't see the larger main pulley was still there...
Thread Starter
Rotary Enthusiast
Joined: Dec 2007
Posts: 1,079
Likes: 0
From: Texas
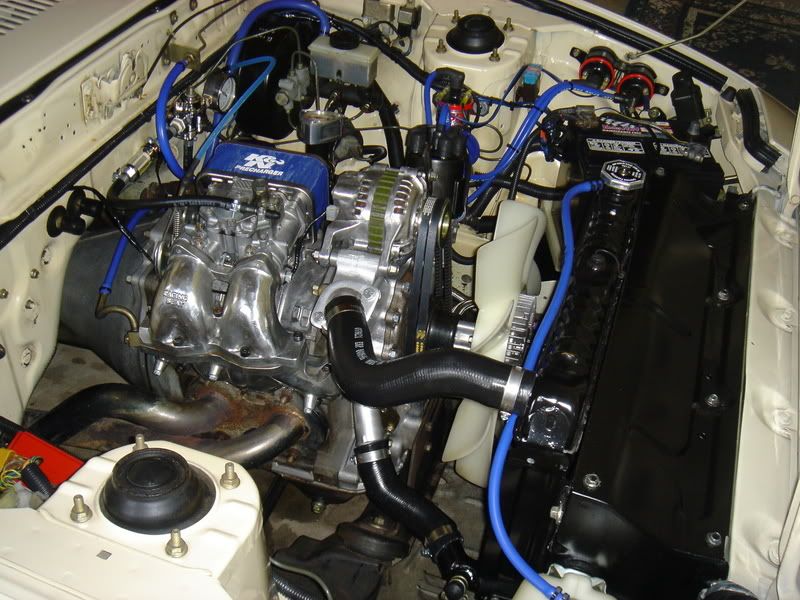
It's cool I have not started (past the pic) yet. Taking my time since it's not my main ride just a restoration project. Thx for the excellent advice will post a pic when it's done.
Thread Starter
Rotary Enthusiast
Joined: Dec 2007
Posts: 1,079
Likes: 0
From: Texas
Got the new pump on but...
Ah "Beep".... One of the thermostat housing bolts broke off!!!
...

So I guess I need to get a salvage housing? .. f.... k..
Sigh.. I wonder if there is a way to just use one bolt and put something like a clamp on and or something like JB Weld. I just wanted to put a new thermostat
in since I had everything apart. If I can put a new one in and just rig up something. Opinions requested. I don't think I can ez tap that bolt out. It broke with maybe 30-50lbs torque.

Ah "Beep".... One of the thermostat housing bolts broke off!!!
...
So I guess I need to get a salvage housing? .. f.... k..
Sigh.. I wonder if there is a way to just use one bolt and put something like a clamp on and or something like JB Weld. I just wanted to put a new thermostat
in since I had everything apart. If I can put a new one in and just rig up something. Opinions requested. I don't think I can ez tap that bolt out. It broke with maybe 30-50lbs torque.
Last edited by Vashner; Feb 27, 2008 at 02:11 PM.
Rotary Freak
Joined: Sep 2002
Posts: 2,815
Likes: 0
From: SF BayArea
That's normal.
You need the 8mm "Heli-coil" kit for drilling out the bolt remnant and screwing in a heli-coil, which will screw into the new enlarges threads and provide new threads for the bolt (which you can get in a blister pack at the autostore and even some hardware stores). Around here it's $50, but will do many such breakages. I just did one last month.
Too bad you're not closer or I could come over and do it in a trice.
This bolt breaks on almost any car that I know of. It serves to remind you to use anti-seize on every bolt or nut you screw into your car! Only $4 for a lifetime supply! Available in handy packets at the autostore checkout counter for a buck!
But first, just for the hell of it, try drilling a straight hole down through the bolt remnant and try removing it with a right-size EZout from the autostore or Ace hardware or truValue or even HD. Maybe it'll work for you, and it's only about $3.
Thread Starter
Rotary Enthusiast
Joined: Dec 2007
Posts: 1,079
Likes: 0
From: Texas
How much hassle is it to remove the WP houseing? I can get one salvage for $50 bucks.
I'll try the ez out tomorrow before ordering the part. I can hit it with some more PB blaster now
that the thermostat house is out of the way.
Yea this looks like the factory thermostat so the bolts been in there since 84. lol.. damn Rust never sleeps.
I'll try the ez out tomorrow before ordering the part. I can hit it with some more PB blaster now
that the thermostat house is out of the way.
Yea this looks like the factory thermostat so the bolts been in there since 84. lol.. damn Rust never sleeps.
Last edited by Vashner; Feb 27, 2008 at 02:57 PM.
Brap, Brap, Ole!
Joined: Apr 2005
Posts: 1,461
Likes: 0
From: kalamazoo, mi
It is VERY easy to remove the whole assembly, just remove the rest of the bolts that are still on the assembly and remove them. Dont forget to keep an eye out for the paper thin washer that is in between the water pump housing an the block. If you loose it, it will leak. Might as well have the water pump assembly bead blasted when its out and then paint it so it resists rust a lil better next time. That is what i did.