
rubber fuel line replacement time


Thread Starter
Senior Member
Joined: Dec 2004
Posts: 506
Likes: 2
From: alabamer
rubber fuel line replacement time
I Searched 10 pages and went back 6 years but I couldn't find:
1..how hard is it to replace the rubber fuel lines above the gas tank?
2..are said lines in as bad of shape as the engine bay ones??... Maybe they don't since they aren't subjected to high temperatures?
3.. is ID 5/16 or 3/8 or 1/4 inch???
I have an 1983 FB with a rebuilt engine that runs fine. I don't want a car fire.


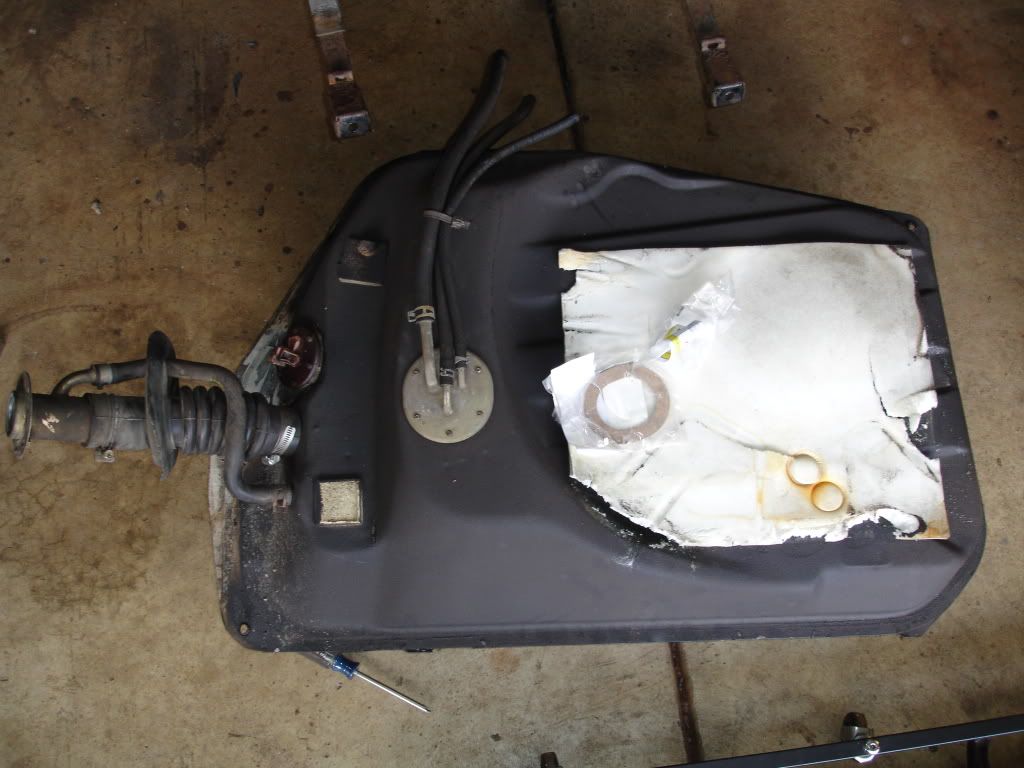
the lines are best accessed with the tank removed as they must be removed form the pickup assembly as well as the hard lines under the car. i have a writeup on removing the tank. it includes pics and if you're interested i'll post it up here.
here's teh writeup i did awhile back. only difference if that your 7 may not have the drain plug in the tank:
here's some info and my writeup on dropping the tank should you need to do that. others may do it differently, but this is what i've found works. dropping the tank is no big feat. just make sure you drain all of the gas first. it makes a big difference when removing and reinstalling the tank. pop open the filler door and remove the three 8mm bolts holding the filler neck on. push the filler neck through the opening. it may be a little tough at first but the seal will unstick and it will push through.
next, get under the car and remove the three lines ahead of the fuel tank. eaiser to do this now rather than when the tank is coming down. then you'll want to remove the small plastic splash guard in the left wheel well. this will give you access to the sending unit. unplug it. chances are the connector will fight you a bit coming off and will be stiff. be patient with it.
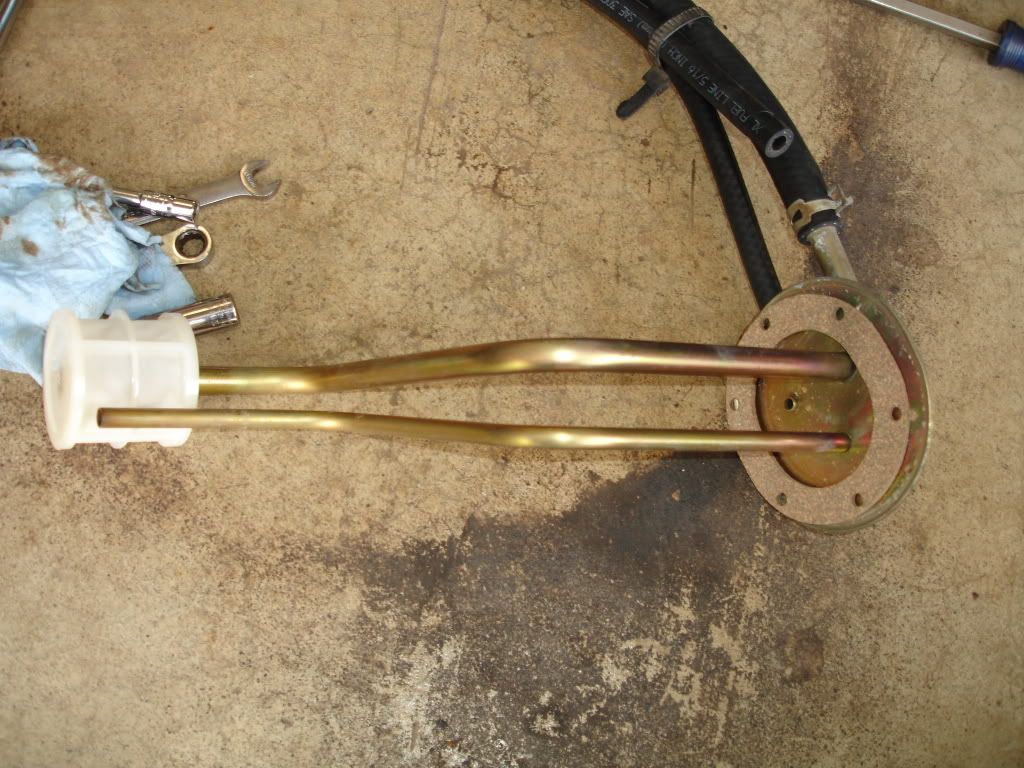
you will then want to remove the two 14mm bolts holding the tank up, move the straps down, and work the tank down. get the tank on the ground and remove the pickup lines and the fuel level sender. you may find the screws for the fuel level sender very rusty and difficult to remove..of course you are in NC so i doubt that thats the case... you can now look in the tank and make a determination of where you want to go from there. when the tank is clean you will want to replace the gasket for the fuel level sender and the gasket for the pickup lines. you may also want to replace the pickup screen that attatches to the pickup lines. this can be clogged or ripped or otherwise in poor condition. the part numbers for replacement parts from mazda are as follows:
pickup/return line gasket: FA54-42-182
fuel level sender gasket: 8871-60-962A
pickp screen: GA97-42-113
fuel tank pad: 8871-42-761
fuel level sender(if yours is bad. new sender comes with gasket): FA54-60-960
i have recently purchased most of these parts for my project and the prices are pretty reasonable from the dealer.
pics to follow with explanations.
here's some info and my writeup on dropping the tank should you need to do that. others may do it differently, but this is what i've found works. dropping the tank is no big feat. just make sure you drain all of the gas first. it makes a big difference when removing and reinstalling the tank. pop open the filler door and remove the three 8mm bolts holding the filler neck on. push the filler neck through the opening. it may be a little tough at first but the seal will unstick and it will push through.
next, get under the car and remove the three lines ahead of the fuel tank. eaiser to do this now rather than when the tank is coming down. then you'll want to remove the small plastic splash guard in the left wheel well. this will give you access to the sending unit. unplug it. chances are the connector will fight you a bit coming off and will be stiff. be patient with it.
you will then want to remove the two 14mm bolts holding the tank up, move the straps down, and work the tank down. get the tank on the ground and remove the pickup lines and the fuel level sender. you may find the screws for the fuel level sender very rusty and difficult to remove..of course you are in NC so i doubt that thats the case... you can now look in the tank and make a determination of where you want to go from there. when the tank is clean you will want to replace the gasket for the fuel level sender and the gasket for the pickup lines. you may also want to replace the pickup screen that attatches to the pickup lines. this can be clogged or ripped or otherwise in poor condition. the part numbers for replacement parts from mazda are as follows:
pickup/return line gasket: FA54-42-182
fuel level sender gasket: 8871-60-962A
pickp screen: GA97-42-113
fuel tank pad: 8871-42-761
fuel level sender(if yours is bad. new sender comes with gasket): FA54-60-960
i have recently purchased most of these parts for my project and the prices are pretty reasonable from the dealer.
pics to follow with explanations.
Last edited by mazdaverx713b; May 23, 2010 at 05:12 AM.
here are the instructions with pics for the tank removal:
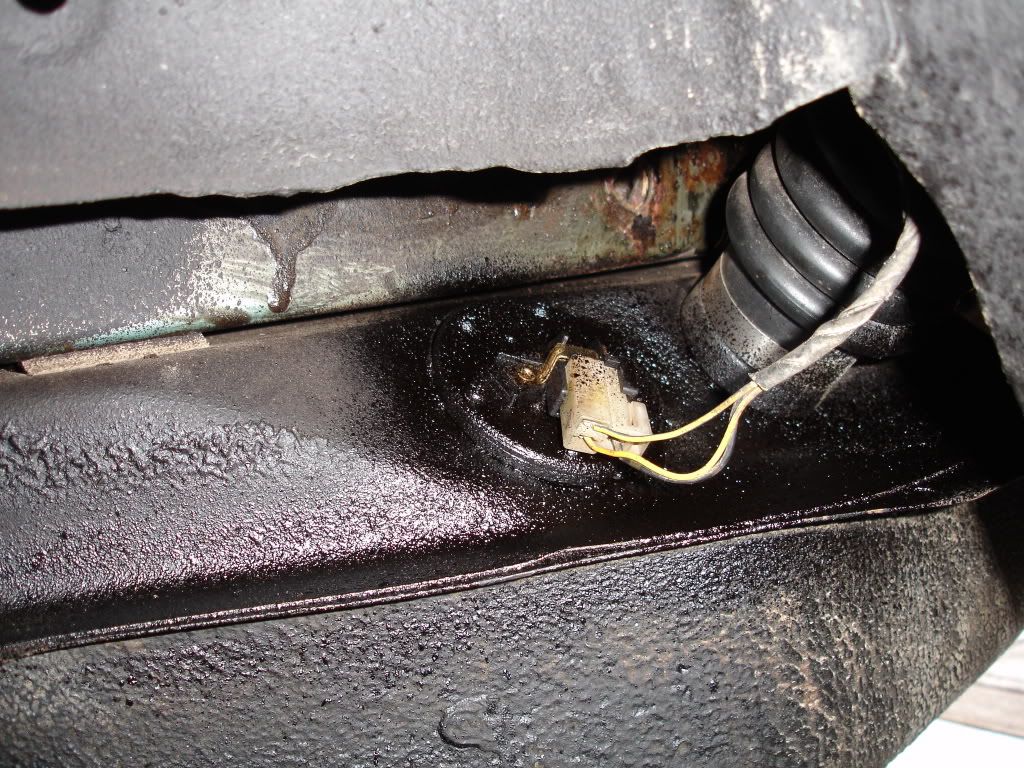
first, jack the car up, put it on stands, remove the left rear wheel, remove the plastic splash shield in the left wheel well. it is held on by two 10mm bolts and a 10mm nut. this will expose the fuel level sender which needs to be unplugged at this step:
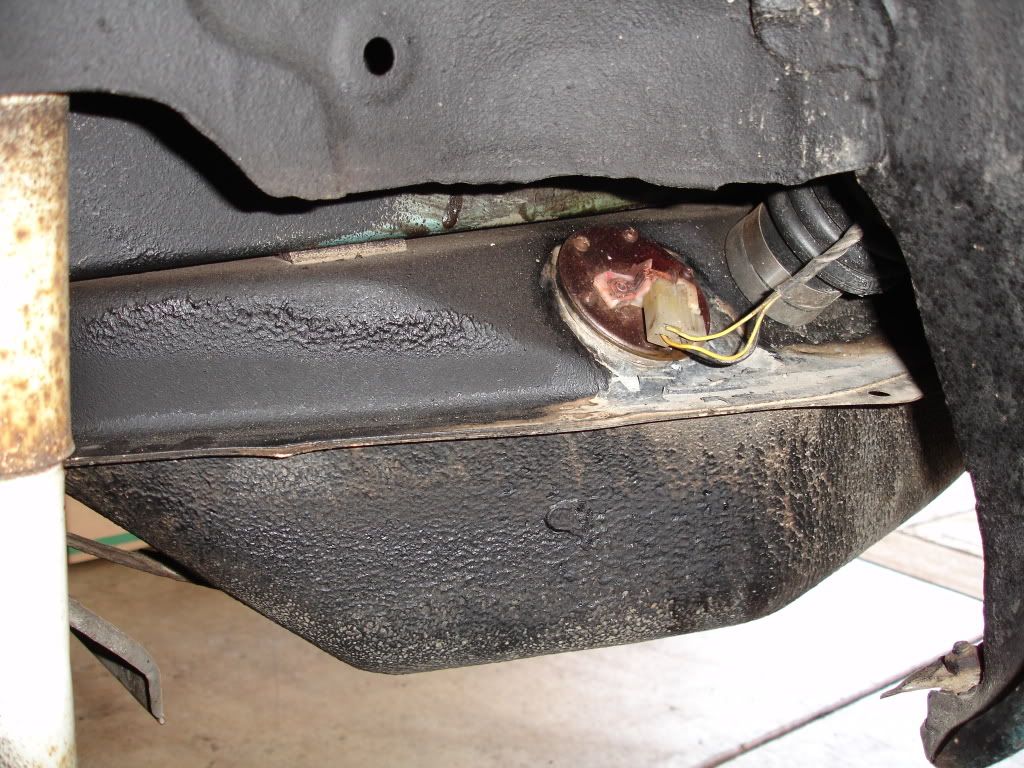
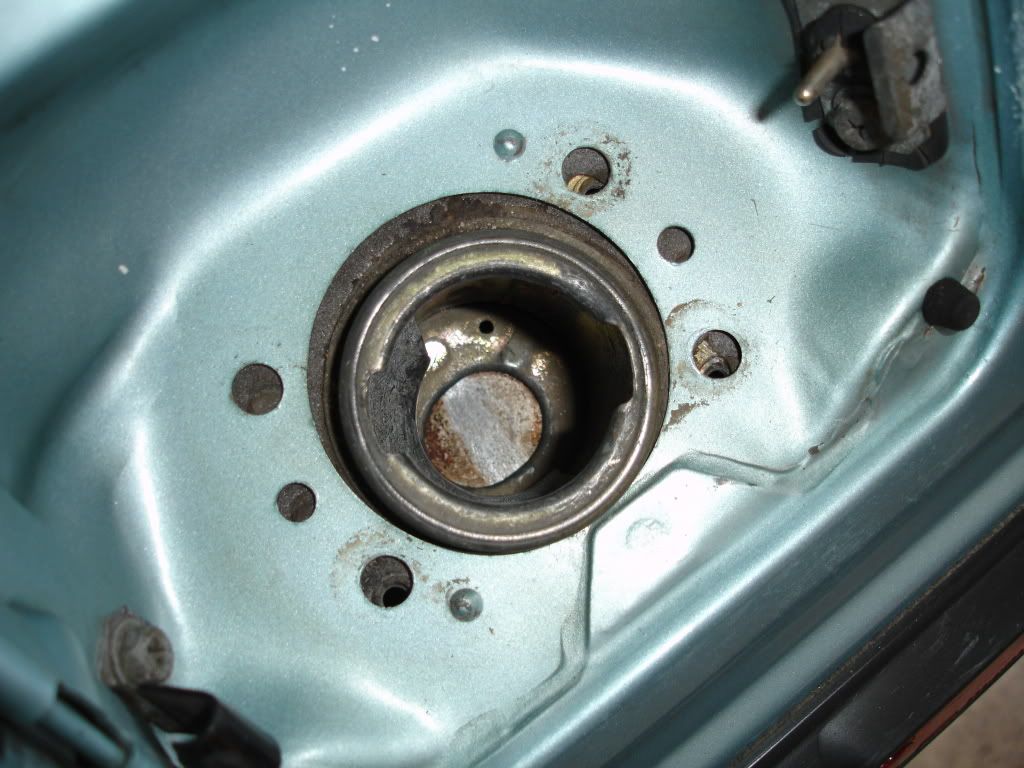
next, open the filler door, remove the gas cap and the three 8mm bolts, lift off the plate and push the neck down until it breaks away from the body:
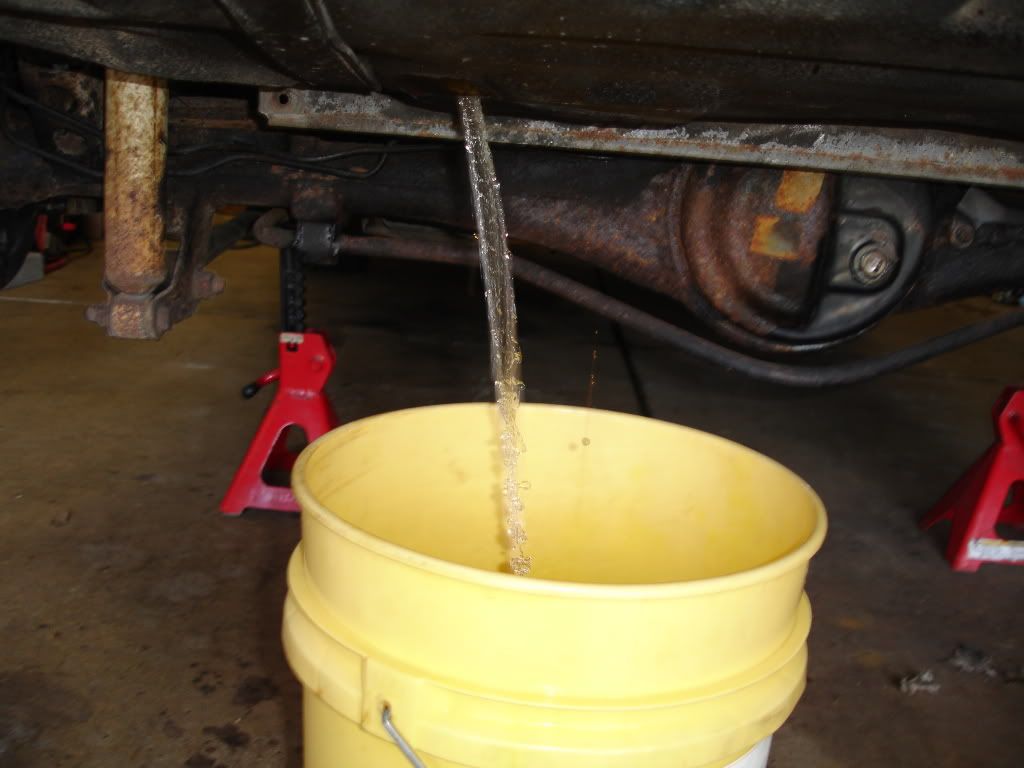
now is a good time to drain the gas. place a suitable bucket under the drain plug and remove the drain plug. a clean 5 gallon bucket works great and you can empty the bucket into a 5 gallon gas can or cans:
after the tank is drained, reinstall the drain plug and remove the clamps from the feed, return, and vent lines and slide the hoses off:

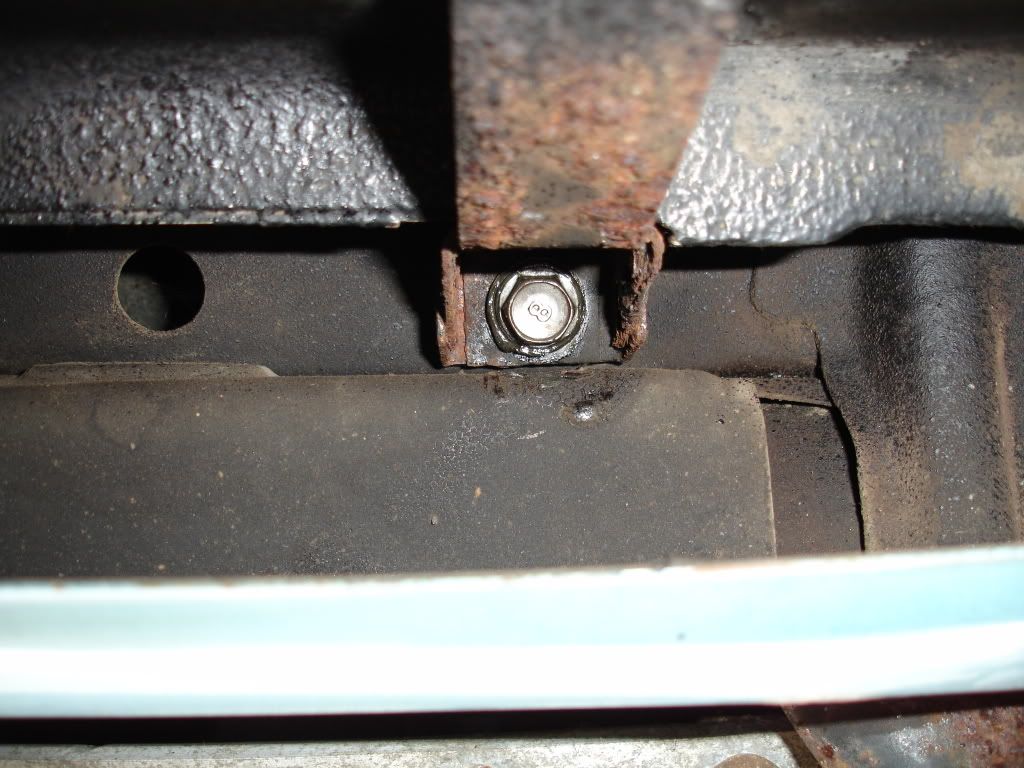
once thats done, remove the 14mm bolt from from each tank strap, they'll be in the front of the straps towards the rear bumper and you'll want to swing the straps down:
when the tank starts coming down, wiggle the filler neck out of its opening. once you do this, the tank will finish coming down(all the while you are supporting the tank with your leg or suitable support i hope)

and the tank will be down and ready for service:
once you are satisfied with the tank, install is the reverse of removal. wiggling the filler neck into its opening while installing the tank at an angle is the toughest part. once everything is set in place, you'll bolt the straps up, install the lines, install the filler hose and cap, connect the sender connector, install the splash shield, install the tire, lower the car down, fill the tank with gas, start, and check for leaks.
here is the new pickup gasket and fuel level sender with screws installed
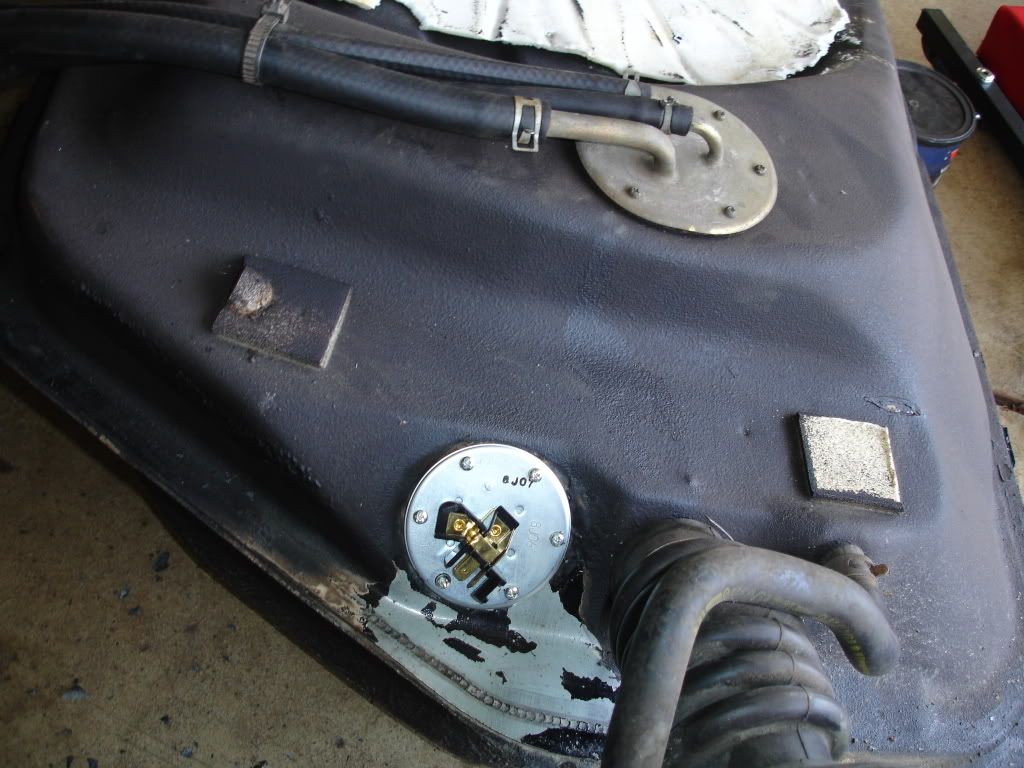
reinstall the tank and add a coat of undercoating to preserve the sender and protect it and the screws from rust. you may also want to clean and undercoat the entire top of the tank while it out to preserve it:
first, jack the car up, put it on stands, remove the left rear wheel, remove the plastic splash shield in the left wheel well. it is held on by two 10mm bolts and a 10mm nut. this will expose the fuel level sender which needs to be unplugged at this step:
next, open the filler door, remove the gas cap and the three 8mm bolts, lift off the plate and push the neck down until it breaks away from the body:
now is a good time to drain the gas. place a suitable bucket under the drain plug and remove the drain plug. a clean 5 gallon bucket works great and you can empty the bucket into a 5 gallon gas can or cans:
after the tank is drained, reinstall the drain plug and remove the clamps from the feed, return, and vent lines and slide the hoses off:
once thats done, remove the 14mm bolt from from each tank strap, they'll be in the front of the straps towards the rear bumper and you'll want to swing the straps down:
when the tank starts coming down, wiggle the filler neck out of its opening. once you do this, the tank will finish coming down(all the while you are supporting the tank with your leg or suitable support i hope)
and the tank will be down and ready for service:
once you are satisfied with the tank, install is the reverse of removal. wiggling the filler neck into its opening while installing the tank at an angle is the toughest part. once everything is set in place, you'll bolt the straps up, install the lines, install the filler hose and cap, connect the sender connector, install the splash shield, install the tire, lower the car down, fill the tank with gas, start, and check for leaks.
here is the new pickup gasket and fuel level sender with screws installed
reinstall the tank and add a coat of undercoating to preserve the sender and protect it and the screws from rust. you may also want to clean and undercoat the entire top of the tank while it out to preserve it:


Trending Topics
Thread Starter
Senior Member
Joined: Dec 2004
Posts: 506
Likes: 2
From: alabamer
good write up mazdaverx713b !!!
my rx-7 is my daily beater, so I need to get everything I need before starting. So:
!>the tubes all look like they are 1/4 in ID, but what about the one coming off the top of the fuel tank? About how much should I buy?
2>about how long did this take you? I'm going to double it for my planning.
3> looks like under coating, and rust etching primer will come in handy.

Joined: Mar 2001
Posts: 31,857
Likes: 3,243
From: https://www2.mazda.com/en/100th/
good write up mazdaverx713b !!!
my rx-7 is my daily beater, so I need to get everything I need before starting. So:
!>the tubes all look like they are 1/4 in ID, but what about the one coming off the top of the fuel tank? About how much should I buy?
2>about how long did this take you? I'm going to double it for my planning.
3> looks like under coating, and rust etching primer will come in handy.
my rx-7 is my daily beater, so I need to get everything I need before starting. So:
!>the tubes all look like they are 1/4 in ID, but what about the one coming off the top of the fuel tank? About how much should I buy?
2>about how long did this take you? I'm going to double it for my planning.
3> looks like under coating, and rust etching primer will come in handy.
mazda fuel line is the best quality ive ever seen, but they dont sell it in bulk and it ends up being like $100/foot
Joined: Mar 2001
Posts: 31,857
Likes: 3,243
From: https://www2.mazda.com/en/100th/
. the part numbers for replacement parts from mazda are as follows:
pickup/return line gasket: FA54-42-182
fuel level sender gasket: 8871-60-962A
pickp screen: GA97-42-113
fuel tank pad: 8871-42-761
fuel level sender(if yours is bad. new sender comes with gasket): FA54-60-960
i have recently purchased most of these parts for my project and the prices are pretty reasonable from the dealer.
pics to follow with explanations.
I replaced 2/3 of the lines to the tank without dropping it, just by feeling around and twisting the hose off gently. If you do it that way, be sure to do them one at a time to not mix them up.
Joined: Mar 2001
Posts: 31,857
Likes: 3,243
From: https://www2.mazda.com/en/100th/
$100/foot sounds like some super duper fuel injection line or braided AN line. The OP has an '83 and can do fine with regular fuel hose.
I replaced 2/3 of the lines to the tank without dropping it, just by feeling around and twisting the hose off gently. If you do it that way, be sure to do them one at a time to not mix them up.
I replaced 2/3 of the lines to the tank without dropping it, just by feeling around and twisting the hose off gently. If you do it that way, be sure to do them one at a time to not mix them up.
Thread Starter
Senior Member
Joined: Dec 2004
Posts: 506
Likes: 2
From: alabamer
Removed the tank and did the hoses!! The gas tank was heavy rusted (flaking) on the right side. The three lines coming off the top of the tank were all hard welded in it.
Apt manager , maintenance man, and neighbors were all bitching. So I only had time to brush on the Por-15 etching primer.
I think the tank is from a car that was in a terrible fiery wreck, and half the gas tank's paint was burned off.
Wish people would mind their own damn business.
Apt manager , maintenance man, and neighbors were all bitching. So I only had time to brush on the Por-15 etching primer.
I think the tank is from a car that was in a terrible fiery wreck, and half the gas tank's paint was burned off.
Wish people would mind their own damn business.
i know what you mean. when i was in my early 20's i was working on my 7 in my apt. parking lot. ticked a lot of people off.. so, i bought a house and now i have no problems. its pretty normal to have paint flaking on the tanks. if it were in a fire, the tank may be in a bit worse shape than it is now.
Thread Starter
Senior Member
Joined: Dec 2004
Posts: 506
Likes: 2
From: alabamer
One last thing, my gas tank it turns out holds 18 gallons. All this time when it showed empty there was really 4 1/2 gallons left.
And when empty, the gas tank weighs maybe 10 or 20 pounds. It is surprisingly light. I emptied the gas tank by removing the gasoline hose supplying the carburetor and running the fuel pump by turning on the ignition but not starting the engine.
three feet of 1/4 inch fuel line and 2 feet of 5/16 inch fuel line was plenty for this project.
the tank should only hold 16.6 gallons...strange. i know (from epic failing) that when the needle in my 7's shows empty...its empty. when i get to the last line on the gauge..the E line, i have one gallon left.
j9fd3s is very correct. Mazda hose is extremely high quality. I reused some GSL-SE hose from tank to pump wherever possible. No signs of deterioration.
The best aftermarket replacement you could find for cheap would be neoprene fuel injection hose from your local auto parts store. It doesn't seem to harden and crack like the cheap stuff from the same stores.
The best aftermarket replacement you could find for cheap would be neoprene fuel injection hose from your local auto parts store. It doesn't seem to harden and crack like the cheap stuff from the same stores.
Joined: Mar 2001
Posts: 31,857
Likes: 3,243
From: https://www2.mazda.com/en/100th/
after i bent the rod (more luck than skill) the gauge was EXACT, each quarter was 4 gallons, when it was on E it MEANT IT
Thread Starter
Senior Member
Joined: Dec 2004
Posts: 506
Likes: 2
From: alabamer
after putting 2 1/2 gallons back in the tank, the fuel gauge showed beyond empty. So much so I wonderred if I connected the sender right.
Then I drove to the gas station and filled it up using 16.6 gallons
Then I drove to the gas station and filled it up using 16.6 gallons

Thread
Thread Starter
Forum
Replies
Last Post
trickster
2nd Generation Specific (1986-1992)
25
Jul 1, 2023 04:40 PM
alphawolff
1st Generation Specific (1979-1985)
17
Nov 17, 2015 05:57 PM