
Quick Help Needed - Front Cover Removal / 12A


Thread Starter
OldSchool
Joined: Jan 2007
Posts: 80
Likes: 0
From: Hotlanta
Quick Help Needed - Front Cover Removal / 12A
As some of you are aware I'm in the process of replacing the freeze plugs on the engine. The rear is complete. Doc's write up on using long bolts with the heads shaved off to install the tranny works wonders. What used to be 30mins of wrestling with the angle is now 2mins of positioning.
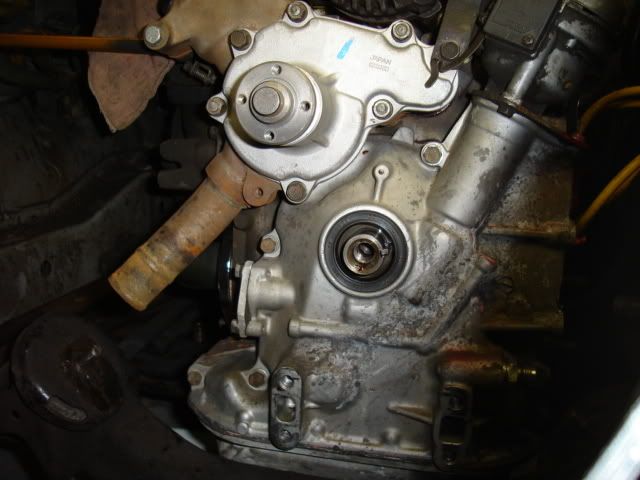
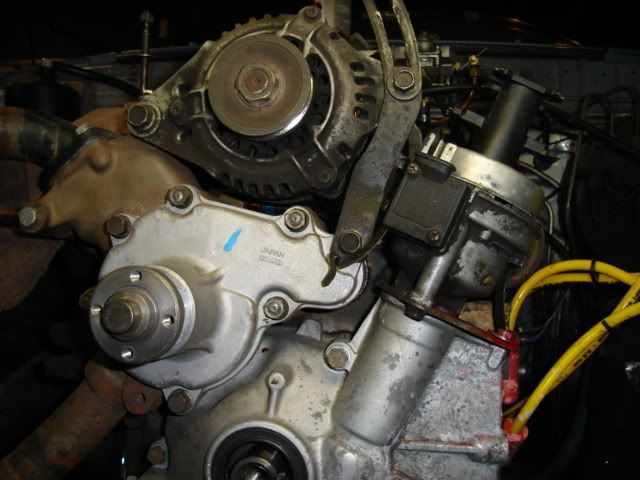
Anyway - my two questions are this. 1. Does the water pump need to be removed? It appears there may be enough clearance in the front cover to leave the water pump intact since there is a crease in the upper cover. Its close but seems manageable.
Question 2. I dont have a 2cycle timing light and would prefer not loosing the timing settings. Can the cover be removed without removing the distributor? If the answer is no, is there a preferred method to indexing the distributor so as not to lose the setting when its reinstalled? Possibly removing only the upwards facing bolt on the distributor plate.
If I can get everything finished by Thurs, I'll be racing at Rockingham this weekend.
Thanks in advance.
Because the dist is driven off the oil pump gears I do not know if it will allow the cover to move forward with the dist gear still meshed. You do not need a "2 Cycle timing light" to set the timing on a rotary. Todays standard inductive lights work just fine. Also if you just scribe the nut that retains the dist it will be dead on if it was right in the beginning.
I think you were referencing the 2 cycle thing to when you set points on the rotaries and used a dwell meter that had to have the 2 cycle/4 cycle function.
As far as the water pump removal, your guess is as good as mine if it will clear or not.
I think you were referencing the 2 cycle thing to when you set points on the rotaries and used a dwell meter that had to have the 2 cycle/4 cycle function.
As far as the water pump removal, your guess is as good as mine if it will clear or not.
Thread Starter
OldSchool
Joined: Jan 2007
Posts: 80
Likes: 0
From: Hotlanta
Thanks, Doc
I do have the top distrib bolt indexed - red paint and center mark. I'm with you on the meshing of the gears. Its probably safer to remove it - but I was curious if anyone has done it with the dist on the front cover.
Same goes for the water pump. It looks as if it could slide out but I wanted positive confirmation of that fact.
Thanks
Just some preventive info. Since you are going to remove the dist you might want to put your pulley back on and remove the dist at TDC with the rotor facing L1. Then make sure that the eccentric does not get moved. When you rotate the pulley it will have the key way facing towards the exhaust manifold.
Do you have the clutch pushed in and held? If not, pull the engine, the torrington bearings have probably slipped, the won't stay in place unless the engine is sitting on it's backside when installing the e-shaft hub. Sorry for the bad news, but if they've slipped and you put the engine back to gether, the endplay will be off and the bearings don't last long at all.
Airflow is my life
Joined: Aug 2002
Posts: 6,736
Likes: 2
From: Orlando, Fl
The water pump housing must be removed. And trochoid is right about the thrust bearings. Since the cover will be off you can make sure that the assembly is properly restacked before you put the cover back on. I screwed the pooch on that once. Not lasting long is an understatement Scott. I crushed both bearings torquing the pulley hub. 
If its not too late do like doc said and set it at tdc before you take it apart. IIRC the keyway will be at 9 oclock as viewed from the front. Then the indexing doesnt matter. You can use the FSM procedure to reinstall the dizzy. The dot lined up correctly will get you back to where you started.
If its not too late do like doc said and set it at tdc before you take it apart. IIRC the keyway will be at 9 oclock as viewed from the front. Then the indexing doesnt matter. You can use the FSM procedure to reinstall the dizzy. The dot lined up correctly will get you back to where you started.
Trending Topics
Thread Starter
OldSchool
Joined: Jan 2007
Posts: 80
Likes: 0
From: Hotlanta
Excellent - thats the data I was looking for. The clutch is depressed so the thrust bearing shouldnt fall behind the spacer. I picked up a spare set of bearings from the dealer along with the wp gasket, front cover gasket and misc o-rings, etc. I'll inspect the current set but the endplay seemed within spec so I suppose everything is mated up nicely.
I'll rotate the eccentric to the 3/4 position in the rotation. Carl, when you say "dot lined up correctly" are you referring to the timing mark on the pully v. the index pin on the front cover?
My concern would be that I mistakenly rotate the distb from its current position when I reinstall it. I'm probably missing some technical facts here.
Thanks
Too old to act my age
Joined: Feb 2005
Posts: 3,164
Likes: 0
From: Tulsa, Ok.
The water pump housing can be removed by taking the 4 nuts off, and leaving the pump attached to the housing.
I'm pretty sure the dizzy must be pulled before the cover can come off, but the main issue would be going back on. As Doc, trochoid, and Carl have all pointed out, making sure the pully is indexed to TDC and lining up the dizzy as outlined in the FSM will insure the dizzy is timed correctly. Marking the dizzy housing where the hold down bolt is, will assist in setting the exact timing back to where it currently is, assuming everything was correctly indexed the last time it was put together.
I'm pretty sure the dizzy must be pulled before the cover can come off, but the main issue would be going back on. As Doc, trochoid, and Carl have all pointed out, making sure the pully is indexed to TDC and lining up the dizzy as outlined in the FSM will insure the dizzy is timed correctly. Marking the dizzy housing where the hold down bolt is, will assist in setting the exact timing back to where it currently is, assuming everything was correctly indexed the last time it was put together.
Right Carl, simply torquing down the hub trashes the bearings, running the engine makes even more of a mess. Then one gets to drop the oil pan, pull the fmoc and clean all the metal bit out. And hopefully with the endplay being out, the rotors, irons and e-shaft hasn't suffered any damage.
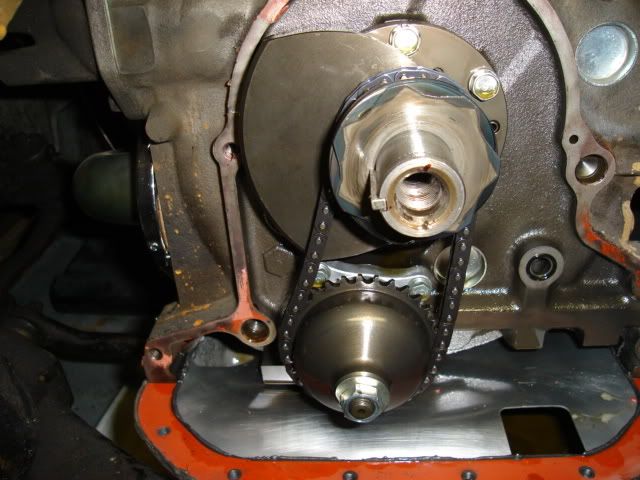
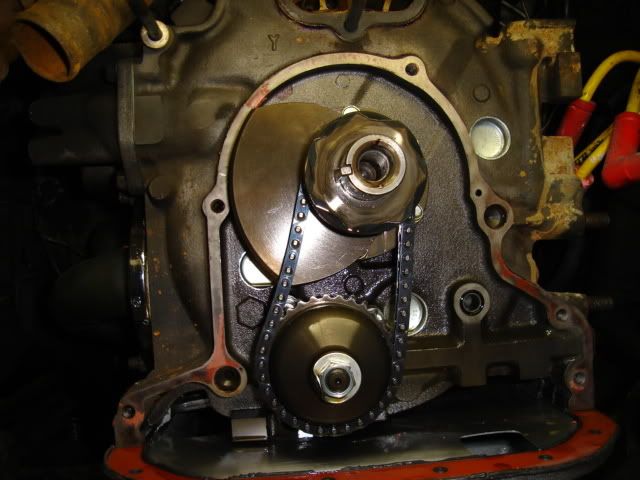
A note for all to see: The dizzy can stay when the front cover is removed. I've seen it done a few times and tried it myself. Know why it doesn't have to be removed? Just take a look at the OMP drive gear. Doesn't it sorta look like the dizzy drive gear?
You will still need to reset your timing of course. The OMP obviously doesn't matter, but the dizzy drive gear can move on its own so you'd better set your static timing before you fire it up. Then do the final adjustment with a (regular) timing light.
You will still need to reset your timing of course. The OMP obviously doesn't matter, but the dizzy drive gear can move on its own so you'd better set your static timing before you fire it up. Then do the final adjustment with a (regular) timing light.
Originally Posted by trochoid
Right Carl, simply torquing down the hub trashes the bearings, running the engine makes even more of a mess. Then one gets to drop the oil pan, pull the fmoc and clean all the metal bit out. And hopefully with the endplay being out, the rotors, irons and e-shaft hasn't suffered any damage.
 Even when driving on it, you think the clutch hydraulics are going out, but they're fine.
  It's a strange situation.
 The engine that suffered a broken thrust bearing or two had it happen in '98. It was a '74 3B REPU engine originally from my white REPU when it was driven by the previous owner. Those '74-'75 engines had notoriously poor thrust assemblies. Ask me how I know.
Anyway it was driven down to the Oregon sand dunes and back towing a trailer with a sand rail on it. When he finally pulled the engine to stick in his baja, I noticed the substantial end play and alerted him. It was quite comical to push the flywheel in and out and watch the dizzy rotor move several degrees each time. We took it to a local rotary shop and they replaced the thrust stuff and bent a front copper washer in the process (Mazdas and More). We promptly replaced it with a spare and that engine has been doing fine ever since. It's still running in the baja. I posted a couple videos the other day.
Thread Starter
OldSchool
Joined: Jan 2007
Posts: 80
Likes: 0
From: Hotlanta
Originally Posted by Jeff20B
A note for all to see: The dizzy can stay when the front cover is removed.
You will still need to reset your timing of course. The OMP obviously doesn't matter, but the dizzy drive gear can move on its own so you'd better set your static timing before you fire it up. .
You will still need to reset your timing of course. The OMP obviously doesn't matter, but the dizzy drive gear can move on its own so you'd better set your static timing before you fire it up. .
Jeff -
I believe thats what we were all thinking (leaving the dizzy intact) - but didnt quite know for sure based on the gear mesh.
I would think that if the eccentric is indexed at 9 oclock AND the rotor on the dizzy is indexed (whichever position its in before taking the cover off) - someone could put the everything back together in perfect (or near perfect) time.
Originally Posted by Rotarywall
How do you know?
Like I said above, you can remove the front cover with the dizzy in it, but it will have to be removed at some point to reset your timing. You might as well remove it first and learn where and how it sits so reinstalling won't cause you grief.
Too old to act my age
Joined: Feb 2005
Posts: 3,164
Likes: 0
From: Tulsa, Ok.
Originally Posted by Jeff20B
Like I said above, you can remove the front cover with the dizzy in it, but it will have to be removed at some point to reset your timing. You might as well remove it first and learn where and how it sits so reinstalling won't cause you grief.
By pulling the dizzy before removing the cover, you can at least know how it was oreinted, and line it back up. Marking the hold down bolt/hold down plate will also allow the timing to be set back within 1-2 degrees of it's original setting, before you fire it up.
Airflow is my life
Joined: Aug 2002
Posts: 6,736
Likes: 2
From: Orlando, Fl
Originally Posted by Joe-Racer
Excellent - thats the data I was looking for. The clutch is depressed so the thrust bearing shouldnt fall behind the spacer. I picked up a spare set of bearings from the dealer along with the wp gasket, front cover gasket and misc o-rings, etc. I'll inspect the current set but the endplay seemed within spec so I suppose everything is mated up nicely.
I'll rotate the eccentric to the 3/4 position in the rotation. Carl, when you say "dot lined up correctly" are you referring to the timing mark on the pully v. the index pin on the front cover?
My concern would be that I mistakenly rotate the distb from its current position when I reinstall it. I'm probably missing some technical facts here.
Thanks
I'll rotate the eccentric to the 3/4 position in the rotation. Carl, when you say "dot lined up correctly" are you referring to the timing mark on the pully v. the index pin on the front cover?
My concern would be that I mistakenly rotate the distb from its current position when I reinstall it. I'm probably missing some technical facts here.
Thanks
If the endplay is ok your fine. If the bearings fall out of place youll have probably no endplay at all.
BTDTWell get the eshaft pulley to TDC. Then remove the dizzy and all the stuff. On re installing the dizzy when you go to put it in, look at the gear. Right above the teeth is a dot in one spot on it. On the dizzy casting/housing theres a raised tit. Align these two. Then looking at the top of the dizzy with the rotor button removed youll see that one of the reluctor teeth lines up exactly with the leading mag pickup center. Now holding the dizzy in this position (I hold the shaft and housing so it doesnt get misaligned), drop it into place. Remember that the drive gear is healical cut so it will want to rotate as the gears mesh. If you get it right, the same reluctor tooth should still be lined up and the adjustment slot should be in the center of its travel area. If its not, the dizzy moved and your off one tooth. Pull it out and try again. You'll have to back it up (CCW) and drop it in on the next tooth. Thats how I always do it. Maybe someone has a better or easier way I dunno.
SARRC race? Your an IT7 racer?

If you are then you have a FSM per the GCR right?
 Theres some good pics and info about this in there.
PS- I meant the FSM not the GCR.

Oh please Mel, dont be such a drama queen, the cover will go back on fine.

Thread Starter
OldSchool
Joined: Jan 2007
Posts: 80
Likes: 0
From: Hotlanta
I've got the excitement right here. I least my wallet is is running for cover. As it turns out the freeze plugs are intact. Not even a smidgen out of place. If you go back to my original problem - the engine froze - it was my hope the front plugs was the cause of water in the oil pan.
This isnt the case. (sigh)
The rear plugs did pop out and I replaced those - but that didnt explain why the cooling system wasn't holding pressure and water was seeping into the oil pan. Mind you - no water is leaking externally.
One of the housings must have been affected. Maybe it's the seals - I dunno. (sigh #2)
I pulled the plugs and they have water on them - both housings it appears. (sigh #3)
Looks like a total rebuild (groan!) And no racing this weekend (grrrrrrrr!)
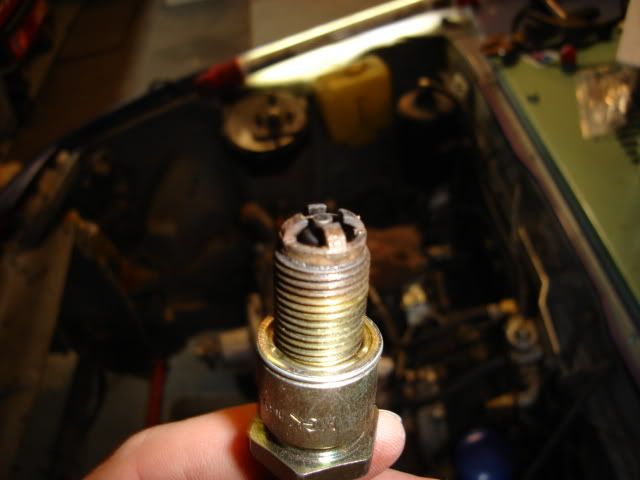
man this sucks..... but on the bright side you can build it better faster stronger........ also on the bright side of things i found nitrous gets for $2 and $3 a pill wooot yay for me