Project: Sleepy Eyes (Pic Warning)
 05-09-08, 12:05 PM
#1
Wrkn Toyota, Rootn Wankel
Thread Starter
Join Date: Sep 2007
Location: "Haystack" Hayward, CA
Posts: 1,642
Likes: 0
Received 1 Like
on
1 Post
Project: Sleepy Eyes (Pic Warning)
I've been seeding the fourms with thoughts of low profile (Sleepy Eye) headlights and not much has come out of it. 
So! I have taken it upon myself to make a set and see how they will work! This is the chronicle of one rotorhead's Obsession with HID lamps for the FB!
The goal is to have a fairly simple drop in kit with few modifications, the lid will fit, the linkage will need only an adapter bar to correct for height, and you can bolt the orginal hinge on it.
Currently this is the first mock-up:


It needs work, the measurements are slightly off and the placing somehow got messed up so the lid won't fit... well time for number 2.
And here it is:


This is the more corrected version that will (Barely) fit the lid, again need to adjust some of the measurements by a small amount to adjust for the size. I think I will go ahead and redo the measurements on AutoCAD so I can have them be more precise; will update when I get more done. Enjoy!
So! I have taken it upon myself to make a set and see how they will work! This is the chronicle of one rotorhead's Obsession with HID lamps for the FB!
The goal is to have a fairly simple drop in kit with few modifications, the lid will fit, the linkage will need only an adapter bar to correct for height, and you can bolt the orginal hinge on it.
Currently this is the first mock-up:
It needs work, the measurements are slightly off and the placing somehow got messed up so the lid won't fit... well time for number 2.
And here it is:
This is the more corrected version that will (Barely) fit the lid, again need to adjust some of the measurements by a small amount to adjust for the size. I think I will go ahead and redo the measurements on AutoCAD so I can have them be more precise; will update when I get more done. Enjoy!
 05-09-08, 12:40 PM
#2
Can't Have One.
Join Date: Apr 2003
Location: Ontario, Cali
Posts: 391
Likes: 0
Received 0 Likes
on
0 Posts
Keep up the good work. I'm interested to see how this turn out.
I have a set on my Miata, and love them. I think it looks good on the Miata over the OEM lamps, those things look like big 'ol air brakes when you have them open on such a small car.

I have a set on my Miata, and love them. I think it looks good on the Miata over the OEM lamps, those things look like big 'ol air brakes when you have them open on such a small car.
05-09-08, 01:27 PM
#4
Wrkn Toyota, Rootn Wankel
Thread Starter
Join Date: Sep 2007
Location: "Haystack" Hayward, CA
Posts: 1,642
Likes: 0
Received 1 Like
on
1 Post
I was just looking over the model and noticed that there is actually a 65 Degree slant to the face of the light, will have to add that into my diagrams.
As for the linkage; if you look at how the linkage is set-up all you need is another bar that is properly measured and the leverage to open and close the new headlight should be good. Its a matter of getting that measurement that's the tricky part. :P
As for the linkage; if you look at how the linkage is set-up all you need is another bar that is properly measured and the leverage to open and close the new headlight should be good. Its a matter of getting that measurement that's the tricky part. :P
05-09-08, 02:27 PM
#6
I was just looking over the model and noticed that there is actually a 65 Degree slant to the face of the light, will have to add that into my diagrams.
As for the linkage; if you look at how the linkage is set-up all you need is another bar that is properly measured and the leverage to open and close the new headlight should be good. Its a matter of getting that measurement that's the tricky part. :P
As for the linkage; if you look at how the linkage is set-up all you need is another bar that is properly measured and the leverage to open and close the new headlight should be good. Its a matter of getting that measurement that's the tricky part. :P
08-05-08, 10:35 AM
#7
Wrkn Toyota, Rootn Wankel
Thread Starter
Join Date: Sep 2007
Location: "Haystack" Hayward, CA
Posts: 1,642
Likes: 0
Received 1 Like
on
1 Post
Okay, back from Sweeden and settled back into my usual groove now. Waiting on Billy to fill my order for those sweet RE-Speed Poly bushings to rebuild my wrecked '82.
I got a little addicted to that daned World of Warcraft game (laugh all you want). So I decided to look over my low profile diagrams while i wait for server maintenence to be finished.
I have a bit of a problem though, does anyone know how to indicate thickness and then overlay a 3D model in AutoCAD 2008? I can't seem to get Hatching or coloring on the model to have it show up better.
Other than that, the model is almost finished, the last part will be the linkage adapter and then creating a full metal prototype in Welding this semester.
I know this is a pretty shitty update so please bear with me.
-Paul
Trending Topics
08-05-08, 09:16 PM
#10
Too many vehicles
Join Date: Jul 2008
Location: Kenosha, Wisconsin
Posts: 139
Likes: 0
Received 0 Likes
on
0 Posts
Dave
08-06-08, 02:50 AM
#13
Full Member
Join Date: Apr 2006
Location: stockton, california
Posts: 84
Likes: 0
Received 0 Likes
on
0 Posts
I had plans to do the same exact thing but got lazy and never finished. I have a set of hella 90mm projector headlights that would probably fit perfect. They are brand new and they come with bulbs, mounting bracket and adjusters. let me know if you interested. keep up the good work and hope you finish!!
08-06-08, 10:12 AM
#14
Wrkn Toyota, Rootn Wankel
Thread Starter
Join Date: Sep 2007
Location: "Haystack" Hayward, CA
Posts: 1,642
Likes: 0
Received 1 Like
on
1 Post
I had plans to do the same exact thing but got lazy and never finished. I have a set of hella 90mm projector headlights that would probably fit perfect. They are brand new and they come with bulbs, mounting bracket and adjusters. let me know if you interested. keep up the good work and hope you finish!!
 But I have a quick question, how do they measure them? Because the lights I had orginlly planned on using were marketed as 20mm HIDs; the lens were 4 inches in diameter.
 As for what this set-up has to do with HIDs? I orginally intended them to fit two 4" projectors in each headlight assembly to update the style and ability of the RX7.
08-06-08, 12:25 PM
#15
Full Member
Join Date: Apr 2006
Location: stockton, california
Posts: 84
Likes: 0
Received 0 Likes
on
0 Posts
I may take you up on that offer. But I have a quick question, how do they measure them? Because the lights I had orginlly planned on using were marketed as 20mm HIDs; the lens were 4 inches in diameter.
As for what this set-up has to do with HIDs? I orginally intended them to fit two 4" projectors in each headlight assembly to update the style and ability of the RX7.
But I have a quick question, how do they measure them? Because the lights I had orginlly planned on using were marketed as 20mm HIDs; the lens were 4 inches in diameter. As for what this set-up has to do with HIDs? I orginally intended them to fit two 4" projectors in each headlight assembly to update the style and ability of the RX7.
http://www.rallylights.com/hella/hel...ages/68137.jpg
10-10-09, 01:18 AM
#16
Wrkn Toyota, Rootn Wankel
Thread Starter
Join Date: Sep 2007
Location: "Haystack" Hayward, CA
Posts: 1,642
Likes: 0
Received 1 Like
on
1 Post
Okay, so I posted the pictures as a sort of teaser in my resto thread, but the real info is going here.
Basically its been a long time since I even thought about trying to make my sleepy eye kit for my car, but progress, albeit slow, has been steady and the car is getting closer and closer to being alive. What does this have to do with resurrecting a thread that's been dead for a long time? That's easy to answer.
I was going through my shopping list at the junkyard today for parts for the GSL-SE and the S4 Engine when I came across a second gen Lexus ES300 who's eyeballs hadn't been torn out yet. We're talking dual projector headlights just sitting there begging me to take them home with me.
For reference, this is the car I am talking about and the headlamps:

I end up getting home and I can't wait to tear open the headlamps to get my juicy prize inside! So lacking a dremel or cutting wheel I opted for the next best thing... a SkillSaw! Some precision cutting, followed by lots of cracking noises and some effort resulted in these!

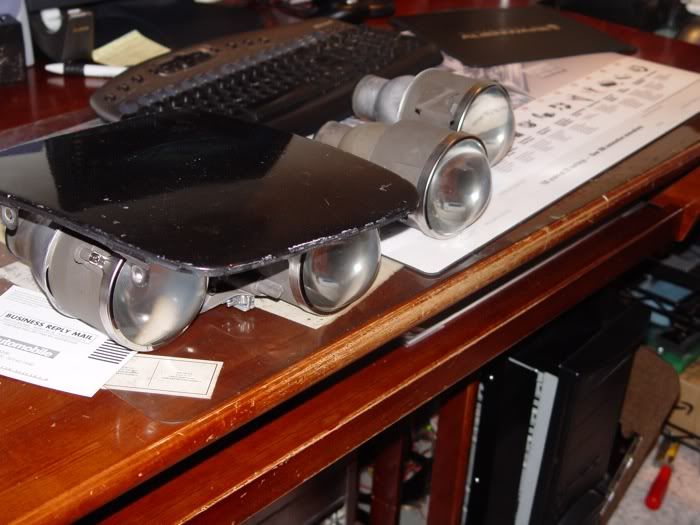
They're one single unit that houses two 4" projectors, the interesting thing about them is that if you look inside them? There's already built in shielding on the top to help shape the beam and prevent glare. These were Halogen Projectors keep in mind. So my sick twisted mind is coming up with many many ways to try and stuff these in my lamp frames and turn them into HID powered monsters.
BUT! This leads me to a small problem that I am faced with. If I use this projector pod without cutting it up, the frame I am designing will be built around the pod and will most likely not end up the easy drop in kit I originally planned. I will keep this thread updated on the progress of trying to use these pods for my own purposes, but I will also try to finalize a design prototype for the drop-ins I want to make.
Okay, now that all the update crap is out of the way lets talk shop? The light units themselves are cast pot metal from what it looks like, which means that welding the two of them together is about as easy as me getting a girlfriend. The unit barely fits in the space if I trim it up some, but if I managed to somehow cut the bridge in between I could have up to 1 1/2" of squish room to play with. Right now I'm a little hesitant to start cutting stuff off just yet, but I will keep playing with ideas. One thing about this lights that's nice and makes me want to try and cut as little of the bridge as I can, is that they come with a level, but then I suppose you wouldn't see the level with the top on huh?
I'll try and get you guys some pictures of the unit disassembled further so you can see the shields I was talking about, hopefully this will turn out nicely.
-Paul
Basically its been a long time since I even thought about trying to make my sleepy eye kit for my car, but progress, albeit slow, has been steady and the car is getting closer and closer to being alive. What does this have to do with resurrecting a thread that's been dead for a long time? That's easy to answer.
I was going through my shopping list at the junkyard today for parts for the GSL-SE and the S4 Engine when I came across a second gen Lexus ES300 who's eyeballs hadn't been torn out yet. We're talking dual projector headlights just sitting there begging me to take them home with me.
For reference, this is the car I am talking about and the headlamps:
I end up getting home and I can't wait to tear open the headlamps to get my juicy prize inside! So lacking a dremel or cutting wheel I opted for the next best thing... a SkillSaw! Some precision cutting, followed by lots of cracking noises and some effort resulted in these!
They're one single unit that houses two 4" projectors, the interesting thing about them is that if you look inside them? There's already built in shielding on the top to help shape the beam and prevent glare. These were Halogen Projectors keep in mind. So my sick twisted mind is coming up with many many ways to try and stuff these in my lamp frames and turn them into HID powered monsters.
BUT! This leads me to a small problem that I am faced with. If I use this projector pod without cutting it up, the frame I am designing will be built around the pod and will most likely not end up the easy drop in kit I originally planned. I will keep this thread updated on the progress of trying to use these pods for my own purposes, but I will also try to finalize a design prototype for the drop-ins I want to make.
Okay, now that all the update crap is out of the way lets talk shop? The light units themselves are cast pot metal from what it looks like, which means that welding the two of them together is about as easy as me getting a girlfriend. The unit barely fits in the space if I trim it up some, but if I managed to somehow cut the bridge in between I could have up to 1 1/2" of squish room to play with. Right now I'm a little hesitant to start cutting stuff off just yet, but I will keep playing with ideas. One thing about this lights that's nice and makes me want to try and cut as little of the bridge as I can, is that they come with a level, but then I suppose you wouldn't see the level with the top on huh?
I'll try and get you guys some pictures of the unit disassembled further so you can see the shields I was talking about, hopefully this will turn out nicely.
-Paul
10-10-09, 01:15 PM
#19
Nice work.
Those Lexus lamps look like they will work great. I'm going to look for a set on my next trip to the junkyard. I have a set of Integra lamps cut apart, I have separated the bridge and the last time playing with them I was working on makeing them even. They have external reflectors that will barely fit in the space allowed, and were also mounted to the plastic housing that has been cut away, so what you have there looks way easier to work with.
Keep up the good work! I'll likely finnish mine when I'm 80.
10-10-09, 07:49 PM
#20
Wrkn Toyota, Rootn Wankel
Thread Starter
Join Date: Sep 2007
Location: "Haystack" Hayward, CA
Posts: 1,642
Likes: 0
Received 1 Like
on
1 Post
Alright, I didn't get much of a change to do anything today at work, Between the load of cars we had and the cleaning and piecing together my radiator and e-fan set-up I didn't get around to measuring the housing and trying to see what I can do with them.
But, I do have an interesting question I'd like answered...
Which side is the high beam?

But, I do have an interesting question I'd like answered...
Which side is the high beam?
10-10-09, 09:03 PM
#21
I touch my Wankel.
iTrader: (1)
Join Date: Aug 2007
Location: Muskegon, MI
Posts: 273
Likes: 0
Received 0 Likes
on
0 Posts
The convex lens will produce an inverted image, so the lens on the bottom will be your low beam. To position it correctly, the main deflector will need to be on the top. If that makes sense?
10-10-09, 10:01 PM
#23
Wrkn Toyota, Rootn Wankel
Thread Starter
Join Date: Sep 2007
Location: "Haystack" Hayward, CA
Posts: 1,642
Likes: 0
Received 1 Like
on
1 Post
Also side note for a Mod, I wanted to do the cool little Preview image for the Lexus picture because its annoyingly big... but I don't know how and now I can't edit it.
10-11-09, 09:17 AM
#24
I touch my Wankel.
iTrader: (1)
Join Date: Aug 2007
Location: Muskegon, MI
Posts: 273
Likes: 0
Received 0 Likes
on
0 Posts
Actually the opposite, the one with the two deflectors I believe will be your low beam and the lens with the deflector on the opposite side is the high. The way this works is that the lows are meant to stay on with the highs so that you get a full coverage.