a pic of my DLIDFIS installed
 07-08-08, 05:05 PM
#26
Rotary Enthusiast
as for why i did this, main reason number one: i wanted to see if i could do it, and see if it worked. i like to do things myself, and since my ignitor blew, i figured, why not, let's just make it a little bit better.
now i can say,"i made that mess of wires and coils under my hood and it works."
now i can say,"i made that mess of wires and coils under my hood and it works."
Gotcha...glad u got your car running.
 07-08-08, 07:05 PM
#27
back in the game
Thread Starter
Join Date: Apr 2008
Location: Grand Rapids, MI
Posts: 143
Likes: 0
Received 0 Likes
on
0 Posts
i went out to play with my car this evening, and i found that the eshaft pulley is on the right way
 because i wanted something to do and i was hoping this would fix my running issue
 because that's not the problem
now i just don't know where to go from here.
i just took a crappy vid with my dad's digital camera of the car "running"
it runs, but it sounds like it's missing evenly and consistently, and it does not like to rev at all. it revs to about 2000, then it's like fuel or ignition cant keep up with the rpms.
here's the vid,
http://www.youtube.com/watch?v=xRPkvB6Dzgo
EDIT: okay, that's not it, that's my favorite song.
here is the video
http://www.youtube.com/watch?v=Ubw06ix9HC0
if anyone has any suggestions that i haven't already tried, please, suggest away,
thanks.
because i wanted something to do and i was hoping this would fix my running issue because that's not the problemnow i just don't know where to go from here.
i just took a crappy vid with my dad's digital camera of the car "running"
it runs, but it sounds like it's missing evenly and consistently, and it does not like to rev at all. it revs to about 2000, then it's like fuel or ignition cant keep up with the rpms.
here's the vid,
http://www.youtube.com/watch?v=xRPkvB6Dzgo
EDIT: okay, that's not it, that's my favorite song.
here is the video
http://www.youtube.com/watch?v=Ubw06ix9HC0
if anyone has any suggestions that i haven't already tried, please, suggest away,
thanks.
07-09-08, 05:08 PM
#29
Rotary Enthusiast
ok man...first of all I watched the video and that is not spark related.
Sounds like a dead rotor. If you checked compression and checks ok, you blew a hose that is behind the carburetor right on the back closer to the firewall, it's a valve with a thick hose coming out of it, its a vacumm valve and you are running in one rotor cause it will partially kill the rear rotor. Check that once the engine catches, you have to be very close to the carb to notice it. It happened to me about 5 months ago with a customers Datsun with a 12a and stock nikki. Exactly the same.
Sounds like a dead rotor. If you checked compression and checks ok, you blew a hose that is behind the carburetor right on the back closer to the firewall, it's a valve with a thick hose coming out of it, its a vacumm valve and you are running in one rotor cause it will partially kill the rear rotor. Check that once the engine catches, you have to be very close to the carb to notice it. It happened to me about 5 months ago with a customers Datsun with a 12a and stock nikki. Exactly the same.
07-09-08, 08:34 PM
#30
back in the game
Thread Starter
Join Date: Apr 2008
Location: Grand Rapids, MI
Posts: 143
Likes: 0
Received 0 Likes
on
0 Posts
are you talking about the hose coming off the intake in the back ?
the one that runs close to the exhaust manifold that commonly gets burned and cracked and causes a leak?
i capped it off, but never actually looked it over for cracks or holes.
i'll try spraying some carb cleaner down there while it's running and see what i get.
thanks
the one that runs close to the exhaust manifold that commonly gets burned and cracked and causes a leak?
i capped it off, but never actually looked it over for cracks or holes.
i'll try spraying some carb cleaner down there while it's running and see what i get.
thanks
07-09-08, 09:49 PM
#31
Rotary Enthusiast
well check around that area. Car will start and sound just like that. It sounds like a huge vacumm leak you got in there could be somewhere else. Try to take another video again maybe trying to keep it running while revving it a bit to see how it behaves. Also I know its got a dead rotor because of the way the motor moves like its unbalanced. Usually that tells me its just starting with one rotor. Kind of like when an engine dies, but it has good compression if not excellent on the half that is good.
07-10-08, 06:37 AM
#33
back in the game
Thread Starter
Join Date: Apr 2008
Location: Grand Rapids, MI
Posts: 143
Likes: 0
Received 0 Likes
on
0 Posts
100% sure my wires are correct. i will play around with the hose on friday because i have to get my senior picture taken today, and i can't get dirty
07-12-08, 01:31 PM
#34
back in the game
Thread Starter
Join Date: Apr 2008
Location: Grand Rapids, MI
Posts: 143
Likes: 0
Received 0 Likes
on
0 Posts
ok, so i had my dad spray some break cleaner around while i kept the car running. and then he got to my block off plate that i made out of sheet metal when i removed the ACV.
the break cleaner completely killed the engine when he sprayed here.
so i took my plate off, to see a ton of carbon gas smelling stuff caked on there. we didn't have any 1/8 in plate, so i sandwiched my block off plate between the intake and the acv, and used silicone around it on both sides of the plate, so it should be sealed completely off, the ACV is just there to hold the plate on.
so i tried to start it up, and got a few puffs, and nothing.
then i pulled the plugs, they were dirty, i cleaned them, and cranked the engine to get all the fuel out of it.
put it back together and it fired up and ran intermittently good. then it died, and i realized i had the fuel pump fuse out. so i put it back in, put a little seafoam down the carb, and tired to fire it up again. this time all i got was a few puffs every once in a while while cranking, and a ton of smoke out the tailpipe. and that brings me here.
i don't know why it won't start now, and i have the plugs out and the chambers airing out right now, so i guess i'll try again.
and that anti afterburn 2 hose, looked ok, but, i haven't figured out what to block the pot off with yet, any ideas on what to use here?
just an update i guess.
07-12-08, 01:45 PM
#35
Rotary Enthusiast
great job man...
few tips:
do one thing at a time. You almost pinpointed the problem but the sea foam deal... arrg dont. Do that after you know the engine is running.
If you do too many things at a time to try to fix one issue you will complicate matters even worst.
Remember one of the best ways to get a stubburn rx7 to start is pull start it if you can. This should be your last bet.
Right now double check everything, now that you ran out of gas, your spark plugs prob got killed, your carb might even be a bit more dirty if it sucked crap from the gas tank. many things could have happened.
So now you got a different issue at hand. I would deflood the engine (crank her without any of the sparkplugs and blow the crap out) out of all that seafoam deal, put some ATF or oil in the chambers, get new spark plugs, drop a bit of gas down the carb and make sure you got fuel pressure to the carb by checking injection spray from the nozzles and level at both bowls in the carb. Car should start. Let it idle, check again for vacumm leaks, fix that and you are set.
Main thing is that you know now that ignition is fine, engine is fine, and you got a vacumm issue at hand.
Good job man!
p.s. three things are important always Compression, ignition and fuel.
you messed with ignition and fuel (due to the ignition deal first, and fuel since you ran out)
compression checks ok as you got her to start and idle semi ok this last time.
07-12-08, 04:16 PM
#37
back in the game
Thread Starter
Join Date: Apr 2008
Location: Grand Rapids, MI
Posts: 143
Likes: 0
Received 0 Likes
on
0 Posts
thanks for everything mperformance, you have been a good help.
and yes, i do do too many things at once when trying to diagnose something, i know this is not the right way to do things, but sometimes, i get a little excited, and brains scramble around a little bit (don't we all).
ok, i just did everything almost exactly how you said, even before i read your post, must be some of those brains are finding their original places agian .
.
it fired right up with a flick of the key. it ran just like it always did, and i know i definitely have a vaccum leak. not only because i know my fuel and ignition are fine, and i have good compression, but also because my dad sprayed brake cleaner around while i held the idle steady. i found that my air control silicone and sheet metal job worked good. no idle changes there, or the AA#2 hose. we found a slight vac leak around the carb base area, but mostly around the thing sticking off the carb.

this pic was taken before i took out "the nest"
i am refering to the thing right to the right of the AA #2 with the clear line going to it.
there was no gasket supplied with the carb rebuild kit i got, so i might just have to make one or something.
another spot was my failed shutter valve. i wired it open with some mechanic's wire, and plugged off the vac ports on it, but i still don't know about it...
what would you guys suggest to do about this.
i suppose i could find some real vacuum caps that are for sure the correct size.
thanks.
and yes, i do do too many things at once when trying to diagnose something, i know this is not the right way to do things, but sometimes, i get a little excited, and brains scramble around a little bit (don't we all).
ok, i just did everything almost exactly how you said, even before i read your post, must be some of those brains are finding their original places agian
.it fired right up with a flick of the key. it ran just like it always did, and i know i definitely have a vaccum leak. not only because i know my fuel and ignition are fine, and i have good compression, but also because my dad sprayed brake cleaner around while i held the idle steady. i found that my air control silicone and sheet metal job worked good. no idle changes there, or the AA#2 hose. we found a slight vac leak around the carb base area, but mostly around the thing sticking off the carb.
this pic was taken before i took out "the nest"
i am refering to the thing right to the right of the AA #2 with the clear line going to it.
there was no gasket supplied with the carb rebuild kit i got, so i might just have to make one or something.
another spot was my failed shutter valve. i wired it open with some mechanic's wire, and plugged off the vac ports on it, but i still don't know about it...
what would you guys suggest to do about this.
i suppose i could find some real vacuum caps that are for sure the correct size.
thanks.
07-13-08, 08:50 AM
#38
Rotary Enthusiast
ok but now that it started and you said it ran like it always did, you are refering that it still has that huge oner rotor missfire or is it now idling a bit better or like it should?
cause now that you fixed the main vacumm leak it should idle a lot better. Little vacumm leaks will not make the engine hesitate like it did on the video just a big one.
let me know... almost there...
cause now that you fixed the main vacumm leak it should idle a lot better. Little vacumm leaks will not make the engine hesitate like it did on the video just a big one.
let me know... almost there...
07-13-08, 12:56 PM
#39
back in the game
Thread Starter
Join Date: Apr 2008
Location: Grand Rapids, MI
Posts: 143
Likes: 0
Received 0 Likes
on
0 Posts
it still seems to have the misfire, but it did run semi good, maybe a little better, but definitely still misfiring. i'll have to get into it more this coming week, i had to stop saturday because it was gonna rain and there's no lights in our barn.
do you know anything about that thing on the carb? what does it do?
how can i fix the gasket, or should i get a new one?
thanks
do you know anything about that thing on the carb? what does it do?
how can i fix the gasket, or should i get a new one?
thanks
07-15-08, 06:40 AM
#40
back in the game
Thread Starter
Join Date: Apr 2008
Location: Grand Rapids, MI
Posts: 143
Likes: 0
Received 0 Likes
on
0 Posts
by using the handy dandy search function and the rite up on how to strip a nikki, i figured out that my vac leak (or at least some of it) is coming from the altitude compensator, an i can just remove this adn block off the holes. cool. i know what i'm doing today.
11-06-08, 04:15 PM
#42
back in the game
Thread Starter
Join Date: Apr 2008
Location: Grand Rapids, MI
Posts: 143
Likes: 0
Received 0 Likes
on
0 Posts
oh man, i haven't been on here in a while i guess...
but the ignition system was not the problem apparently. but this served as a solid upgrade from the stock ignition. i might have said this before, but the main reason i upgraded to this was because i blew one of the j109s so i just figured why not upgrade and use the HEI's cuz they're cheaper to replace. i still have to clean up a lot of the wiring and solder my connections, but i'm gonna save that for after i get the car running.
the actual problem was vacuum leaks. in a lot of places. so i pulled the carb off, and the intake, and i'm gonna make the block off plates and probably strip the carb down to whatever is needed.
what kind of pictueres would you like to see? i can go take more of what you want.
11-06-08, 06:46 PM
#43
hells yeah man, i'm glad that you know what's causing your problems...i would like to see some pics of the wiring, i have a real good idea, but i'd like to have some visual aid (i'm just gonna rewire mine to use a GM igniter as trailing since mine is toast lol) you've already covered mounting...what did you use for your heat shield plate thingy? (i believe that's gonna be my main problem on finding somewhere where it don't look bad) :P
11-06-08, 07:40 PM
#44
back in the game
Thread Starter
Join Date: Apr 2008
Location: Grand Rapids, MI
Posts: 143
Likes: 0
Received 0 Likes
on
0 Posts
well, for my shield/heatsink/ignitor mounting plate, i just used some sheet metal i found in the barn, and crudely cut it out with a tin snips. i guess it's a good idea to put some dielectric grease on the bottom of the ignitors, but i forgot to do that. i bent a 90 deg. angle in it so i could mount it to the bolts where the coils are originally in the car. i just hose clamped the three new coils together, and bolted them to an empty hole on the shock tower. i can try to get some pictures tomorrow of my horrible wiring job for you. if not tomorrow, then for sure saturday because i will probably be cleaning out the barn so i can put my SHO in there for the winter.
11-10-08, 06:10 PM
#45
thanks man your thread was of help, , anyways don't worry about the wiring, i found some link and it made it extremely clear as to which wire goes where, so i got it all taken care off now, i ended up mounting the plate for the gm ignitor where the A/C mount used to go, i added quite a few washers to keep it away from the engine, i may go back and add more but i let the engine warm up and the plate barely got warm, besides the cool air from the fan hits that spot so i imagine it's gonna stay pretty cool even when i run it hard, my only concern is if it rains, i'm pretty sure no water will hit it, but i may still add an extra plate or something just to make sure lol.
, anyways don't worry about the wiring, i found some link and it made it extremely clear as to which wire goes where, so i got it all taken care off now, i ended up mounting the plate for the gm ignitor where the A/C mount used to go, i added quite a few washers to keep it away from the engine, i may go back and add more but i let the engine warm up and the plate barely got warm, besides the cool air from the fan hits that spot so i imagine it's gonna stay pretty cool even when i run it hard, my only concern is if it rains, i'm pretty sure no water will hit it, but i may still add an extra plate or something just to make sure lol.
11-10-08, 08:01 PM
#46
back in the game
Thread Starter
Join Date: Apr 2008
Location: Grand Rapids, MI
Posts: 143
Likes: 0
Received 0 Likes
on
0 Posts
very nice, very nice. i hope you have good luck with this system, and i'm glad it came together for you. now i just have to find some steel to make block off plates, and i can start putting my car back together.
11-11-08, 07:43 AM
#47
common sense prevails....
iTrader: (7)
Join Date: Jul 2008
Location: Chino and Lake Arrowhead Calif
Posts: 1,669
Likes: 0
Received 9 Likes
on
9 Posts
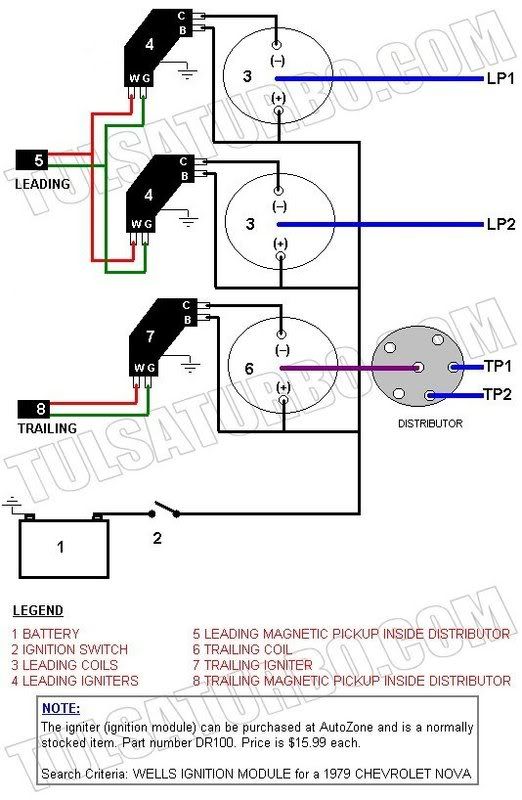
In other words just run two coils off one ignitor???
11-11-08, 02:36 PM
#48
I tried that with a J-109 several years ago. It didn't like driving two coils (weak spark, halved voltage etc). You might have better luck with a GM HEI, because they can handle almost twice the current load as a J-109, but I don't recommend it. They're cheap enough to get two and avoid the potential problems.
11-11-08, 04:28 PM
#49
back in the game
Thread Starter
Join Date: Apr 2008
Location: Grand Rapids, MI
Posts: 143
Likes: 0
Received 0 Likes
on
0 Posts
i never thought about that, one ignitor to two coils. but i would agree it would give weaker spark, or something wouldn't be as strong. and yeah, the HEI's are cheap enough to get a few and a few extras.
11-11-08, 06:11 PM
#50
common sense prevails....
iTrader: (7)
Join Date: Jul 2008
Location: Chino and Lake Arrowhead Calif
Posts: 1,669
Likes: 0
Received 9 Likes
on
9 Posts
I tried that with a J-109 several years ago. It didn't like driving two coils (weak spark, halved voltage etc). You might have better luck with a GM HEI, because they can handle almost twice the current load as a J-109, but I don't recommend it. They're cheap enough to get two and avoid the potential problems.