
Lets install an A/C system! (Help me not ruin everything)

Green circles show where the hard lines from the air box come through the firewall. This is where harnesses #22 and #20 come together. Two wires pass through the firewall from the air box. The Blue wire is part of harness #22. The Yellow/red wire comes from the Frost Temperature Warning Switch on the air box. Two wires from harness #20 come from the left side of the engine compartment. The Blue wire connects to the Blue wire from harness #22. The Yellow/blue wire connects to the yellow/blue wire in harness #19. Harness #19 is a short pigtail with a rubber shroud which connects to the Pressure switch. Yellow/red wire comes from the Frost Temperature Warning Switch on the air box and connects to the Yellow/red wire in Harness #19.

You can see the High pressure hose in this picture. It connects to the lower hard pipe coming through the firewall on one end. It has the pressure switch inline on my GSLSE and GSLs. It runs forward along the frame rail, makes a left turn to go through a hole in the right radiator support and connects to the top of the drier.

You can see the High pressure hose in this picture. It connects to the lower hard pipe coming through the firewall on one end. It has the pressure switch inline on my GSLSE and GSLs. It runs forward along the frame rail, makes a left turn to go through a hole in the right radiator support and connects to the top of the drier.
This is the high pressure hose running from the lower hard pipe at the fire wall to the top of the drier. It turns left and goes through the radiator support on the right side of the picture.

This is the high pressure hose from the high side fitting on the compressor down to the frame rail, forward, inside the radiator support and to the top fitting on the evaporator.

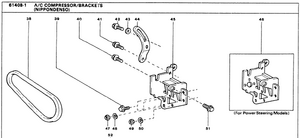
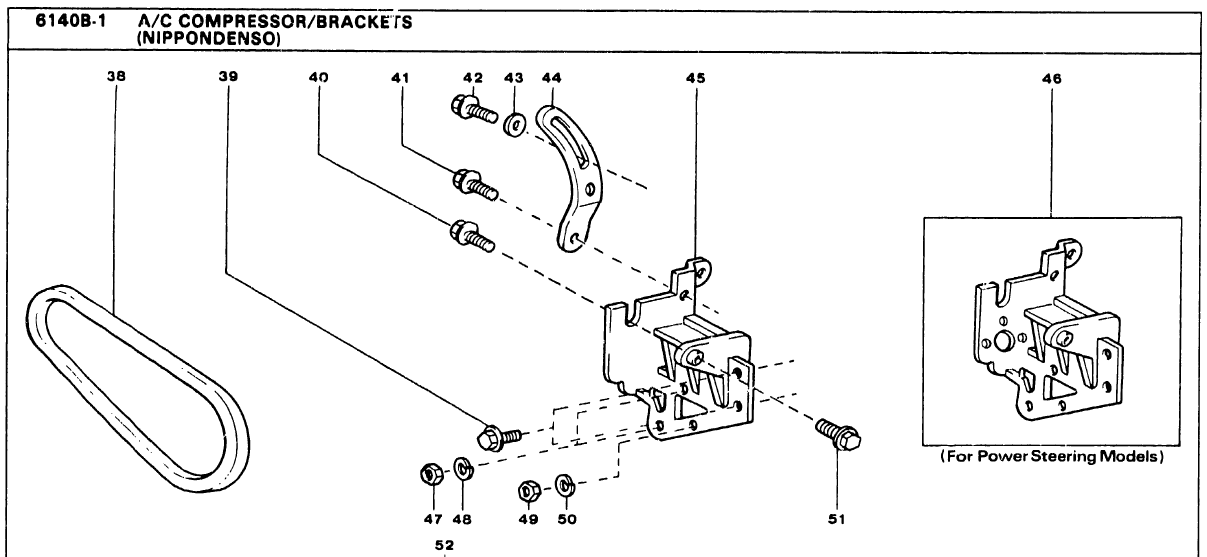
I think your mount will work fine. Here's a 85 non PS mount and an 83 mount (none had PS before 84). Looks like you have the earlier mount.


This is the high pressure hose from the high side fitting on the compressor down to the frame rail, forward, inside the radiator support and to the top fitting on the evaporator.
I think your mount will work fine. Here's a 85 non PS mount and an 83 mount (none had PS before 84). Looks like you have the earlier mount.
Up to now all the pictures have been from 84-85 GSLSEs or GSLs with the pressure switch in the hard line. This is an 84 GS system. Connections are the same but this system uses a different drier with the pressure switch in it.
Here's how the high side hose goes inside the radiator support. Note the hose for this system is all rubber in this area on this system. The GSLSEs and GSLs have 2 sections and part of them are hard lines.

Condenser and Receiver/drier connections. Looking down, in front of radiator with cover plate removed.

Here's how the high side hose goes inside the radiator support. Note the hose for this system is all rubber in this area on this system. The GSLSEs and GSLs have 2 sections and part of them are hard lines.
Condenser and Receiver/drier connections. Looking down, in front of radiator with cover plate removed.
A little off topic.....
The purple arrows point to the arms and motor needed to actuate the vent linkage with the push button HVAC controls. The red circles are the 2 screws for the arms. The blue circle is one of the mounting screws for the motor bracket. There is another on the opposite side and 2 under the motor. The manual lever unit has the "amplifier" connected to it with a bracket. The whole thing is removed from the center console as one unit and replaced with the push button controls. Maybe SF can post some pictures of the manual brackets and cable holder that these arms replace. I don't have any cars with manual controls still installed.

The purple arrows point to the arms and motor needed to actuate the vent linkage with the push button HVAC controls. The red circles are the 2 screws for the arms. The blue circle is one of the mounting screws for the motor bracket. There is another on the opposite side and 2 under the motor. The manual lever unit has the "amplifier" connected to it with a bracket. The whole thing is removed from the center console as one unit and replaced with the push button controls. Maybe SF can post some pictures of the manual brackets and cable holder that these arms replace. I don't have any cars with manual controls still installed.
Thread Starter

Joined: Feb 2004
Posts: 2,109
Likes: 32
From: Canada
Last edited by Sgt Fox; Aug 29, 2011 at 01:57 PM.
Thread Starter
Joined: Feb 2004
Posts: 2,109
Likes: 32
From: Canada
Been doing some research for what oil to lubricate the o-rings with before installation.
OILS USED IN AUTOMOTIVE A/C SYSTEMS
MINERAL OIL
Mineral oil is used in all old R12 (Freon) systems. It has worked well for years and would be the recommended lubricant for all R12 applications. R12 has a high affinity for mineral oil, meaning it takes mineral with it as it travels through the system. Mineral oil does not mix with R134a and there for not usable. I have specialized in air conditioning work and have been getting mineral oil on my skin for years with no ill effects that I know of.
PAG OIL (Polyalkylene Glycol Oil)
PAG oil is used OEM (Original Equipment Manufactures) in their R134a systems. PAG oils will soften paint which can be a major problem. PAG oils are harsher on o-rings and seals. PAG oils may cause skin irritations. PAG oil seems to give my skin problems when I work with it. I get a mild rash even from the vapors. It is recommended that you always wear protective gloves and goggles while handling or servicing a system with PAG oil. PAG oil is very hydroscopic (absorbs moisture from the air) and must be kept in closed metal containers.
POLYOL ESTER OIL (Retrofit Oil)
Polyol Ester oil (Ester for short) or retrofit oil as its' sometimes called is the preferred oil to use when you are performing a retrofit. Ester oil is recommended by most after market manufactures and rebuilders. Ester oil mixes with and is compatible with mineral oil. Ester oil can be used with R12 and R134a refrigerants. Ester oil is not as harsh to o-rings, seals and paints as PAG oils. This is the oil that comes in or is supplied with the compressors that come from Everco, Murray, and Four Seasons. When you are doing major repairs you could prepare the vehicle for later retrofit.
You could:
Flush the heat exchangers and hoses.
Add an R134a compatible drier/accumulator.
Service with Ester oil along with R12.
Then add special service fittings, label and R134a when R12 becomes unavailable.
I have been told that Poyol Ester oil does not provide as good of lubrication as mineral oil when used with R12.
RECOMMENDATIONS
OEM Manufactures
They use and recommend PAG oil. If you add oil to a OEM system use PAG oil.
AFTER MARKET MANUFACTURES
Four Seasons, Everco and Murray are the main aftermarket A/C parts suppliers.
They recommend that you retrofit only when you have too.
They supply and recommend Ester oil for use when you do retrofits. Also sense its compatible with all R12/R134a compressors it could be used in a R12 system that may be retrofitted latter.
They recommend that you put 1/2 of the oil in the compressor and the other 1/2 in the accumulator or evaporator if it does not have an accumulator. This starts the system with good oiling of the compressor.
They supply and recommend a solvent for flushing air conditioning systems. It Contains HFCF-141b which is a non-hazardous/non-regulated solvent for automotive use.
They recommend that you use the same oil that's already in the system when you are just adding oil. In a system that contains PAG oil you should add PAG oil.
Four Seasons Everco and Murray have hot lines that can provide you with their catalogues, views and recommendations.
Four Seasons Hot Line 1-800-433-7508
Pn 59009 Ester Oil 100 vis.
Pn 59012 Ester Oil 150 vis.
Pn 59015 Ester Oil 68 vis.
Pn 59030 Flushing Solvent 141b
Pn 59031 Capture Tank
Pn 59032 Capture Hose & Fitting Kit
Four Seasons has a oil capacity and viscosity recommendations in their catalog.
Everco & Murray Hot Line 1-800-325-8886 (Choice: 2, 6)
Pn 409500 Ester Oil 100 vis.
Pn 409517 A/C Flush Solvent
Pn 409920 Capture Tank
Pn 409921 Capture Hose & Fitting Kit
I'll search further. The 85 without PS in the picture is on one of the two running RX-7s I have. You can't have that one I do have the one with PS I can send you. It will probably weigh as much as all the other stuff I sent. You can also have the 83 in the other picture. That is my first RX-7. It's pretty used up. I may have another 84. I'll dig through the parts piles.
Ron
I do have the one with PS I can send you. It will probably weigh as much as all the other stuff I sent. You can also have the 83 in the other picture. That is my first RX-7. It's pretty used up. I may have another 84. I'll dig through the parts piles.Ron
Thread Starter
Joined: Feb 2004
Posts: 2,109
Likes: 32
From: Canada
Haha, no worries. Figured I'd see if anyone had one sitting around. I think I've got all the rest of the bits I need to get everything working.
The PS one will probably interfere with my respeed rack. If I can't find a non power steering bracket, I could probably cut it to fit. The compressor on the 81-83 is different again, no? I have a correct tension arm in the other package I got. I wonder if the mounting ears for the compressor are the same.
EDIT,
hmm, looking at the parts fiche, the 81,82 and 83 all used a different system. From the parts diagram, their mounts look like the Wynns/sanden mount of the dealer installed air. They do not look like the picture you posted of the 83. It also looks like the 83 sits lower than the 85. Is this correct?
Seems like the PS one is the same dimensions, just with extra holes.
Last edited by Sgt Fox; Aug 29, 2011 at 04:44 PM.

The 84-85 non PS bracket is the same size and shape as the bracket with PS so it might rub also. I've found another bracket like the 83. The compressor in my 83 appears to be exactly like the 84 and 85s. Outside to outside of each of the compressor mounting tabs is 3 7/8". Inside to inside of each of the different brackets is 4". The brackets have a bushing in one side (like the alternator) which slides tight to the compressor mounting tabs when rear bolt is tightened.
FWIW The hoses in the 83 are different. The connections to the compressor, condenser, drier and air box appear the same (I haven't removed them). There are fewer sections and longer hoses. They are almost all rubber with some short hard lines on the end. 84-85 hoses have several more pieces and at least 1/2 are hard lines. I'll look more closely when it stops raining.
FWIW The hoses in the 83 are different. The connections to the compressor, condenser, drier and air box appear the same (I haven't removed them). There are fewer sections and longer hoses. They are almost all rubber with some short hard lines on the end. 84-85 hoses have several more pieces and at least 1/2 are hard lines. I'll look more closely when it stops raining.
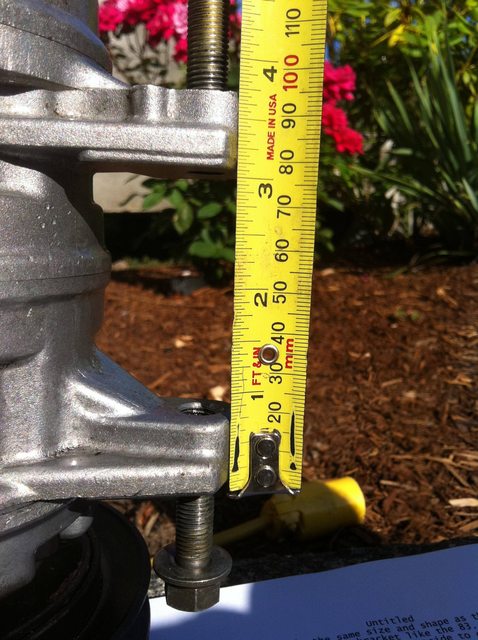
The plot thickens. I didn't get my tape down under the installed compressor in my car so I just assumed it was the same size since the bracket fit. My bad. I have two different compressor types. One appears to be like yours. The other is the same size and shape, but it has 4 sets of mounting tabs. This is one of the ones I measured at 3 7/8". It will not fit into the 84 bracket with PS that I have. After more careful measurement I see that the bracket is more like 3 7/8". The 84 and 85 I checked tonight each have the same compressor which looks like yours. I'll measure more carefully tomorrow and take some more pictures.
Thread Starter
Joined: Feb 2004
Posts: 2,109
Likes: 32
From: Canada
Hmm, that makes more sense. What is the distance of the red line (inside of mounting ears):
If the compressor ears I posted 2 posts up will fit in there, even if I need a spacer, then I think I can use that bracket.
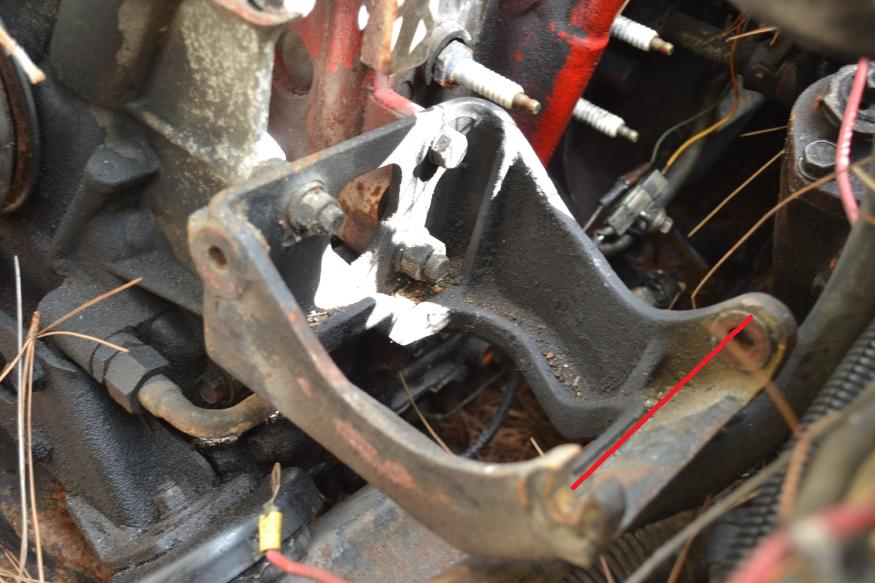
If the compressor ears I posted 2 posts up will fit in there, even if I need a spacer, then I think I can use that bracket.
Last edited by Sgt Fox; Aug 31, 2011 at 11:44 PM.
Thread Starter
Joined: Feb 2004
Posts: 2,109
Likes: 32
From: Canada
Hey Ron, how did the bottom hole in the evaporator core box install? Mine seems to be hanging 3/4" away from the firewall when the upper and the inlet and outlet are lined up. It seems pretty solid with just the clamps and top nut on, so maybe the bottom isnt needed.
My 2 cents : )
It's a shame about that compressor bracket, LBS of steel when all it needs is an aluminum plate bolted to the engine with 2 ears for the bottom of the comp to mount to. Might not be to hard to fab one for the right person. The good thing for you is the Nippondenso comp is lighter than the Sanden.
I would recommend using R-152a refrigerant. It is currently used in canned air dusters. The dusters used 134a when that was the refrigerant of choice. The same for r-12. You can get it for $3.50 a 12 oz. can from the right place. I have used it all summer. An intelligent 2nd gen member has a thread on it here; https://www.rx7club.com/2nd-generation-specific-1986-1992-17/c-charging-easy-cheap-safe-alternative-refrigerant-964688/
Duracool is distributed in Canada but is based in Australia. You probably already know it's a mix of propane and iso-butane.There are a number of different brands selling the same thing with only a slightly different mix ratio. I have mixed my own and it worked well except when the car was heat soaked (FL sun all day, drive home), but I did not have a more eff. condenser installed at the time. From what I've read, all auto AC professionals don't recommend using a blend because it can fractionate, or leak at different rates, changing the ratio. The ratio is based on matching pressures and cooling capacity to the system design.
I have said it on here before that PAG oil should not be used in a system that has or had R-12 in it. From what I have "read", it reacts with r-12 (and residual r-12) and forms globs of "crap". Just thought I'd mention it as it was not in the oil info posted above.
I have used 2 different size parallel flow condensers in 1st gens. One w/the lines fit in the stock rad support, the other fully filled the support in front of the rad and the lines came out where the battery was. The latter is my current set up using 152a. Both work better than the stock set up which allows air to bypass the condenser. You may find the one you want here; http://www.ackits.com/c/Parallel/Par...+Aluminum.html
Here is the other compressor I have. The same compressor is in my 83 GSL and 84 GS. I can't be sure the 84 is the stock compressor. I'm pretty sure I swapped the original with this one. Mounting ears are just a hair over 3 7/8" outside.


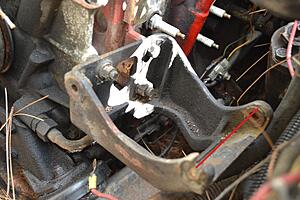
Here are the brackets I have. Not sure what the third one is from. Might be RX-4 or other old school. It is similar to the 83 but not exactly the same. The compressor I pictured in the last post will not fit into the 84-85 brackets without a little grinding on the ears. Looks like the one in my 83 will fit. You can see the bushing will slide to easily hold the 3 1/2" ears you have.


Hard to get a picture of the compressor ears in my car with the system installed, but it appears to be the same compressor you have. What is the number on the back? 10P...?

Hard to get a picture of the compressor ears in my car with the system installed, but it appears to be the same compressor you have. What is the number on the back? 10P...?
There is a metal bracket that bolts to the firewall with two bolts. The lower evaporator bolt screws into that bracket. Didn't notice that when I removed it. I'll send it with the compressor bracket. I'll get them to Fedex Monday morning.
Thread Starter
Joined: Feb 2004
Posts: 2,109
Likes: 32
From: Canada
Classic Air Part # 11-1044 which is 15 5/8 X 20 1/2 X 1. It is a bit larger than original and took some shoehorning to get it to mount, but it will fit. Here is the link:
http://www.classicautoair.com/Catalo...alog_Final.pdf
page 93
This cataloge is also a good source of info about ac. Explained alot about differents types of components such as paralell vs serpentine condensers etc....
The larger the condensor the cooler the air will be, so it is worth the work.
http://www.classicautoair.com/Catalo...alog_Final.pdf
page 93
This cataloge is also a good source of info about ac. Explained alot about differents types of components such as paralell vs serpentine condensers etc....
The larger the condensor the cooler the air will be, so it is worth the work.
The hardline hose from the compressor to the condensor does fit. The hose from the condensor to the dryer does not. It would seem that Mazda used a smaller fitting on their condensor output. Classic air sells crimp on oring fittings, so I will have to order one of their #6 90 degree oring as well as a crimp.
Thread Starter
Joined: Feb 2004
Posts: 2,109
Likes: 32
From: Canada
Things are looking up in this project.
-Got a local shop to crimp on a 5/8"-18 o-ring fitting so now the condenser-drier hose will work. Also started swapping the brackets over on the condensers as well as building some new mounts. It has to be canted slightly, as the oversize racing beat sway bar is in the way.
-Installed the bottom bracket for the evap core. Fits in just like it should.
-Managed to avoid making new FC FMOC brackets. I was able to just swivel it forward at a 45 degree angle. Got lucky I guess.
-Figured out I won't need to make a new custom bracket for my fuel pressure reg. By removing it, installing the hardline and then re-installing the bracket, everything fit (just).
-Hardline also just clears the Mazdatrix engine brace.
-Bought myself a 5CFM deep vacuum pump for AC. Got a great deal on it, $140 instead of its new price of $550. It also came with a new quart of vacuum pump oil. You have to change the oil every time, as the oil absorbs some of the moisture of the system.
-The 83 bracket 74RX4 sent will do the job. Unlike the sanden bracket, the nippondenso bracket does not clear the respeed steering linkage. After cutting out a good sized notch on the firewall side, the respeed linkage can pass through the bracket. Doesn't look too bad either. It would seem I need to make a slight spacer to take up the slack between my ears.
-Classic auto air is a great company. They stepped up with the incorrect customs value, pursued UPS and even credited me the fee UPS is charging for reevaluating the error. I wouldn't hesitate to do business with them again.
Good to hear that things are progressing. I guess some complications are unavoidable, but it sounds like you are coping with the issues well. I wish I had bought a vacuum pump when I did mine, instead I payed a local shop to evacuate and charge the system, would have done better to do it myself.
I agree about Classis Auto Air. They sent me the wrong, slightly larger condenser at first and agreed to fix the issue, no questions asked, then I decided that I could get it to fit so I kept it.
Keep us posted on your progress.
ps..
This may be premature, but I would like to suggest a modification to your system. When I started using mine I could feel it when the compressor was running and did not like the way it seemed to sap my power. I decided to instal a vacuum operated cutout switch so that the compressor would cut off any time I applied full throttle (or almost full throttle) and it really works great so that I don't even notice the power loss at all, makes the car much more fun to drive while operating the air. I can find the part number for the adjustable vacuum switch I used if your interested.
just a thought.......