
How-to: Build custom kickpanel speaker enclosures

Thread Starter
Joined: Sep 2002
Posts: 2,932
Likes: 6
From: Surrounded by Sebey parts, Rhode Island
How-to: Build custom kickpanel speaker enclosures
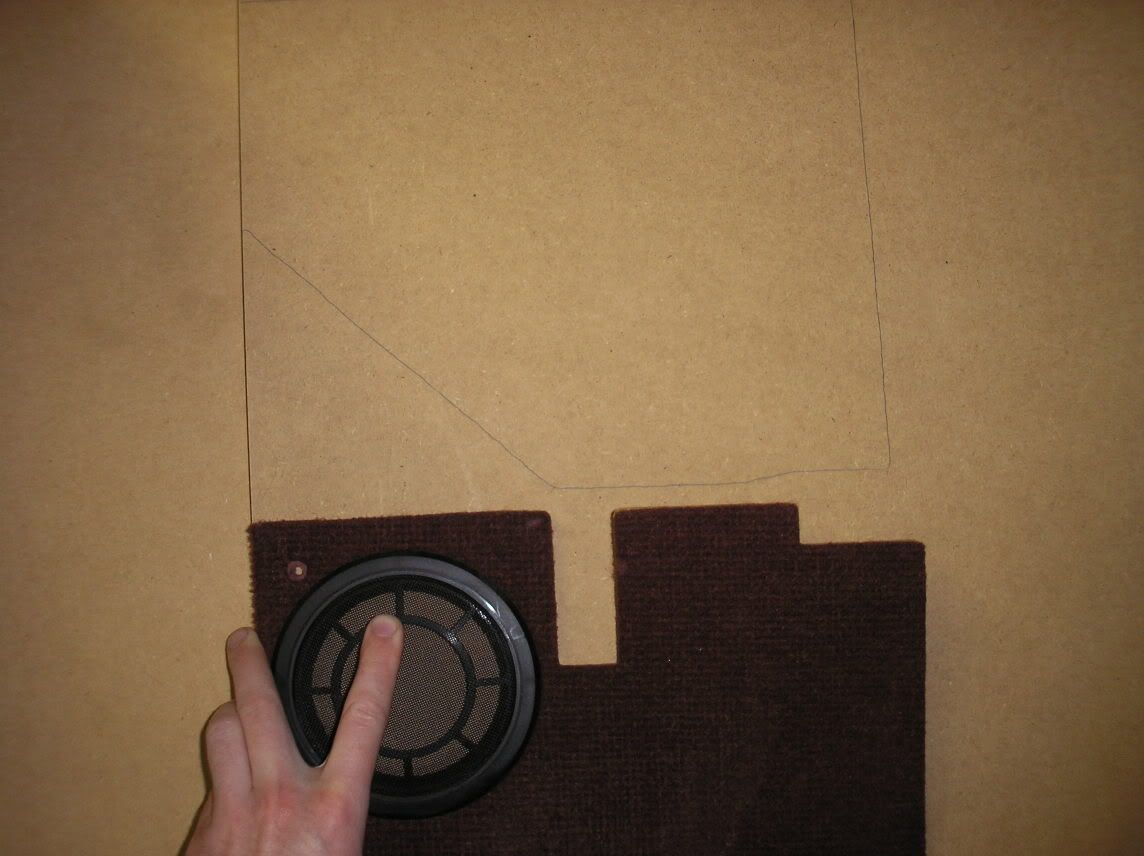
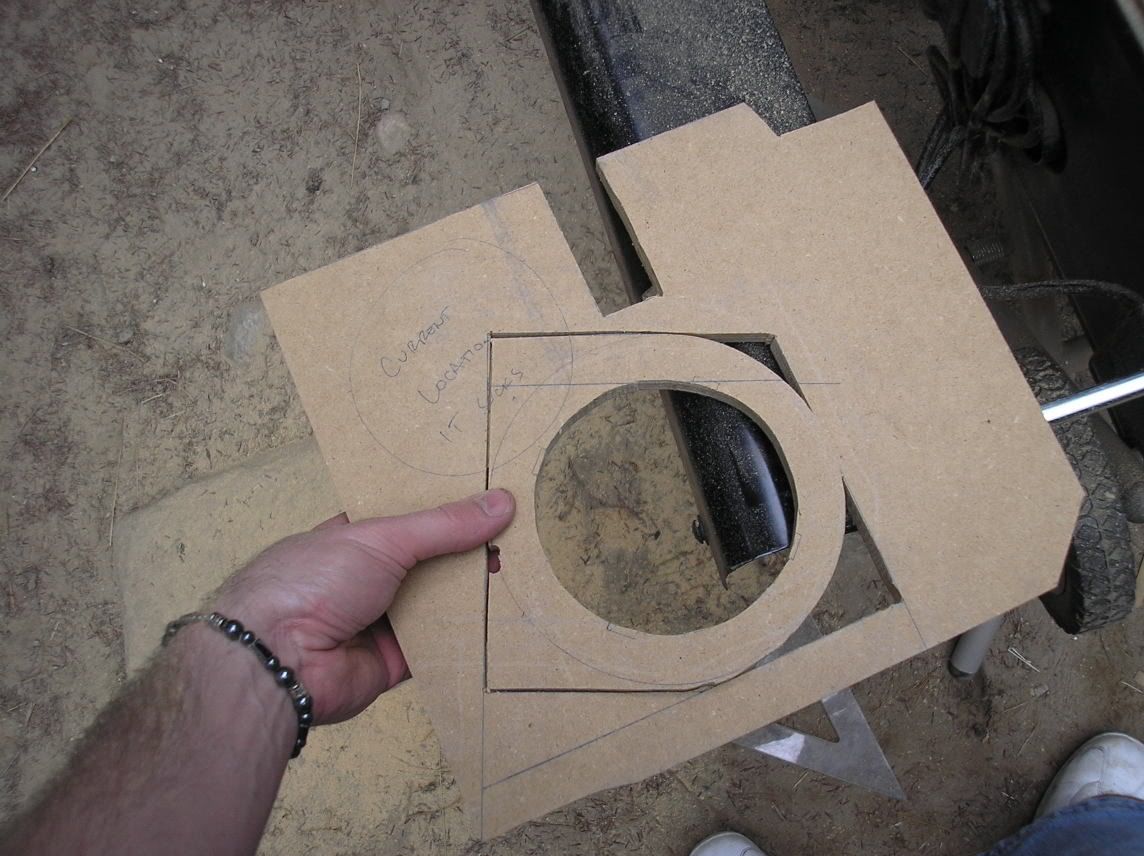
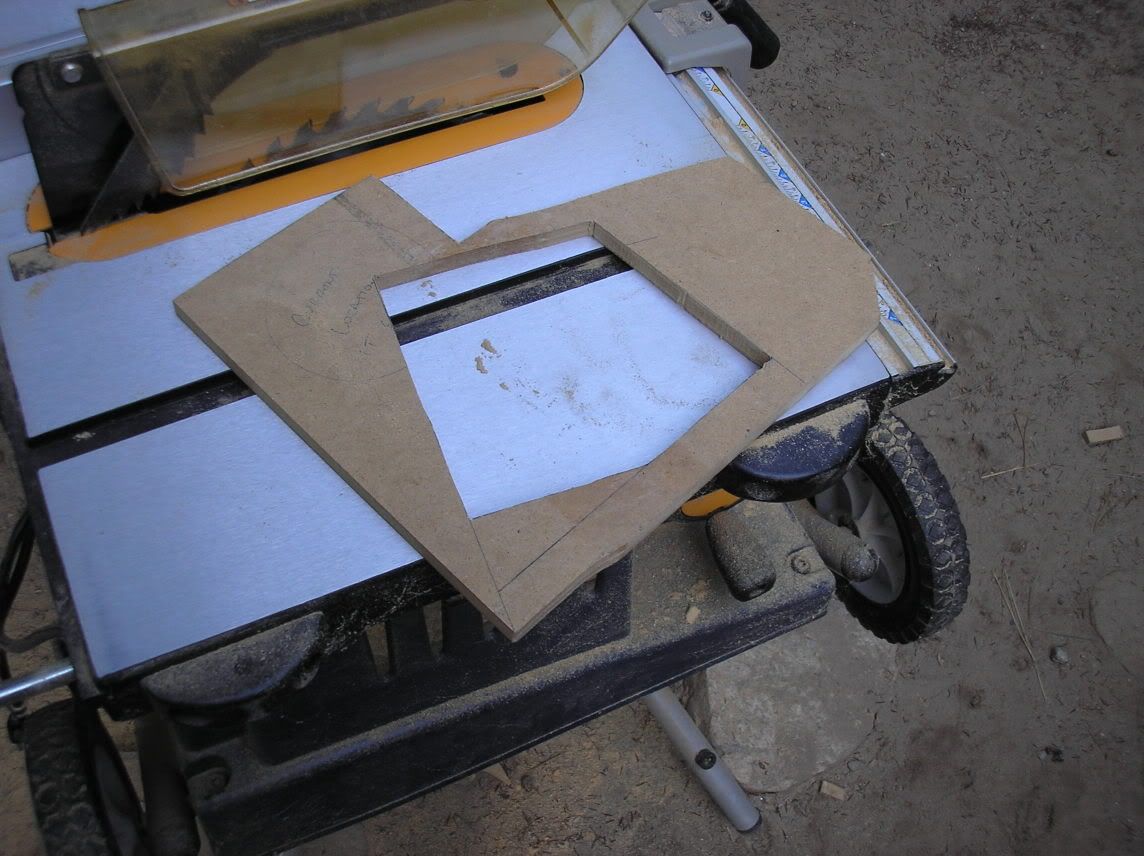
First thing I did was take the current speaker covers from the car and trace their basic shape onto a piece of 1/2" MDF.
Then, my helpers and I got out the power tools.
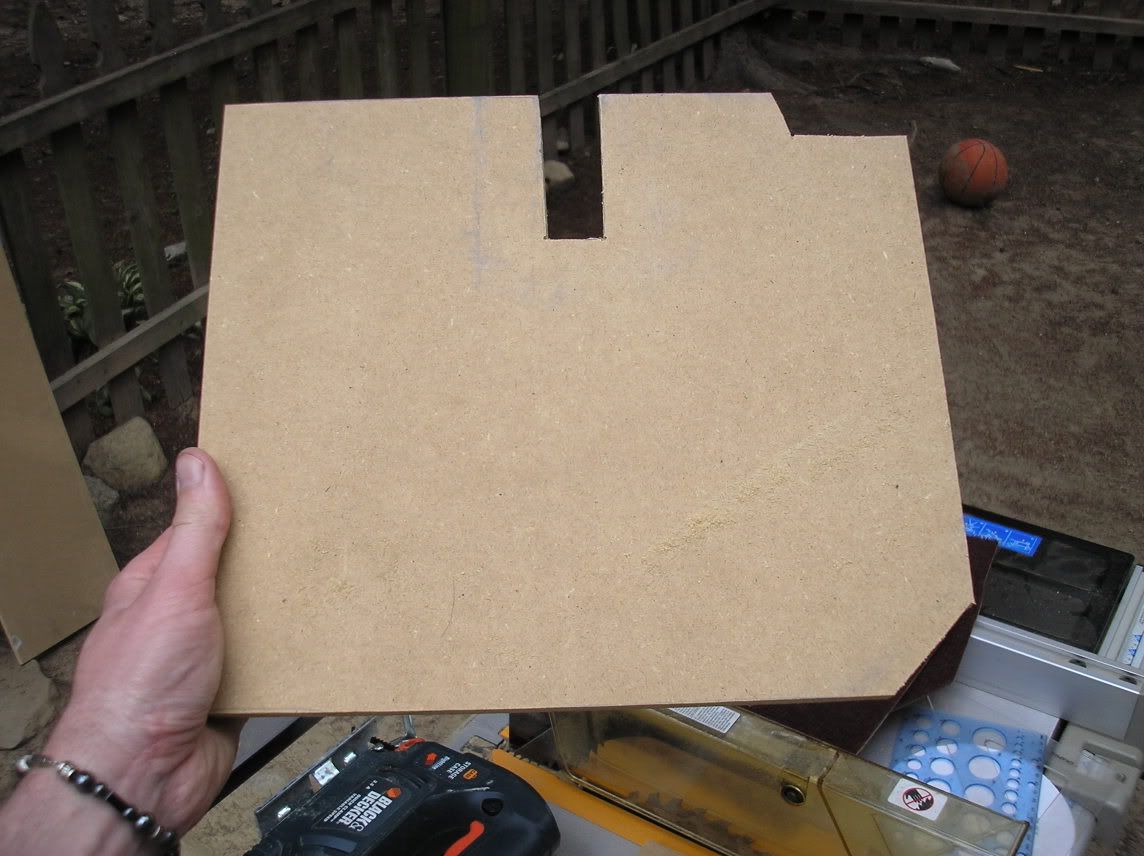
Cut the MDF down to size. I used a table saw, because I have one. Don't have one? Jigsaw or circular saw works fine, too.
Compare them to the originals...
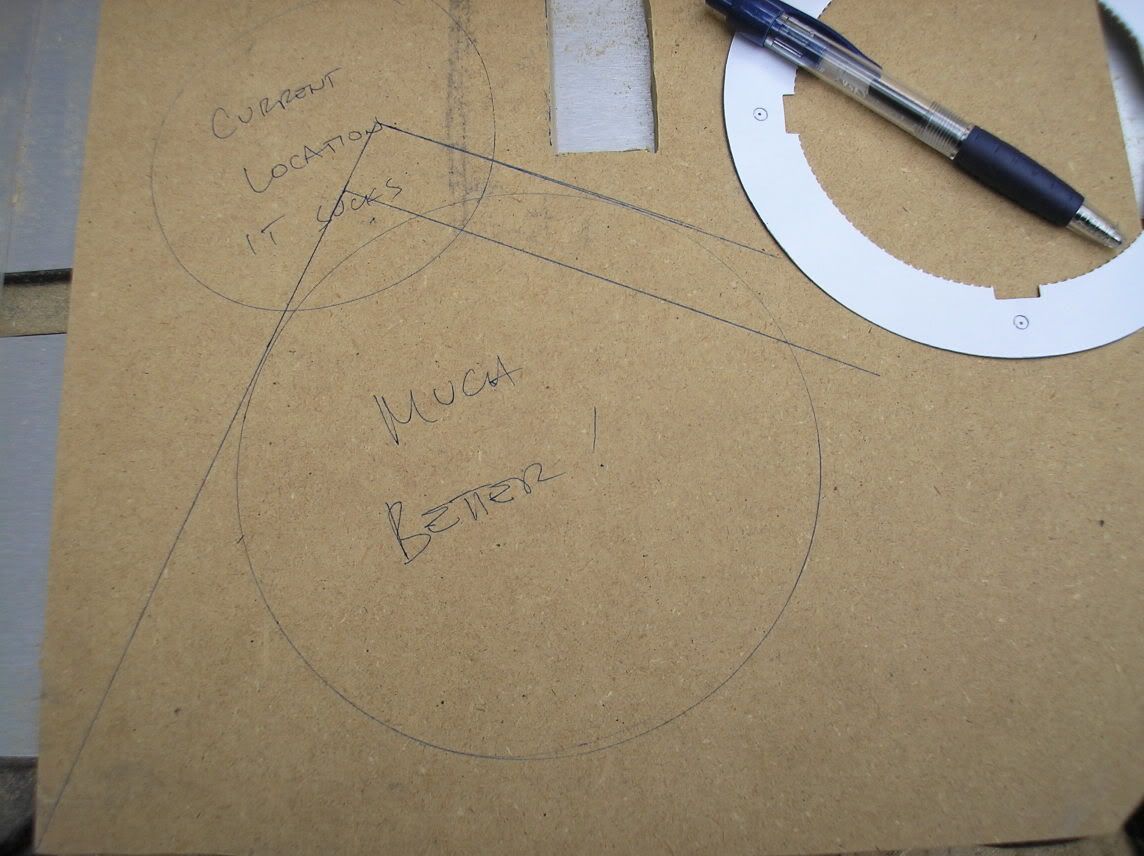
Next, I figured out where I wanted them to go. The original location sucks, so I went a different route.
Then, my helpers and I got out the power tools.
Cut the MDF down to size. I used a table saw, because I have one. Don't have one? Jigsaw or circular saw works fine, too.
Compare them to the originals...
Next, I figured out where I wanted them to go. The original location sucks, so I went a different route.
Thread Starter
Joined: Sep 2002
Posts: 2,932
Likes: 6
From: Surrounded by Sebey parts, Rhode Island
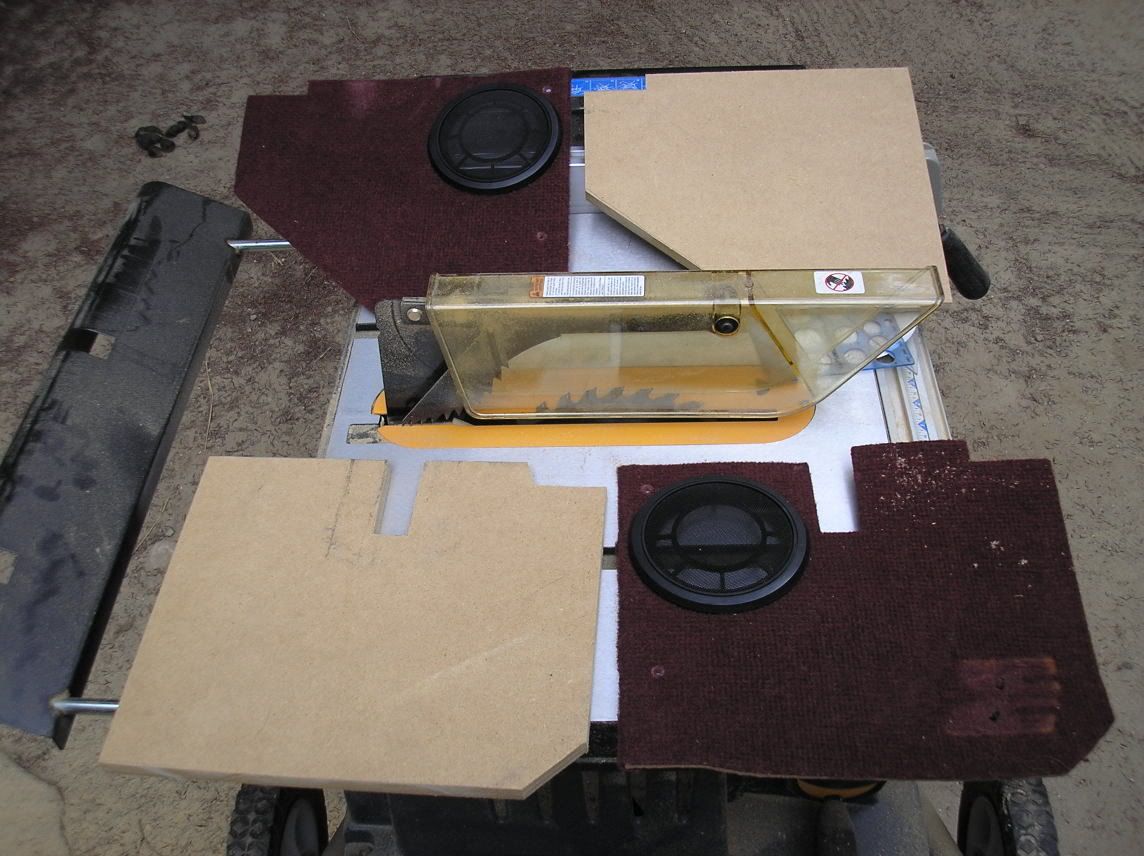
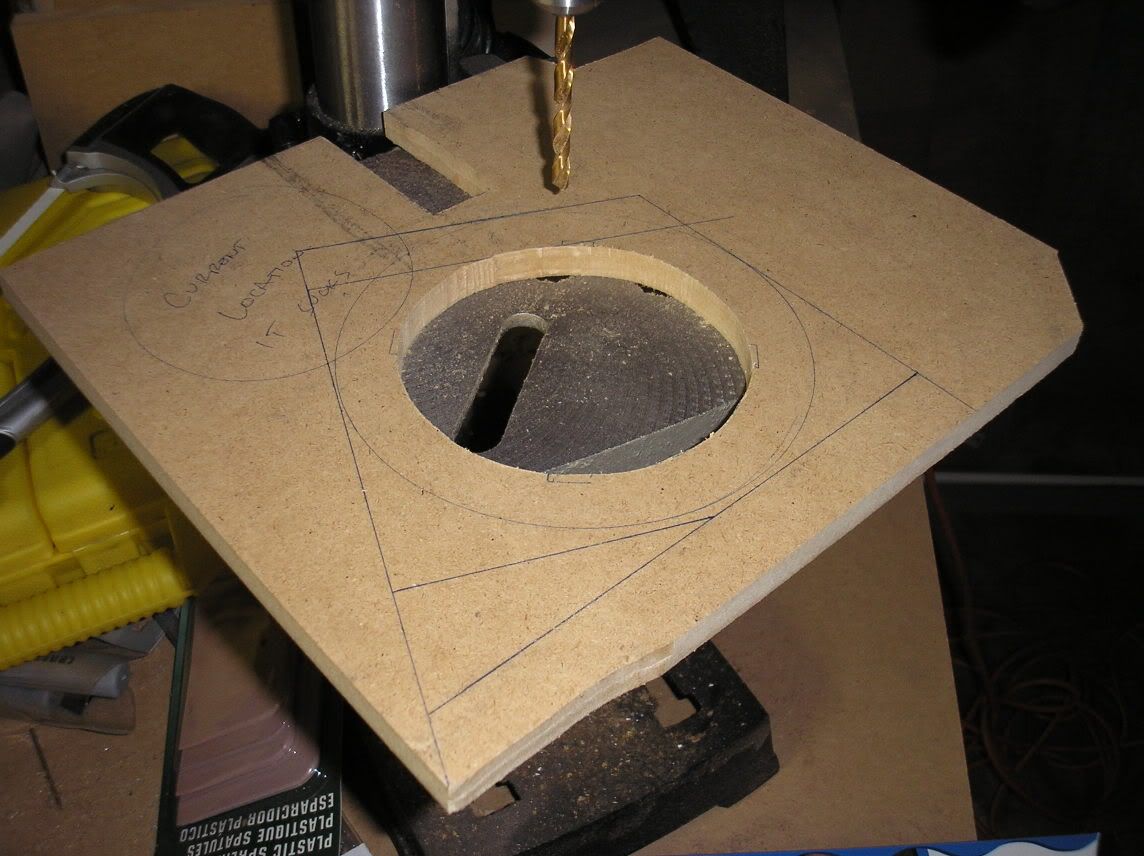
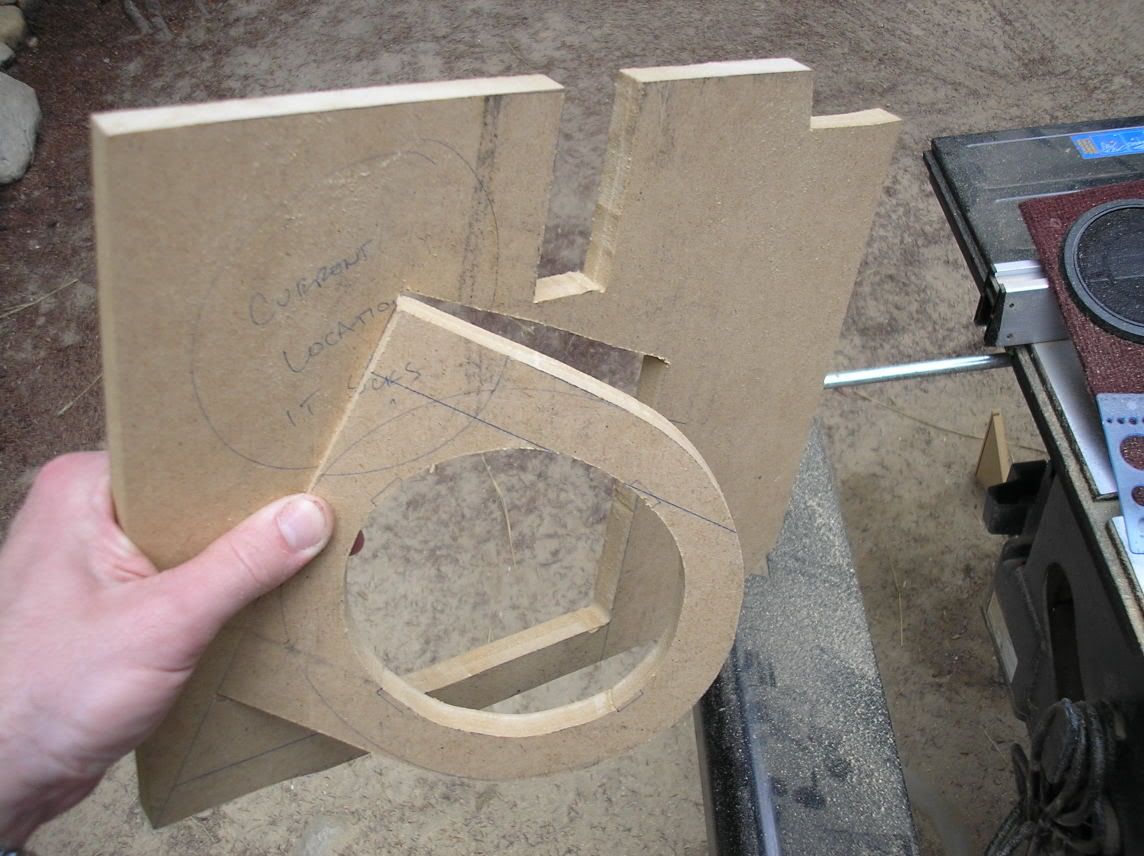
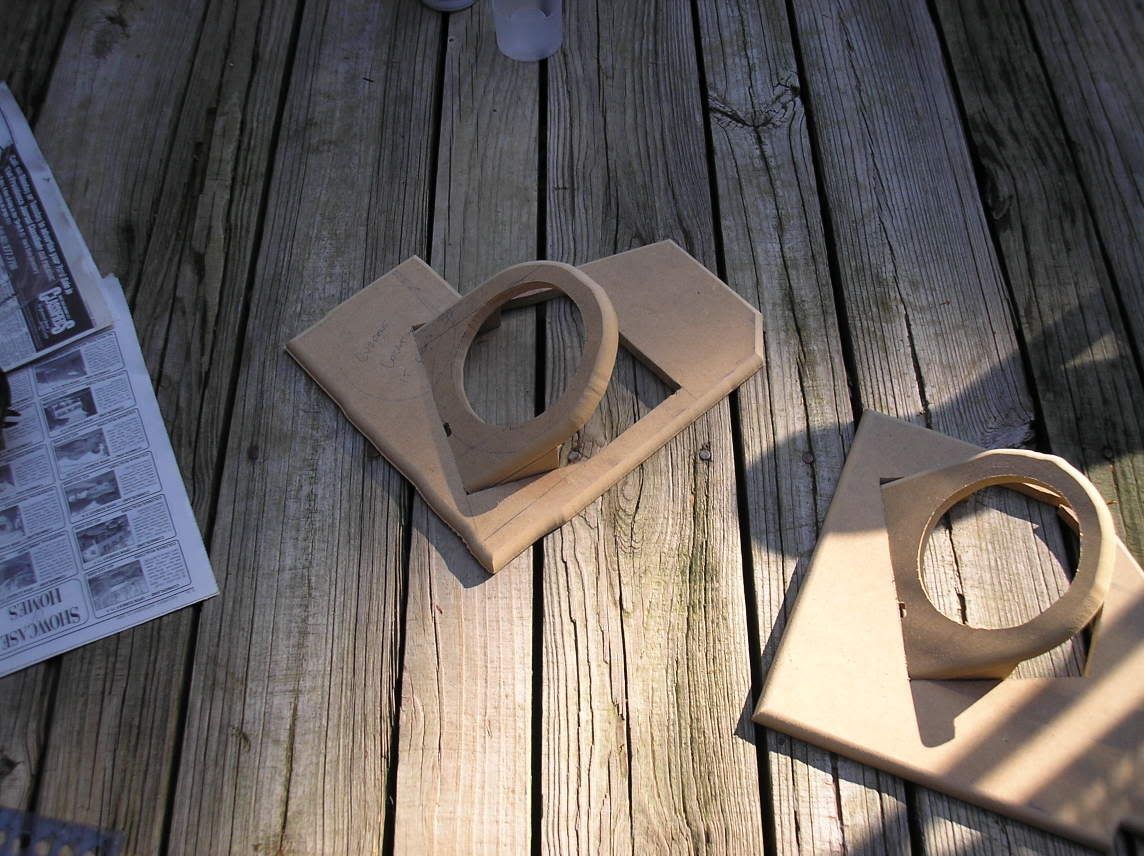
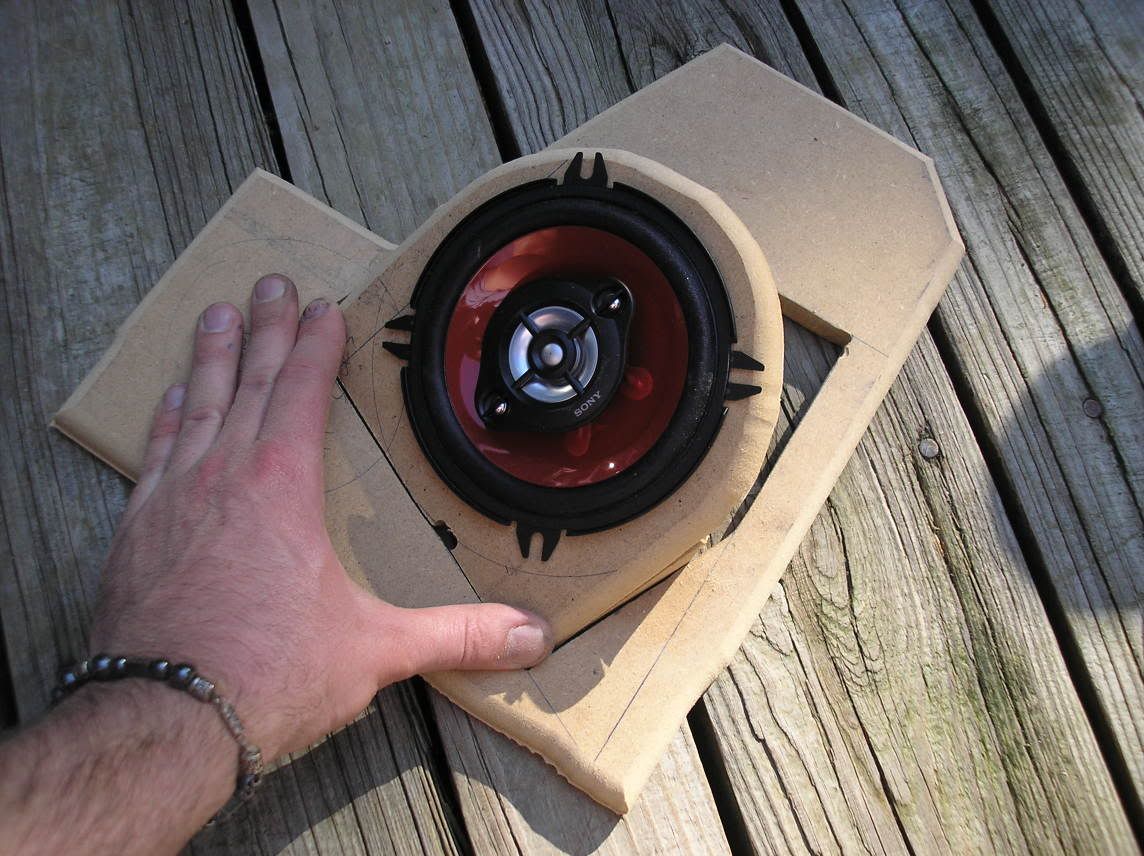
I drilled a pilot hole to be able to cut out the circular hole for the speaker using the template that came with the speaker.
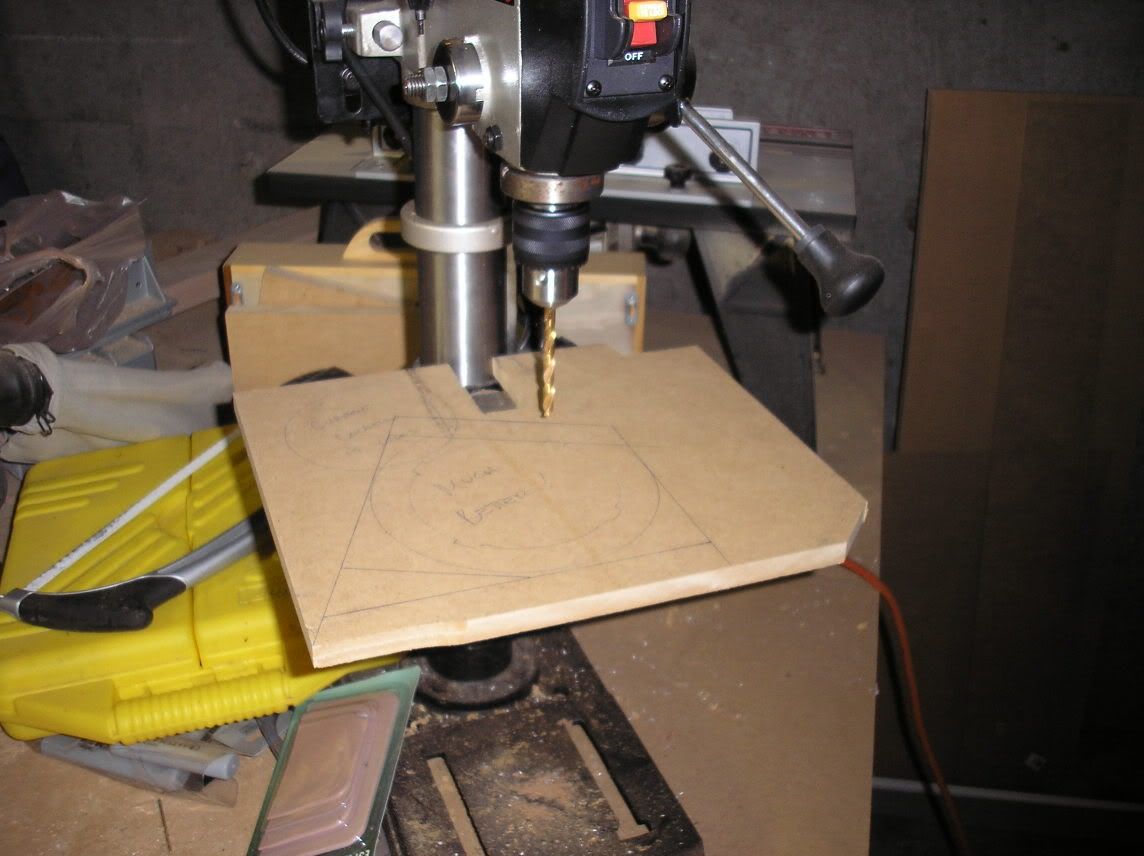
Then, I drilled a pilot hole to cut out the piece that would hold the speaker. You will see a method to my madness later.
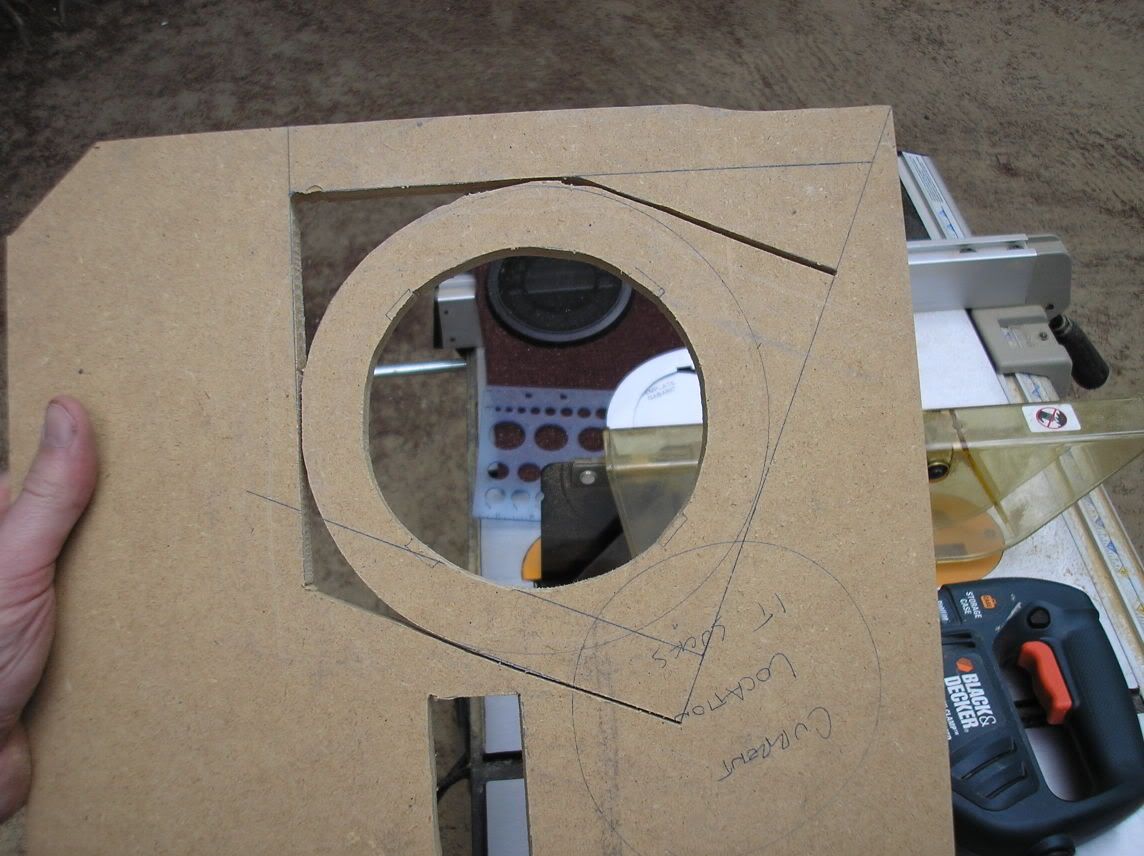
All cut and trimmed:
Then, I drilled a pilot hole to cut out the piece that would hold the speaker. You will see a method to my madness later.
All cut and trimmed:
Thread Starter
Joined: Sep 2002
Posts: 2,932
Likes: 6
From: Surrounded by Sebey parts, Rhode Island
Because the stock speakers basically fire straight across the cabin and into the center console, I decided to angle them up and out.
I found the proper angle by test fitting the speaker and making sure it didn't touch underneath. I cut a couple pieces of MDF to hold it at that angle so I could cut some support pieces.
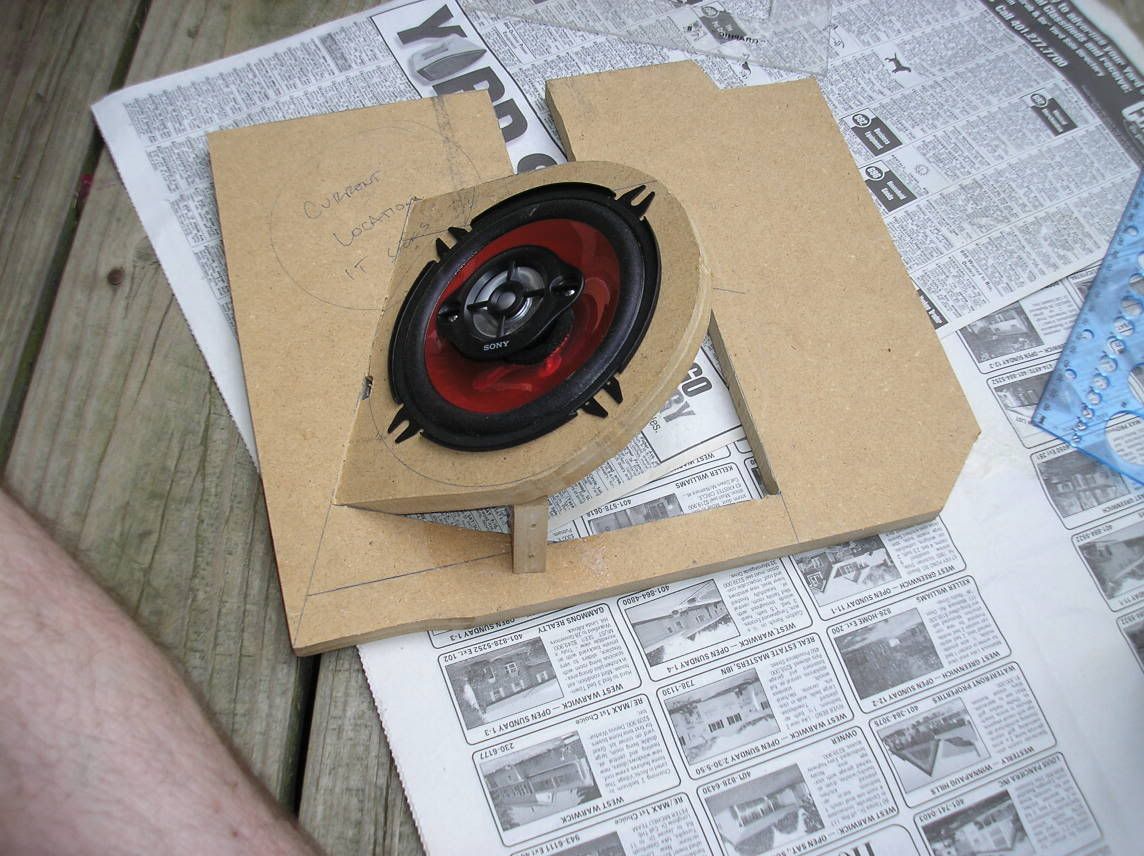
For the passenger side, I simply traced the same cuts I made on the drivers side, and cut them out the same way.
I then test fit the new pieces to the car. ****! Turns out the wiring harness on the drivers side would interfere. My solution? Cut the board. I will be covering these in fake black leather, so all I'm going to do is cut the leather in the same pattern as the original panel, slap a piece of cardboard onto the missing section, and velcro it up and over the wiring harness. Pretty simple.
I found the proper angle by test fitting the speaker and making sure it didn't touch underneath. I cut a couple pieces of MDF to hold it at that angle so I could cut some support pieces.
For the passenger side, I simply traced the same cuts I made on the drivers side, and cut them out the same way.
I then test fit the new pieces to the car. ****! Turns out the wiring harness on the drivers side would interfere. My solution? Cut the board. I will be covering these in fake black leather, so all I'm going to do is cut the leather in the same pattern as the original panel, slap a piece of cardboard onto the missing section, and velcro it up and over the wiring harness. Pretty simple.
Thread Starter
Joined: Sep 2002
Posts: 2,932
Likes: 6
From: Surrounded by Sebey parts, Rhode Island
As you can see, you need to take some breaks in between:
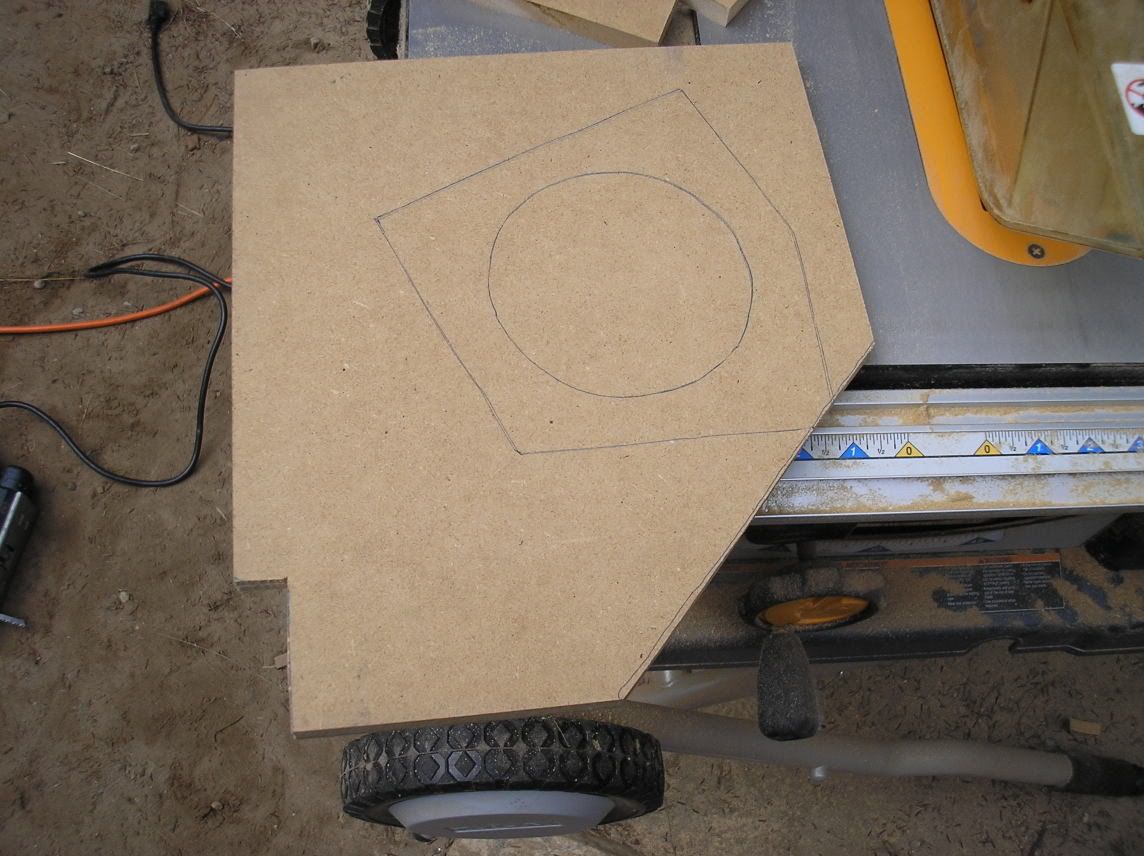
I lined up some MDF to the angle created by my new part, traced the line, and cut it out with my jigsaw. Then, I made 3 more pieces just like it. These four pieces form the supports for the speaker piece, and I sprayed them with 3M superduper adhesive to keep them in place. They will be attached with some seriously small screws, so as not to break them. If the screws break them, I will just make some brackets out of metal... I just didn't feel like going to Home Depot tonight.
So, this is where I'm leaving off for now. I will finish them up this weekend and cover them in the fake leather I'm using in the rest of my interior.
I decided to round off all the edges with my router. Why? I don't know, I was bored, and hadn't used it in a while.
Well, there you go. Simple, easy... I will probably make some speaker covers, because I have a square yard of grille cloth just sitting here.
man you are awesome. You must have alot of free time lately with these awesome projects you have going underway. Ordering all sorts of parts and rims and stuff I can't wait to see how your project starts piecing together!
These kick panels are a awesome idea though man, I think I will have to do something like this at some point because the stock front speaker position is worthless!
These kick panels are a awesome idea though man, I think I will have to do something like this at some point because the stock front speaker position is worthless!
Thread Starter
Joined: Sep 2002
Posts: 2,932
Likes: 6
From: Surrounded by Sebey parts, Rhode Island
Yeah, I fucked up the edge of the drivers side with the router... That's what happens when you round off the wrong side, then try to round off the right side. If I can't hide it with the leather, I'll just make a new one. No big deal.
Trending Topics
Thread Starter
Joined: Sep 2002
Posts: 2,932
Likes: 6
From: Surrounded by Sebey parts, Rhode Island
Originally Posted by Dan_s_young
man you are awesome. You must have alot of free time lately with these awesome projects you have going underway. Ordering all sorts of parts and rims and stuff I can't wait to see how your project starts piecing together!
These kick panels are a awesome idea though man, I think I will have to do something like this at some point because the stock front speaker position is worthless!
These kick panels are a awesome idea though man, I think I will have to do something like this at some point because the stock front speaker position is worthless!
Thread Starter
Joined: Sep 2002
Posts: 2,932
Likes: 6
From: Surrounded by Sebey parts, Rhode Island
Oh yeah... Coming next week: How to make a subwoofer enclosure where your storage bins used to be (that hopefully won't sound like ****!!!) Here's a hint: You won't be able to see the sub. At all. 

What?
Joined: Sep 2003
Posts: 3,833
Likes: 1
From: CT
I tried what you are doing and found that your legs will be killing them. It is better to make them on the doors, rather the kick panels, especially on the drivers side. Did you relocate the hood pop over there yet? I'm not down playing what you are doing, just dropping my experience.
Oh, let me know if you need help on the sub enclosure. Check out my step by step at my cardomain page.
John
Oh, let me know if you need help on the sub enclosure. Check out my step by step at my cardomain page.
John
Stay away from my CT!!!
Joined: Apr 2005
Posts: 1,120
Likes: 0
From: Giddings, Texas
$100T2, you are an inspiration, but im doing a painted fiberglass sub box in the back... But looking at the kick panels i might put some speakers there instead of covoring them up and putting them on the door panel, your how-to's are great just to let you know. 5 thumbs up for you!!! Now that i think about it, i may do the 6x9's that are in the back angled towards the front like you have.
/Brad
/Brad


Green to RX-7's
Joined: Oct 2005
Posts: 339
Likes: 0
From: Atlanta
Originally Posted by $100T2
I take about 75 pics every time I do a DIY, and it would take forever for me to resize them. It wouldn't be worth it.
used to be a 1meg file .... now only 108k great for web usage.. and i keep the originals on my PC.
Rotary Freak
Joined: Sep 2004
Posts: 1,901
Likes: 0
From: Kitchener, Ont. Canada
Originally Posted by $100T2
Actually, this project has been scrapped. I figured out a better way, and will be posting it this weekend.
are scrapping the project?
i sent you a pm. maybe we can work out a trade
nick
Thread Starter
Joined: Sep 2002
Posts: 2,932
Likes: 6
From: Surrounded by Sebey parts, Rhode Island
Sure, if you want them, we can work something out... Let me know.
You might want to wait for the "new method", because if they turn out well, I will be happy to duplicate them and sell 'em.
You might want to wait for the "new method", because if they turn out well, I will be happy to duplicate them and sell 'em.
love the braaaap
Joined: Jul 2003
Posts: 3,771
Likes: 5
From: Bognor, Ontario
The front of the RX-7 is crap as far as speaker placement. For someone like me, those panels you made would be useless as I am 6'3" and things are tight to begin with. Actually, the minute I saw the angle of the speaker, I thought to myself "thats useless for me, my legs would be hitting the speaker ALL THE TIME". I found the best spot was actually the stock location. The RX-7 just wasn't made to have large or uniquely placed speakers in the front. The best way to make it how you want would be to put a component set in with 5 1/4" woofers in the stock location with the tweeter in the dash area.
PS, throw out those POS sonys. I have NEVER heard a sony car speaker or any sony car audio equipment that sounds somewhat good. I generally rate them lower than Koss or something like that. Get some alpine or pioneer premier speakers. They are a little more money, but well worth it.
PS, throw out those POS sonys. I have NEVER heard a sony car speaker or any sony car audio equipment that sounds somewhat good. I generally rate them lower than Koss or something like that. Get some alpine or pioneer premier speakers. They are a little more money, but well worth it.
Thread Starter
Joined: Sep 2002
Posts: 2,932
Likes: 6
From: Surrounded by Sebey parts, Rhode Island
I'm also 6'3", and angled them so that they are in the spot least likely to cause interference. However, because I wanted to buy myself some more space, I have something else in mind.
As far as the Sony's go, I just wanted something I can screw around with until I figure out a final placement. I realize they aren't show car quality, but they are definitely better than the 15 year old paper woofers the car came with.
As far as the Sony's go, I just wanted something I can screw around with until I figure out a final placement. I realize they aren't show car quality, but they are definitely better than the 15 year old paper woofers the car came with.

Thread
Thread Starter
Forum
Replies
Last Post
rx8volks
Canadian Forum
0
Sep 1, 2015 11:02 PM