
Headlight linkage assy

Thread Starter
Joined: Apr 2008
Posts: 286
Likes: 0
From: NAPLES, FL
Headlight linkage assy
RE: '84 GSL-SE
I noticed that the bushings on my headlight linkage assy were looking pretty worn, so after a friend gave me 2 with new bushings, I decided to replace them. Well I only got to the passenger side. One side came off easily, but the other end is being a pain in the a%^. My manual states I just need to simply pry it off, but I still cant remove the other end. In fact the linkage is actually bending. After searching the forum, I can only find statements like "remove the linkage arm"....but not HOW to do it !
So now, I have one end removed because the bushing crumbled in my hand from age deterioration, so I NEED to replace it now. What are the procedures to PROPERLY remove and replace them?
Thanks in advance
Thread Starter
Joined: Apr 2008
Posts: 286
Likes: 0
From: NAPLES, FL
Thanks - I actually figured a way to do it. I pushed it toward the fender which popped one side of the bushing out, then when I pulled, it removed easily. Putting the new ones on were very simple...just firm pressure.
Again I appreciate your response
Again I appreciate your response
Be curious to know where your friend got these bushings?? Mazda does not sell them separately, and a fair amount of Forum discussion here on what to use as substitutes! Kindly share details, pics!
Stu Aull
80GS
Alaska
Stu Aull
80GS
Alaska
Joined: Jun 2008
Posts: 8,376
Likes: 30
From: Chino Hills, CA
If I'm reading the OP right, Stu, his friend gave him rods with 'new' bushings already in them.
I read that as "...gave me 2 rods with new bushings...", since the rest of the post is about getting the rods on and off, not installing the bushings.
...so after a friend gave me 2 with new bushings...
Trending Topics
Thread Starter
Joined: Apr 2008
Posts: 286
Likes: 0
From: NAPLES, FL
Thanks for the clarification for I did mean "...so my friend gave me 2 (RODS) with new bushings (GROMMETS)".
Here is a link to the write-up:
https://www.rx7club.com/forum/showth...light=grommets
THUNKRD - You responded to that I thread...and even suggested a group buy on poly ones...Maybe you forgot? LOL
Stu - YOU even stated you would buy 2 sets !
Here is a link to the write-up:
https://www.rx7club.com/forum/showth...light=grommets
THUNKRD - You responded to that I thread...and even suggested a group buy on poly ones...Maybe you forgot? LOL
Stu - YOU even stated you would buy 2 sets !
Joined: Jun 2008
Posts: 8,376
Likes: 30
From: Chino Hills, CA
I'm currently durability-testing a solution I came up with for this problem on my own car. So far it's working well, just trying to get an idea of lifetime.
I'll probably know whether or not I'm happy with it in a few more weeks, then I may offer them to the forum either as a DIY kit of bushings, or as a 'rod rebuild' service where you send me your old rods and I put new urethane bushings in them, possibly cleaning and painting the rods along the way. Or a core swap deal, or something.
Does this sound like something there'd be enough interest in for me to pursue?
Wouldn't need to be a "group buy" as I'm making the bushings myself & can make as few as I want to, or as many (within reason; I'm not a factory!); I just want to know if I can cover materials costs & time, based on interest.
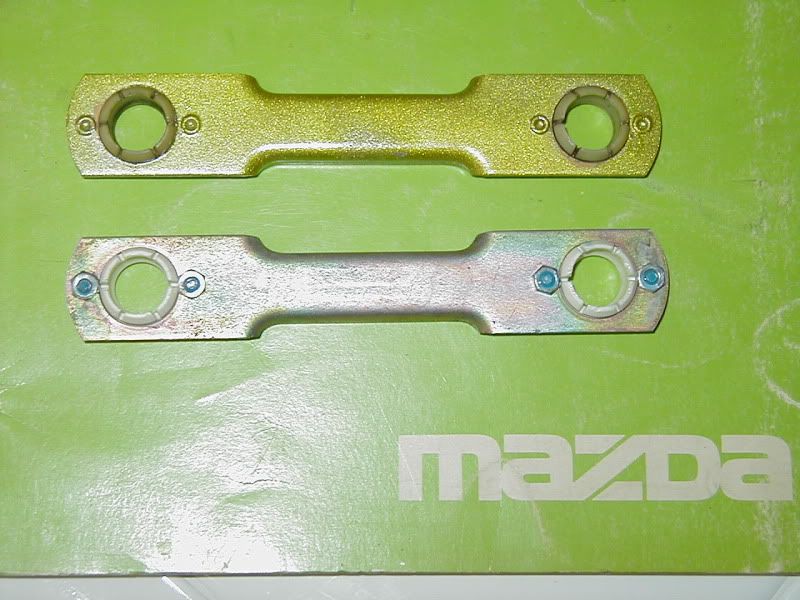
My prototype (small) rod on the bottom; old repainted rod on top:

I'm testing a similar large-rod solution, too, just don't have pix handy.
Does this sound like something there'd be enough interest in for me to pursue further?
I'll probably know whether or not I'm happy with it in a few more weeks, then I may offer them to the forum either as a DIY kit of bushings, or as a 'rod rebuild' service where you send me your old rods and I put new urethane bushings in them, possibly cleaning and painting the rods along the way. Or a core swap deal, or something.
Does this sound like something there'd be enough interest in for me to pursue?
Wouldn't need to be a "group buy" as I'm making the bushings myself & can make as few as I want to, or as many (within reason; I'm not a factory!); I just want to know if I can cover materials costs & time, based on interest.
My prototype (small) rod on the bottom; old repainted rod on top:
I'm testing a similar large-rod solution, too, just don't have pix handy.
Does this sound like something there'd be enough interest in for me to pursue further?
Joined: Jun 2008
Posts: 8,376
Likes: 30
From: Chino Hills, CA
Thanks; they are properly concave on the inside, and don't fall off the ball. Little more flexible material than the originals, so they go on easier.
So far, the ones I put in my car are holding up fine after several months.
So far, the ones I put in my car are holding up fine after several months.


Joined: Jun 2008
Posts: 8,376
Likes: 30
From: Chino Hills, CA
 Yep. I was working another project at the time, and the white countertop was just too white for a background. Good eye.
Other than using handmade urethane bushings, not especially.
Easy enough to put in; drill or punch out the rivets, fasten in new bushings with 4-40 hardware, and blue locktite to make the nut stay put.
Since the large bushings don't have fasteners (originals are molded in place), I used epoxy to mount them. Easy enough to grind/file/chip off with an Xacto if they ever need re-replacement.
Since the large bushings don't have fasteners (originals are molded in place), I used epoxy to mount them. Easy enough to grind/file/chip off with an Xacto if they ever need re-replacement.

Genius At Work
Glen, you could make ANYTHING look "easy" man! You are amazing....
I'll sign up for a set whenever you open up for biz! (and I am saying that with 2 complete new sets inhouse...)
Stu Aull
80GS
Alaska


Thread
Thread Starter
Forum
Replies
Last Post
renjiv2
3rd Generation Specific (1993-2002)
57
Jan 25, 2024 03:34 AM
FC3S Timmy
2nd Generation Specific (1986-1992)
16
Oct 3, 2015 01:08 AM