
Fusible link...should it stay or should it go?

Hey all,
Just got done reading through the 1st gen archive and would like some advice.
I just got a second gen alt (80amp) and I'm planning on installing it shortly, although I'm concerned with the fusible link (can it handle the extra juice). I haven't had any problem, but I'm planning on adding an e-fan some time this summer.
How difficult is it to add a 2nd gen fuse block? There are some really good write-ups in the archive, but they keep referencing pictures that are no longer avaiable.
Anyone out there willing to post some new pix and maybe shed some new light on an old subject....any help is appreciated.
Pat
Dreamin of drivin my 7!
iTrader: (18)
Joined: Feb 2009
Posts: 1,073
Likes: 1
From: Seabeck, Washington
Pat
Just did this twice, and about to do it to my wifes too. Took all of about 15 to 20 minutes. I also have the S5 alt and a Taurus e-fan, which is why I did the upgrade. Easier to replace a fuse than find the fuseable link. I can take pics of the install and step by step of the new one if you need.
I even figured a way to reuse the old bracket to mount the new fuseblock in the same place with the same mounting hardware.


Senior Member
Joined: Nov 2009
Posts: 346
Likes: 3
From: Australia
Dreamin of drivin my 7!
iTrader: (18)
Joined: Feb 2009
Posts: 1,073
Likes: 1
From: Seabeck, Washington
Going out to do this in a bit and take pics. Will take pics of the final intall in my 84 too as it has the upgraded alt install too. I too noticed a difference when I did both. The stock alt works, but upgrading the alt and wiring makes the car not bog or "idle up"when using accesories or when the efan comes on, etc. plus with the new wiring, I also added a couple grounds, which has also improved things and my starter no longer does that "spin" at times. I also chose to go with a new Optima, which helps with things too. Pics etc. too come this afternoon.
Going out to do this in a bit and take pics. Will take pics of the final intall in my 84 too as it has the upgraded alt install too. I too noticed a difference when I did both. The stock alt works, but upgrading the alt and wiring makes the car not bog or "idle up"when using accesories or when the efan comes on, etc. plus with the new wiring, I also added a couple grounds, which has also improved things and my starter no longer does that "spin" at times. I also chose to go with a new Optima, which helps with things too. Pics etc. too come this afternoon.
As I said, I appreciate the effort.
Trending Topics
Dreamin of drivin my 7!
iTrader: (18)
Joined: Feb 2009
Posts: 1,073
Likes: 1
From: Seabeck, Washington
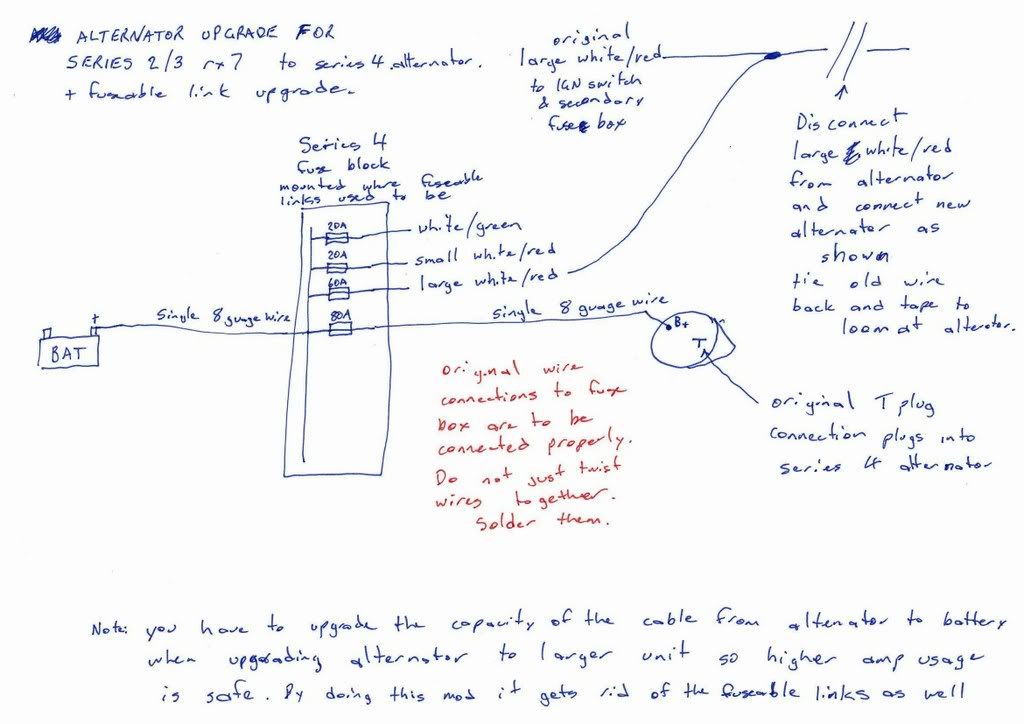
Installing a second gen. Fuseblock in an FB
Ok, what you have (fuseable links) should look something like this.
-Now first disconnect your battery terminals so you don't have to worry about frying yourself or any of your wiring while your making the switch to fuseblock.
-Now pull the boot back on the larger gauge wire connected to your fuseable link and unscrew/disconnect wire and push to side.
-Locate the 2 mounting screws on the bracket mounting the fuseable link and remove these.
- Now you can unscrew/remove the fuseable link block from the mounting bracket
- Next cut the remaining connected wires as close to the block as you can, or if your VERY patient, you can attempt to remove them spade connector intact.
- Your halfway done!
- unwrap the wires back a little ways down the harness now as you'll need a little slack to play with later.
- Now take some female spade connectors and crimp them onto the smaller wires you cut off of the fuseable link block. (ignore this if you pulled them out connector intact)
- Take the wire that you unscrewed from the fuseable link and either file the opening larger, drill it 1/16 larger, or cut it in the middle and open up the hole to fit the screw in the side of the fuseblock.
-Now one side of the fuseblock has 1 screw behind the flap, the other has 2. The side with one is the feed side. This is the side you connect the wire from the battery to. (the connector you made bigger in the last step) Tighten the screw, close the little flap.
- Now take the largest of the wires that went to the links and crimp on a "eye" type connector and screw it to the lower screw on the remaining side under the flap on the fuseblock, tighten and close flap. (this is the "main" circuit)
- Now the remaining wires can be plugged into any availabe male connection under the fuseblock. (they take a bit of coaxing and wiggling to get on)
- Now just swap fuses in the block to match amp rating to accessory you plugged. (basically for stock wires you can just use the pink 30 amp on all but the main anyway)
- Your done! You can now use the remaining male connections under fuseblock to connect any other accessories you need to power and use fuse rated for your application. I am using one for my efan w/60amp fuse and another for my fuel pump w/ 40 amp fuse.
- mount fuseblock to shock tower with brackets or what ever you come up with.( I'll post a way to reuse the link braces to mount this in next post)
- Reconnect your battery and your done!

Thread
Thread Starter
Forum
Replies
Last Post
Turblown
Vendor Classifieds
12
Oct 17, 2020 03:25 PM